
If you find missing files on your USB drive or your Mac has trouble recognizing the device, chances are that your USB has been corrupted. Even if you’re really careful, many cases of corruption result from factors totally outside the user’s control.
Fortunately, you can often salvage your USB device in most cases. This article will show you how to fix a corrupted USB drive on Mac and recover data from it. Read on!
Table of Contents
What are the Reasons for USB Drive Corruption
USB drive corruption isn’t only common, it’s pretty much inevitable given enough time. If your USB drive is not showing files and folders, won’t appear in Finder, or has missing data – below are the common reasons why:
- Virus and malware infection. Connecting your flash drive to an infected computer will infect your USB. Viruses and malware often lead to corruption.
- Improper ejection. If you did not “properly eject” your USB before disconnecting it from your Mac, you may have interrupted an ongoing read/write process. This can corrupt your drive.
- Using the drive on different operating systems. Operating systems may store and manage files differently. When you use a single USB across multiple devices with different OS, you risk corrupting the USB.
- Power outages/surges. A sudden power surge or loss may interrupt ongoing read/write processes which could lead to corruption.
- Natural wear. USB may begin to malfunction when it reaches a certain number of erase/write cycles. This doesn’t only decrease its performance, but also shows that it’s near the end of its lifecycle.
- Physical damage. USB drives are susceptible to damage from extreme temperatures, water, breakage, and dust and debris. This manifests in malfunctions, corruption, data loss, or all 3.
In the following sections, we’ll show you how to recover data from your flash drive (so you can secure it to a separate storage device) and then how to repair a flash drive on a Mac. However, if you suspect that your USB has been physically damaged, read this section immediately.
How to Recover Data from a Corrupted USB Drive
There are 2 ways to fix a corrupted USB drive: DIY and professional data recovery service. If your drive hasn’t been physically damaged and the corruption was caused by a virus or faulty software, you can safely attempt to recover your data yourself by following the guide for Method #1.
If your drive has been physically damaged, attempting to fix a corrupted USB drive or recover it yourself will probably make it worse and may lead to permanent data loss. You’ll need professional help. Read Method #2 for more details.
Method 1: Recover Data From USB Using Data Recovery Software
In severe cases of logical damage, macOS may not even recognize the drive. The only way to access your data is by using data recovery software. Data recovery software can extract and rebuild files directly from your drive’s file system without macOS’ assistance.
For this article, we’ll be using Disk Drill. You can use other tools, but Disk Drill can (1) support common USB file systems like ExFAT, FAT32, HFS+, and APFS, and (2) create a disk image of your drive. Creating an image of the drive allows us to retrieve data from the image instead of taxing your malfunctioning drive further and risking permanent data loss.
Step 1. Download and install Disk Drill for Mac.
Step 2. Connect your corrupted USB drive to your Mac. Ignore any error message that may appear.
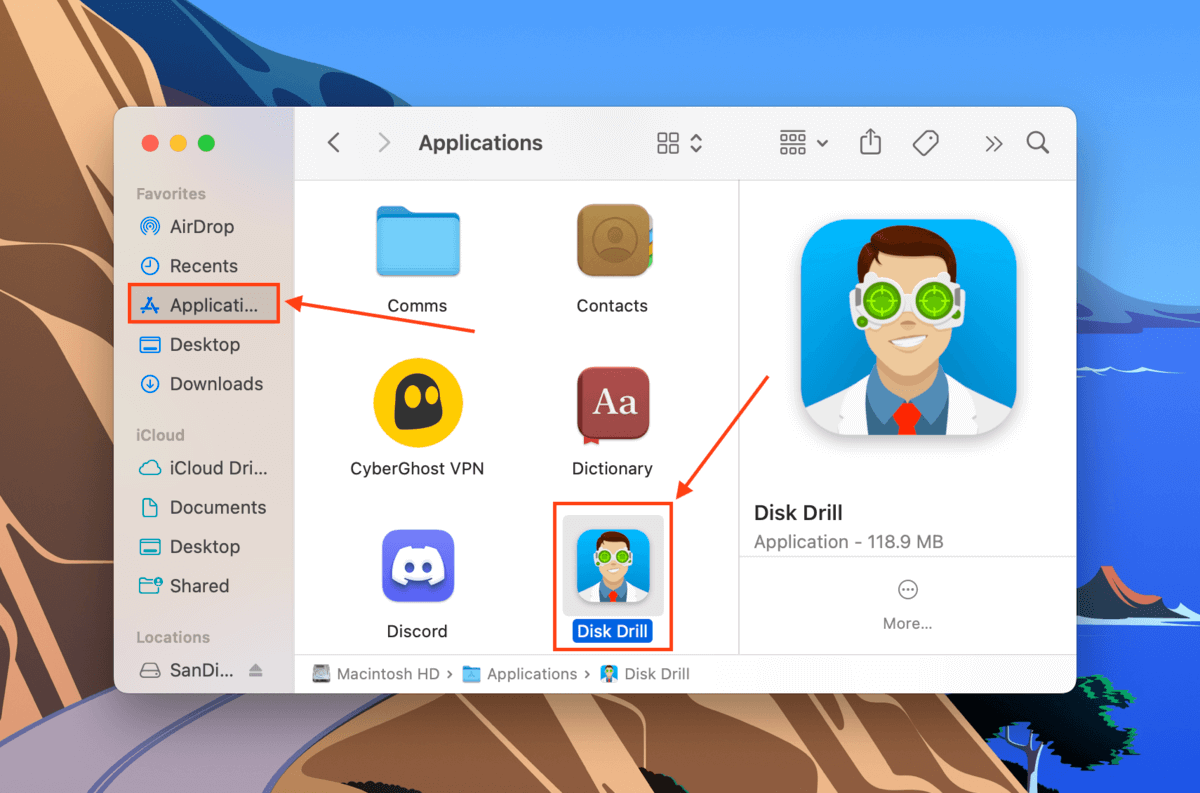
Step 3. Launch Disk Drill (Finder > Applications > Utilities)
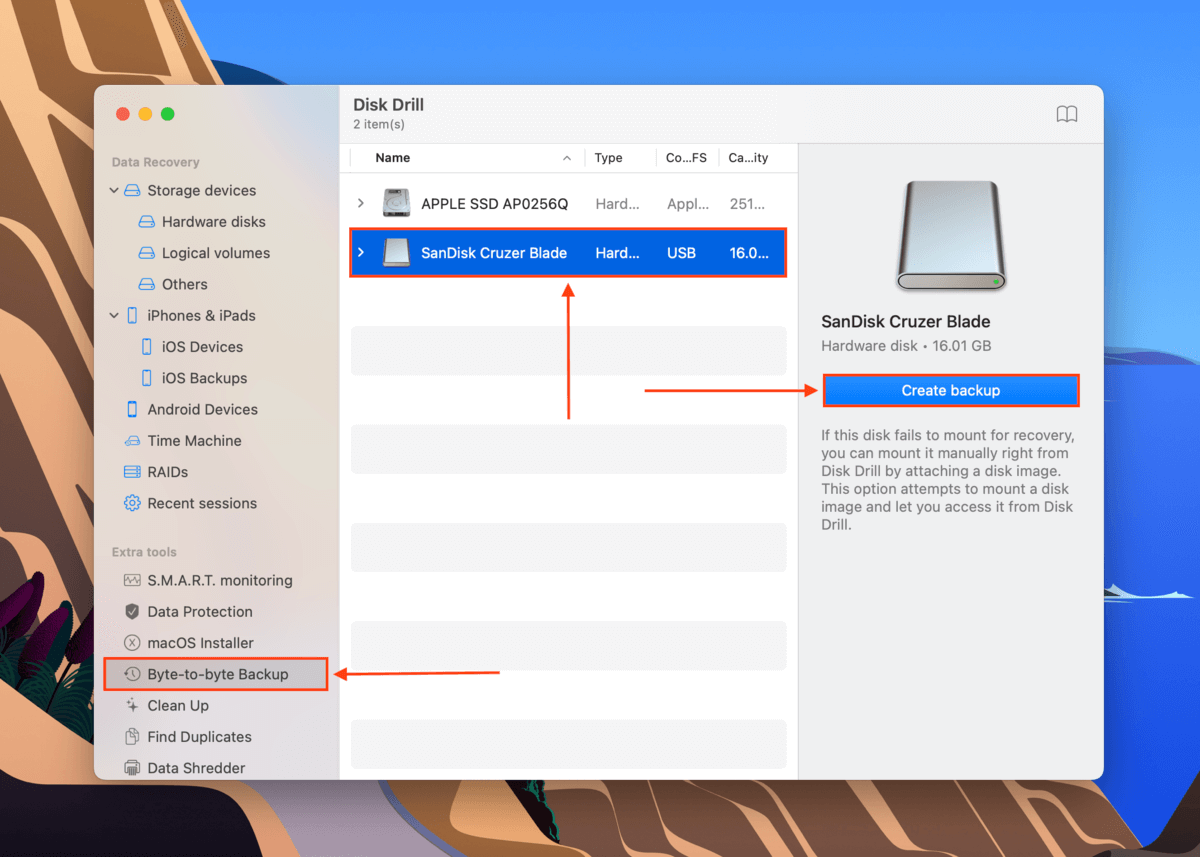
Step 4. On the left pane, click Byte-to-byte Backup. Then, select the corrupted USB drive and click Create backup to create a byte-level image backup.
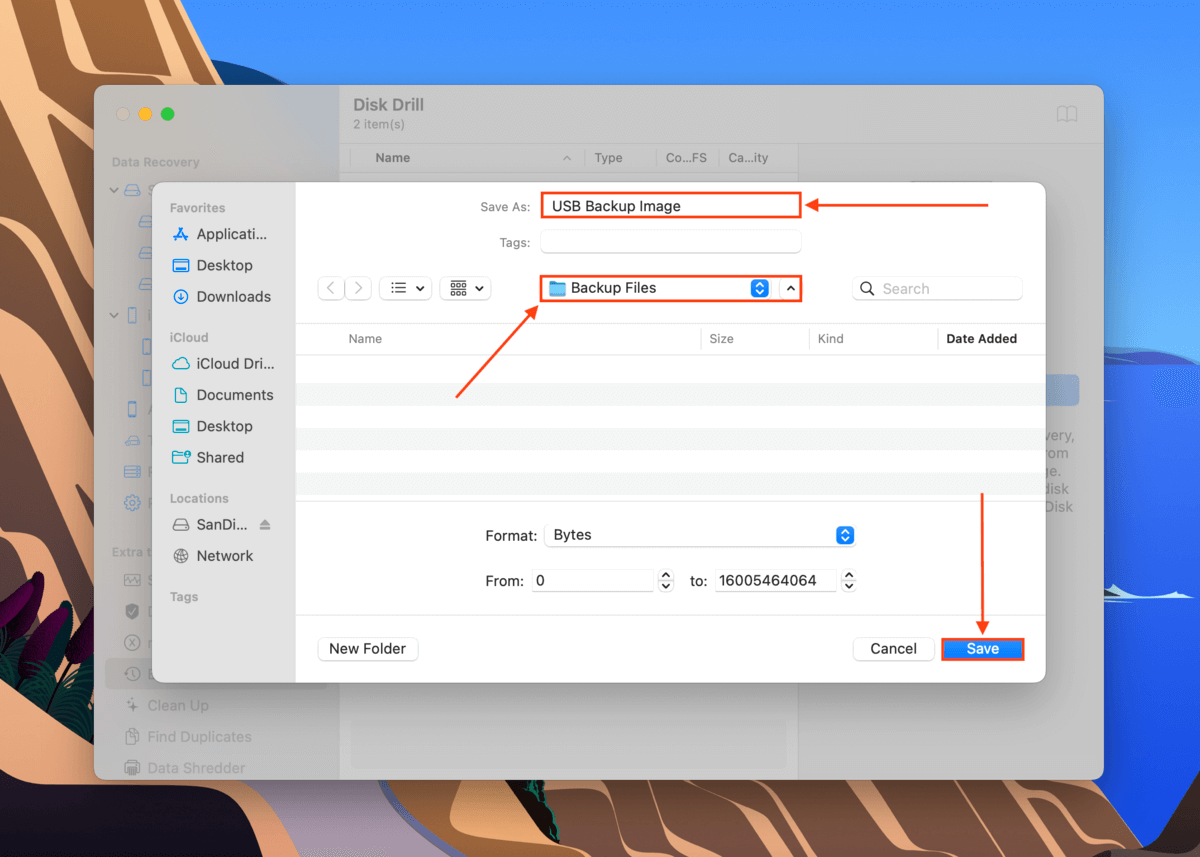
Step 5. In the dialog, name your image and select a location on your Mac to save the backup file. Then, click Save.
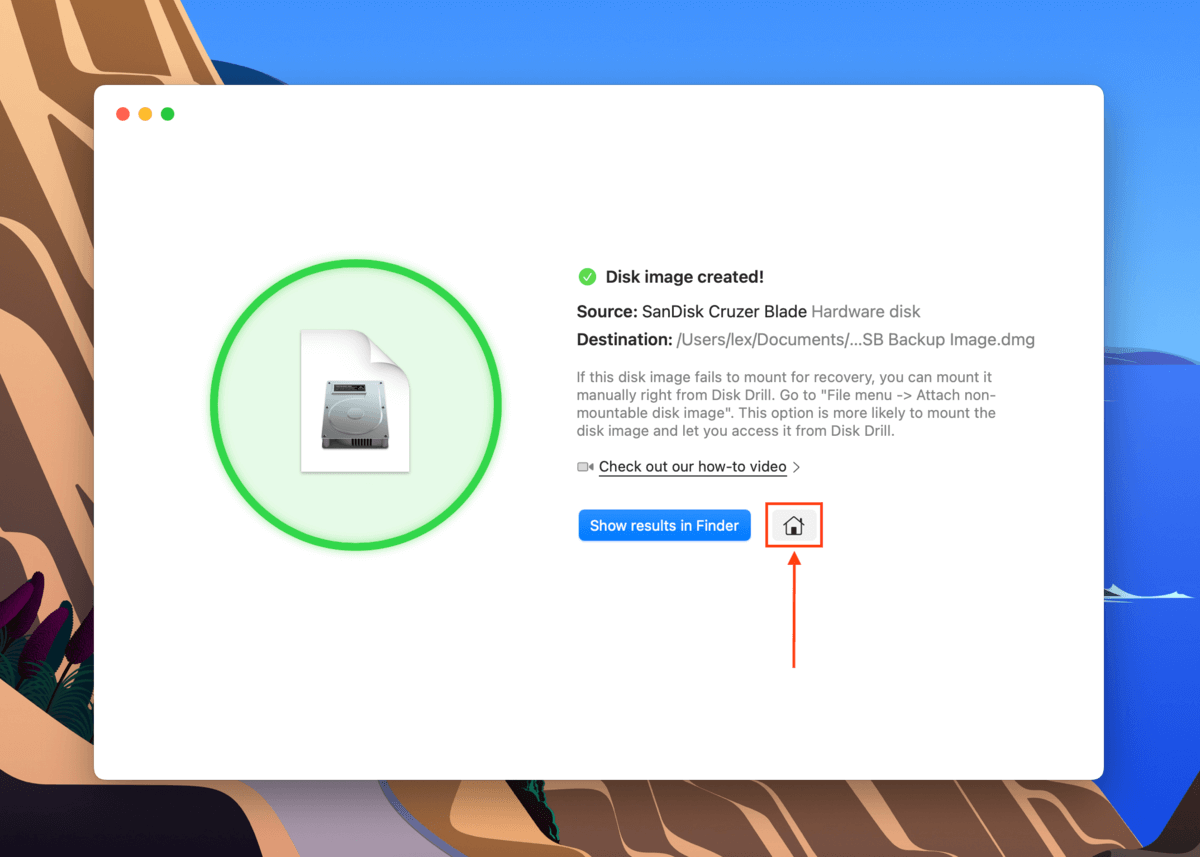
Step 6. Return to Disk Drill’s main window by clicking the house icon next to the Show in Explorer button.
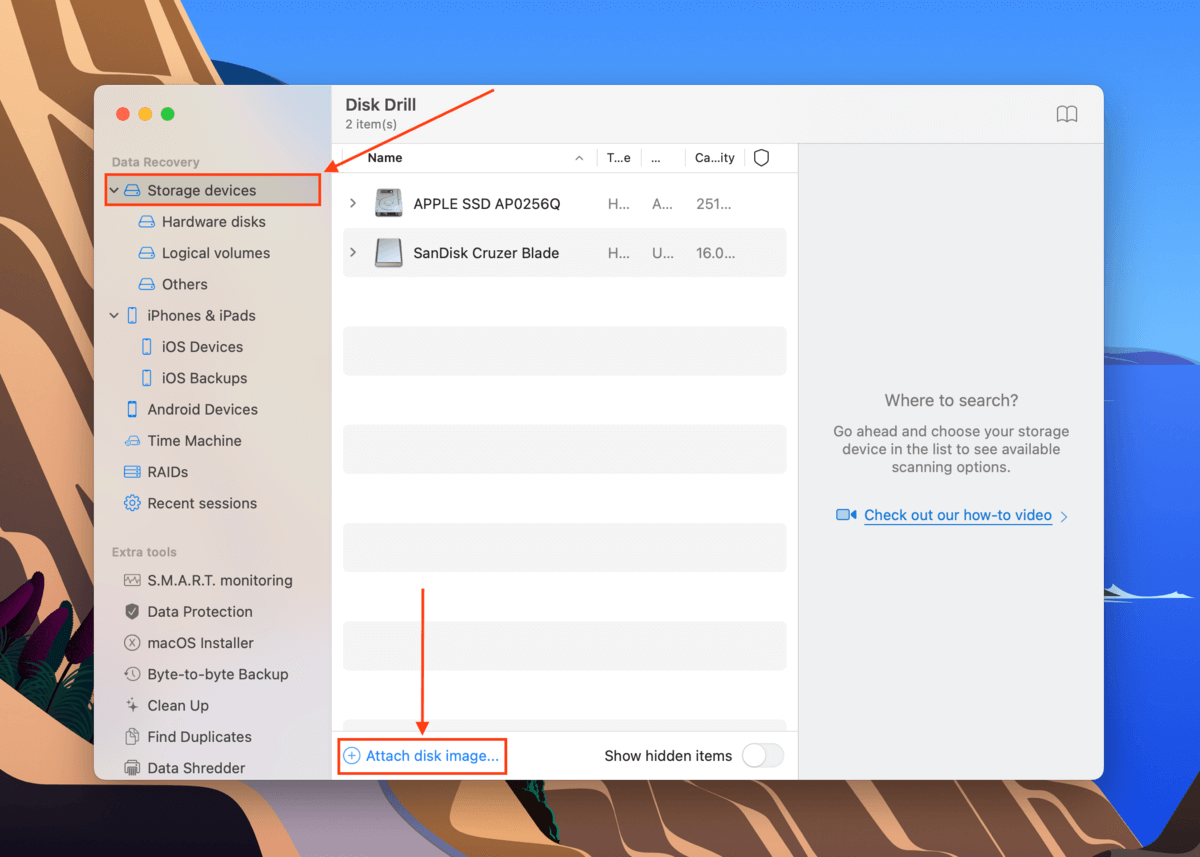
Step 7. On the left pane, click Storage Devices under the Storage devices section. Then, click the Attach disk image… located at the bottom part of the window.
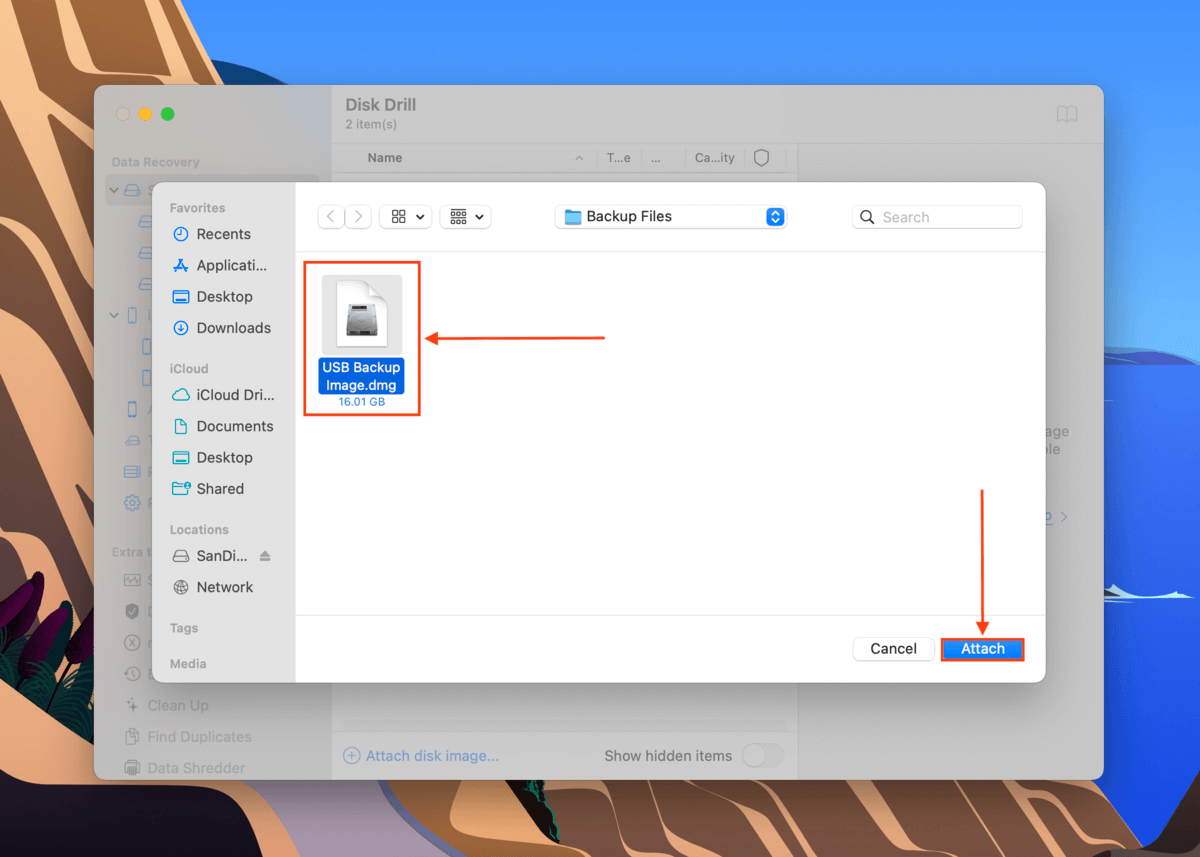
Step 8. Select the backup file and click Open.
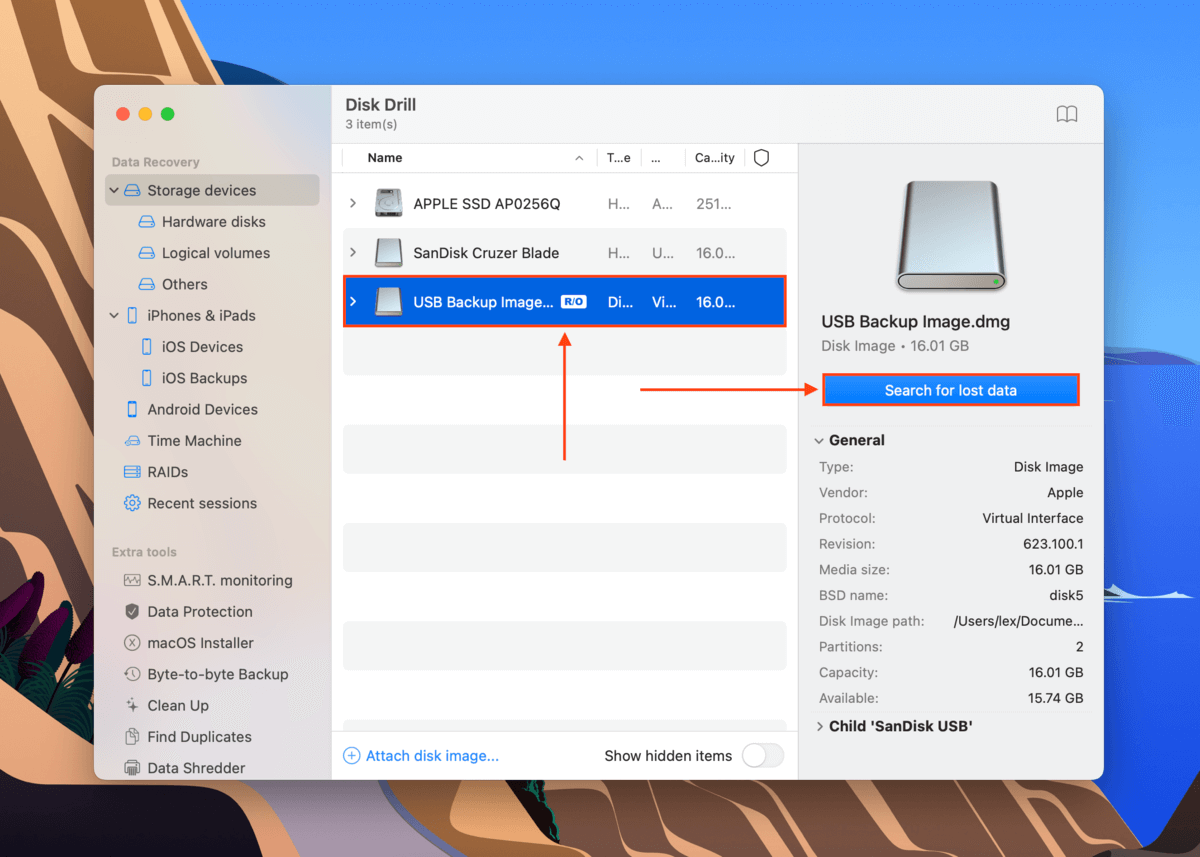
Step 9. In the middle pane, select the disk image backup and click Search for lost data.
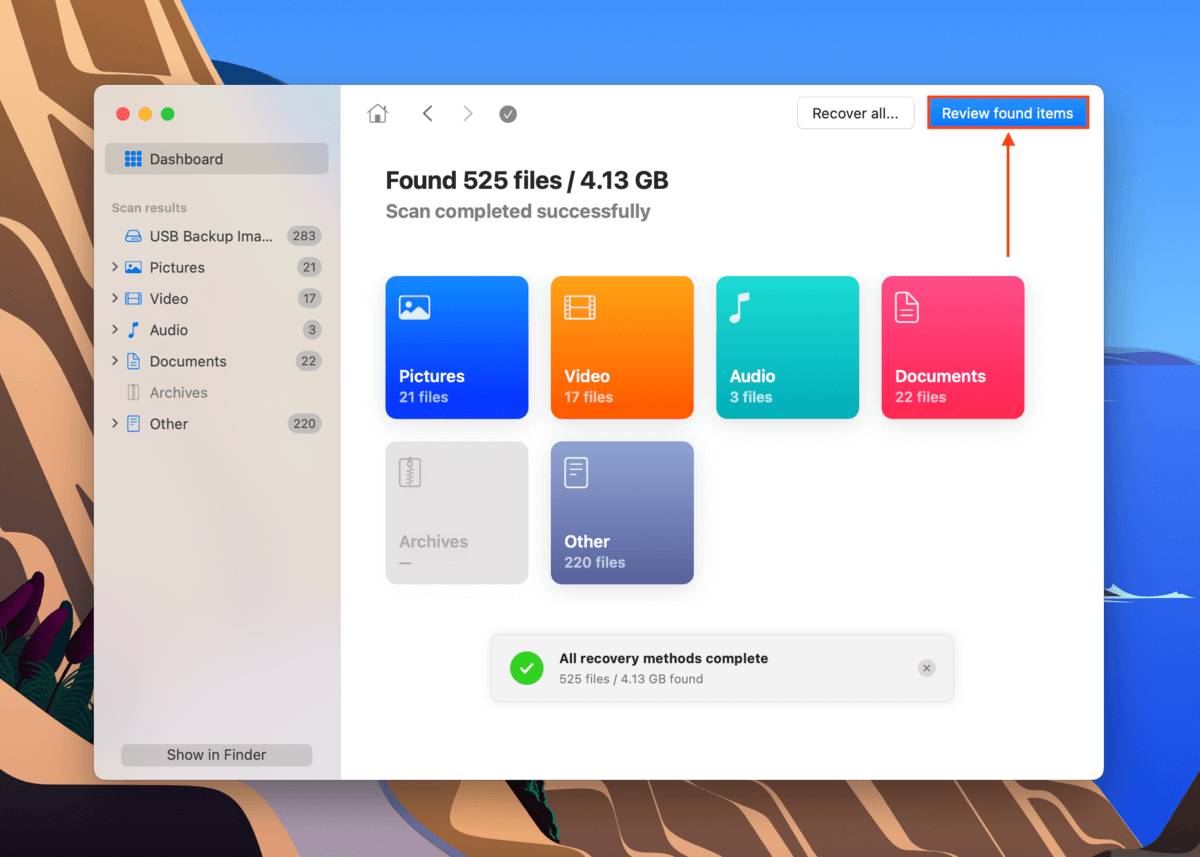
Step 10. Once the scan is complete, click Review found items.
Step 11. You will see the list of recoverable data – expand the Existing tab to see files currently stored on your USB. You can sort them via file type or use the search bar to locate a specific file. You can also preview the file by clicking the eye button that appears when you hover your mouse pointer beside the file name.
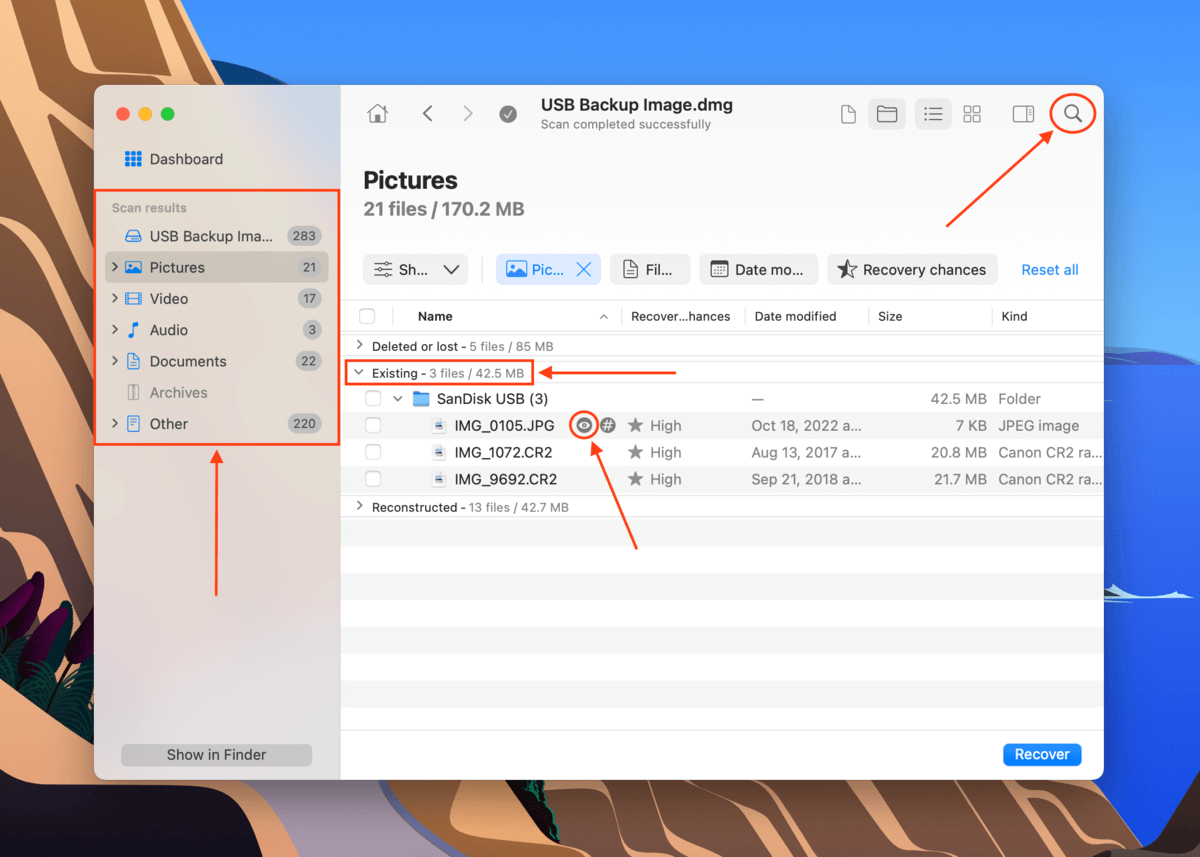
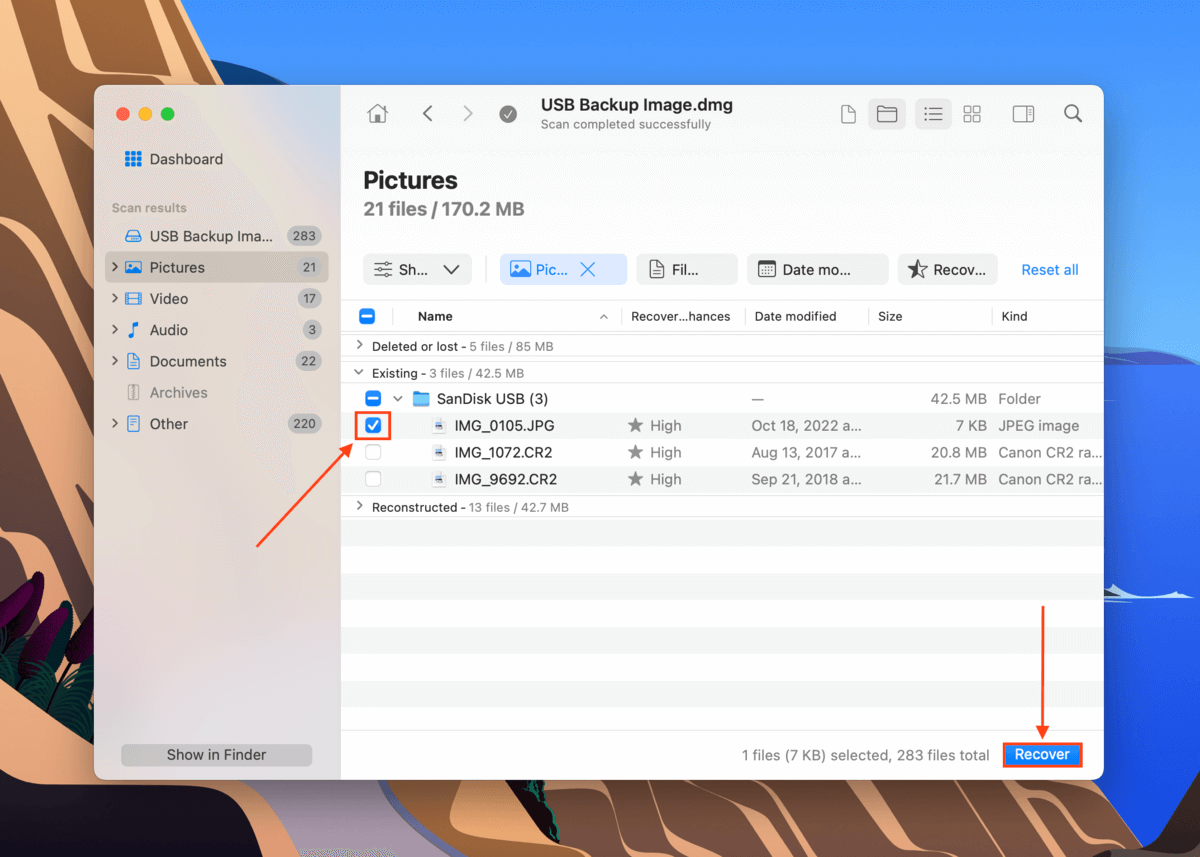
Step 12. Use the boxes in the leftmost column to select the files you want to restore. Alternatively, tick the box at the top of the column to select everything. Then, click Recover.
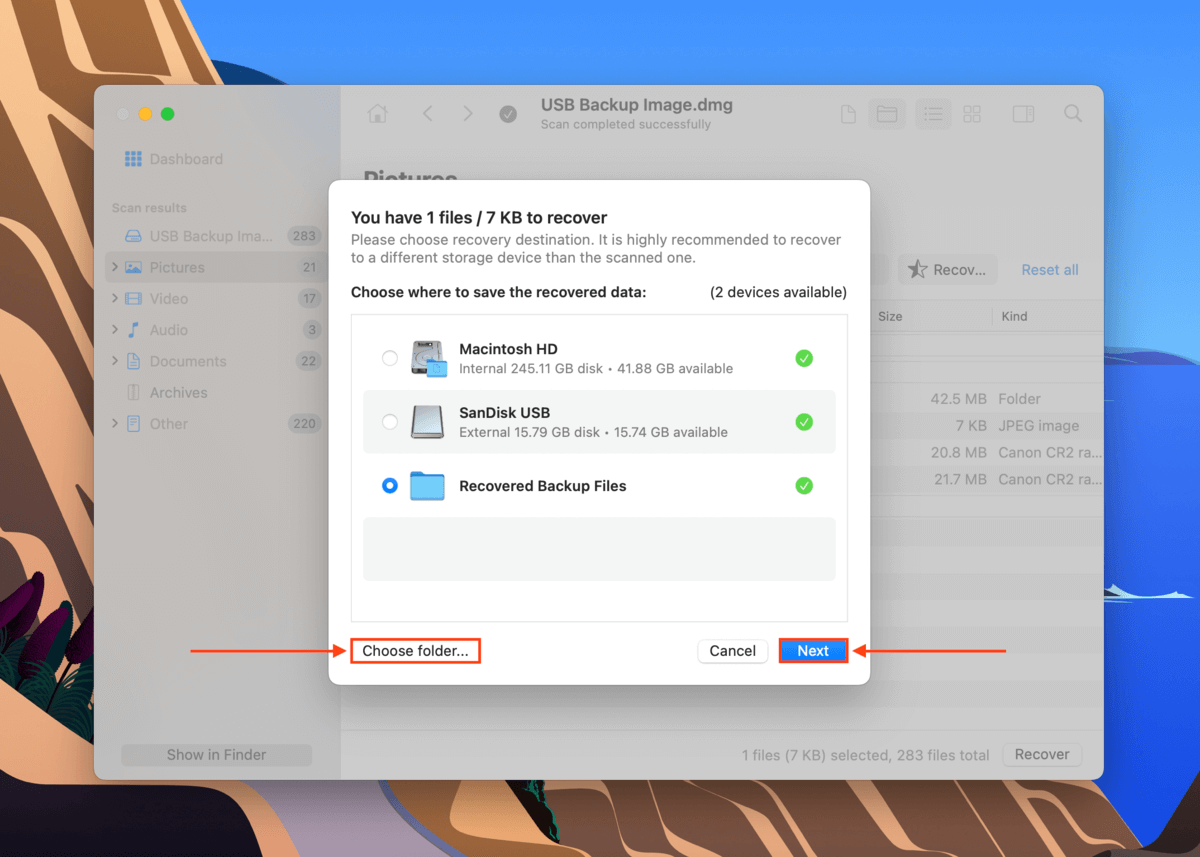
Step 13. In the dialog, choose a location on your Mac for the recovered files. Then click Next. Wait for the recovery process to complete.
Method 2: Send Your Flash Drive to a Data Recovery Service
If your drive has been physically damaged, your best chance is to send your USB to a professional data recovery service. They will disassemble your drive and attempt to safely recover your data using advanced technology – something DIY recovery can’t do.
If you’ve never tried using one before, try to look for the following:
- Class 100 Cleanroom. The #1 requirement – a professional data recovery service should have a cleanroom to protect the sensitive parts of your drive from particles.
- No data. no charge guarantee – Very few services offer a guarantee that they won’t charge you if they are unable to recover any data. It’s a sign of quality.
- Free estimate. Some services can give you a rough quotation over the phone after you explained the issues with your USB.
- Charges per hour. Avoid data recovery companies that charge per GB or MB of recovered data. It doesn’t work that way.
How to Repair Corrupted USB Drive on Mac
Depending on the severity and cause of corruption, you can try any of the 4 methods below to restore the USB drive to its original state on Mac.
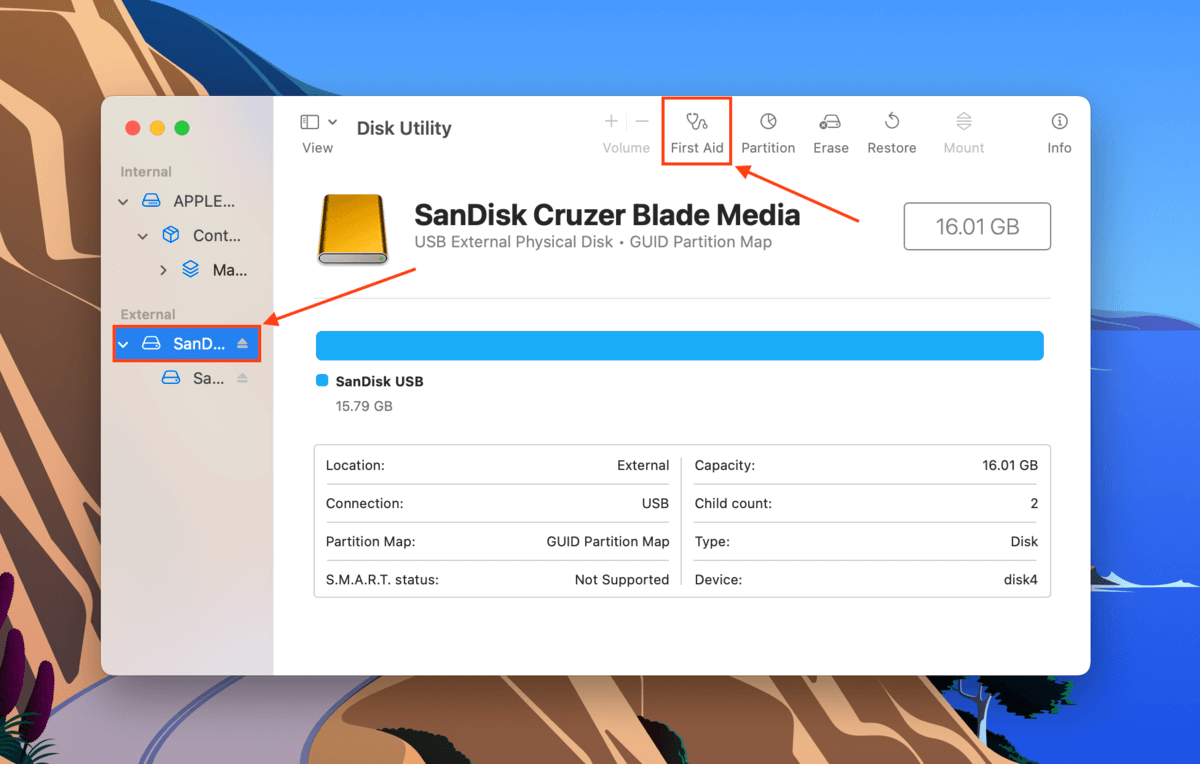
Fix 1: Repair via First Aid in Disk Utility
Disk Utility has a tool called First Aid that can diagnose and automatically fix any disk errors it finds. To use it, launch Disk Utility (Finder > Applications > Utilities).
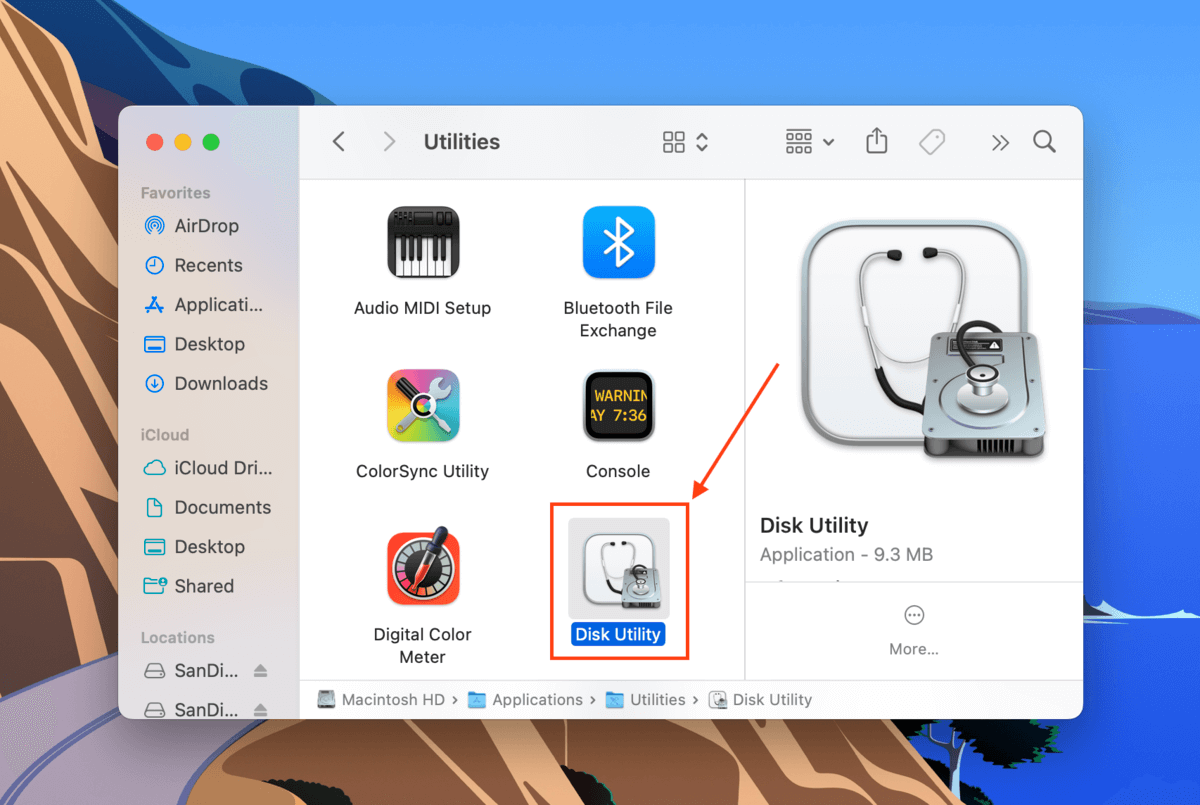
Select your flash drive from the left sidebar and click First Aid at the top of the screen. Confirm when prompted.
Fix 2: Update USB Drivers
if your drivers are outdated, macOS may struggle to read even a healthy USB drive. To update your drivers, you need to update macOS. Launch System Preferences > Software Update to begin the process.

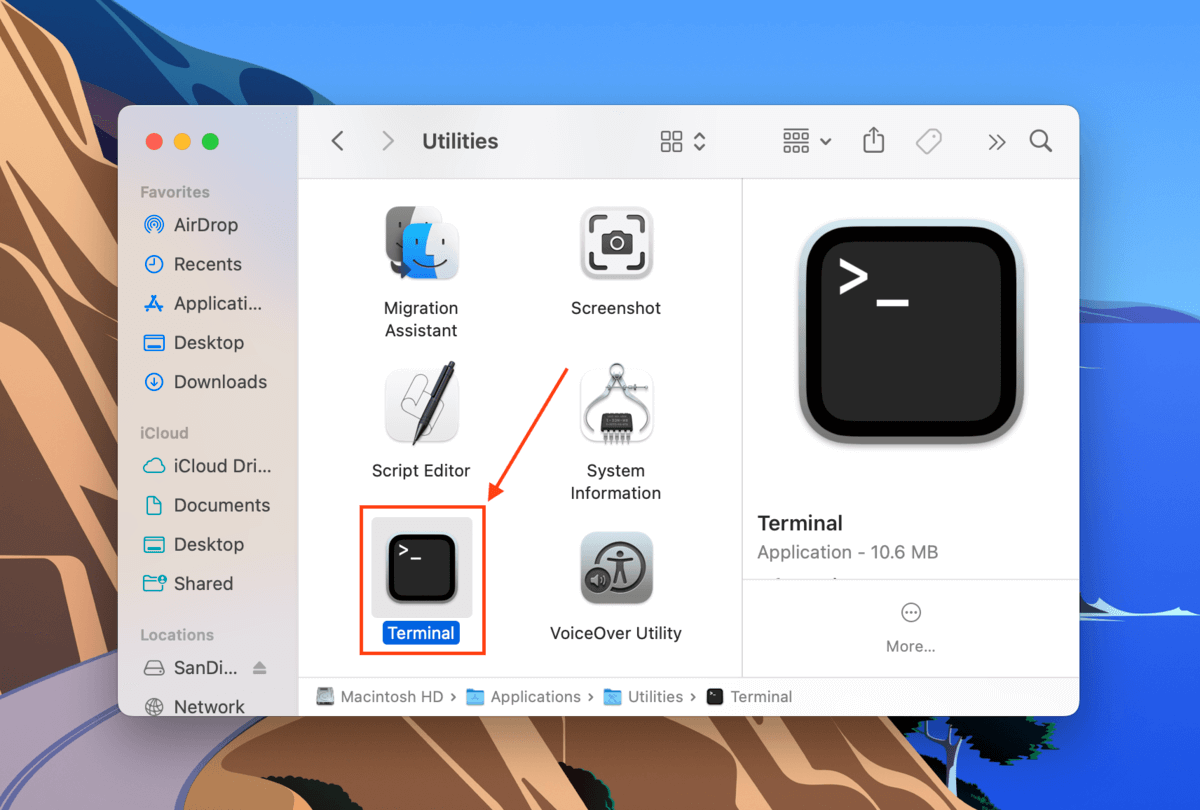
Fix 3: Repair via Terminal
If you don’t mind using the command line, you can repair a USB drive with Mac Terminal. It may seem intimidating at first, but you’ll be fine as long as you follow the steps closely:
Step 1. Connect your drive to your Mac.
Step 2. Launch Terminal (Finder > Applications > Utilities).
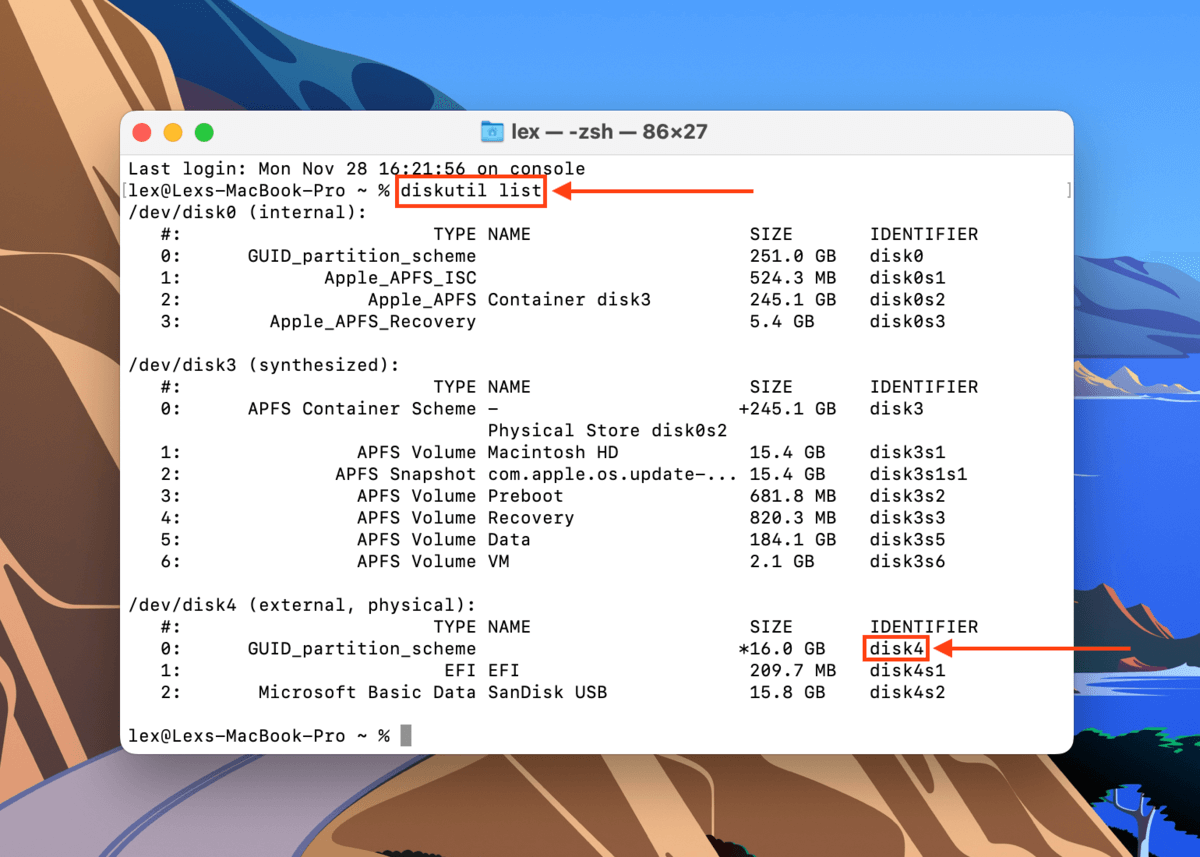
Step 3. Type the following command and hit Return:
diskutil list
Take note of your USB drive’s identifier.
Step 4. Type the following command and hit Return:
diskutil repairDisk /dev/disk4
Replace “disk4” with your own USB’s identifier.
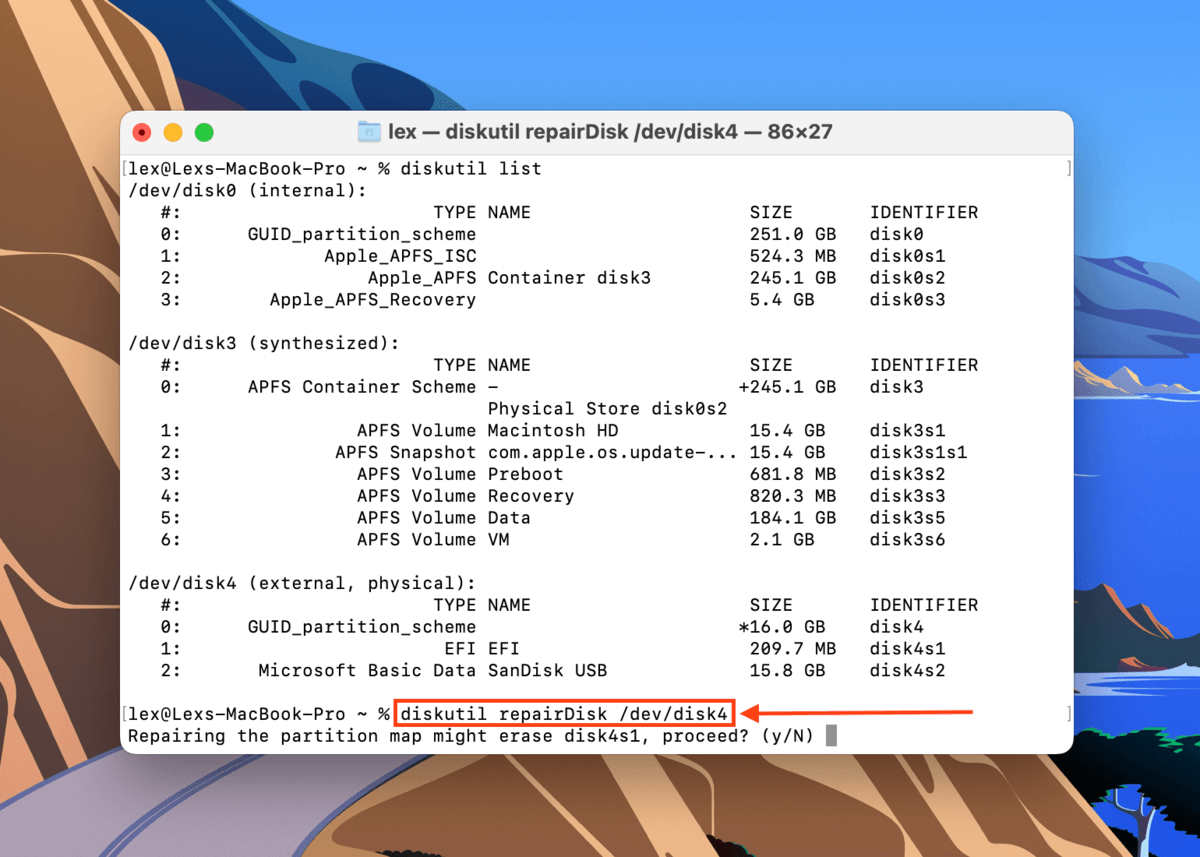
Step 5. Terminal will warn you that proceeding with the repair may erase your drive. Type the following command and hit Return:
y
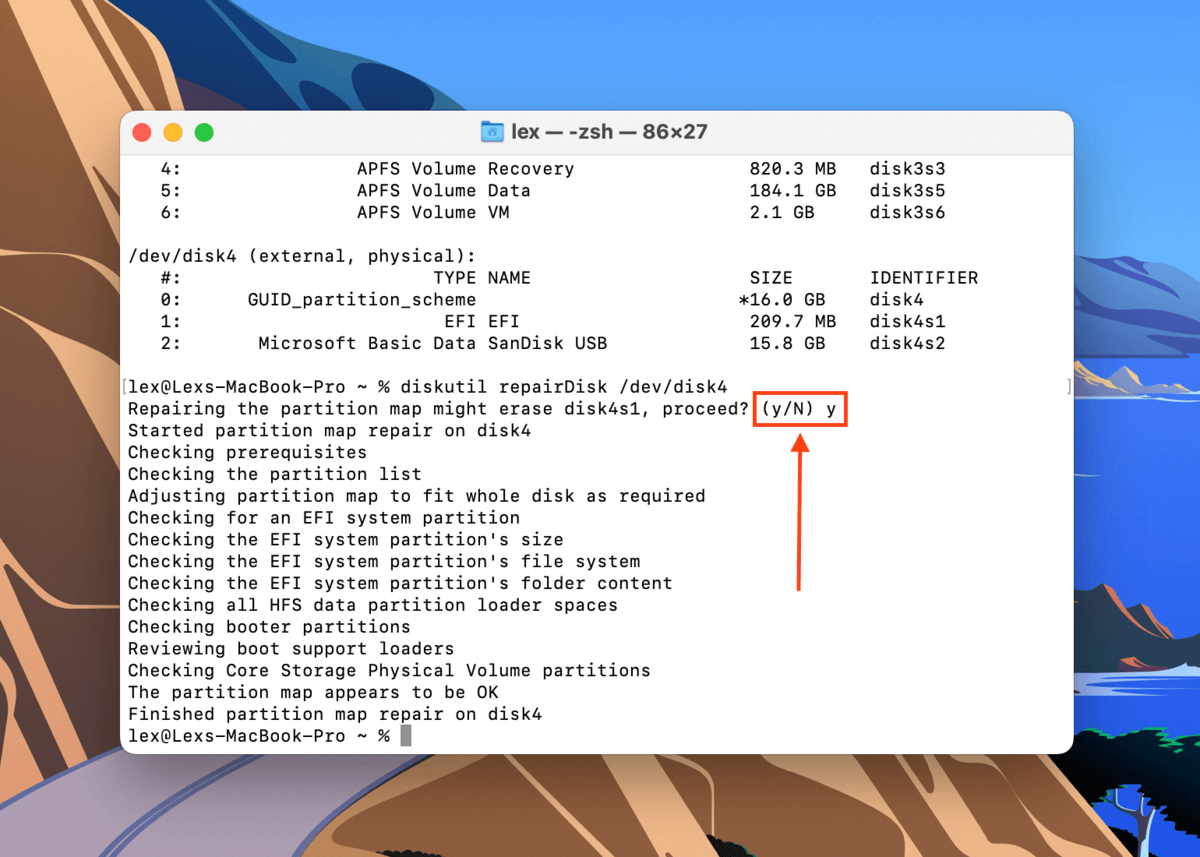
Step 6. You’ll be notified when the repair is complete. Close the Terminal window and check if your USB is working.
Fix 4: Format the USB
If all else fails, you can use Disk Utility’s Erase tool to restore your USB drive to its original state on Mac. However, formatting your USB means a 100% chance of data loss – you’ve been warned!
To format your USB, launch Disk Utility (Finder > Applications > Utilities).
Select your USB from the left sidebar and click the Erase button at the top of the window.
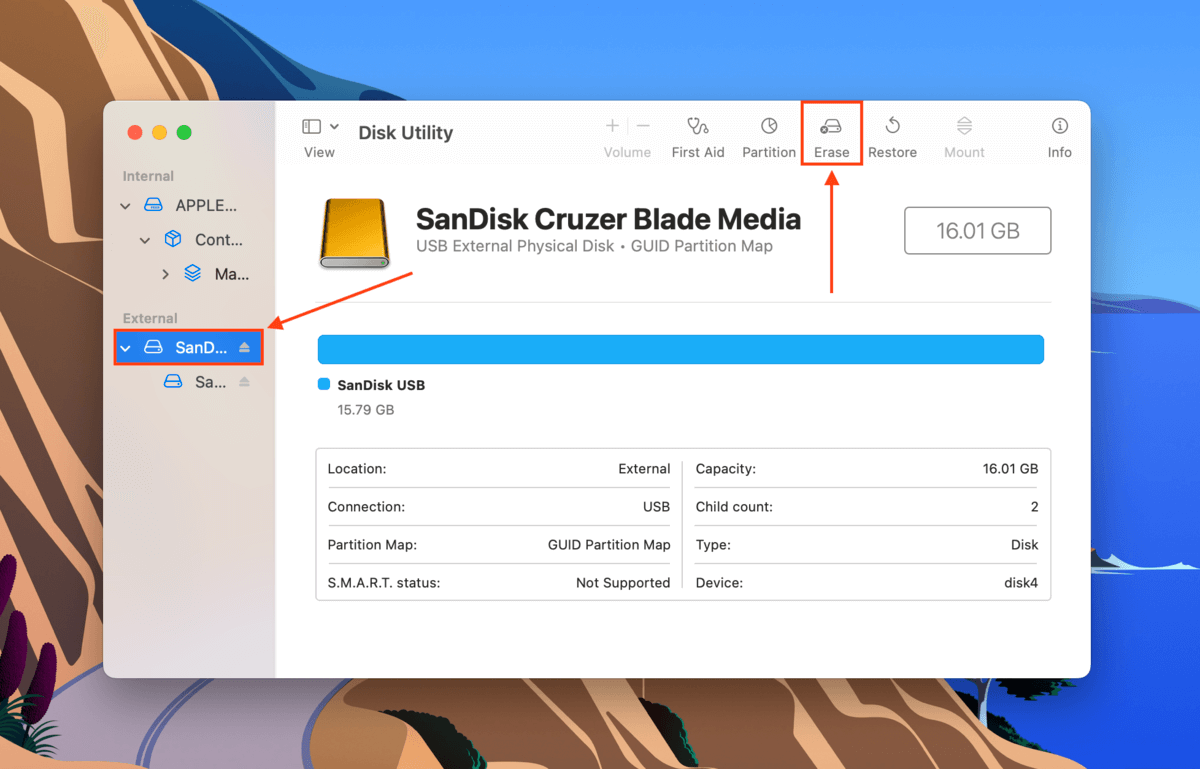
In the dialogue box: name your drive, choose a format (we suggest ExFAT) and a scheme (we suggest GUID Partition Map) and click OK to proceed.

Conclusion
USB flash drives are useful, but they’re easily susceptible to corruption. Even if you take care of your drive, simply connecting it to an infected computer can risk your data. Even attempting to fix your corrupted drive can cause data loss. To avoid the worst consequences of drive corruption, we highly recommend routinely backing up the data on all of your storage devices.
FAQ
Below are the 4 methods to repair your corrupted USB drive on Mac. Note that fixing your drive may result in data loss:
- Repair your drive using Disk Utility’s First Aid tool.
- Update macOS.
- Use the diskutil repairDisk command in Terminal.
- Format your USB using Disk Utility’s Erase tool.
You can reset or reformat a USB drive by following the steps below:
- Connect your USB to your Mac and launch Disk Utility (Finder > Applications > Utilities).
- Select your corrupted USB drive and click Erase.
- In the dialog: name your drive, select a file system (we recommend ExFAT) and a scheme (we recommend GUID Partition Map) and click Erase.


