
USB flash drives, often called thumb drives, are our compact companions for document transfers, photo exchanges, and small-scale backups. But their portability often leads to unforeseen mishaps: a precious project accidentally deleted before a big presentation, cherished photos lost in a data management incident, or key documents gone after a poorly thought-out formatting attempt.
However, files that have disappeared from a USB flash drive are not always gone for good. With the right tools and techniques, they can be brought back to life. This comprehensive guide will teach you how to recover deleted and disappeared data from a flash drive effectively on your Mac.
Table of Contents
Common Reasons Why Files Disappear from Flash Drives
While thumb drives are invaluable for their portability and convenience, files stored on them can sometimes go missing without a trace. This section will explore the typical scenarios that lead to such mysterious disappearances. Whether it’s a simple oversight or a more complex issue, understanding these common reasons will not only help you recover lost data but also prevent future losses.
| Reason | Description |
| 🧹 Accidental deletion or formatting | All it takes to delete important files from a flash drive is one wrong click. If you notice your mistake immediately, you should be able to retrieve your files from Trash, but files that are no longer in Trash can be recovered only with the help of Mac USB drive data recovery software. |
| 🦠 Malware or virus | If your computer is infected with either malware or a virus, then it could be the cause of your Mac not being able to recognize or use a flash drive. When malware or viruses get bad enough, they can inhibit system speed, performance, and hardware connectivity. |
| 💻 Improper ejection | It’s important that you always properly eject your flash drive before removing it from your Mac to avoid interrupting a write operation running in the background. |
| 💾 Using the wrong flash drive | Some of us use multiple flash drives. Make sure that you’re using the right one when plugging it into your Mac if you’re not seeing your files you may have grabbed the wrong flash drive. |
| 🔨 Hardware damage | If you use a USB drive with a damaged connector, you shouldn’t be surprised when you lose important files. To protect your files, keep your USB drive away from dust and water and, if possible, avoid carrying it loosely in your pocket with keys and spare change. |
How to Recover Files from a Flash Drive on Mac
Navigating through the loss of files on a flash drive can be daunting, but Mac users have several routes to potentially reclaim their data. This section will guide you through the methods available to recover files from a flash drive on a Mac. From quick fixes that may restore recently deleted items to more in-depth recovery tactics, we’ll detail the steps to help you retrieve what you’ve lost. Let’s get started!
Solution 1: Check the Trash Folder
Recently deleted files can often be found in the Trash folder. If that’s the case in your situation, you’re in luck because flash drive recovery on Mac from the Trash folder is a very simple process.
To recover files from USB drive on Mac using Trash:
Step 1. Open Trash by clicking on its icon, located on the right side or bottom of the Dock. 
Step 2. Go through Trash and look for the files you want to undelete. Select them by either pressing and holding the command key and then clicking the files or by holding the left mouse click and dragging the cursor around them. 
Step 3. Click on any of the selected files, hold the click, and drag your mouse to another folder or your desktop.
Solution 2: Use USB Data Recovery Software for Mac
When files bypass the Trash, or if it’s been emptied, specialized USB data recovery software for Mac comes to the rescue. These programs analyze your flash drive to unearth and restore deleted data, sometimes even files lost in formatting or corruption.
Disk Drill, renowned for its user-friendly interface and excellent performance, stands out as one of the best USB data recovery software tools for Mac users.
With it, you can find all hidden, recently, and permanently deleted files. It can even recover files from USB flash drives that have been corrupted—all with just a few simple clicks.
To recover files from a USB flash drive on Mac:
Step 1. Download, install, and launch Disk Drill for Mac.
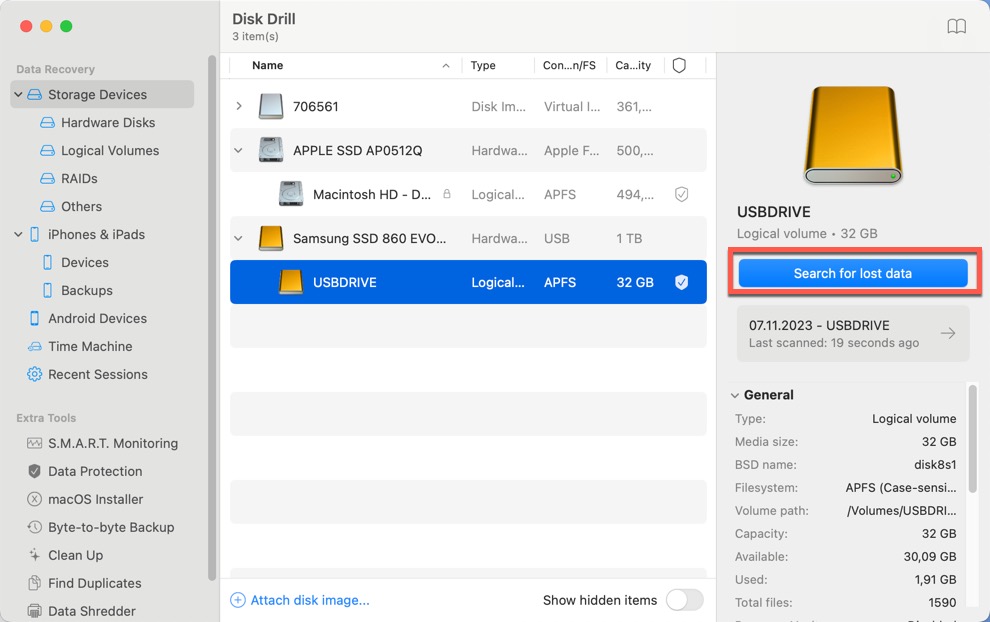
Step 2. Select the USB flash drive you want to recover in the Sotrage devices section of Disk Drill and click the Search for lost data button.
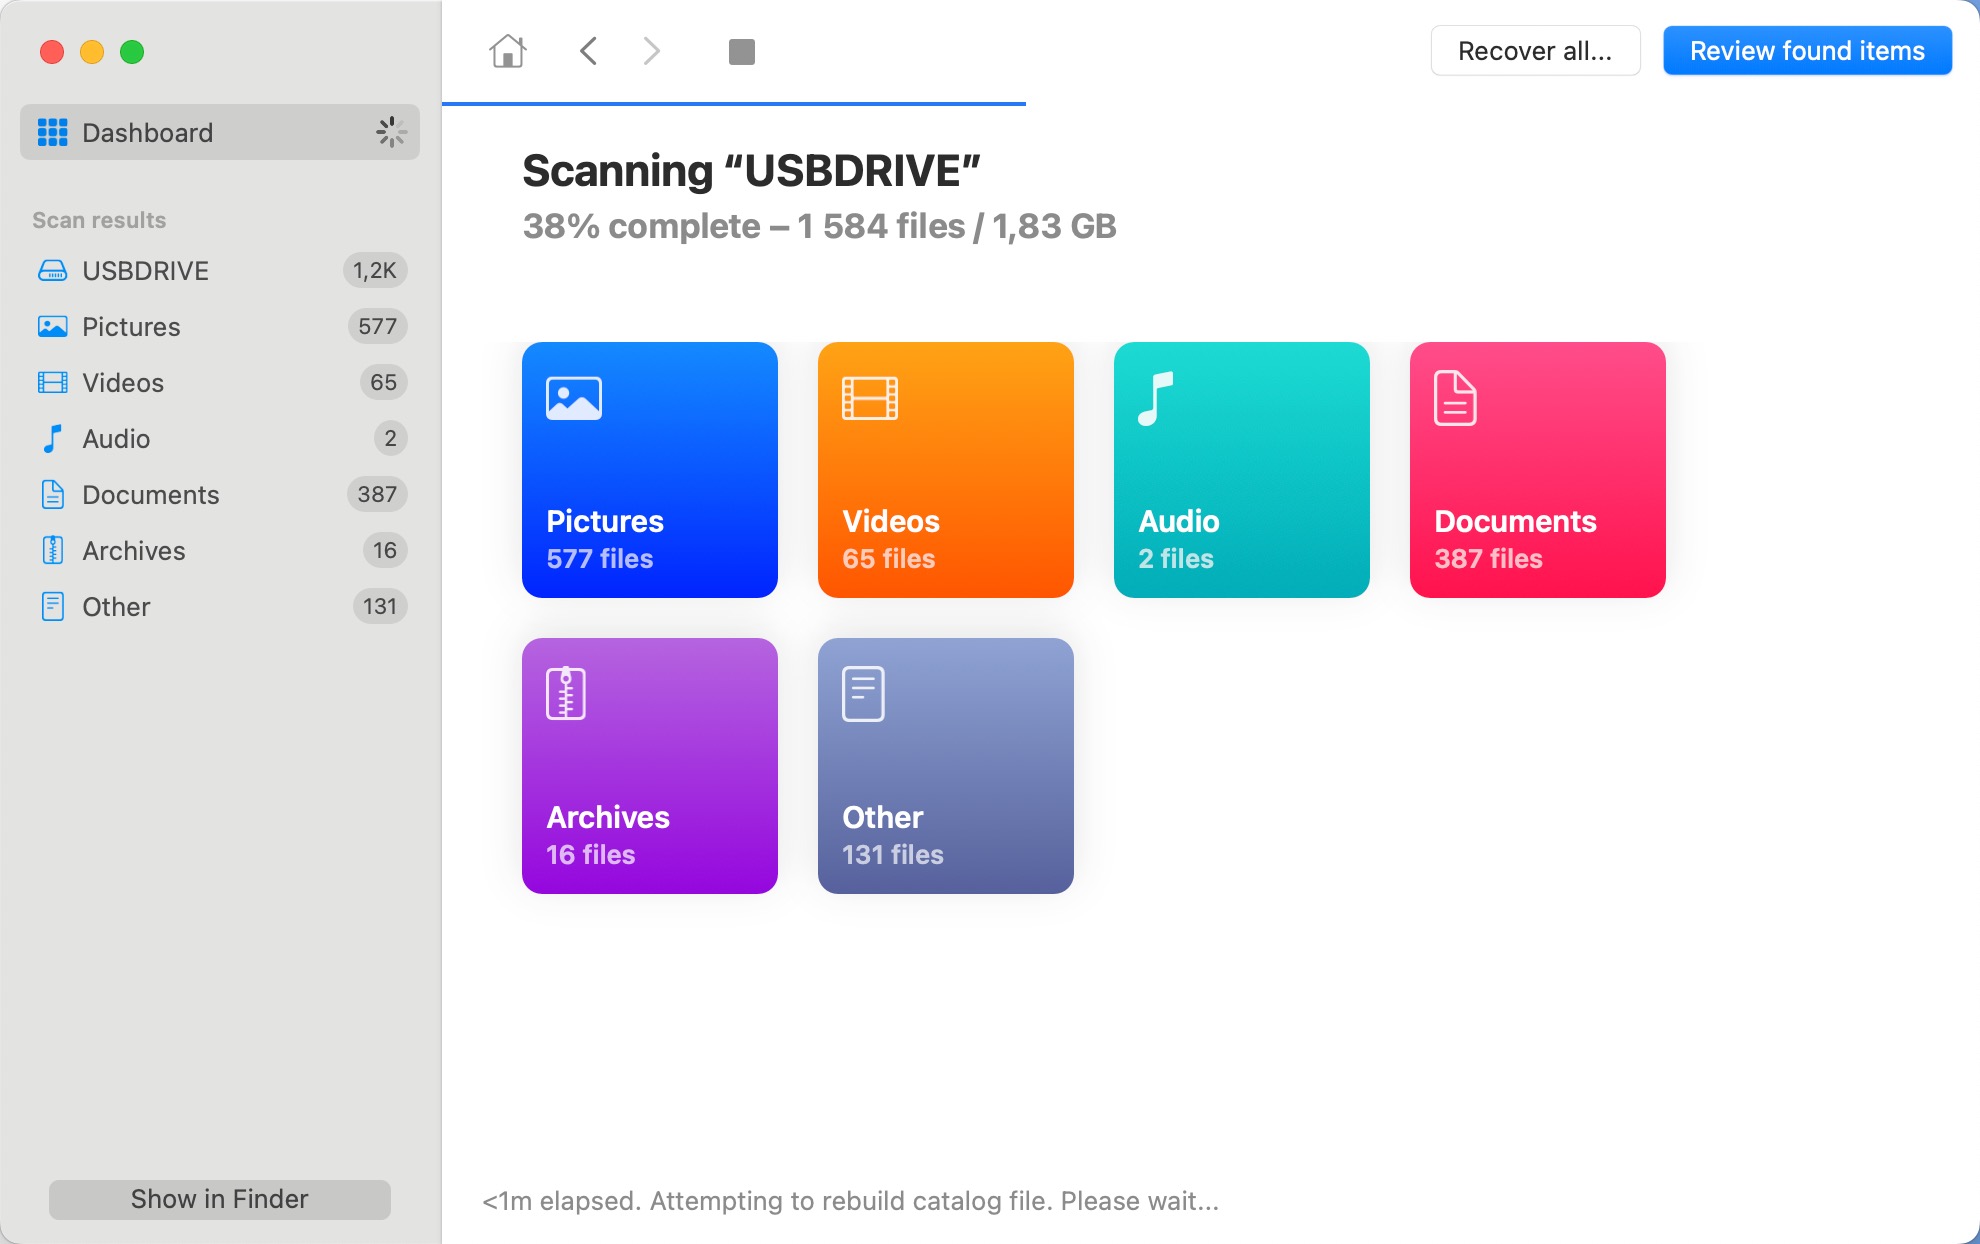
Step 3. Wait until Disk Drill finishes analyzing your USB flash drive and then check the results (or you can start analyzing them even during scanning).
Step 4. Go through the three main folders in which Disk Drill lists found files (Deleted or Lost, Existing, and Reconstructed) to find what you’re looking for. You can take advantage of the application’s filters and sorting options.
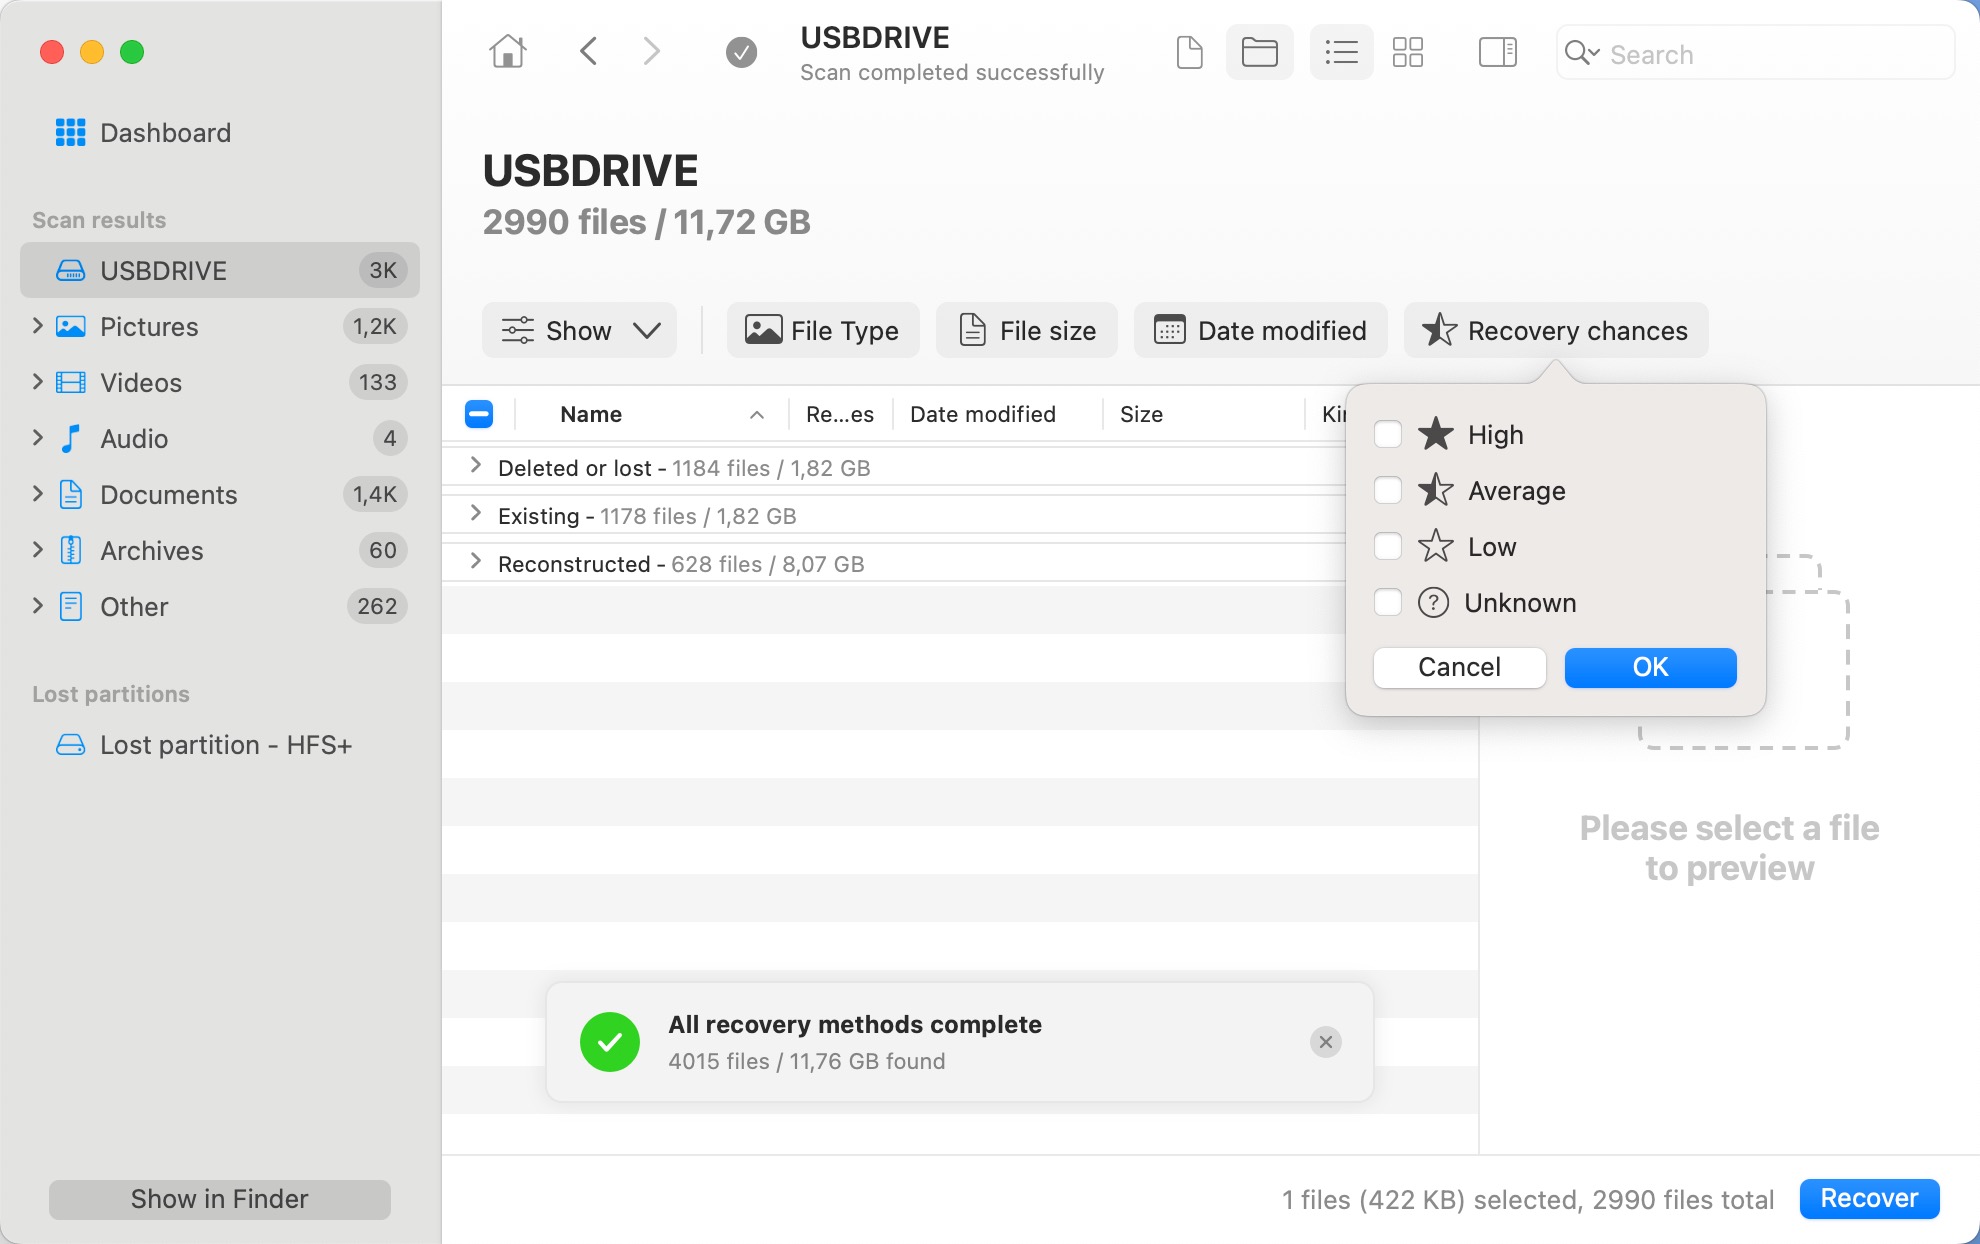
Step 5. Select each file you want to recover and click the Recover button in the bottom-right corner.

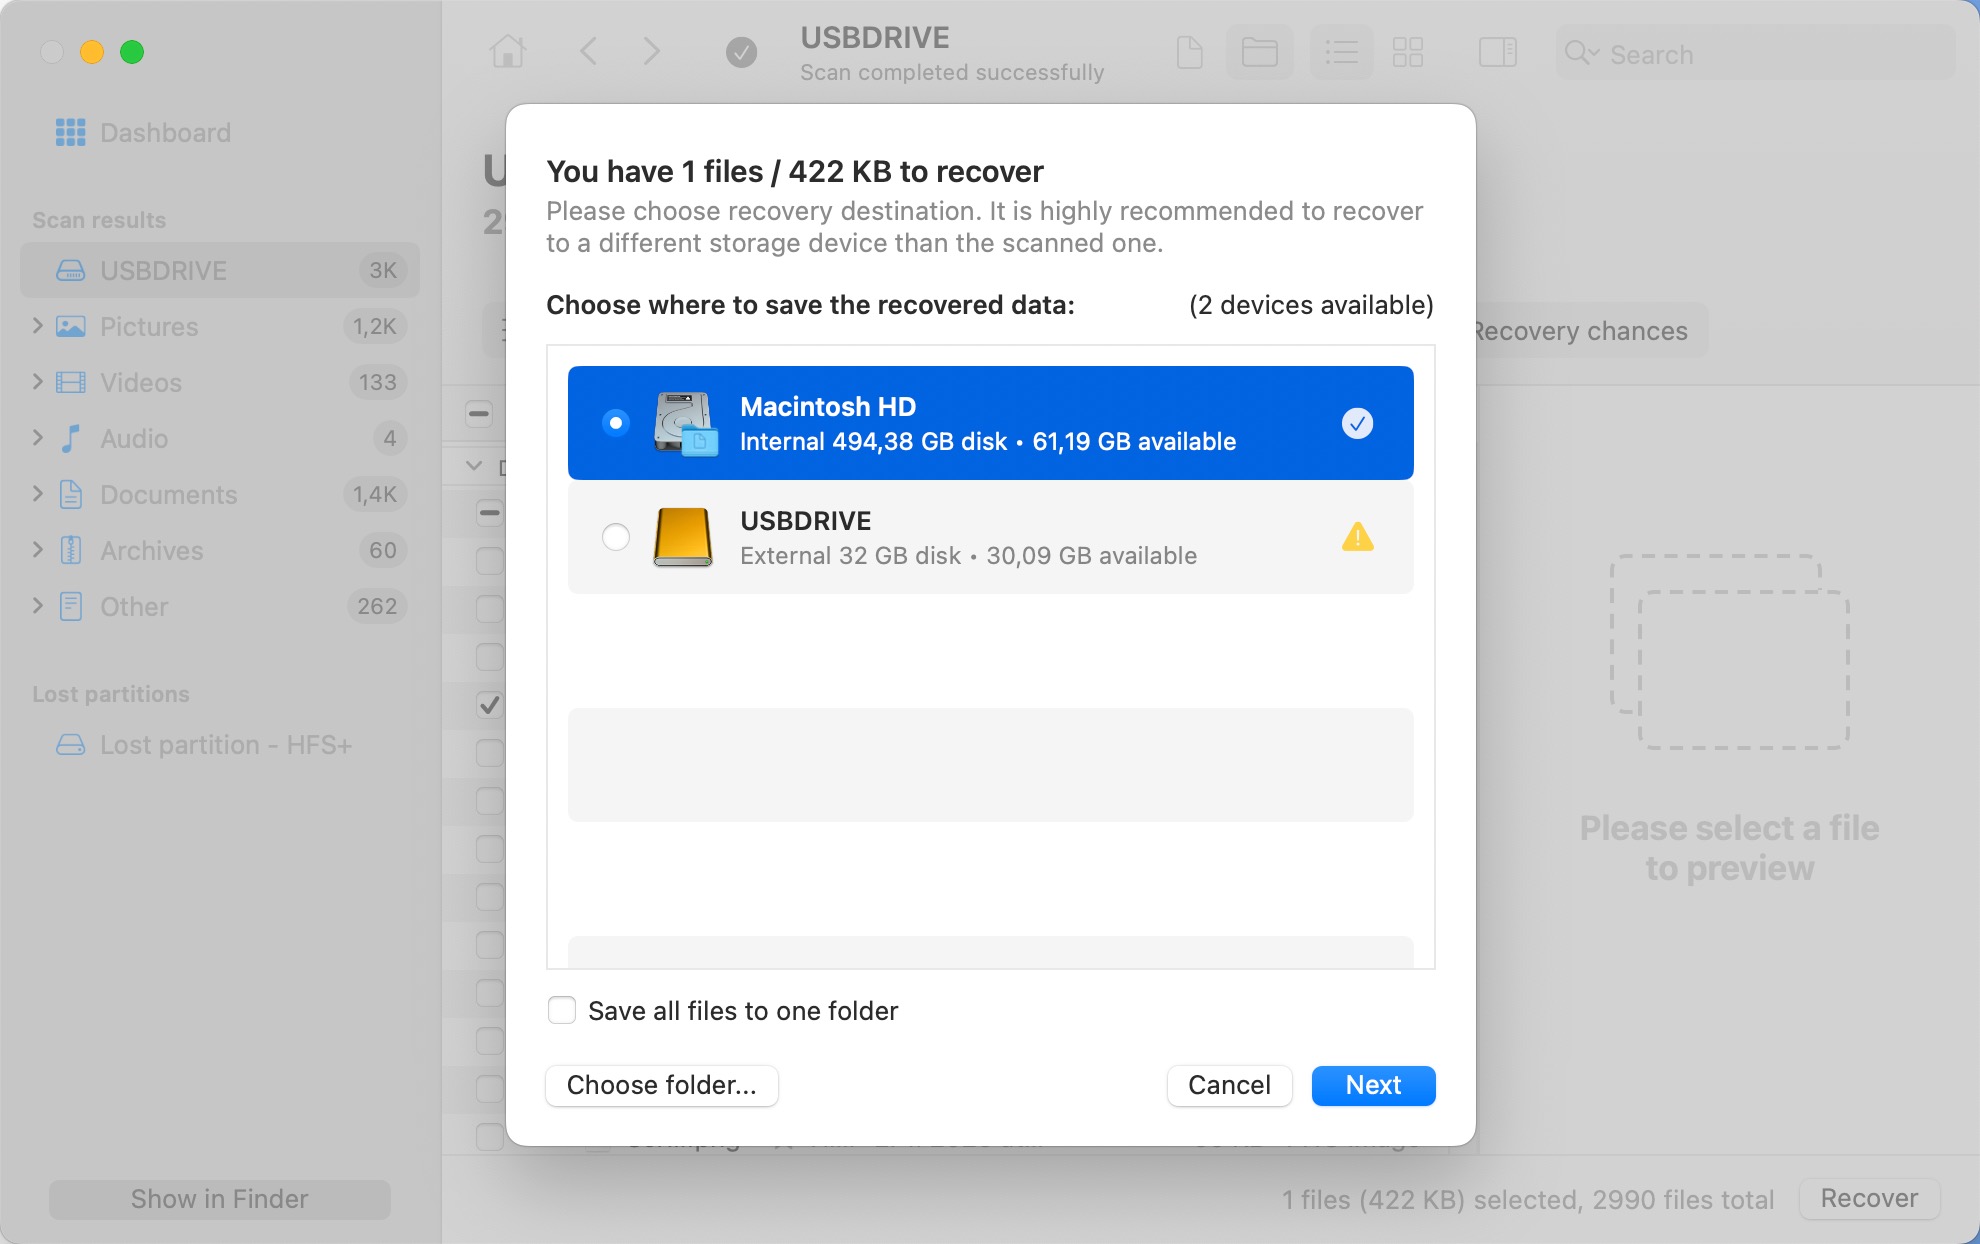
Step 6. Specify where you want Disk Drill to recover the deleted files and complete the recovery process.
Solution 3: Unhide Files on USB Drive
Sometimes, your files are not lost; they’re just hidden. For example, this can occur when the chflags command in Terminal has been used to set the hidden attribute on certain files or folders.
This command can be activated by user error, such as inadvertently copying and pasting commands from the internet or entering an incorrect path.
Additionally, a rogue application with access to your system could change file visibility settings without your knowledge. This attribute alteration effectively masks the files from plain sight in the Finder,
To uncover your hidden files, follow these detailed steps:
Step 1. Connect your USB flash drive to your Mac.
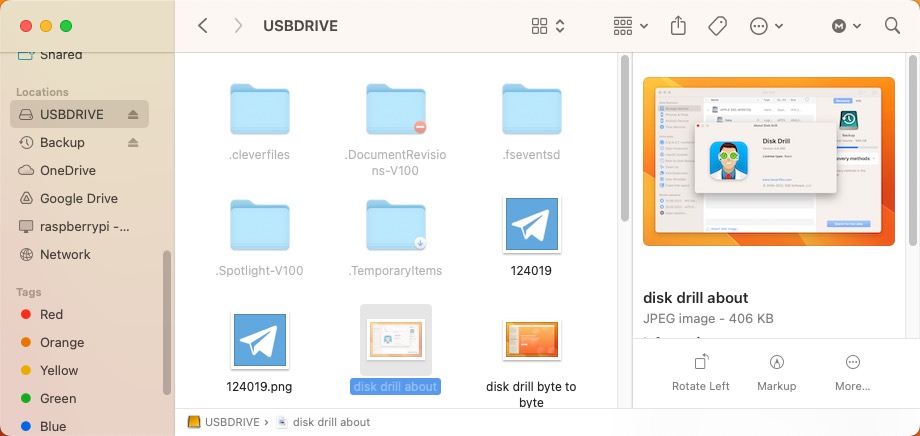
Step 2. Launch Finder and select your USB flash drive. Press Command + Shift + . (dot) to toggle the visibility of hidden files on your Mac.
Step 3. Check carefully if you can see any hidden files appear as slightly translucent in the Finder window. These are your hidden files, and you’ve just confirmed that they’re still present on the USB flash drive.
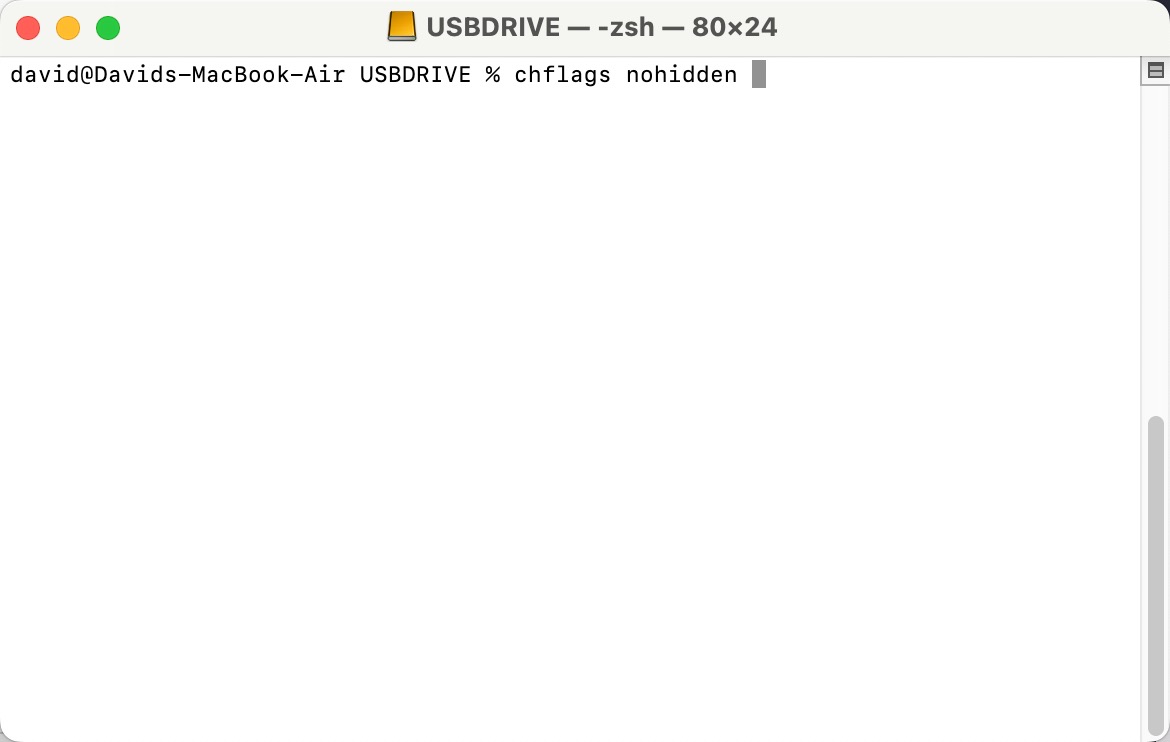
Step 4. To permanently unhide your hidden files, you can use the chflags Terminal command. Open Terminal from your Applications folder, and type the following command (don’t hit Return yet): chflags nohidden. Make sure the command is followed by a single space.
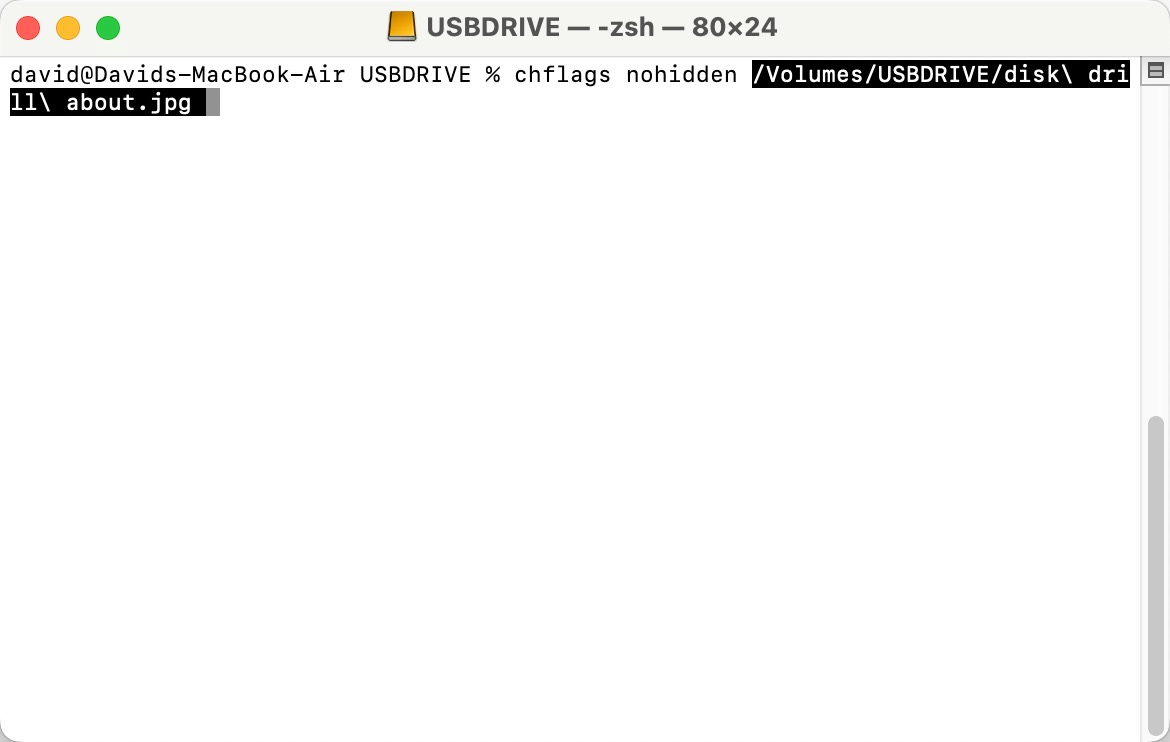
Step 5. Drag and drop the hidden file or folder you want to unhide from Finder into the Terminal window, which will insert the file’s path. Press Return to execute the command.
Step 6. After unhiding your files, you may want to toggle the hidden files view off in Finder. Press Command + Shift + . (dot) again, and the hidden files will become invisible once more.
Why Can’t Some Files Be Recovered?
 Unfortunately, data recovery is an unpredictable process, and you may not always be able to recover all lost files.
Generally speaking, files can be recovered until they are overwritten by new files. That can happen nearly instantly or after several months and even years—it all depends on the size of your USB drive and how much you use it. For example, if you accidentally format a 2 GB flash drive and write 2 GB of new files to it, it’s almost guaranteed that none of the original files will be recoverable.
Physical damage may also jeopardize the recovery of deleted files and even render the entire flash drive useless. Unfortunately, there’s not much regular home users can do to repair a physically damaged USB flash drive because any such repair requires specialized equipment and plenty of experience.
Another thing that complicates file recovery on some Macs is the lack of USB ports. For example, the latest MacBook Air offers just two Thunderbolt 3 (USB-C) ports and an audio jack—no full-size USB port available. Fortunately, all you need to recover files from a USB flash drive on a Mac that doesn’t have a full-size USB port is a suitable dongle.
How to Prevent Data Loss from USB Drive?

Preventing data loss from a USB drive doesn’t require any special skills or expensive software. You just need to treat your USB drive responsibly and keep in mind the following five tips:
- Use your USB drive responsibly: If you keep important files on your USB drive, you need to use it responsibly, which means properly ejecting it before you physically remove it from your computer and taking care not to interrupt any active read/write operations before they finish.
- Keep your USB drive away from dust and moisture: Physical damage can wreck a USB drive in an instant, and it’s often impossible to repair it. To prevent it, keep your USB drive away from dust and moisture and always use the included cap to protect the USB connector.
- Back up your files from time to time: Just because most people use USB sticks as cheap and handy backup devices doesn’t mean that you shouldn’t back up your files from time to time. It’s always much better to lose a day’s or a week’s worth of work than everything.
- Defend your computer against malware: Malicious hackers love USB sticks because they make it easy for them to spread their malware from one computer to another. To prevent your USB stick from becoming a host for a virus or some other digital parasite, use a reliable anti-malware solution.
- Don’t rely too much on a single USB drive: Considering how affordable USB drives are, there’s no reason to rely on a single and risk losing gigabytes of data at once. Instead, buy multiple USB drives and use each for a different purpose. That way, even if one of them stops working, the data loss won’t be terrible.
With these five tips, you can prevent data loss from a USB drive and avoid the loss of time and valuable data associated with it. But even if you do lose important files, remember that you can always recover them using USB recovery software.
Conclusion
USB flash drives serve as indispensable tools for managing and transferring our important data. However, the convenience of portability comes with risks; data loss is an all-too-common occurrence. This guide has aimed to arm you with the knowledge to recover files that have disappeared from your flash drive on a Mac. Hopefully, you’ve gained valuable insights into the various reasons for data disappearance and the different methods to retrieve it and, most importantly, have successfully retrieved your missing files.
FAQ:
Use the following procedure to open a flash drive to view its contents on a Mac.
- Connect the flash drive to your Mac’s USB port.
- Open a Finder window.
- Locate the drive in the Locations section of the left side panel.
- Click on the device name to open it.
The following procedure can be used to delete files from a flash drive on a Mac.
- Connect the drive to your Mac.
- Open the drive using Finder.
- Highlight and right-click on the items you want to delete.
Select the Move to Trash option to delete them from the flash drive.
To reset or reformat a flash drive on Mac, use the following procedure.
- Connect the drive to your Mac.
- Open the Disk Utility application.
- Select the device from the list on the left.
- Click on the Erase tab at the top of Disk Utility.
- Select the file system that will be used to format the drive.
- Click the Erase button to perform the reformat.
You have several options for recovering deleted data from a USB drive without using software on your Mac.
- If you just deleted the files, the Command-Z keystroke combination which undoes your last action may be able to recover the data.
- Look in your Mac’s Trash with the USB drive connected to your Mac. If it’s in the Trash, the file can be easily recovered.
- Use a previously created backup to restore the lost data.


