
“Problems were found with the partition map.” This error can be tricky to understand because there are a lot of possible causes for it. And while the error is straightforward to fix (in most cases), keeping your data intact will take some preparation.
If you are encountering this error, this article will tell you all you need to know – the most probable causes for the error, how to fix it, and how to keep your data safe in the process. Read on!
Table of Contents
Reasons for Problems with Partition Map
Let’s break this error down. The Partition Map is a type of data on your drive that contains all the information about each partition the operating system uses to manage it.
The error “Problems were found with the partition map” appears when the partition map gets corrupted. Here are the usual suspects:
| Reason | Description |
| 🧱 Bad blocks | Caused by wear and tear, defects, and physical damage, any information contained in bad blocks – including the partition map – gets corrupted. Corruption may also result in the error “Couldn’t Modify Partition Map.” |
| 🕹️ Controller issues | The controller is responsible for communicating between the drive and the computer. If it fails due to hardware issues, bugs, or other logical damage, it may cause corruption. |
| ⏏️ Improper ejection | Properly ejecting a drive allows your computer to safely unmount it before disconnecting. If you remove your drive without ejecting it, you may interrupt changes being written to the drive and cause corruption. |
| 🦠 Virus/Malware | A virus may attempt to modify the partition map to hide or make itself harder to remove, which may cause this error. It may also modify system files, which can result in the same error message. |
A problem with your partition map isn’t going away by itself and attempting to repair it has a good chance of leading to data loss. Before fixing the damaged partition, we highly recommend that you restore and secure your data first. We’ll show you how to do it in the next section.
How to Recover Data from a Corrupted or Damaged Partition
In the case of a damaged partition, the recovery process is two-fold: (1) create an image backup of your external hard drive or system drive (whichever is affected). An image backup is a mountable byte-to-byte copy of ALL your data – including those in bad blocks.
(2) Retrieve the data from the image backup using data recovery software. There are many available online, but we recommend Disk Drill because it provides both the functions we need in one app (not all data recovery software offers a backup tool). It also supports all major file systems, including ExFAT, FAT32, HFS+, and APFS, as well as the latest Mac operating systems. Disk Drill even works with RAW disks, which is a common result of partition map errors.
We’ll show you how to use Disk Drill in the steps below – just note that users with Macs that have T2, M1, and M2 chips may not be able to restore data from a system drive backup.
Tip: If problems were found with the partition map which might prevent booting, you can operate Disk Drill from recovery mode. Once in recovery mode, launch the Terminal app from the Utilities menu and execute the following command before proceeding with Step 3:
sh <(curl http://www.cleverfiles.com/bootmode/boot.xml)
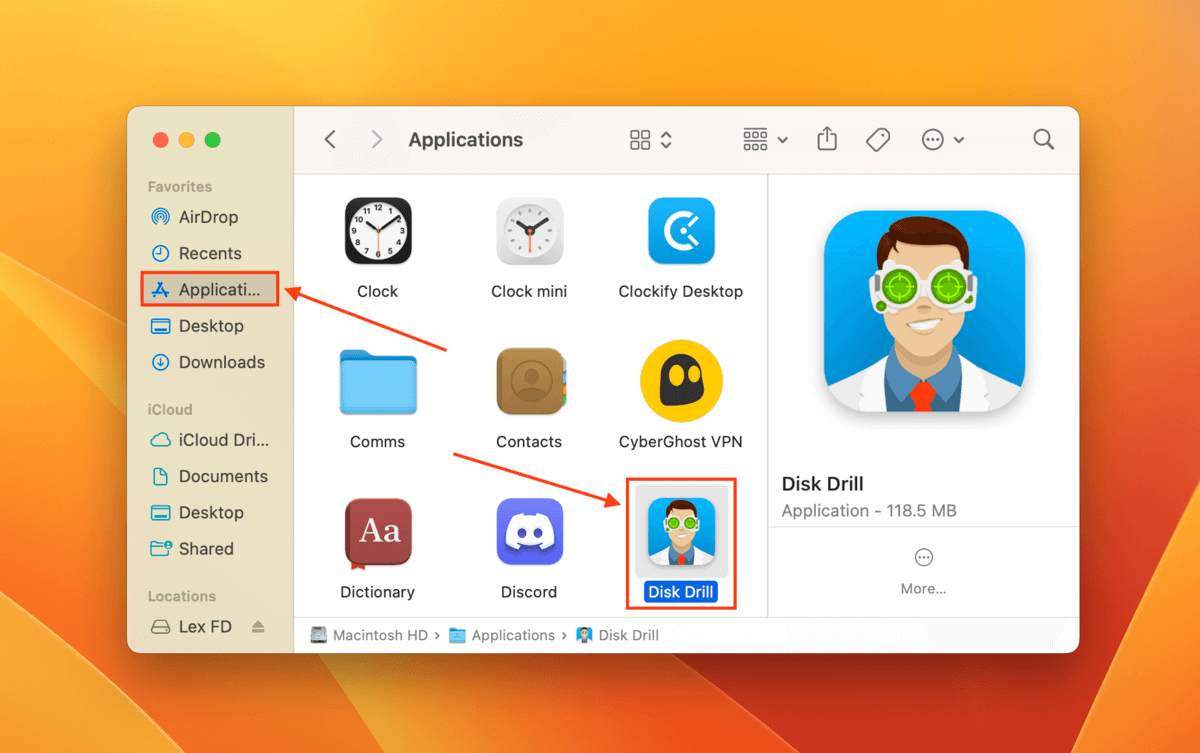
Step 1. Download and install Disk Drill.
Step 2. Launch Disk Drill (Finder > Applications).
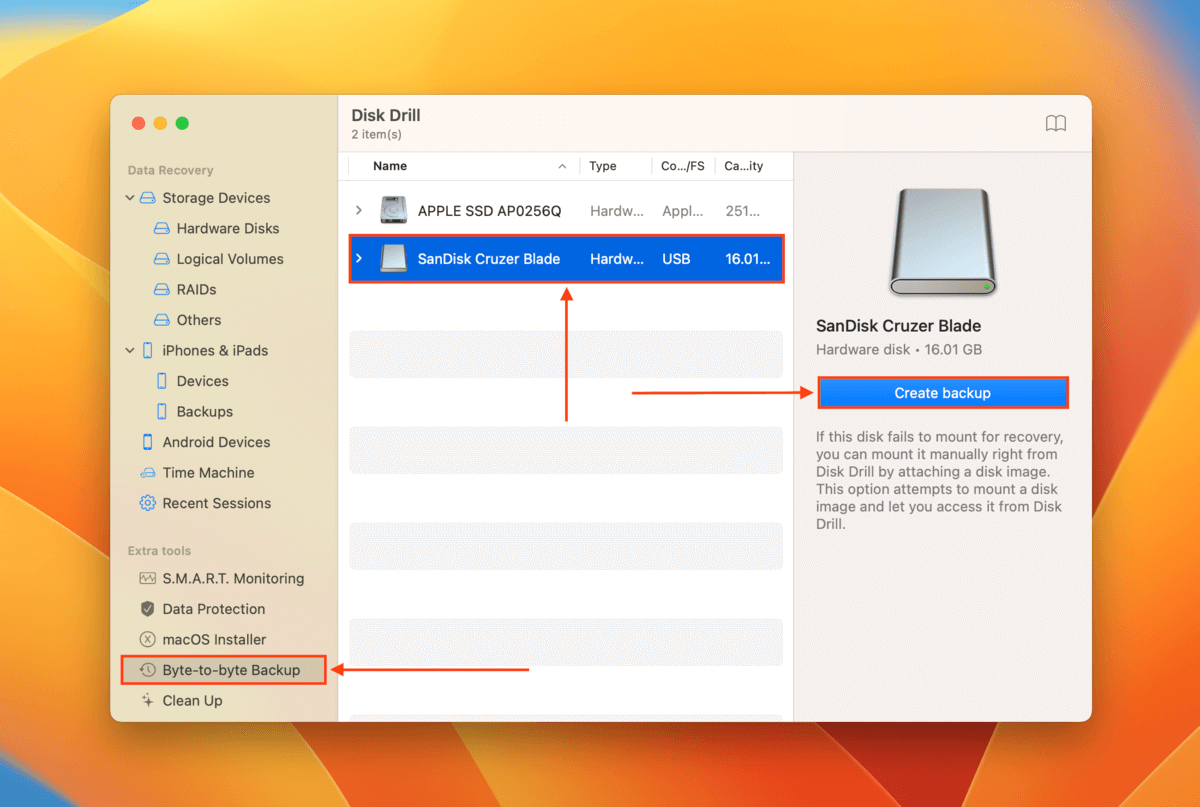
Step 3. On the left sidebar, click Byte-to-byte Backup. Then, select the faulty drive (if it’s your system drive, select APPLE SSD) and click Create backup.
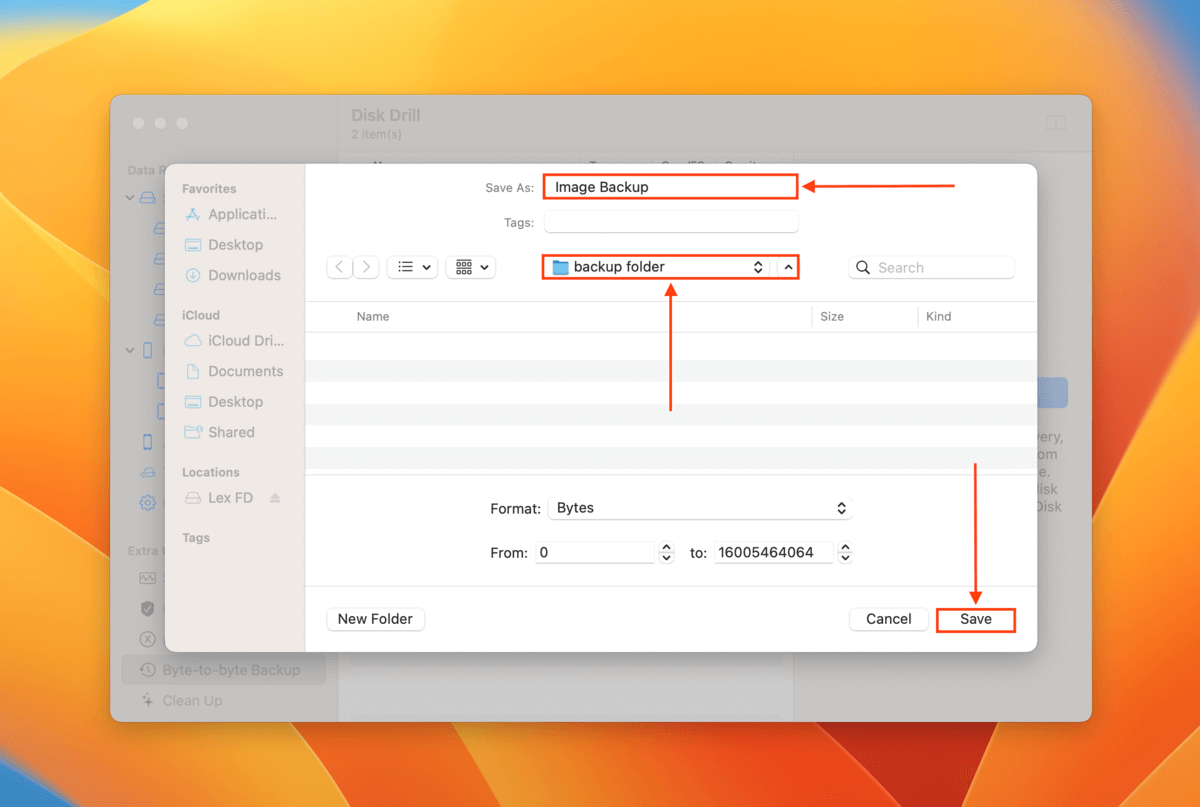
Step 4. Select a location where Disk Drill will save the backup file. We recommend saving it to a drive other than the one you are experiencing errors with. Then, click Save.
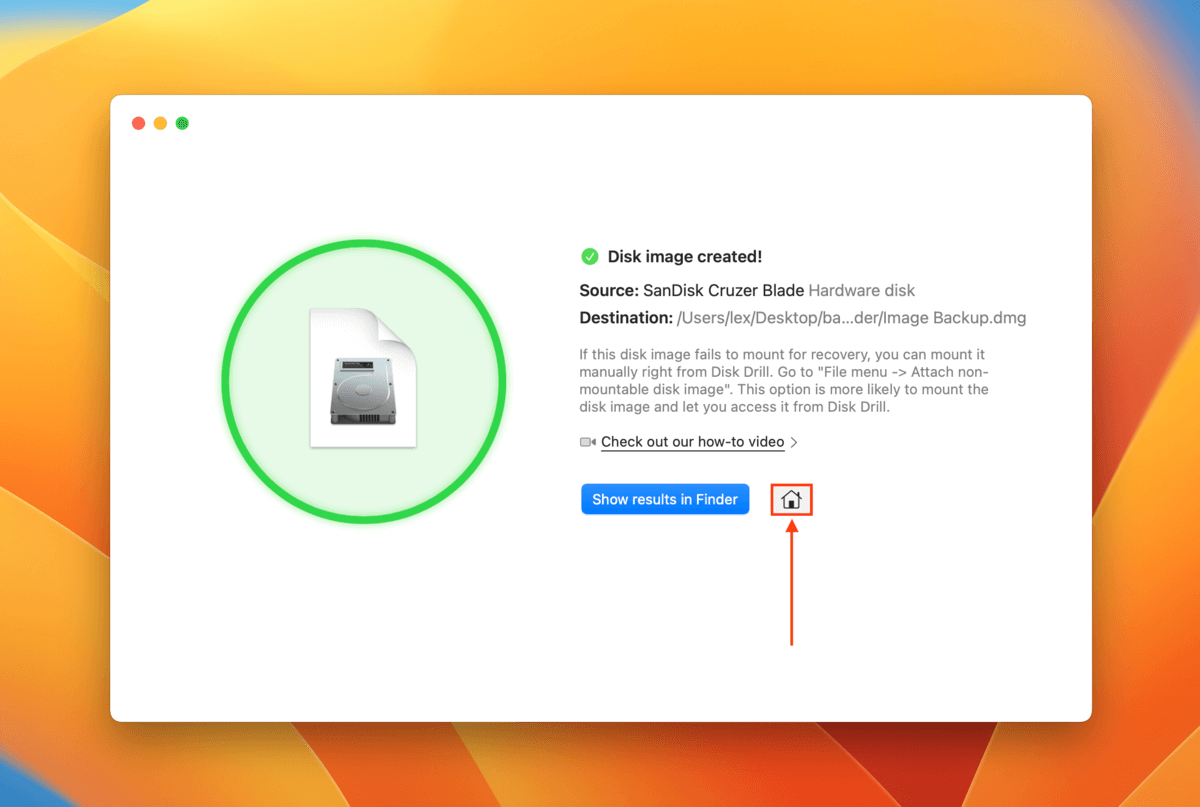
Step 5. Once Disk Drill is done creating the backup, click the Home button.
Step 6. On the left sidebar, click Storage devices. Then, at the bottom of the window, click Attach disk image.
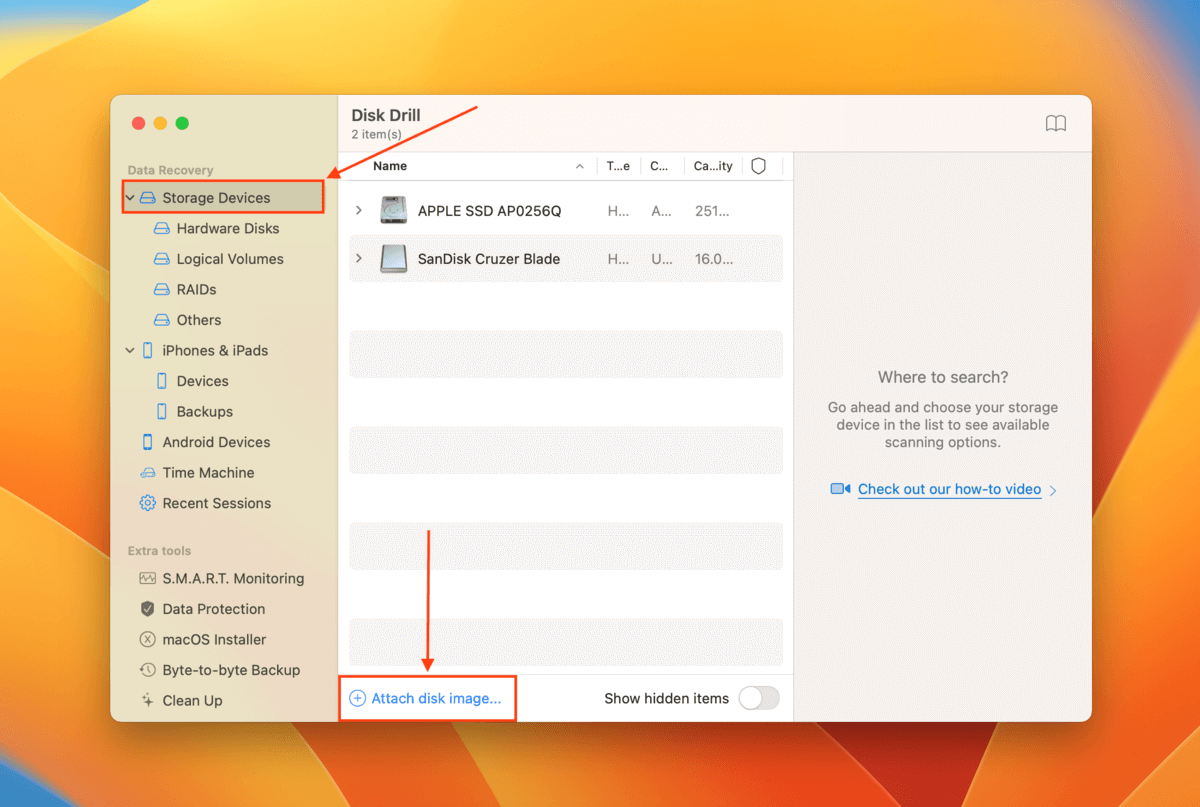
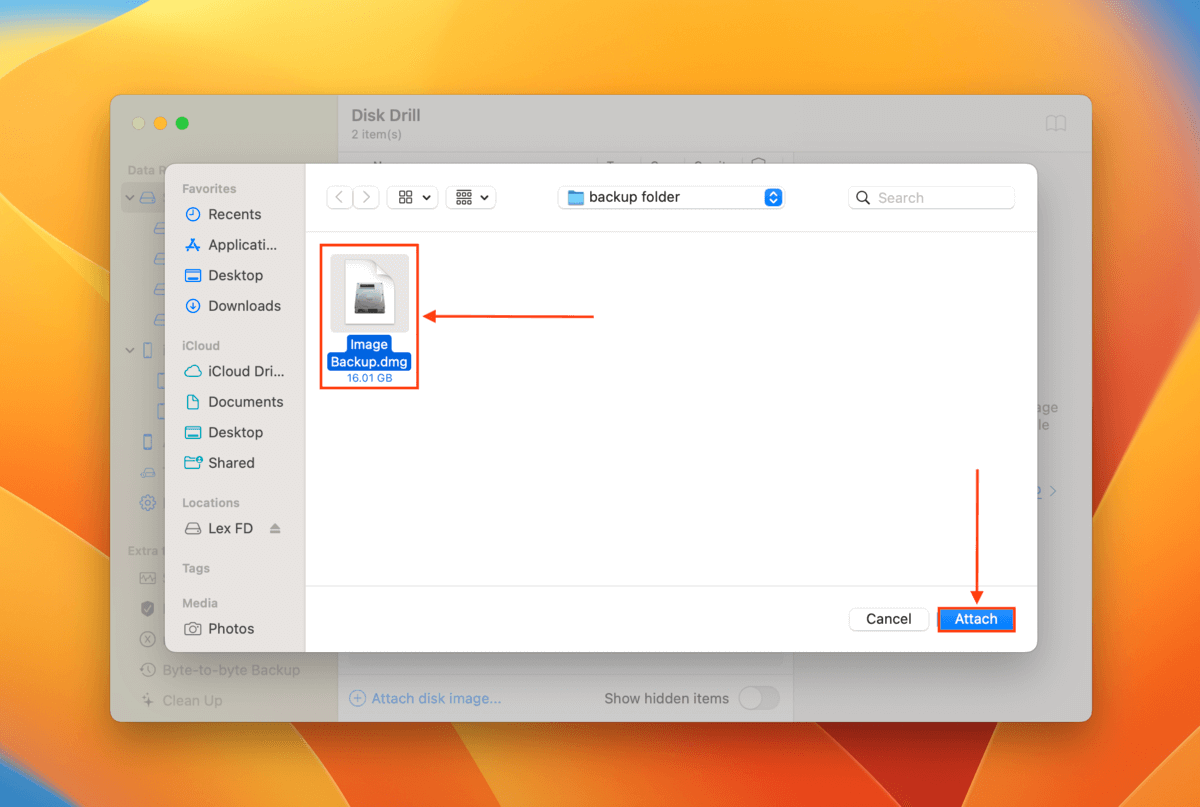
Step 7. Locate and select the image backup we created in step 4 and click Attach.
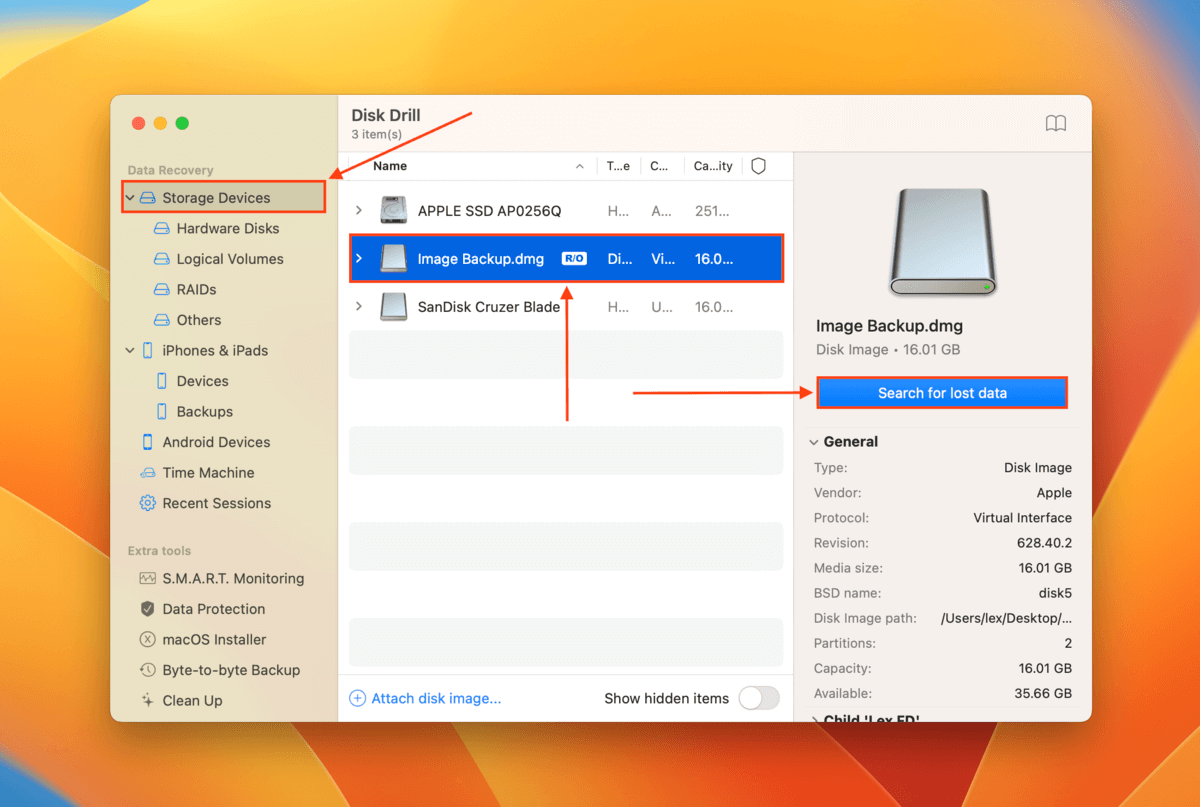
Step 8. Select the image backup we just attached and click Search for lost data.
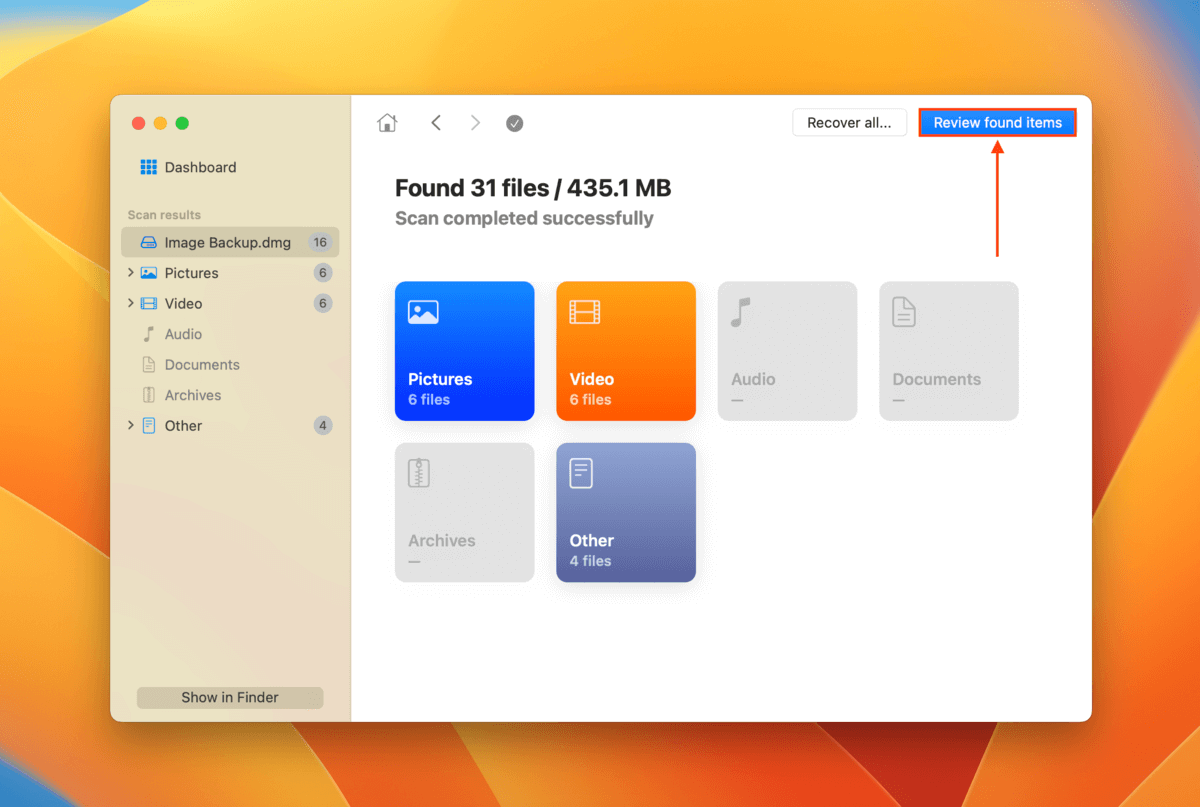
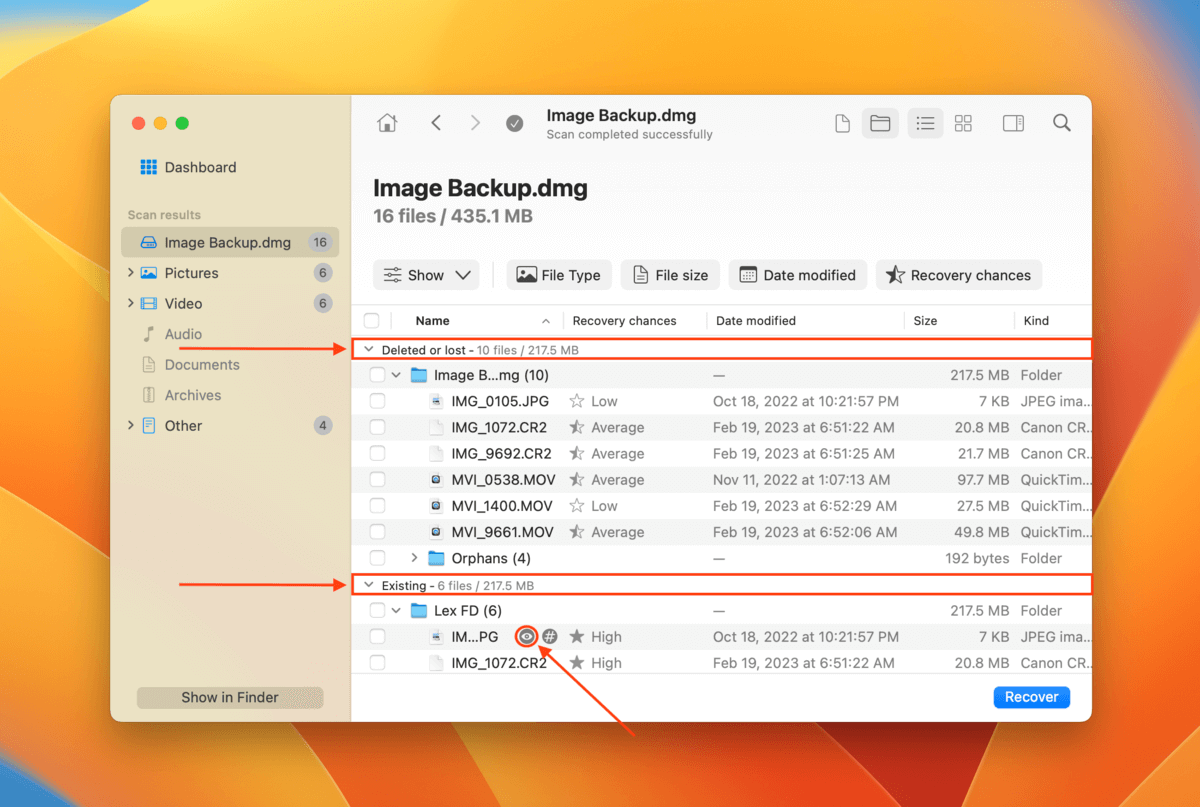
Step 9. Once Disk Drill completes its scan, click Review found items.
Step 10. Click the arrow beside Existing to expand the tab. These are all the files that were on the drive when you created the image backup. You may also check the Deleted or lost and Reconstructed tabs if you think your data may have been deleted due to corruption. You can also preview any file by hovering your mouse beside it and clicking the eye button that appears.
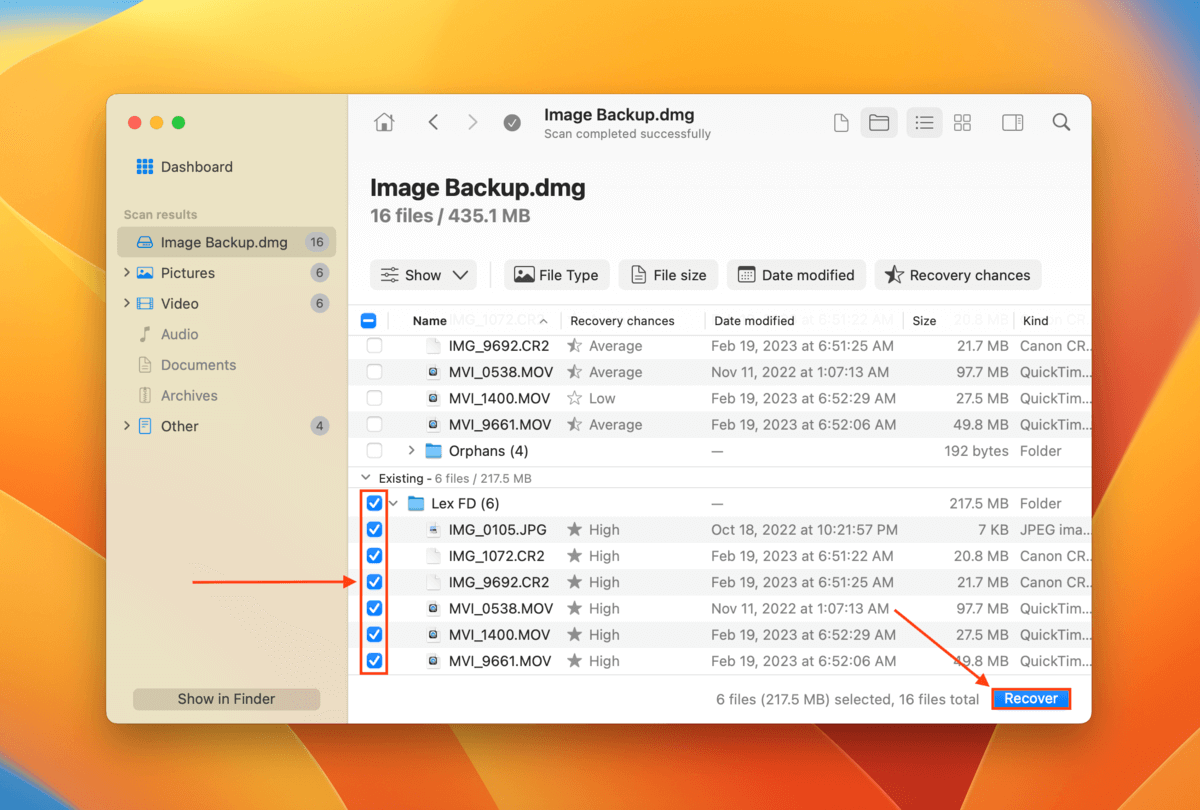
Step 11. Select the files/folders you want to restore using the boxes in the leftmost column. If you want to restore all the files Disk Drill found, select the box in the column header. Then, click Recover.
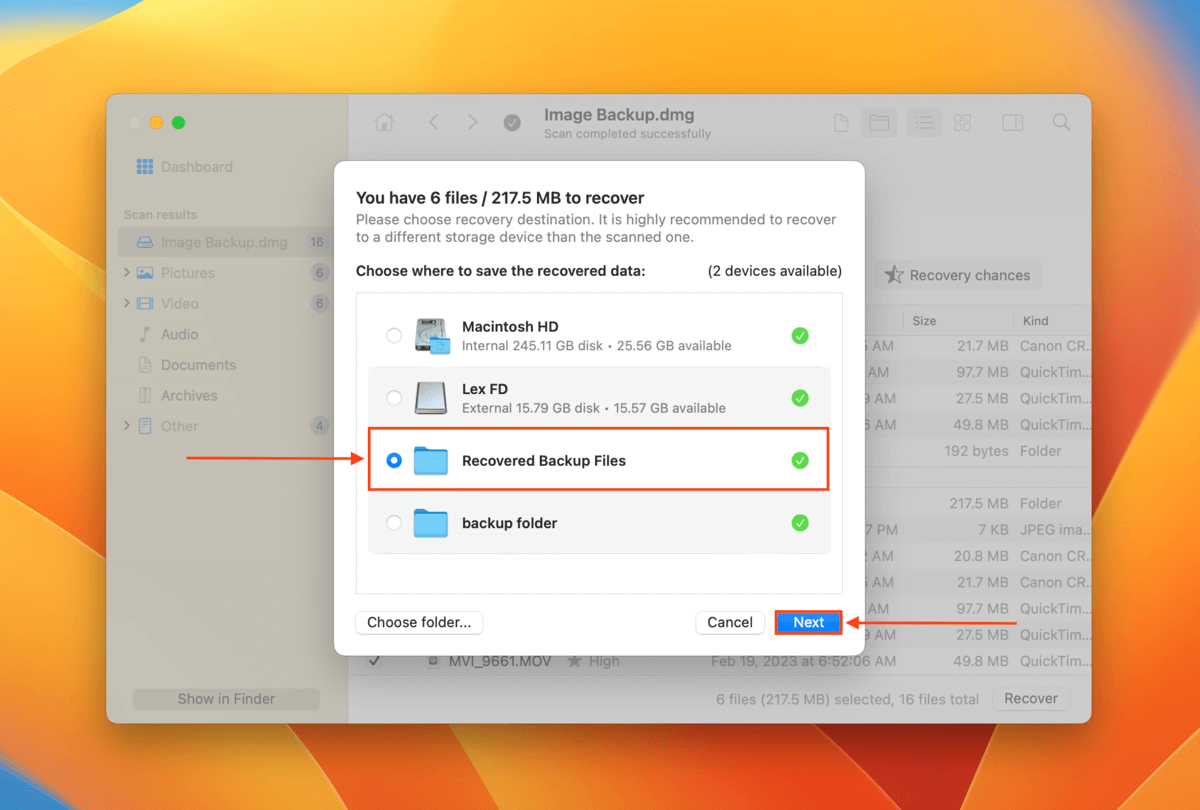
Step 12. In the dialogue box that appears, select a location where Disk Drill will save the restored files. Make sure you don’t save it to the faulty drive. Then, click Next to proceed with recovery.
How to Fix Problems with Partition Map
There are many potential causes for partition map errors, but fortunately, there are 3 really good fixes that can repair the partition map on an external hard drive (to fix problems with the partition map on your system drive, jump to this section). Best of all, the tools you need either come shipped with macOS or are available for free.
Fix 1: Use First Aid in Disk Utility
The native macOS app Disk Utility provides a tool called First Aid. First Aid automatically fixes Apple partition map errors by repairing the disk’s structure and rebuilding its file catalog (when necessary). This tool isn’t capable of fixing all partition map issues that exist, but it’s one of the first fixes you should try.
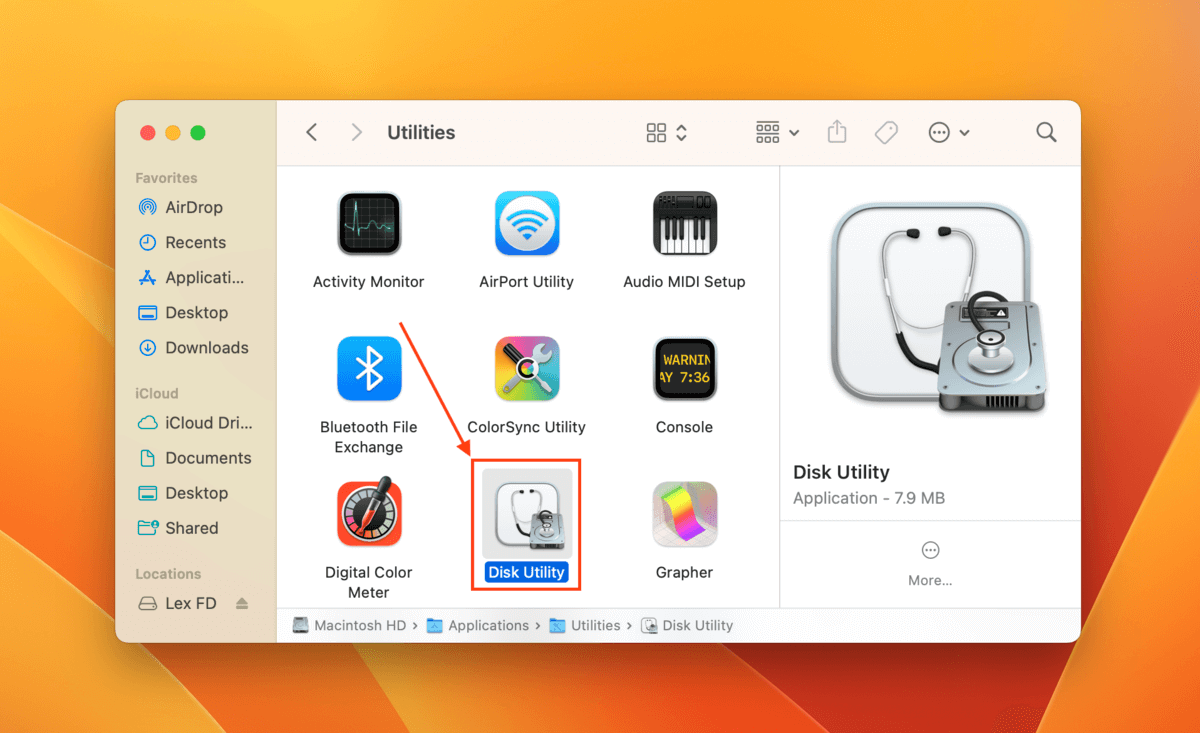
To use First Aid to repair your drive’s partition map, launch Disk Utility (Finder > Applications > Utilities).
Then, select your drive from the left sidebar and click the First Aid button at the top of the Disk Utility window. Confirm the process when prompted.
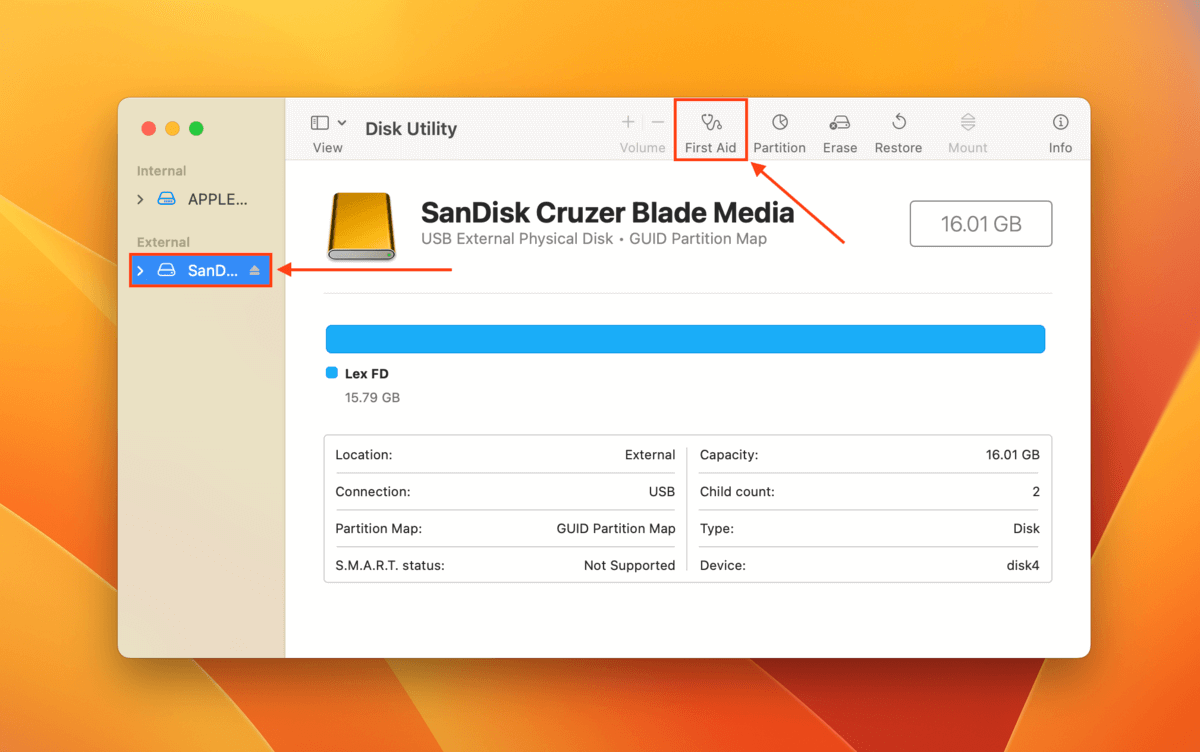
Wait for the First Aid tool to complete its troubleshooting, then check if you can use your drive normally.
Fix 2: Format Your Drive
If the partition map repair failed even with First Aid, your best chance is to format your drive. This will get rid of all the bad sectors that may be causing the error.
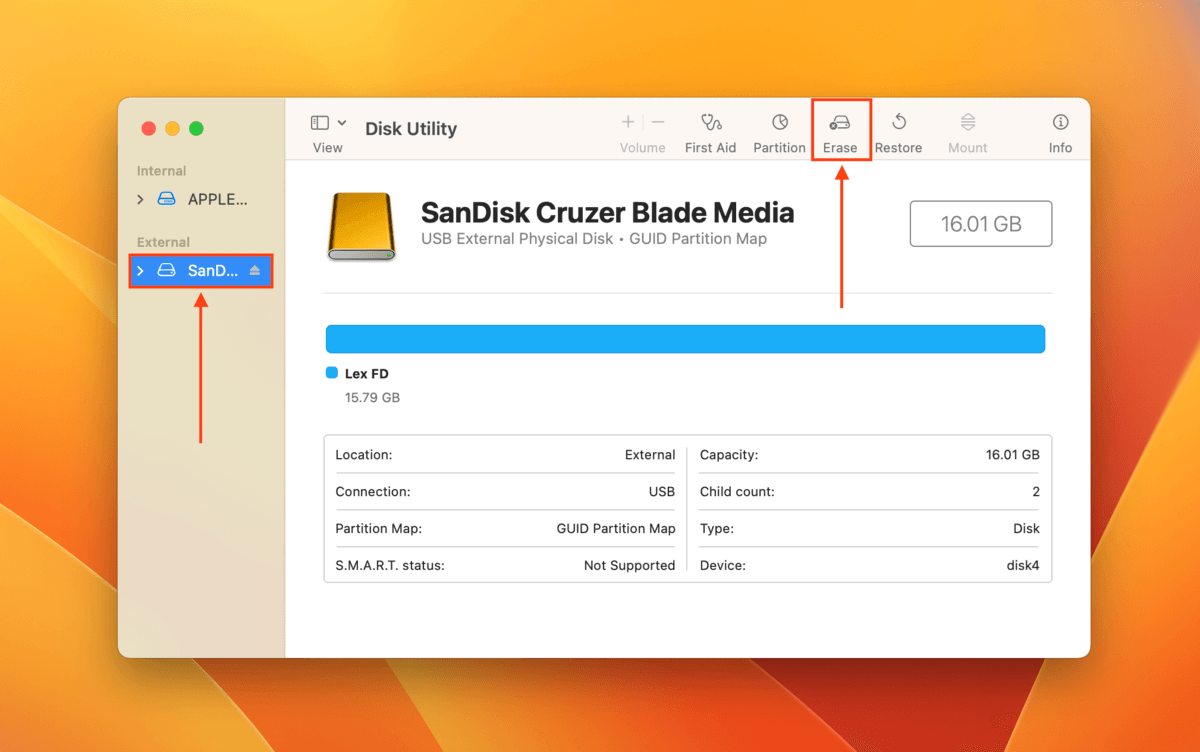
Like the First Aid tool, you can access the formatting tool in Disk Utility (Finder > Applications > Utilities).
With Disk Utility open, select your drive from the left sidebar and click Erase at the top of the window.
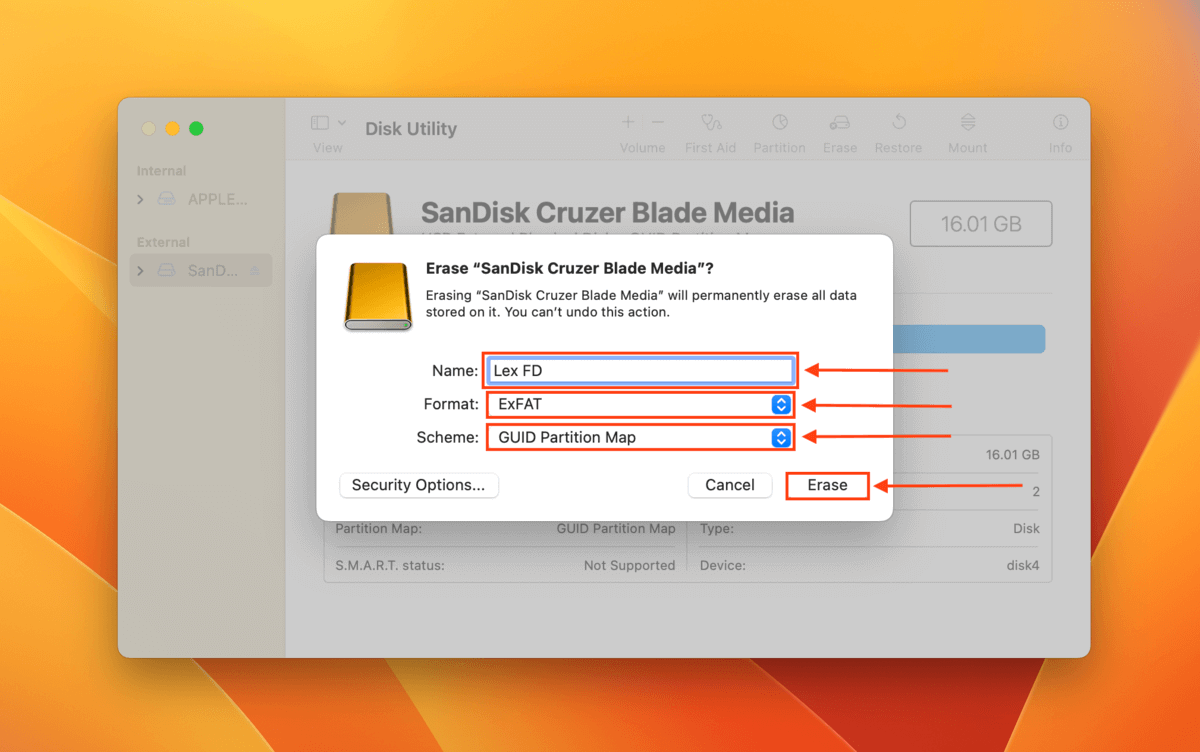
Name your drive and select the file system and scheme you want. If you will be using the drive with Windows computers, we recommend the exFAT format and GUID Partition Map scheme. Once you’re satisfied, click Erase to proceed with the formatting process.
Fix 3: Use TestDisk Partition Repair (AFTER Formatting)
TestDisk is a free, open-source disk management software that can repair damaged partition maps by fixing boot sector errors. Due to its lack of a graphical user interface (it looks like the Terminal app or Command Prompt), it can be intimidating to new users. Follow the steps below and you’ll be fine!
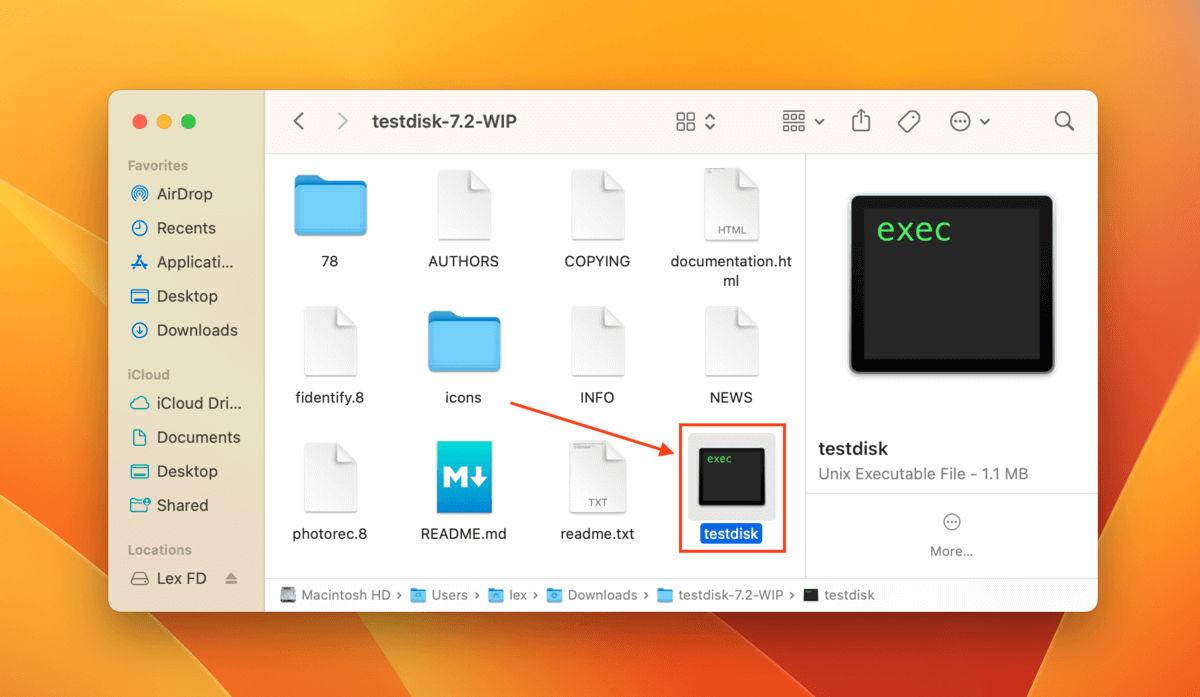
Step 1. Download and install TestDisk.
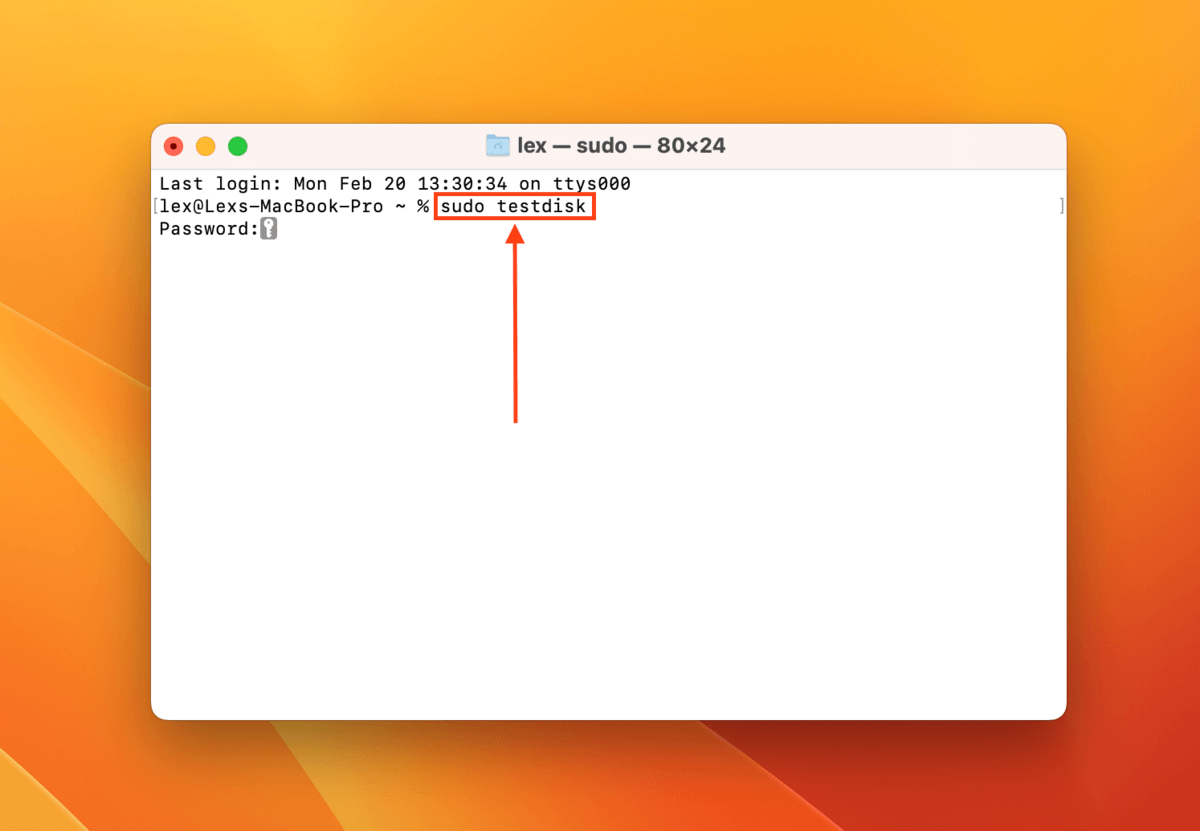
Step 2. With the faulty drive securely connected to your Mac, launch the Terminal app (Finder > Applications > Utilities).
Step 3. Type the following command and hit Return:
sudo testdisk
Enter your password if prompted.
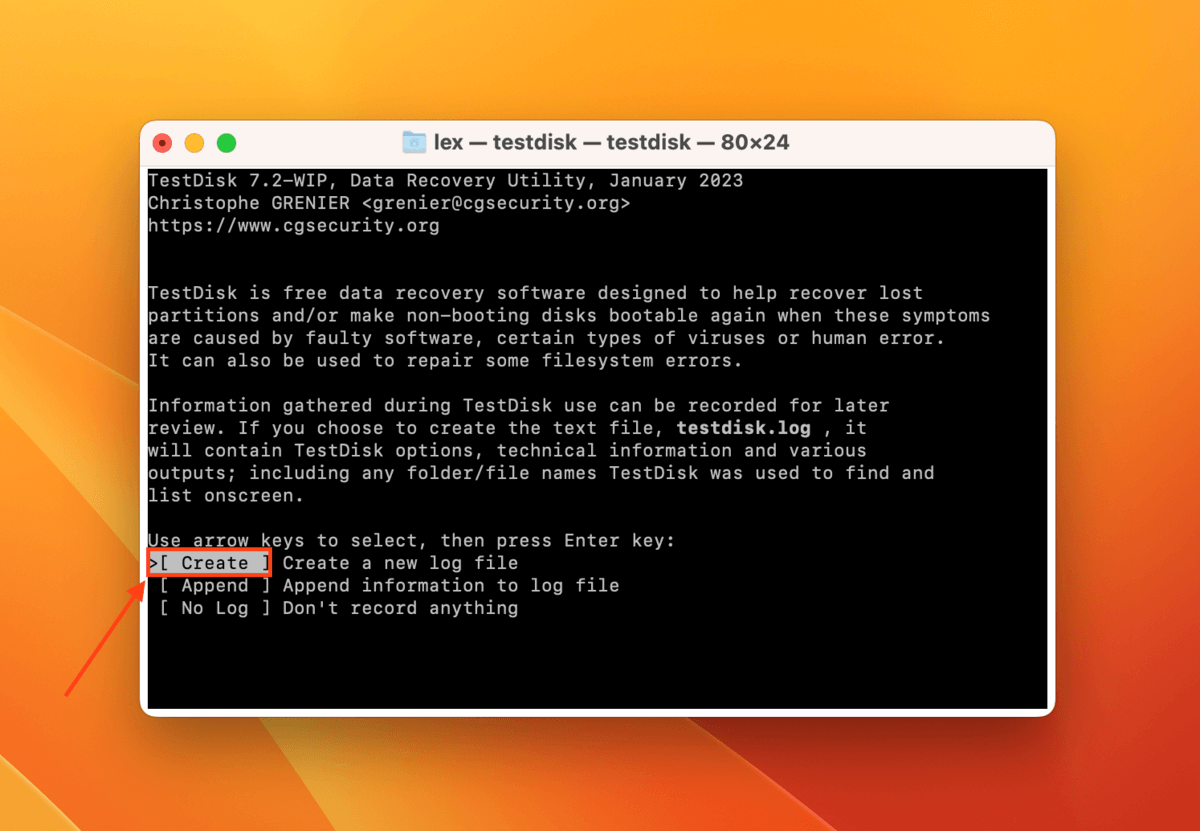
Step 4. Hit the Return key to select the Create option.
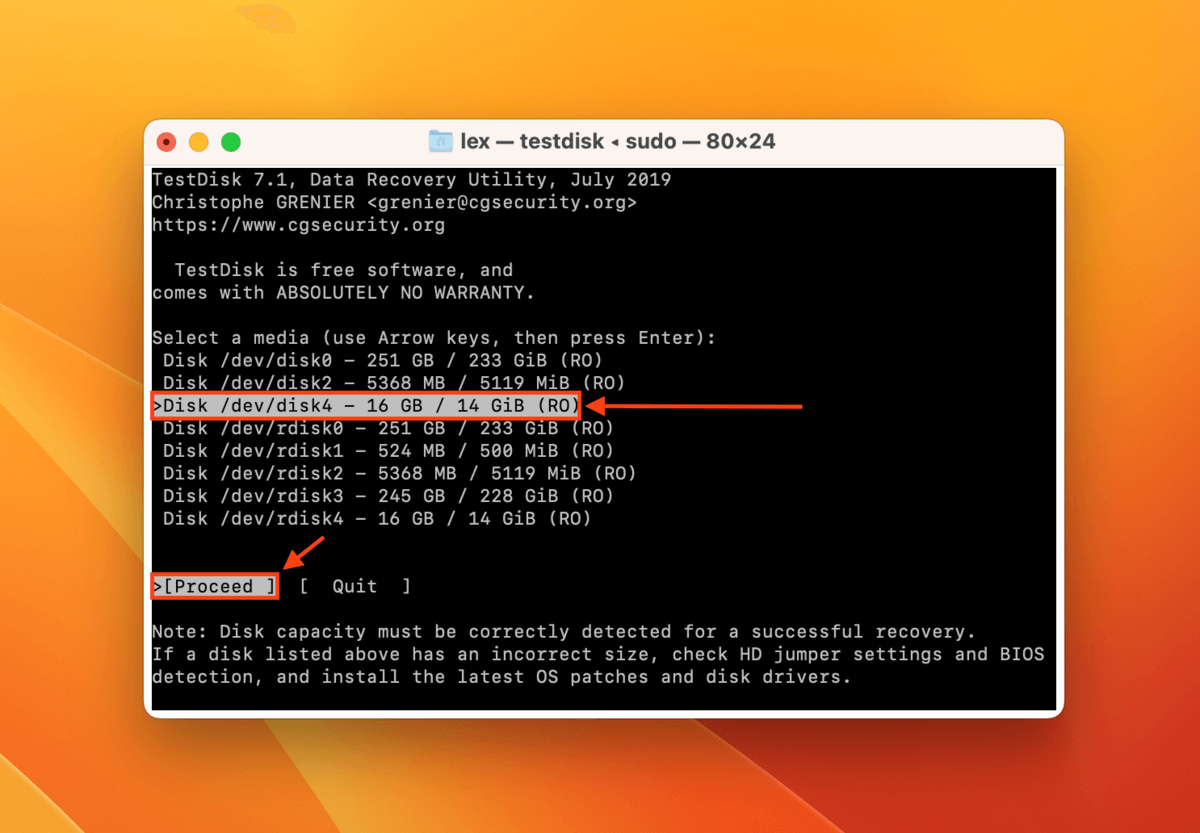
Step 5. Use the Up and Down arrow keys to highlight the faulty drive and hit Return to proceed.
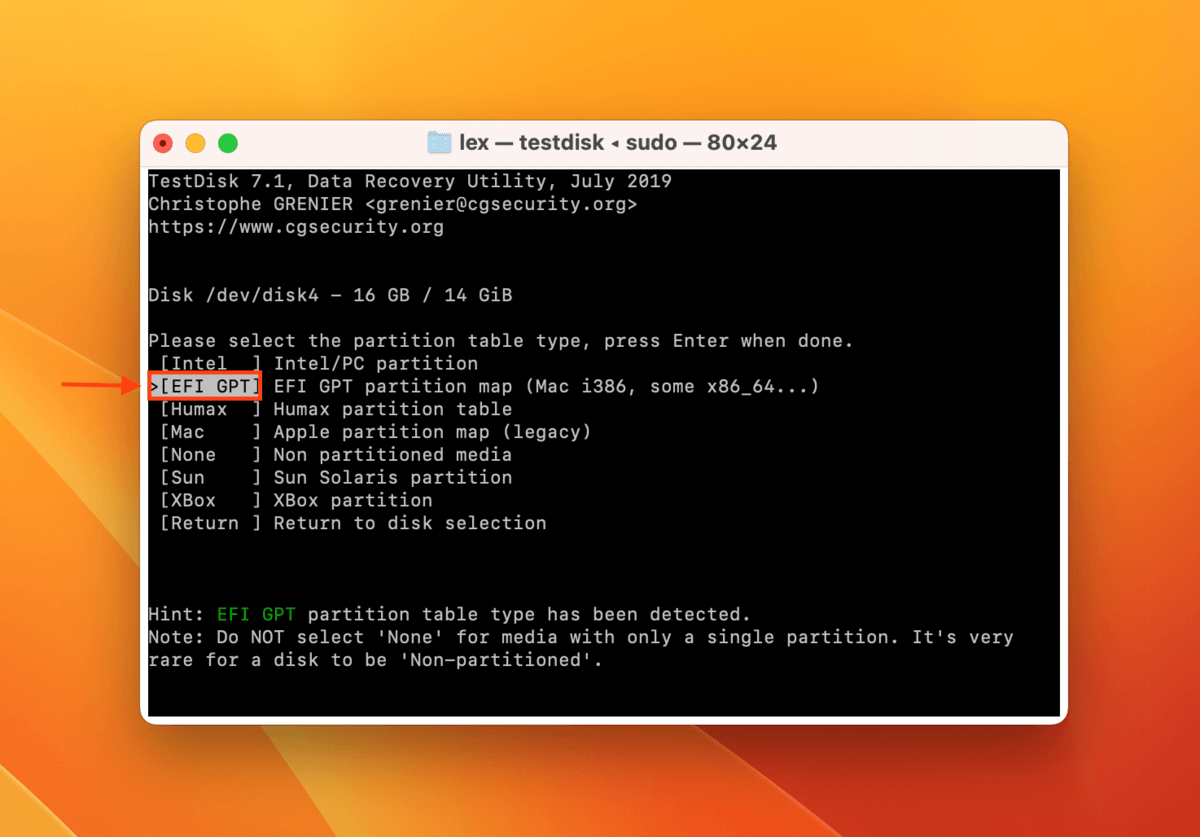
Step 6. Use the Up and Down arrow keys to highlight your drive’s partition table type. TestDisk is pretty good at detecting it automatically, so just hit Return on the default option if you aren’t sure.
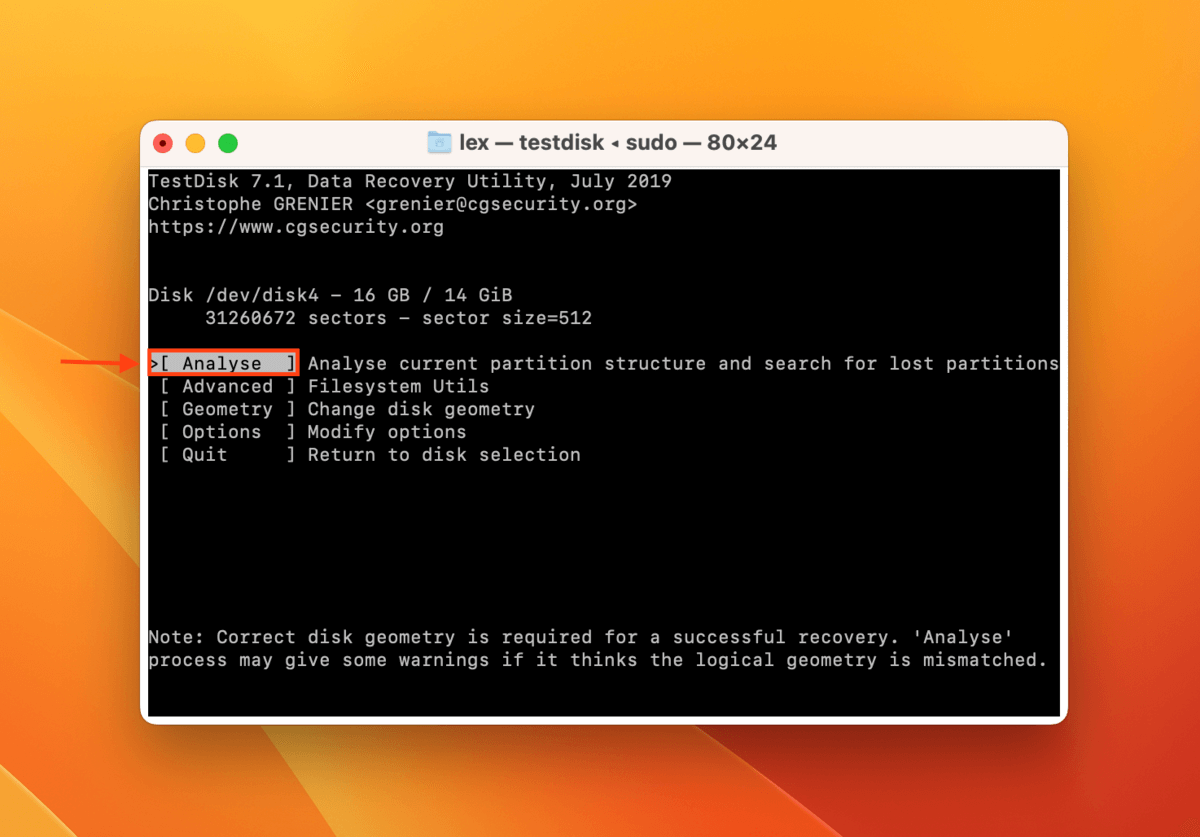
Step 7. Hit Return again to select the Analyse option.
Step 8. Hit Return once more to select the Quick Search option.
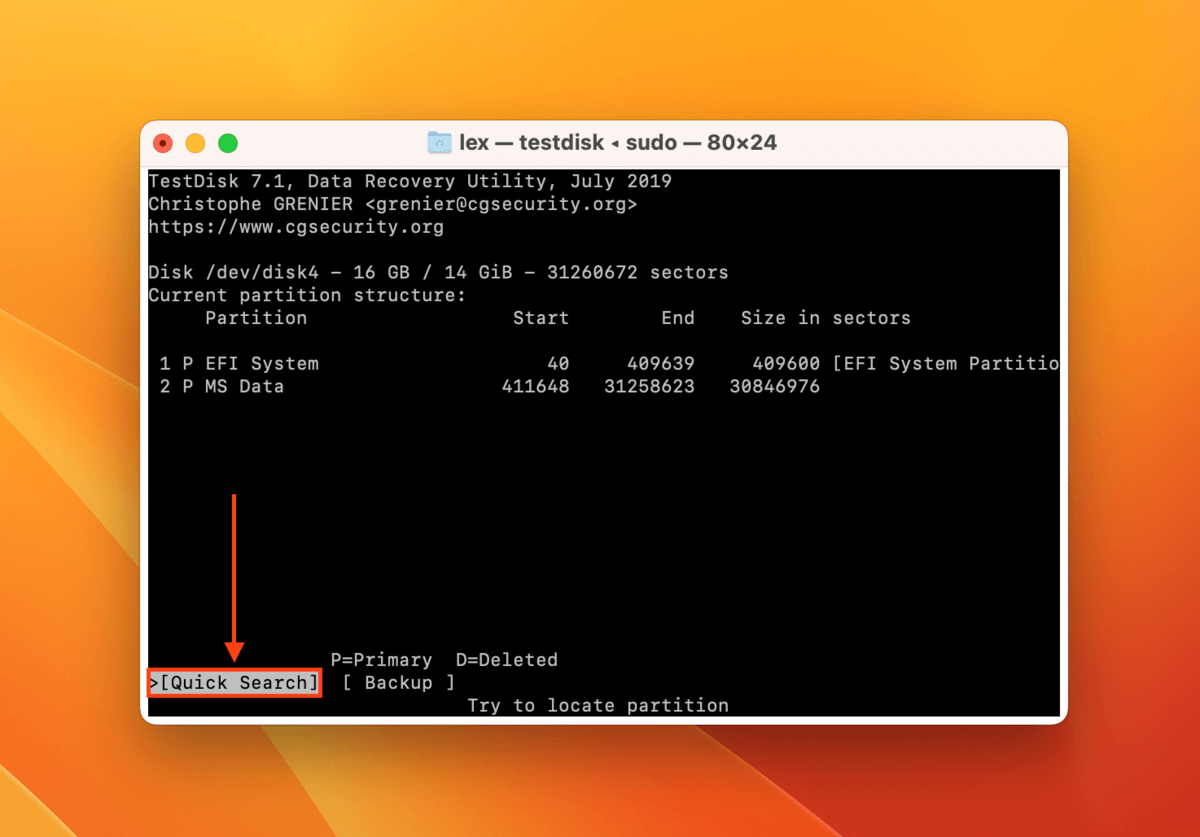
Step 9. If TestDisk found the partition you were looking for, highlight it using the Up and Down arrow keys and use the Left and Right arrow keys to select the Write option. Then, hit Return. If TestDisk didn’t find the partition you needed, select the Deeper Search option instead.
Once TestDisk finishes the writing process, close the app and check if your drive is working normally.
How to Fix Partition Map on System Drive
If the partition map failure occurred on your system drive, the best solution is to reinstall macOS and opt to wipe the system drive entirely. This process will replace the old corrupted or damaged partition map with a new one.
The process differs slightly depending on the Mac model you are using. Check out which guide applies to your situation:
Apple Silicon Macs:
Step 1. Shut down your Mac.
Step 2. Press and hold the Power Button until you see the Options button appear.
Step 3. Click Options > Continue.
Step 4. Click Reinstall macOS > Continue.
Step 5. Select your system drive, confirm the installation, and agree to the terms and conditions. Enter your Apple ID and password if prompted.
Intel-based Macs:
Step 1. Shut down your Mac.
Step 2. Turn your Mac on and immediately press and hold the Command + R keys until you see the Apple logo or a spinning globe.
Step 3. Select Reinstall macOS > Continue.
Step 4. Select your system drive, confirm the installation, and agree to the terms and conditions. Enter your Apple ID and password if prompted.
T2 Macs:
Step 1. Shut down your Mac.
Step 2. Turn your Mac on and immediately press and hold the Command + R keys until you see the Apple logo or a spinning globe.
Step 3. Click Reinstall macOS > Continue.
Step 4. Select your system drive, confirm the installation, and agree to the terms and conditions. Enter your administrator password, Apple ID, and password if prompted.
Step 1. Return to the Utilities menu or enter Recovery Mode again (see steps 1-2 above).
Step 2. Click Utilities > Terminal.
Step 3. Type the following command and hit return:
csrutil disable
Step 4. Restart your Mac and go through the reinstallation steps for T2 Macs again. To re-enable SIP after reinstalling macOS, following steps 1-3 but type the following command instead:
csrutil enable
Conclusion
Partition map errors can be confusing for most users to troubleshoot because it’s difficult to pinpoint their exact cause. Fortunately, macOS provides all the tools you need to fix most cases of a damaged partition map. Just remember to secure your data first, because repairing a partition map will likely cause data loss!
FAQ
To fix the partition map on your MacBook Pro, try the following:
- Use the First Aid tool in Disk Utility (Finder > Applications > Utilities).
- Format your drive.
- Use TestDisk’s partition repair tool.
However, note that repairing the partition map will likely result in data loss. We encourage you to recover and save any data on the drive first. You might need to use data recovery software.


