
Hard drive failure can come at any time, which can result in data loss. In the worst cases, the drive won’t even boot at all, making the user’s data inaccessible through interfaces like Finder. Fortunately, there are multiple ways to recover data from a MacBook that won’t boot.
This article will guide you through all the available methods. Most of them are completely free, but some take a bit of effort and preparation. Follow the instructions below so you don’t get lost along the way.
Table of Contents
Reasons Why MacBook Won’t Boot
While MacBooks tend to be extremely resilient, as with any technology they are vulnerable to both internal and external damage. Unfortunately, either can cause a Mac to fail to boot. Below are the most common reasons that users encounter:
Below are the most common reasons that users encounter:
- Power failure. A MacBook may fail to boot due to a faulty power supply or even simply due to having insufficient power.
- Hard drive failure. There are multiple causes for hard drive failure—such as improper ejection, power surges, firmware faults, software issues, exposure to excess heat, etc. Any of these factors can cause corruption or even boot failure.
- Physical damage or poor maintenance. The connection between the hardware, firmware, and other components may be severed, loose, or smudged with dirt, causing damage to the disk.
- Unsuccessful upgrade. These issues can occur when trying to upgrade/update the macOS, the device firmware, or the hardware. Major culprits may include huge disk space consumption, incompatibility issues, or some hidden bugs.
- Formatting errors. If something went wrong during formatting, it can corrupt the system installation and cause boot failure. Fortunately, you can still recover a formatted Mac hard drive.
8 Methods to Recover Data from Mac that Won’t Boot
Attempting to recover files from an unbootable Mac seems like an unbeatable dead-end. Thankfully, some methods enable users to work around this problem and recover their data—in many cases, fully intact. Read on to find the best method for your situation.
Method 1 Use a Time Machine Backup
Time Machine, a powerful native Mac tool, that can backup and restore individual files or entire disks worth of data. This section assumes that the user has a Time Machine backup created before the startup issue. If you have access to another Mac, you can plug in your Time Machine backup drive and access your data using Finder. If you don’t have another Mac, you can restore your Time Machine backup disk using macOS Recovery Mode.
To view your backup files in another Mac:
Step 1Plug the Time Machine backup drive into a working Mac.
Step 2Proceed to Finder > the external storage device.
Step 3Choose “Backups.backupdb.”
Step 4Double click the source folder. Another list of folders sorted by backup date will be shown.
Step 5Copy and paste the files that you want to backup.
To restore from Time Machine (restores the entire backup drive):
Step 1Plug the Time Machine backup drive into the faulty Mac.
Step 2Launch Recovery Mode. For Apple Silicon-based Macs, hold the power button until you see “Loading startup options on-screen. Then, click “Options”, then “Continue.” For Intel-based Macs, power on your Mac then hold (CMD + R) until the logo appears.
Step 3Choose “Restore From Time Machine Backup” > “Continue.”
Step 4Select the backup you want to restore.
Step 5Choose Macintosh HD as the destination to restore your Mac using the backup you selected.
Method 2 Create Disk Image using Disk Utility
If you don’t have a Time Machine backup, you can use Disk Utility to create an Apple Disk Image (.dmg) backup via Recovery Mode. You can then mount the disk onto another Mac and use a data recovery tool to restore your files. For this article, we’ll be using Disk Drill – we’ve featured it many times in our Mac data recovery articles because it’s super easy to use and highly effective, even for large amounts of data. Here’s how to do it:
Step 1Plug in an empty external storage device big enough to carry your data – this is where you’ll save your image backup.
Step 2Launch Recovery Mode. For Apple Silicon-based Macs, hold the power button until you see “Loading startup options on-screen. Then, click “Options”, then “Continue.” For Intel-based Macs, power on your Mac then hold (CMD + R) until the logo appears.
Step 3Launch Disk Utility.
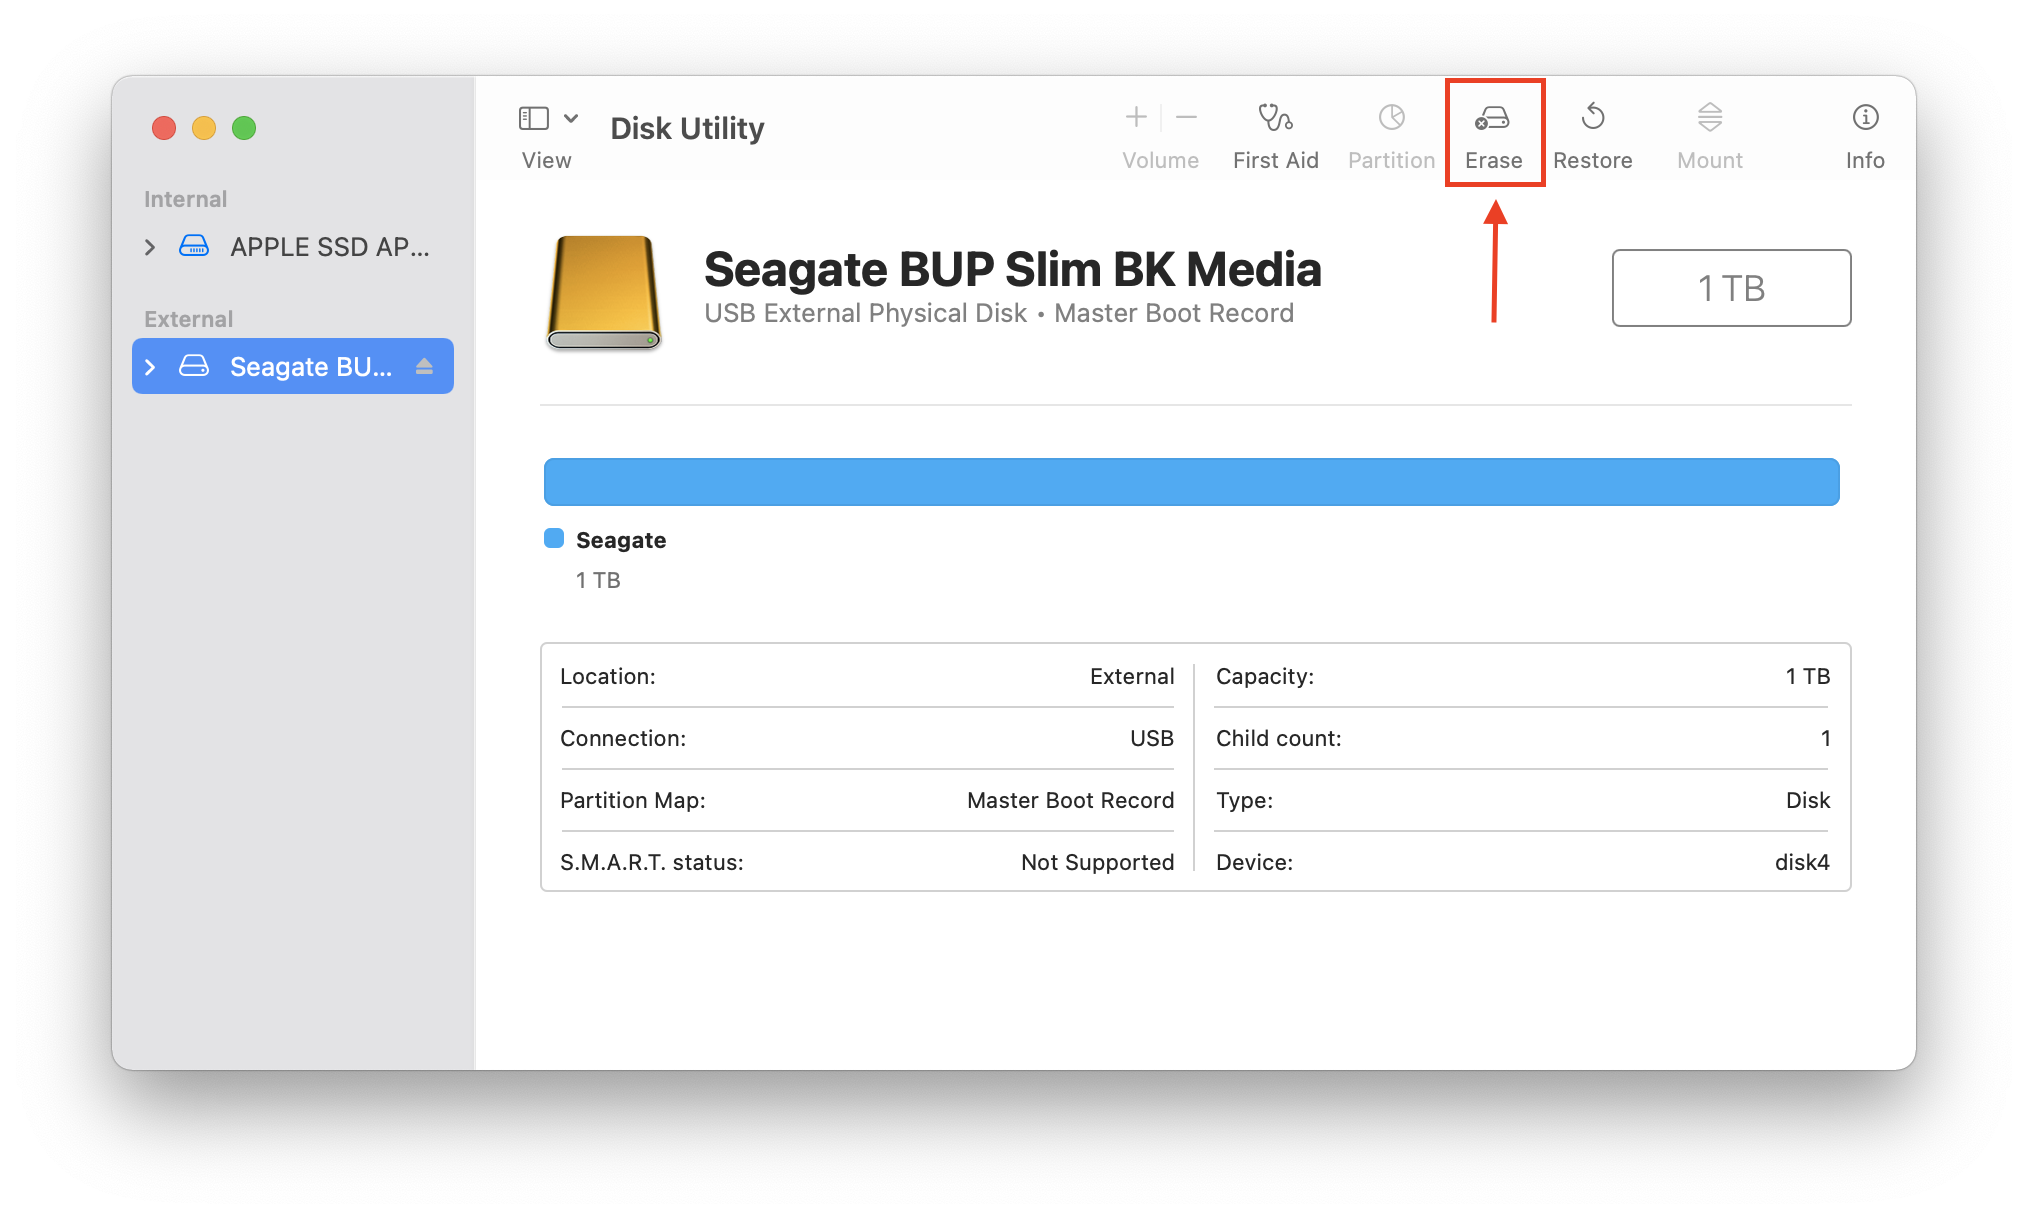
Step 4Select your external storage device, and click “Erase” to reformat the drive.
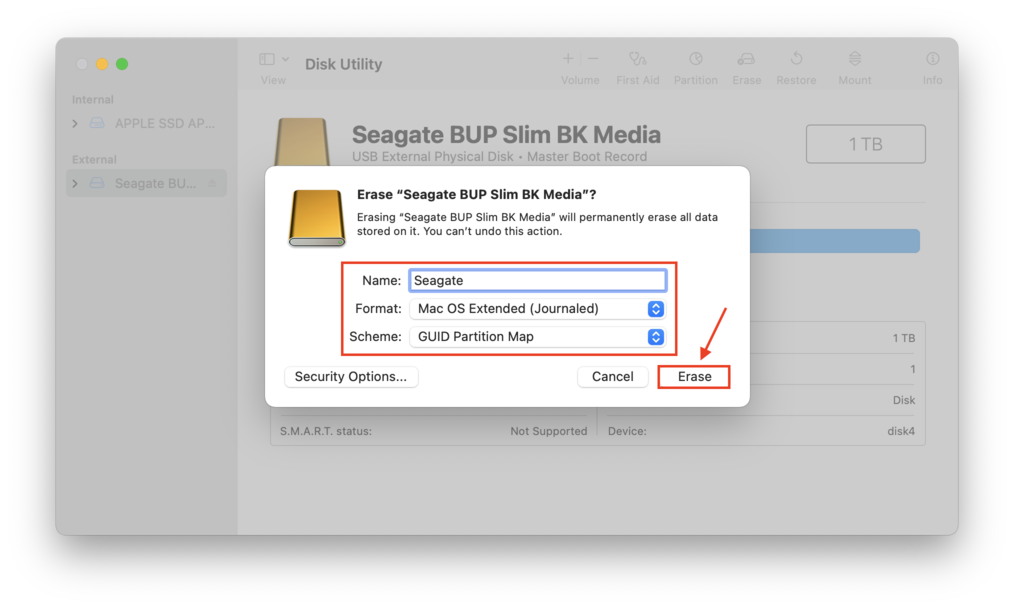
Step 5Name your drive, choose “Mac OS Extended (Journaled)” as the format, and choose “GUID Partition Map” as the Scheme. Then, click “Erase.”
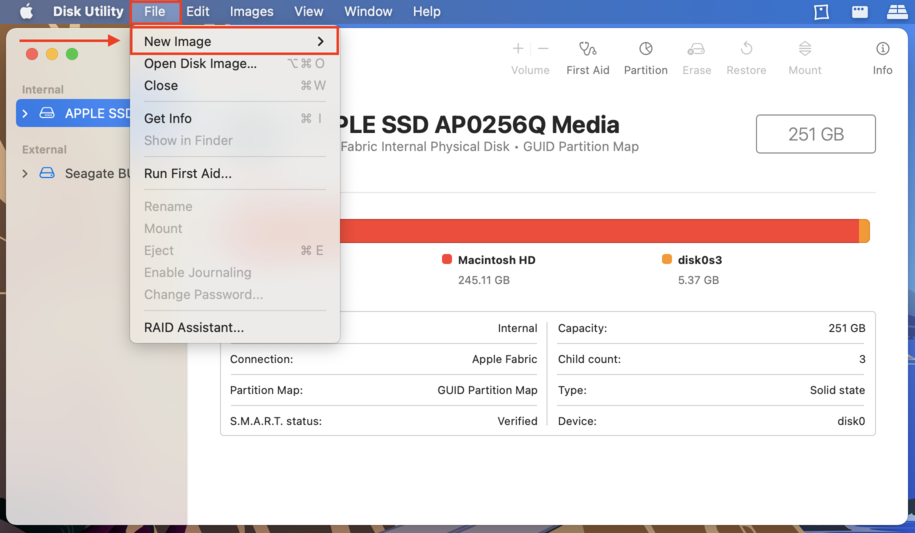
Step 6Once the process is complete, select your system drive > “Macintosh HD” on the left sidebar, then on the Apple menu bar, click “File” > “New Image” > “Image from Macintosh HD”
Step 7On the dialogue box that appears, make sure you do the following: name your image file, select your external storage device as the file destination, and read/write as the format. Adding tags and encryption are optional (if you are creating this image just for the sake of data recovery, I suggest not encrypting it to make your life easier later).

Step 8Now we have an image of the data that Disk Drill can scan. Quit the Disk Utility app and eject the drive.
Step 9On a working Mac, insert the backup drive we just created.
Step 10Locate the Image Backup file, then double-click it to mount it.
Step 11Download and install Disk Drill.
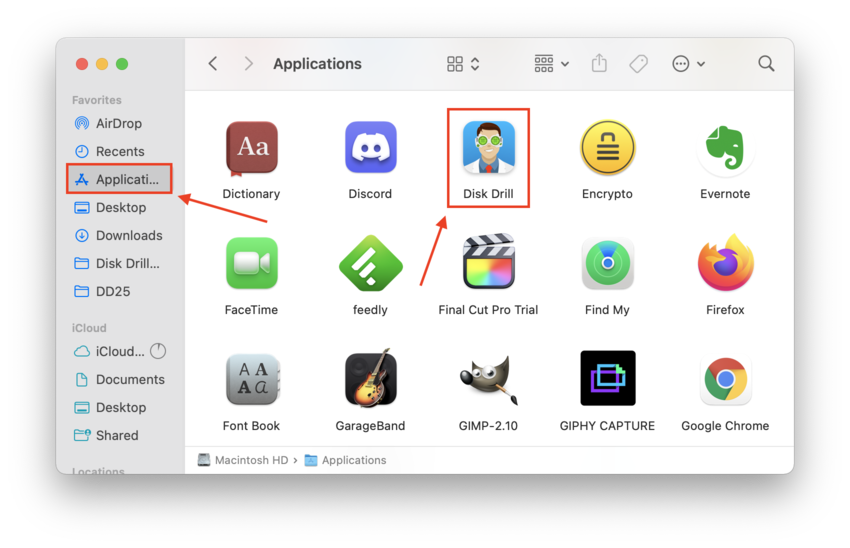
Step 12Launch Disk Drill by opening Finder > Applications > Disk Drill.
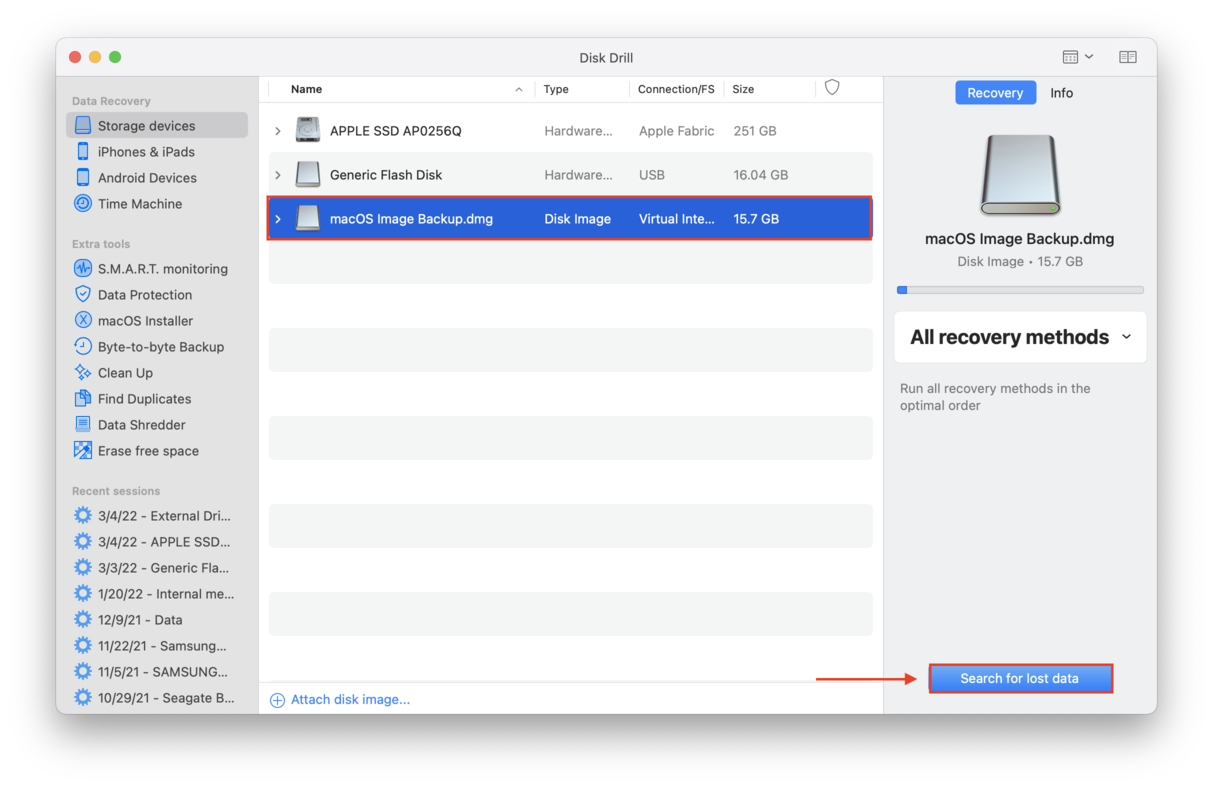
Step 13Select the image backup disk and click “Search for lost files.”
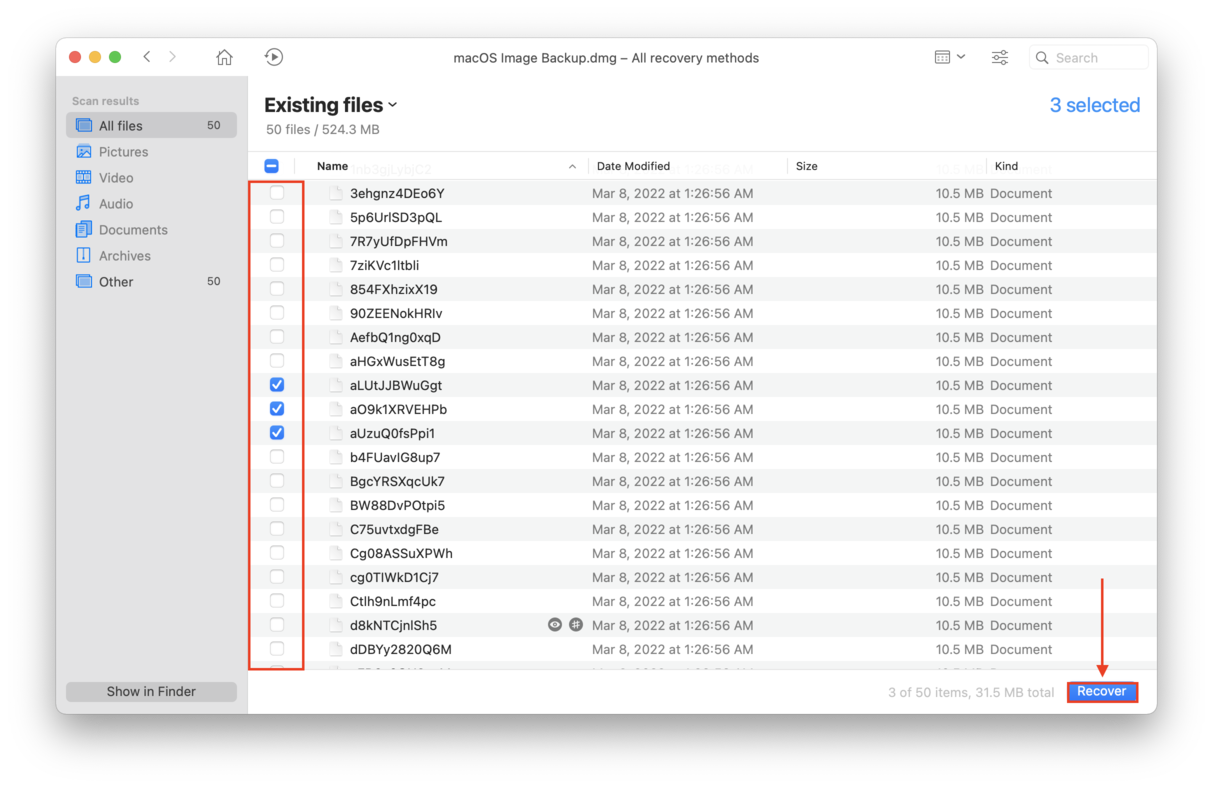
Step 14Wait for Disk Drill to complete the scan, then click “Review found data” near the bottom-right corner of the window.
Step 15Select the files you want to recover by ticking the checkboxes beside them, then click “Recover.”
Step 16On the dialogue window that appears, choose where you want Disk Drill to save your files. Then, click “OK.”
Method 3 Create macOS USB Installer
Users can run Disk Drill from a bootable USB Drive. This is an ideal solution for Macs that fail to start up from their internal drives. You can install the macOS environment to run via an external storage device.
Step 1On a working Mac, plug in a USB or any external drive (with at least 256GB size).
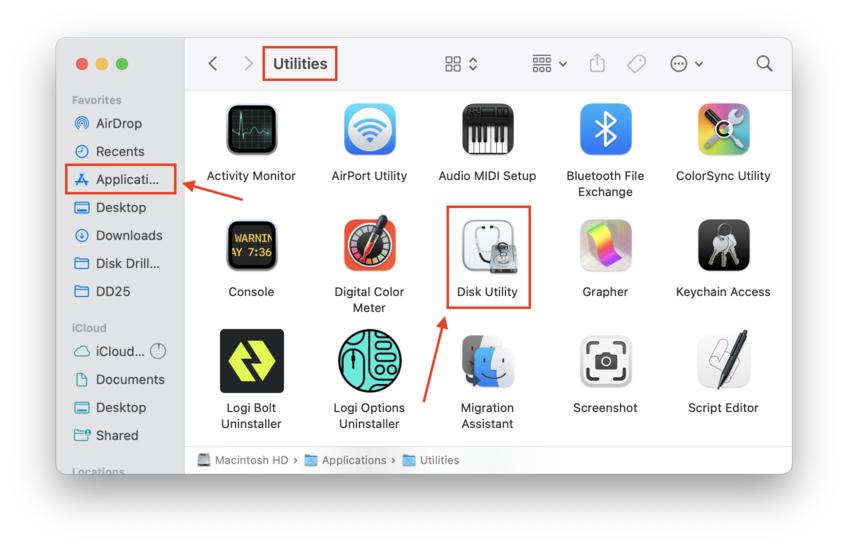
Step 2Go to Finder > Utilities > Disk Utility.
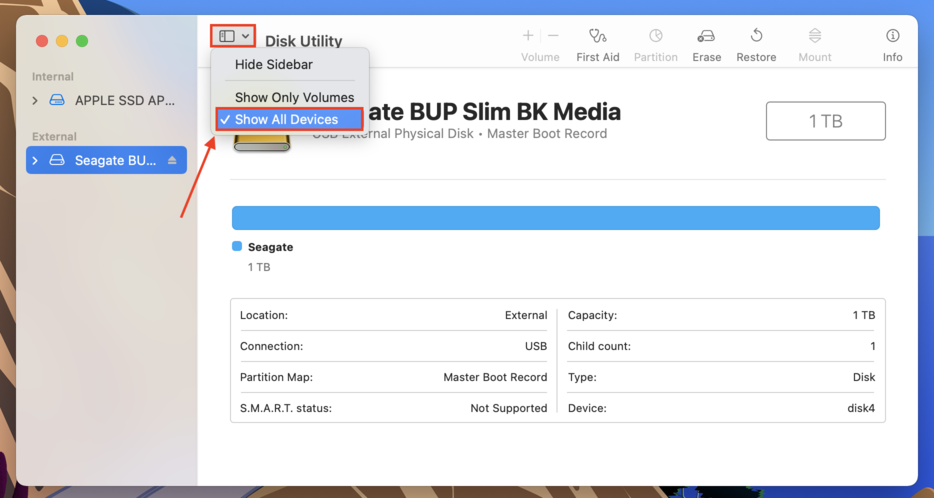
Step 3Click on the View menu > Show All Devices. This will display the root drive along with the external volume underneath.
Step 4Select the external drive, then click “Erase” to reformat the drive.
Step 5Rename the drive according to preference. Then choose “APFS” as the format and “GUID Partition Map” as the scheme. Then, click the “Erase” button.

Step 6Download Monterey from the App Store but don’t continue with installation.
Step 7Open Finder > Applications and double-click the installer.
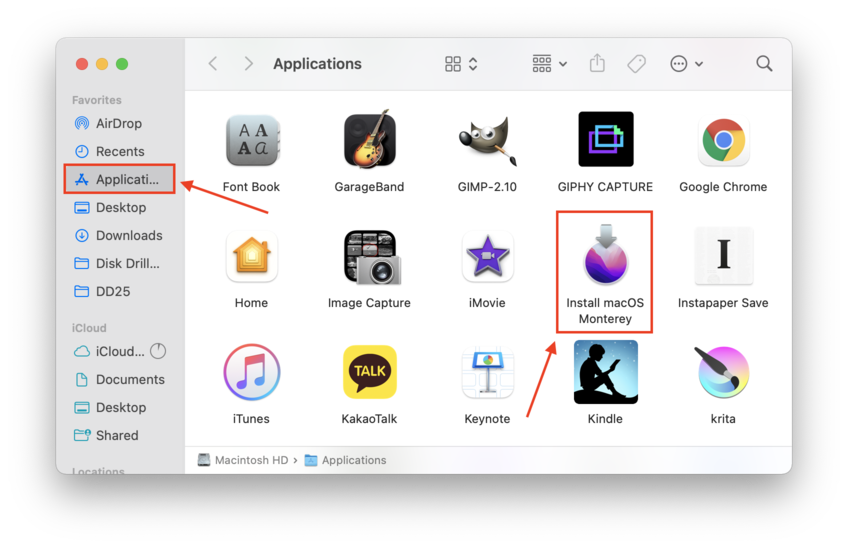
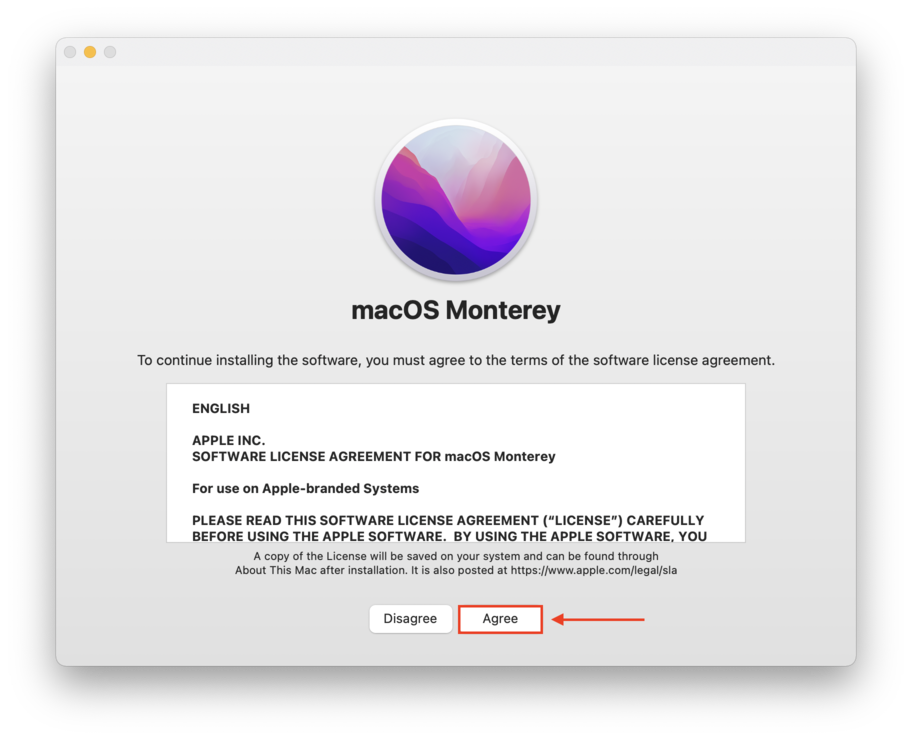
Step 8Click “Continue”, then “Agree” when prompted with the license agreement.
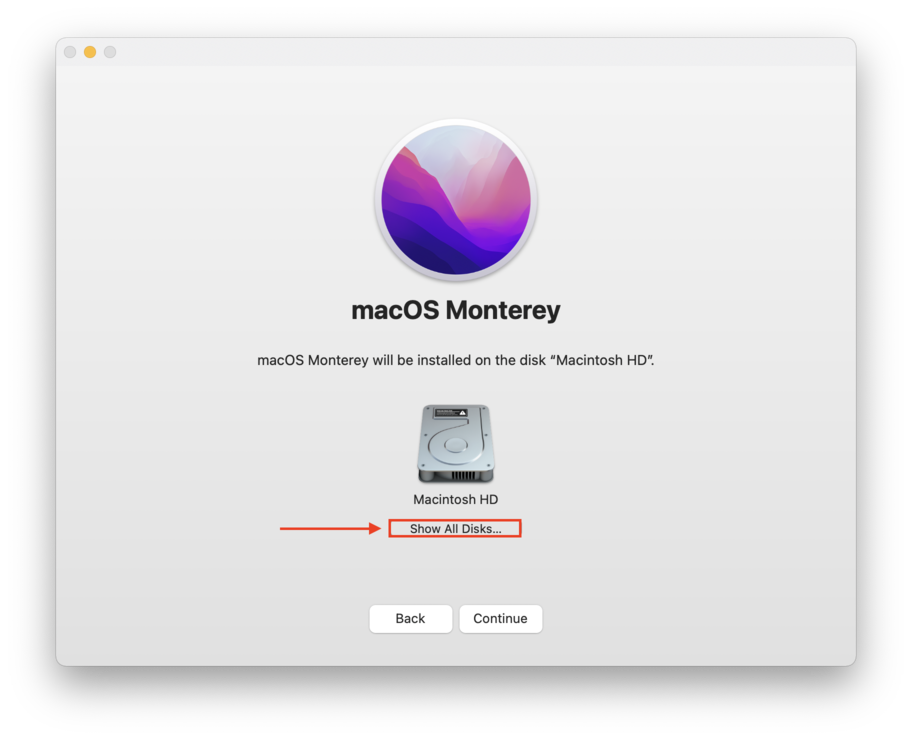
Step 9Click on “Show All Disks.” Then, select your external storage device and click “Continue” at the bottom of the window.
Step 10Once the installation is complete, safely eject your drive and plug it into your dead MacBook.
Step 11Now, let’s boot into macOS on the external drive. If you have an Apple Silicon-based MacBook, hold the power button until you see “Loading startup options” on-screen and choose the external drive as boot source. If you’re using an Intel-based Mac, hold the Option key to launch Startup Manager and select your external drive.
Step 12Once you’ve booted into macOS, download and install Disk Drill. You can then proceed to scan and restore your drive – it will appear in Disk Drill as an external drive. For step-by-step instructions, jump to Method 2 and proceed to step 12.
Method 4 Connect the Mac’s Hard Drive to Another Mac (Old MacBooks Only)
If your MacBook was released mid-2015 or earlier, you should be able to manually remove your internal hard drive. This is also one of the best methods if your MacBook crashed and won’t turn on. You can buy an enclosure, which turns your disconnected internal drive into an external drive that you can plug into another computer.
Step 1Connect your hard drive to a working Mac.
Step 2If you can access your drive through Finder, you can simply drag-and-drop your files to another location.
Step 3If you can’t locate your drive on Finder, launch Disk Utility by opening Finder > Applications > Utilities > Disk Utility.
Step 4Select your drive from the left sidebar, then click “Mount.”
Step 5Locate your drive through Finder, then drag-and-drop your files.
Method 5 Connect the Mac to another Mac
Macs have the useful ability of sharing data with other Macs, called “Target Disk Mode” for Intel-based Macs and “Sharing Mode” for Apple Silicon Macs. Using this feature, you can directly access your files on another Mac. Here’s how to do it:
Step 1Connect the two Mac devices using a Firewire or Thunderbolt cable.
Step 2If your dead MacBook has an Intel chip, press the power button and immediately hold the (T) key to launch Target Disk Mode, then skip to step 6. If it uses an Apple Silicon chip, hold the power button until you see “Loading startup options” on-screen.
Step 3Select “Options”, then click “Continue.”
Step 4On the Apple menu bar, click “Utilities”, and select “Share Disk.”
Step 5Select system disk, then click “Start Sharing.”
Step 6If your Mac uses an Apple chip, you should now be able to open your system drive from the desktop of the other Mac and drag-and-drop your files. If you’re using an Intel-based Mac, there are a few more steps. First, Open Finder > Locations > Network.
Step 7Double-click on your dead Mac’s drive, then click “Connect” > “Guest” > “Connect.”
Step 8Transfer the files you need, then safely eject the drive.
Method 6 Launch Disk Drill in Recovery Mode
This is a simple and useful method if you don’t have access to another Mac. All you need is a stable Internet connection and minimal knowledge in running command lines. Since you can’t install Disk Drill via the regular interface, you can use the Terminal app through Recovery Mode to download and launch Disk Drill from the internet. Here’s how to do it:
Step 1Plug in an external storage device where you can save the recovered data.
Step 2Boot into Recovery Mode by holding the power button until “Loading startup options” appears, then click “Options”, then “Continue.”
Step 3On the Apple menu bar, click Utilities > Terminal.
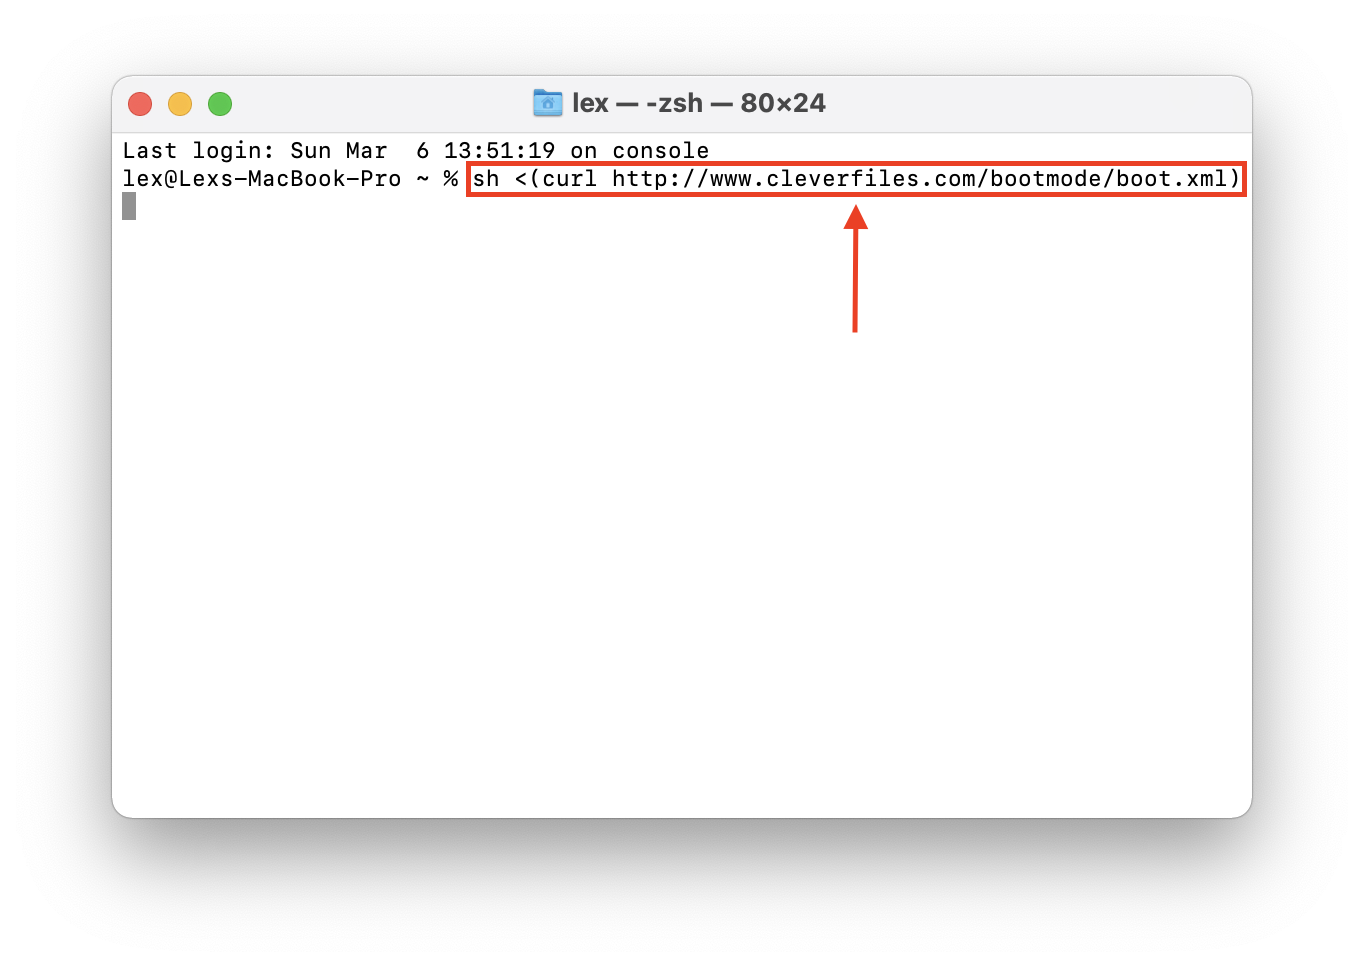
Step 4In the Terminal window, type the following and press return to download and launch Disk Drill directly from Recovery Mode:
sh <(curl http://www.cleverfiles.com/bootmode/boot.xml)
Step 5This will launch Disk Drill directly from macOS Recovery Mode. You can then proceed to scan your internal drive as normal. For a step-by-step guide, jump to Method 2 and proceed to step 12.
Method 7 Use Data Recovery Services
If everything on this list fails, you might need to get your drive to a professional data recovery center. The more you use a damaged drive, the worse it gets. Data recovery services have the tools to safely get files off a Mac that won’t boot and even repair it. For newer Macs, they can also recover data from an SSD that won’t boot. If you’ve never done it before here’s how:
Step 1Locate a reputable professional data recovery center in your area. Make sure they have ISO certified “Class 100 Cleanroom” labs, “No Data No Charge” guarantee, flexible service options, and over 80% success rate.
Step 2Contact them via phone or email and explain the problems you are experiencing with your drive and what data you wish to recover. Good data recovery centers will at this point give you a free rough quote for the job.
Step 3Send your drive to the center. You may need to sign a few waivers before they start working on it.
Step 4Wait for a few days until the job is complete. Pay the fee and get your drive back, along with your recovered data.
Method 8 Use Internet Recovery Mode
Deep within your system disk, Mac stores a hidden partition that contains Recovery Mode, which boots separately from your system disk. However, it’s possible that the recovery partition also got damaged, which prevents Recovery Mode from booting.
Internet Recovery Mode downloads Apple’s recovery tools from the internet to your Mac. You can restore from a time machine backup, reinstall macOS, get help online through safari, or launch Disk Utility.
For Apple Silicon Macs, booting into Internet Recovery Mode is no different from booting macOS Recovery. Simply power off your Mac and hold the power button until you see “Loading startup options” on-screen. Then, click “Options”, then “Continue.”
For Intel-based Macs, the process is a bit different. First press the powerful button, the immediately press and hold (Option + CMD + R) until you see a spinning globe and the text “Start Internet Recovery” on-screen.
How to Recover Data from a MacBook that Won’t Turn On?
MacBooks that won’t turn on are harder to deal with than unbootable Macs. This is because they can’t boot to Recovery Mode in any way. In this case, try connecting your Mac to a docking station and plug that into a working Mac. You may be able to access your drive data through Finder. If that doesn’t work, we can use a tool like Disk Drill, which can detect drives that even Finder can’t read. For a step-by-step guide, proceed to step 12 of Method 2.
However, if you can’t pull out your internal drive from your Mac, you’ll have to send your device to a professional data recovery center. Jump to the section Method 7: Use Data Recovery Services to learn more.
Ways to Prevent Problems with Data Loss from Hard Drives
Data loss has always been a risk when working with physical drives, especially with traditional hard drives that are more fragile than solid-state drives. But thanks to the advances in cloud technology, automated backup software, and drives with terabytes of space, you can avoid total data loss with the right habits. Here are 5 tips:
Tip 1. Create local and cloud backups.
Users should always have a copy of important files. This can be done by creating a backup through platforms such as the Time Machine or Apple iCloud. It is also important to scan for malware and test the backup regularly.
Tip 2. Install programs only from proven sources.
Users should prevent any installation of third-party software from insecure or sketchy download sites. This ensures the safety of sensitive information from being deleted, leaked, or misused. Look for tools that have real reviews.
Tip 3. Check the S.M.A.R.T. status of your drive regularly.
Users can check the S.M.A.R.T. status of their MacBook hard drives and internal disk storage by using the native Disk Utility app or through Disk Drill. This offers insight into the health of disk hardware itself and helps you preempt actual damage and data loss.
Tip 4. Don’t rush an update. If you do decide to update, make a backup.
Users must not install macOS or firmware updates immediately. Otherwise, saved documents in the hard drive can be wiped out along with other application data.
Tip 5. Store your hard drive properly.
Make sure to secure your physical drive with a case and avoid keeping it in hot places. Hard drives have spinning disks and other sensitive machine parts that can get damaged in bad conditions, which can cause corruption and data loss.


