
Need to recover data from a dead MacBook? There are several ways you can do it depending on the available tools and why exactly your MacBook died and won’t turn on. Below, we provide you with 7 different methods that you can try on your own to recover data from a MacBook that won’t turn on.
We discuss both MacBooks with hard drives and those that use SSDs (solid state drives) and provide step-by-step instructions with screenshots so you don’t get lost along the way. Read on.
Table of Contents
Can You Recover Data from a Mac that Won’t Turn On?
Yes! In most cases, you can recover data from a MacBook that won’t turn on. Even if macOS itself is compromised, as long as the data on your drive hasn’t been deleted AND overwritten, there’s hope.
Here are a few dead MacBook Pro scenarios where recovery is possible (and even likely):
- Unoptimized software. The software on your Mac may be bugged or infected, or may not be optimized for your current version of macOS.
- Faulty macOS update. macOS updates (especially their beta versions) may contain unexpected bugs that negatively affect your system.
- Black screen of death. This usually indicates a power issue or hardware malfunction.
- Logically damaged system drive. Your system drive may be corrupted to the point of not booting.
In the sections below, we’ll demonstrate several methods to recover data from a dead Mac hard drive or solid-state drive that work for any of these cases.
How to Recover Data from a Dead Macbook Hard Drive
Below are 7 different methods with instructions and accompanying screenshots on how to recover data from a dead MacBook Pro (or any other Mac). The method that works for you depends on the tools you have available. Read on.
Method 1: Use Data Recovery Software in Recovery Mode
Data recovery software are powerful tools that can extract data directly from a drive’s file system – for this article, we’ll be using a software called Disk Drill. While you would usually have to install data recovery software on your Mac while it’s running, Disk Drill can run directly from recovery mode.
This makes it perfect to retrieve files from a dead hard drive. We’ll demonstrate how to do this in the steps below.
Step 1. Connect a storage device (like a USB) to your Mac, ensuring it has enough space to store your recovered data.
Step 2. With your Mac turned off, press the power button and immediately press and hold the Command and R keys until you see the Apple logo.
Step 3. On the menu bar in the Recovery screen, click Utilities > Terminal.
Step 4. Enter the following command and hit Return to install and launch Disk Drill from the Terminal:
sh <(curl http://www.cleverfiles.com/bootmode/boot.xml)
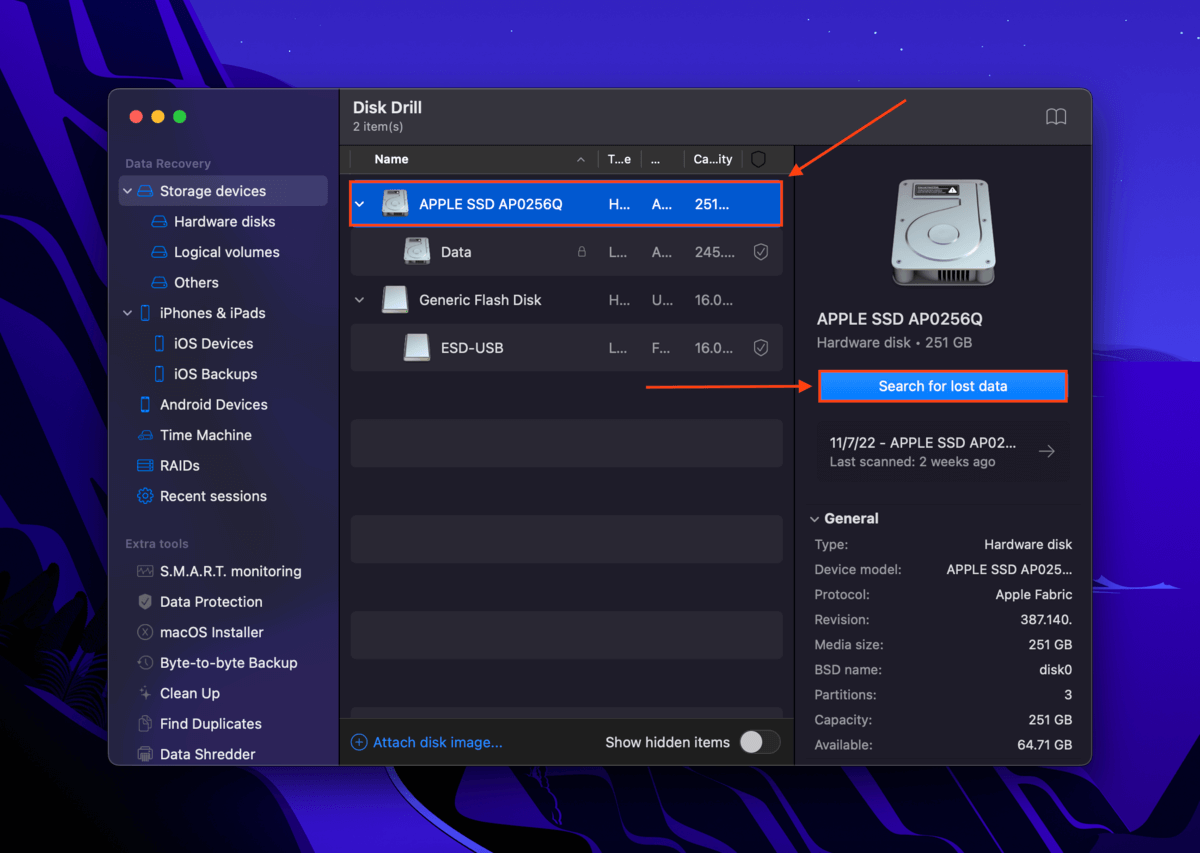
Step 5. Select your drive from the list and click Search for lost data.
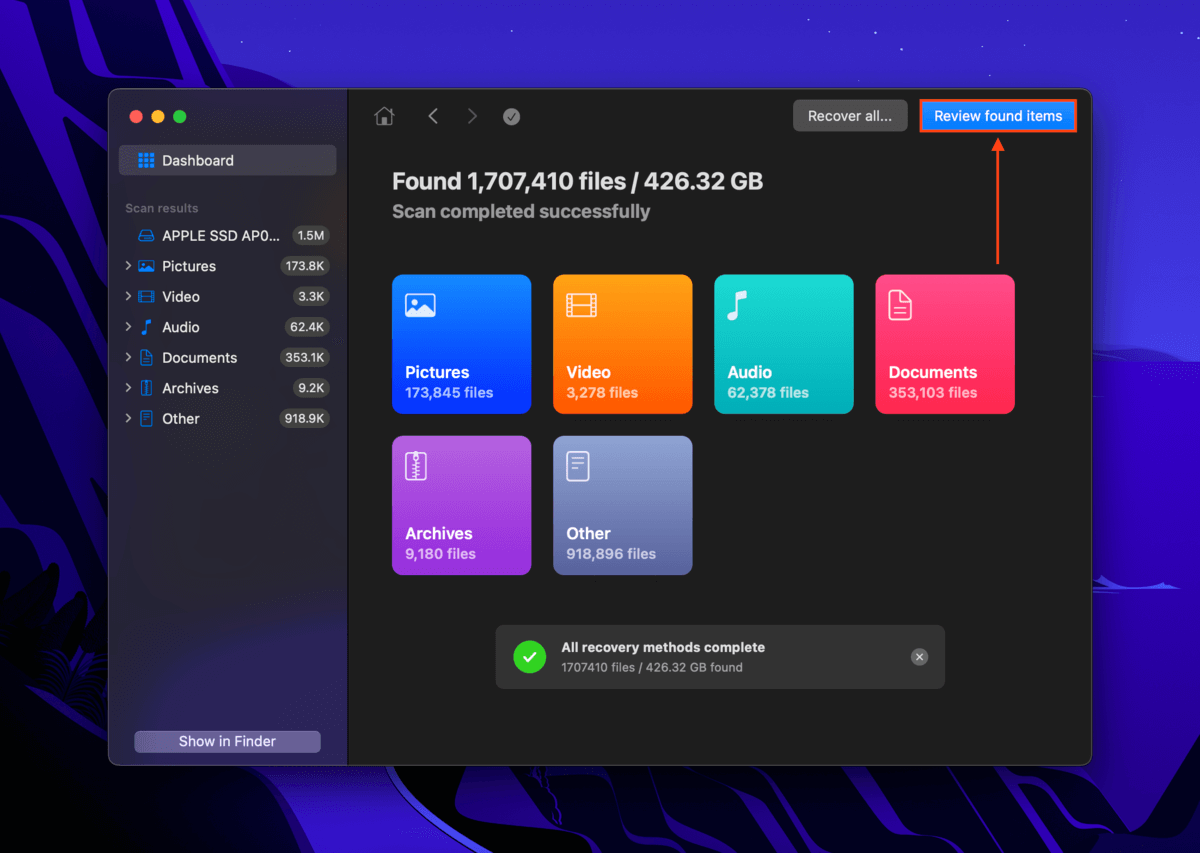
Step 6. Wait for Disk Drill to complete its scan. Then, click Review found items.
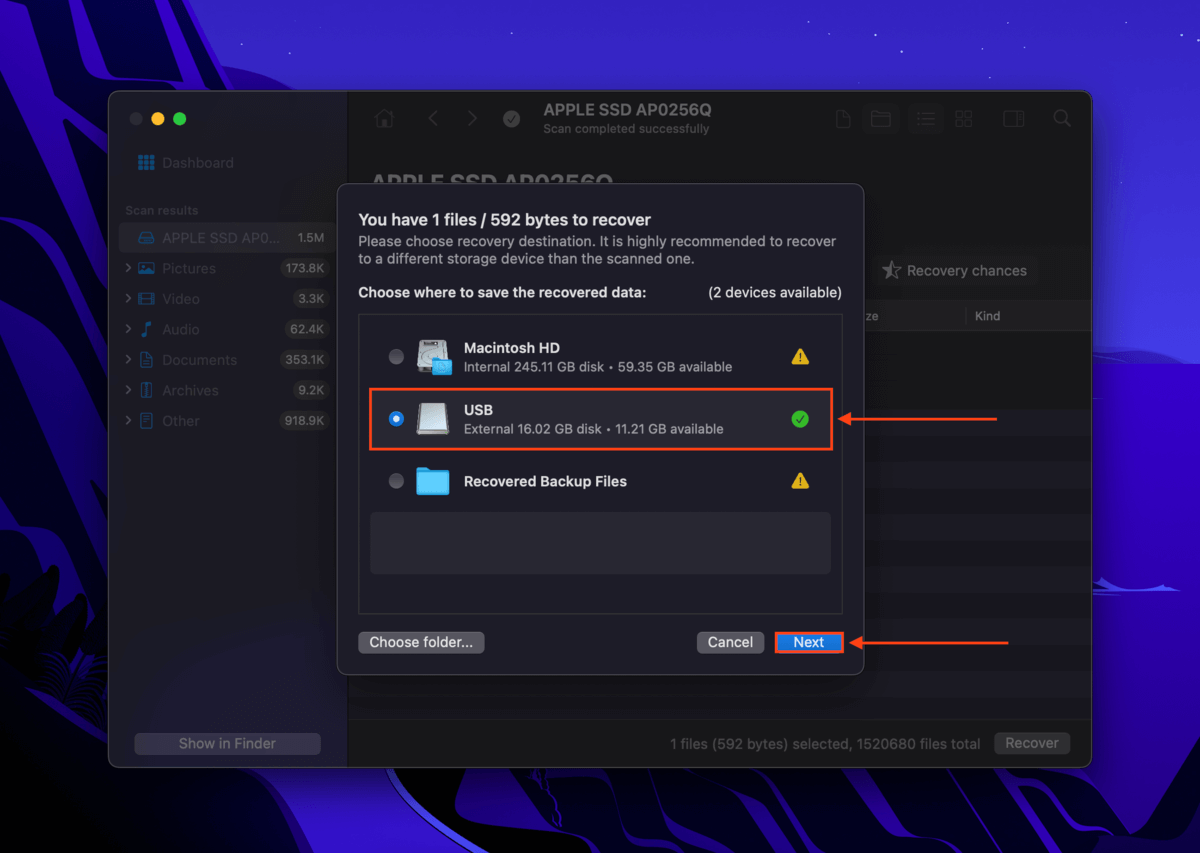
Step 7. Use the boxes in the leftmost column to select the files you want to restore (or leave them blank if you want to restore everything) and click Recover.

Step 8. In the dialogue box that appears, select the storage device you connected in Step 1. Then, click Next to begin the recovery process.
Method 2: Scan an Image of the Drive
Disk Utility is a disk management app that we can use to create an image (or exact copy) of the dead MacBook’s drive. Fortunately, Disk Utility can be launched from Recovery Mode. Next, we’ll install Disk Drill on another Mac and use it to recover the image we created with Disk Utility.
We’ll demonstrate how to do this in the guide below.
Step 1. Connect a drive to your Mac, ensuring it has enough space to store a complete copy of your drive.
Step 2. With your Mac turned off, turn it on and immediately press the Command and R keys until the Apple logo appears on screen.
Step 3. Select Disk Utility and click Continue.
Step 4. Select your drive from the left sidebar. Then, on the menu bar, click File > New image > Image from [your drive].
Step 5. Name your image file, add any tags, and choose a destination folder in the drive we connected in step 1. Then, click Save.
Step 6. Once the image has been created, eject your drive and turn off your Mac. Then, connect the drive to another Mac.
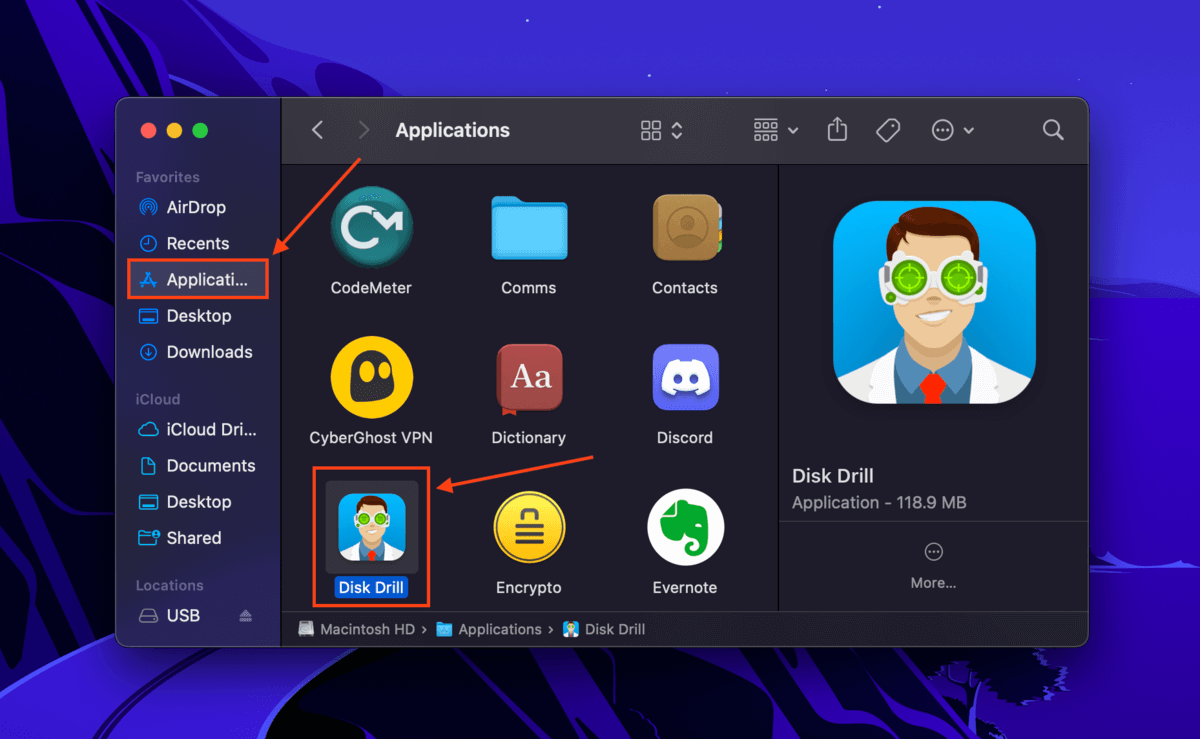
Step 7. On the working Mac, download and install Disk Drill.
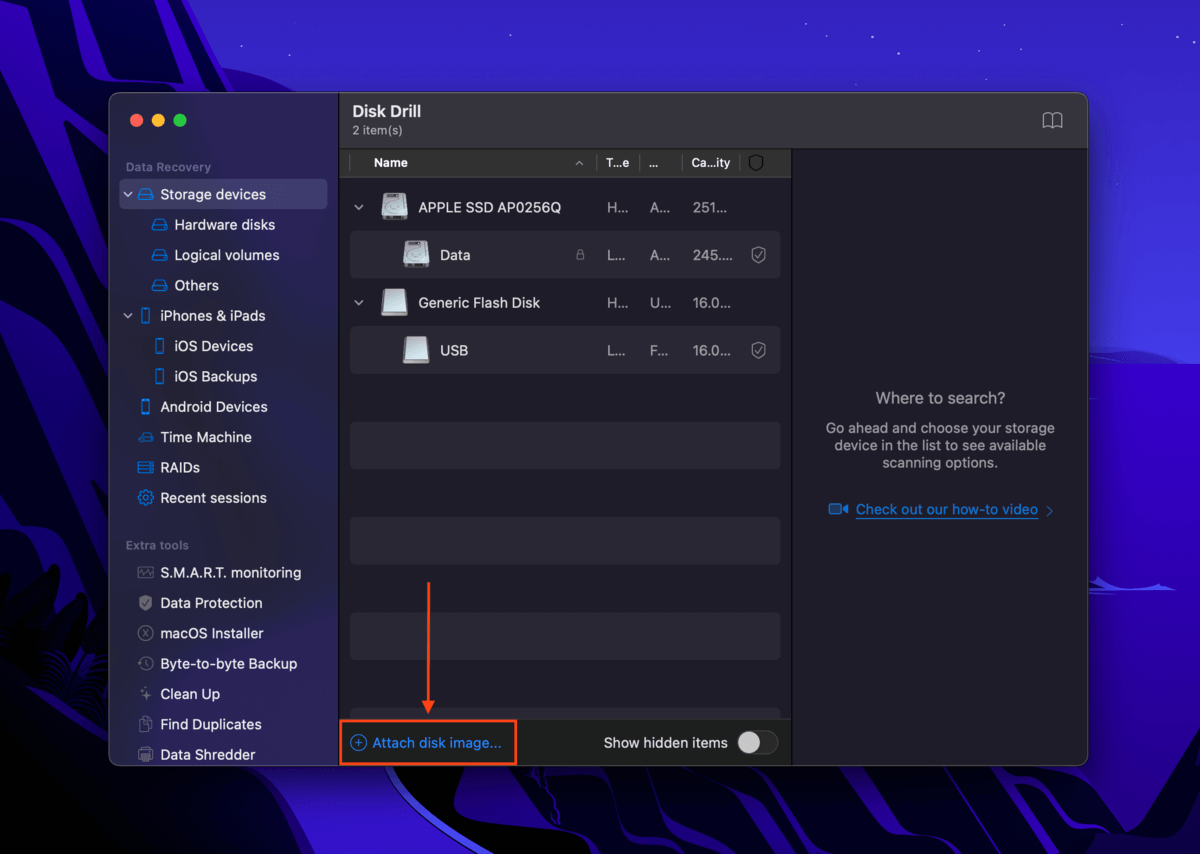
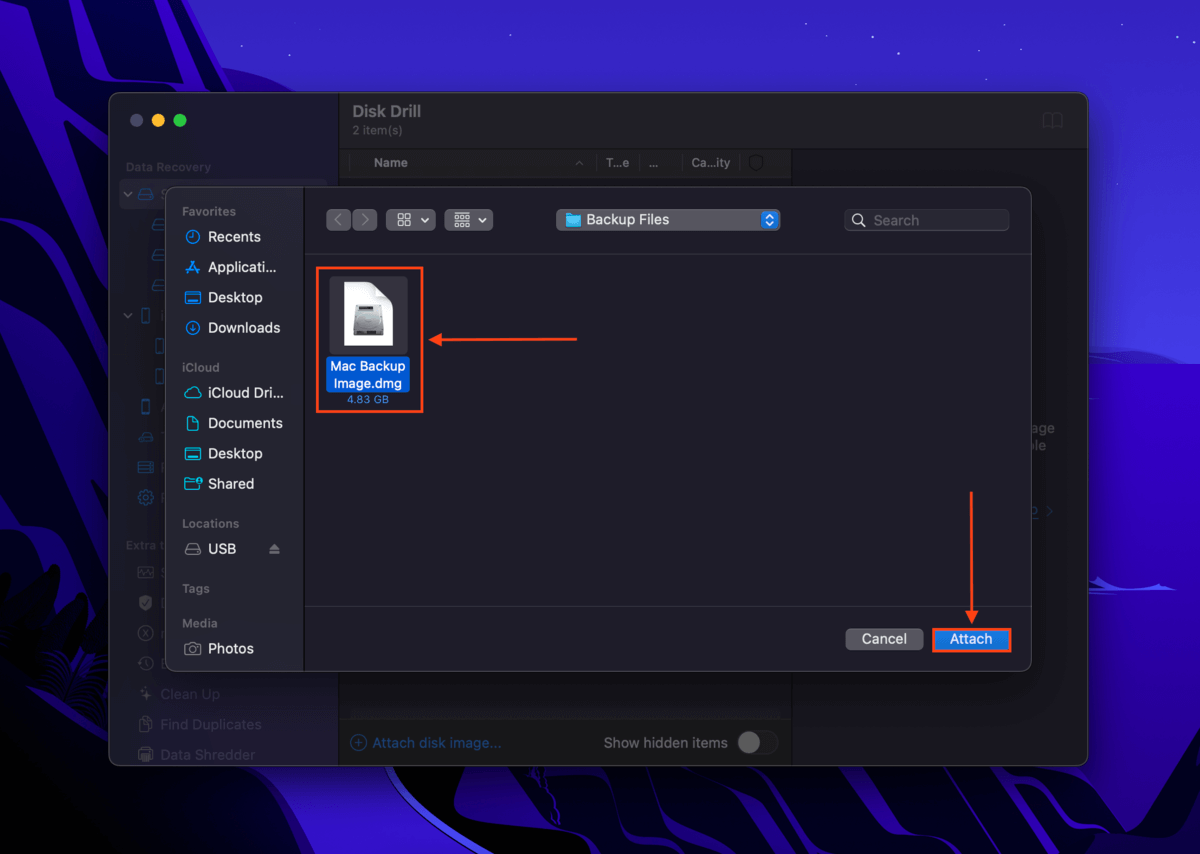
Step 8. Launch Disk Drill (Finder > Applications) and click Attach disk image… near the bottom of the window.
Step 9. Locate the image file we created in step 5 and click Attach.
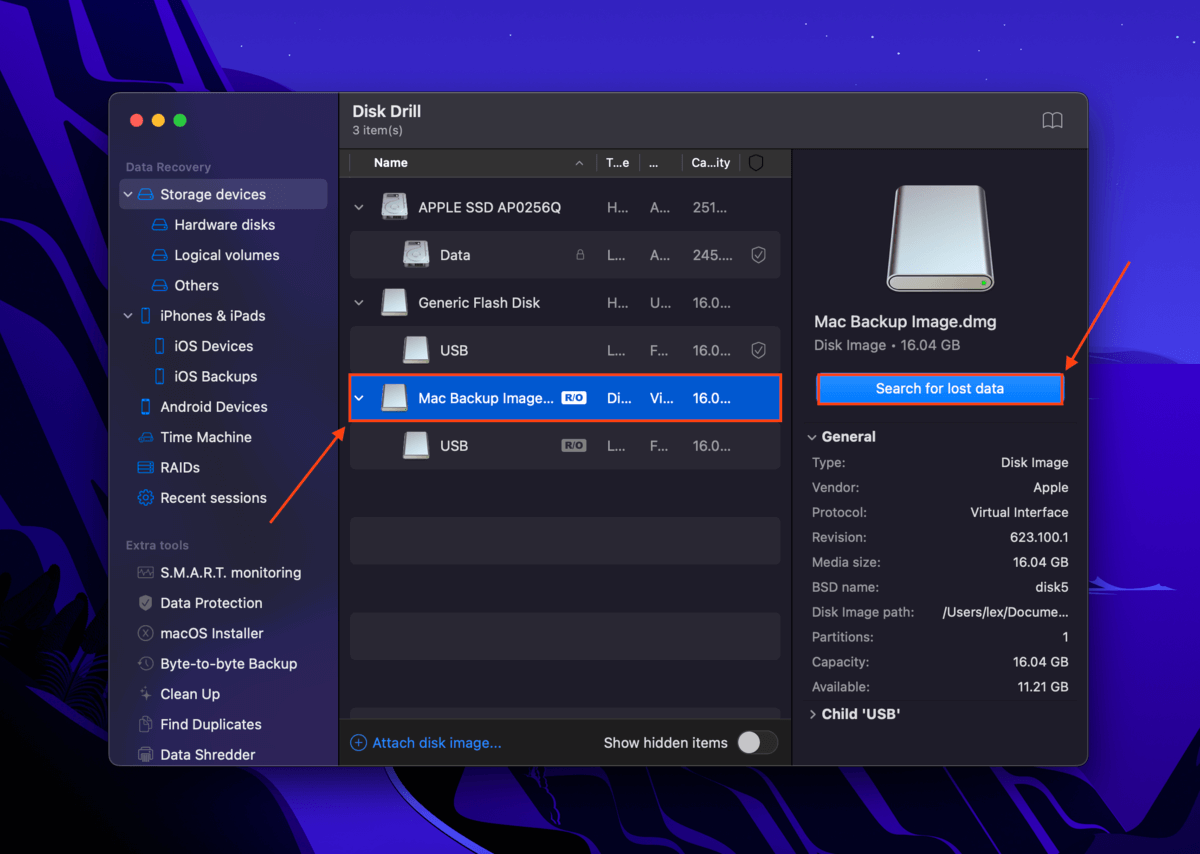
Step 10. Select the newly-added disk image from the list and click Search for lost data.
Step 11. Follow steps 6-8 from Method 1, except save your files to the working Mac instead of an external storage device.
Method 3: Recover to a Windows PC
If you have a Windows PC available, you can also connect your Mac drive to your Windows PC as an external drive. Once connected, you can drag and drop your files as normal. You’ll need 3 things:
- Tools to disassemble your Mac and access the drive inside.
- An enclosure that can turn your internal Mac drive into an external hard drive or SSD.
- If your Mac drive is formatted to HFS+ or APFS, you’ll need a third-party program that can read it like HFSExplorer. Alternatively, you can download Disk Drill for Windows and extract data from the drive using its data recovery tool. The Windows version of the Disk Drill app can still recognize and scan non-Windows formatted drives.
Method 4: Recover to Another Mac
If you have another Mac available, you can connect the two Macs with a cable and use Target Disk Mode to turn your dead MacBook into an external drive. This will allow you to transfer files from a broken Mac to a new Mac. Here’s how to do it:
Step 1. With the non-working Mac turned off, connect it to the working Mac with a cable.
Step 2. On the non-working Mac, press and hold the T key while powering it on until you see a disk icon on the desktop of the working Mac.
Step 3. On the working Mac, double-click the disk icon to view your data. You can then transfer your files by dragging them to the desktop or to specific folders on the working Mac.
Step 4. Once you’re done transferring your files, “eject” the non-working Mac by dragging the disk icon to the working Mac’s Trash folder. You can now safely power down and disconnect your computer.
Method 5: Create a Bootable USB
If you have a flash drive (and access to another Mac), you can create a bootable USB with Disk Drill and use that to get files off your dead MacBook. Fortunately, the latest version of Disk Drill makes it very easy to create a bootable USB. Here’s how:
Step 1. On a working Mac, connect your flash drive.
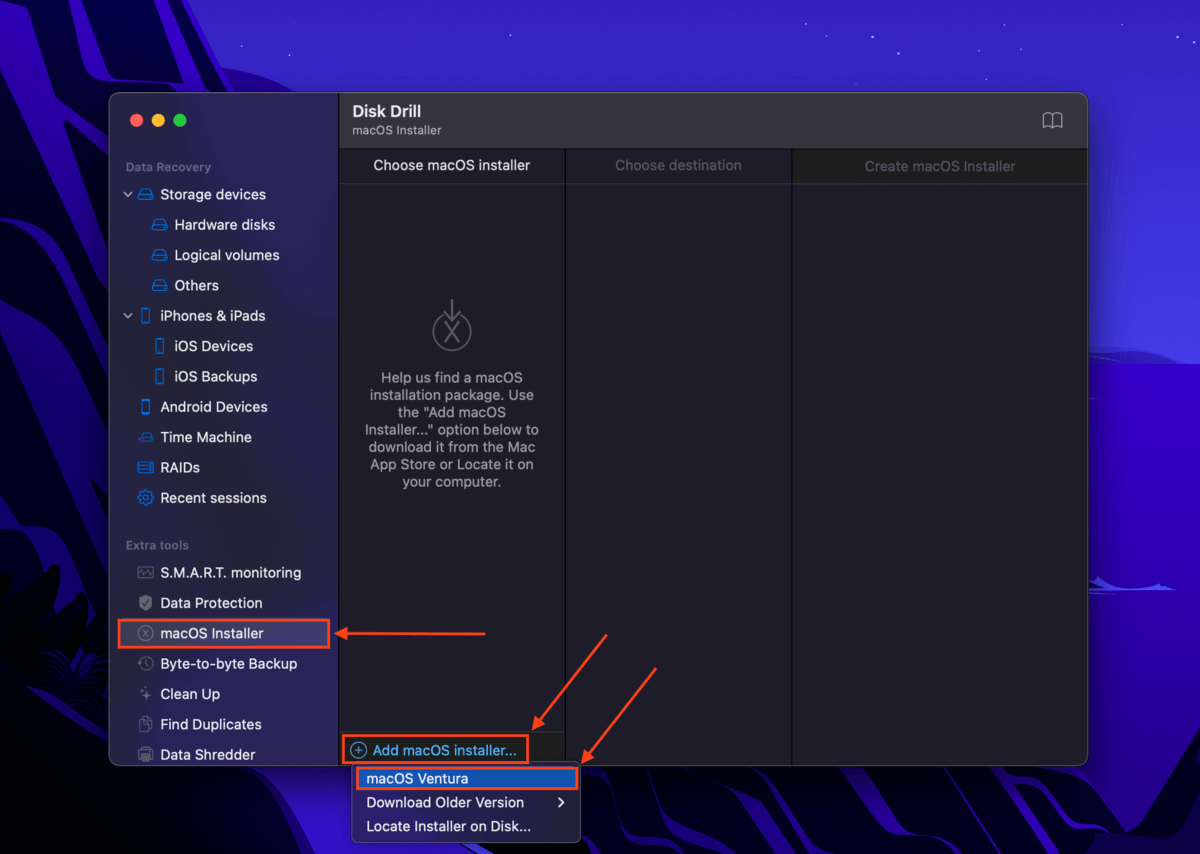
Step 2. On the same Mac, download and install Disk Drill. Launch the app (Finder > Applications).
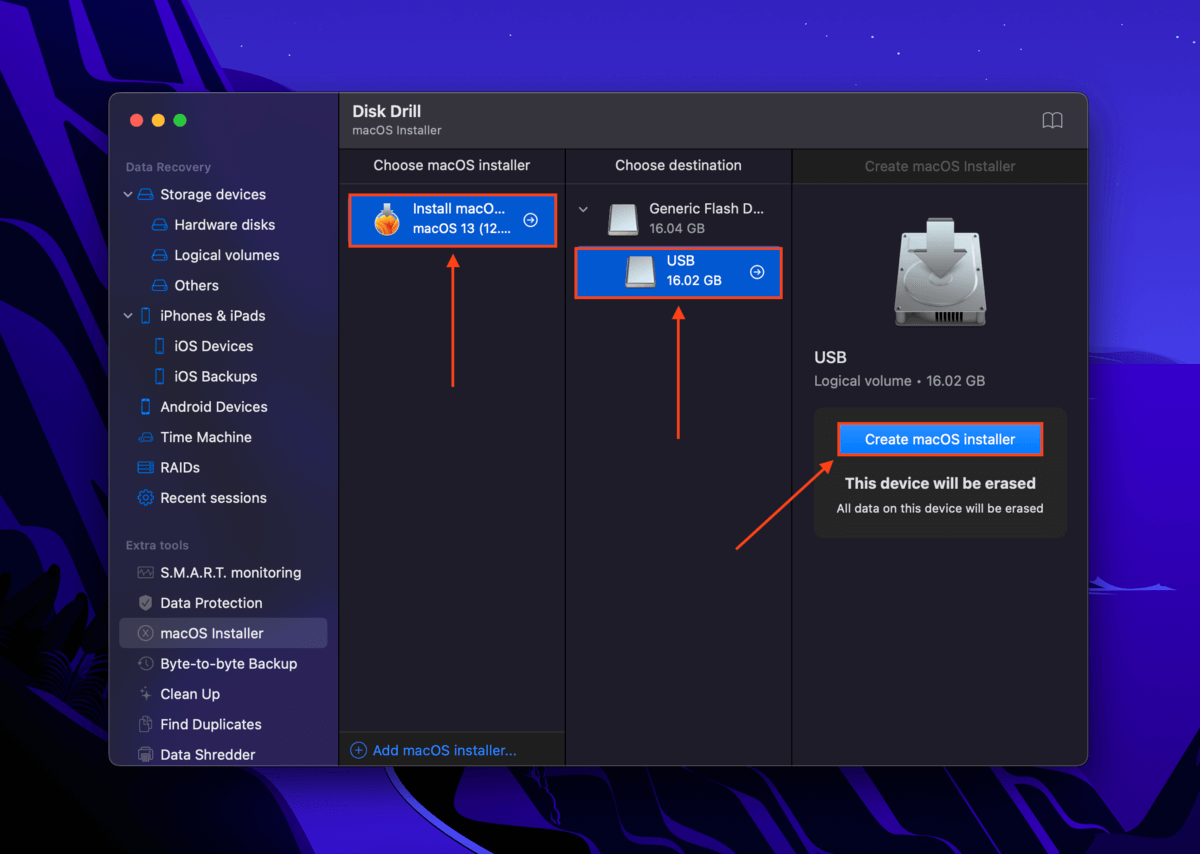
Step 3. Select macOS Installer on the left sidebar. Then, click Add macOS installer… near the bottom of the screen and either download macOS via Disk Drill or add an installer file you downloaded earlier.
Step 4. Select the installer from the Choose macOS installer column and select your USB flash drive from the Choose destination column. Then, click Create macOS installer.
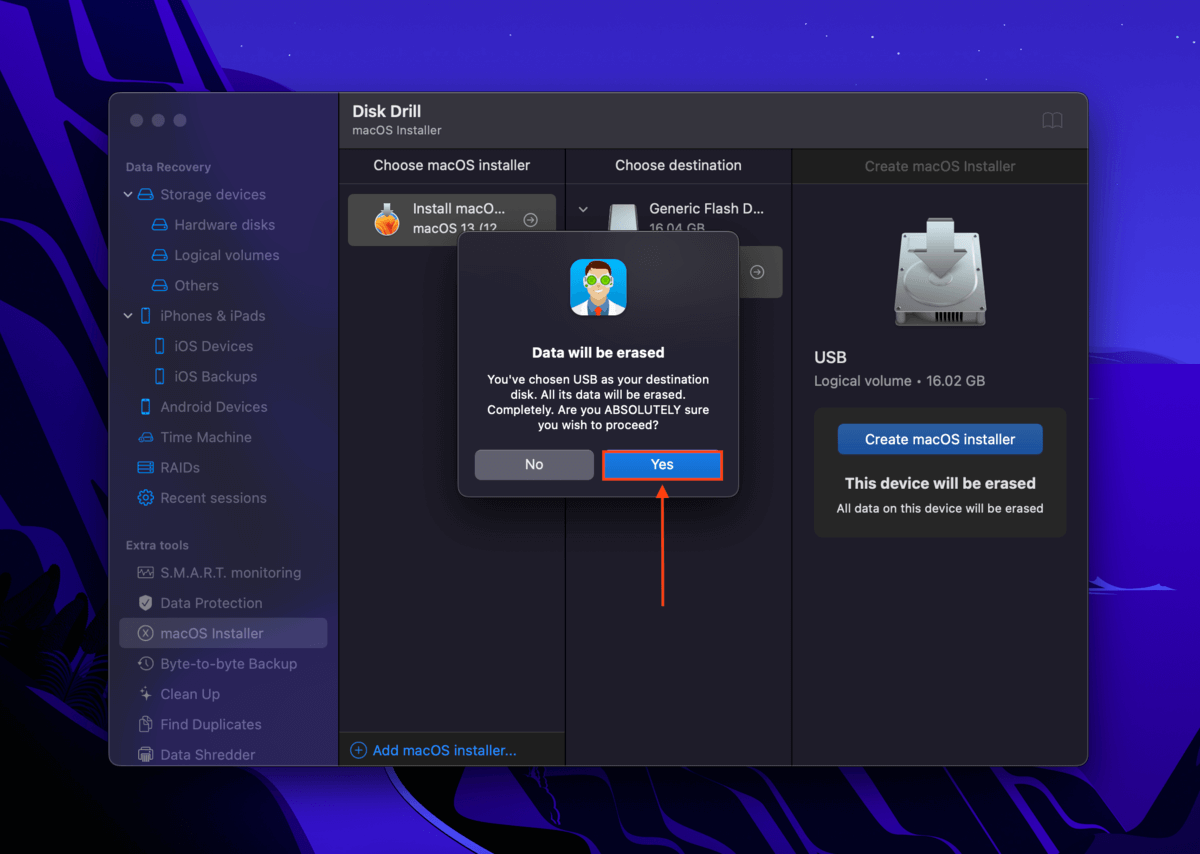
Step 5. Click Yes to confirm. Once the process is complete, close Disk Drill and safely eject your USB.
Step 6. Connect your flash drive to your dead MacBook. If you’re using an Intel-based Mac, power it on and press and hold the Command and R keys. If you’re using an Apple Silicon Mac, hold the power button until you see the Startup Options window.
Step 7. Opt to boot into macOS with your USB flash drive.
Step 8. Once you have booted into macOS on your flash drive, download and install Disk Drill.
Step 9. Launch Disk Drill and select your dead Mac’s drive.
Step 10. Follow steps 5-8 from Method 1, except save your files to the same USB running Disk Drill or connect another storage device with enough space to store the data from your Mac drive.
Method 6: Restore From a Time Machine Backup
If you enabled Time Machine on your Mac, you have 2 options. The first option is to have your computer fixed and recover your Time Machine backup through Recovery Mode. Option 2, which we’ll demonstrate below, is to use the Migration Assistant app on another Mac to transfer your files. Here’s how to do it:
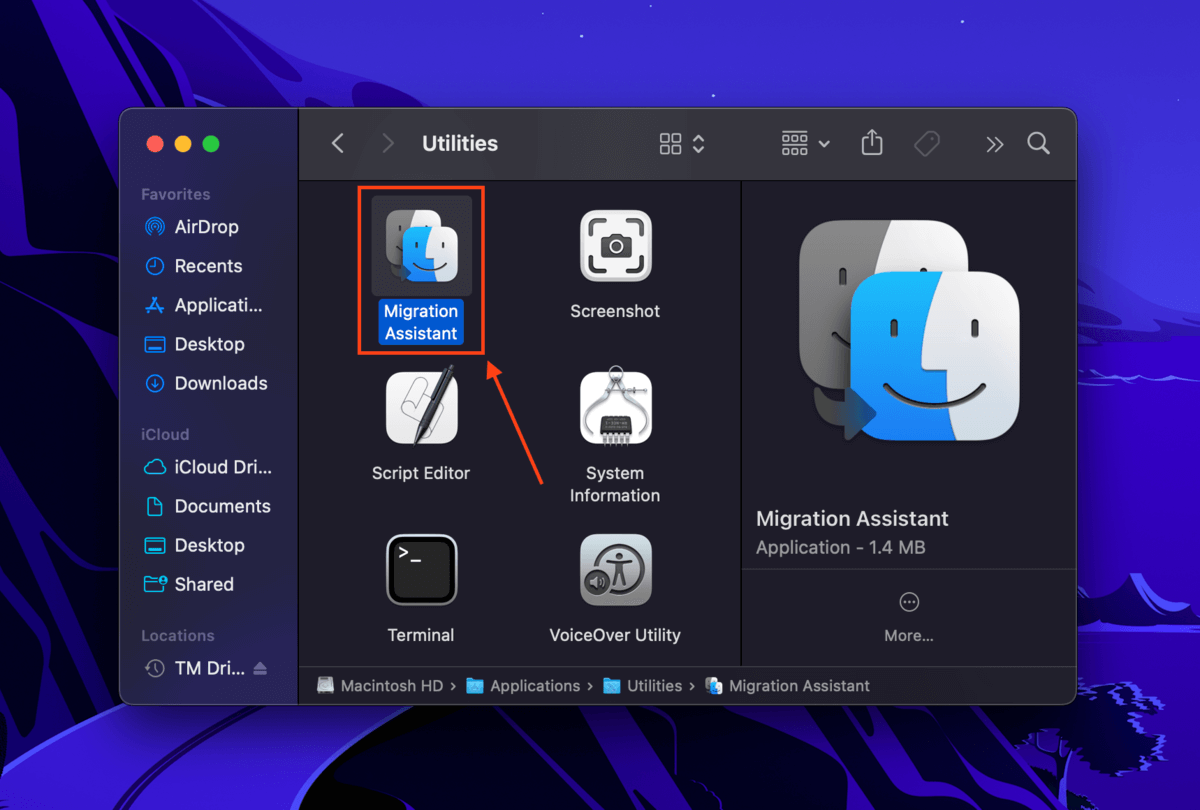
Step 1. Connect your Time Machine drive to a working Mac and launch Migration Assistant (Finder > Applications > Utilities).
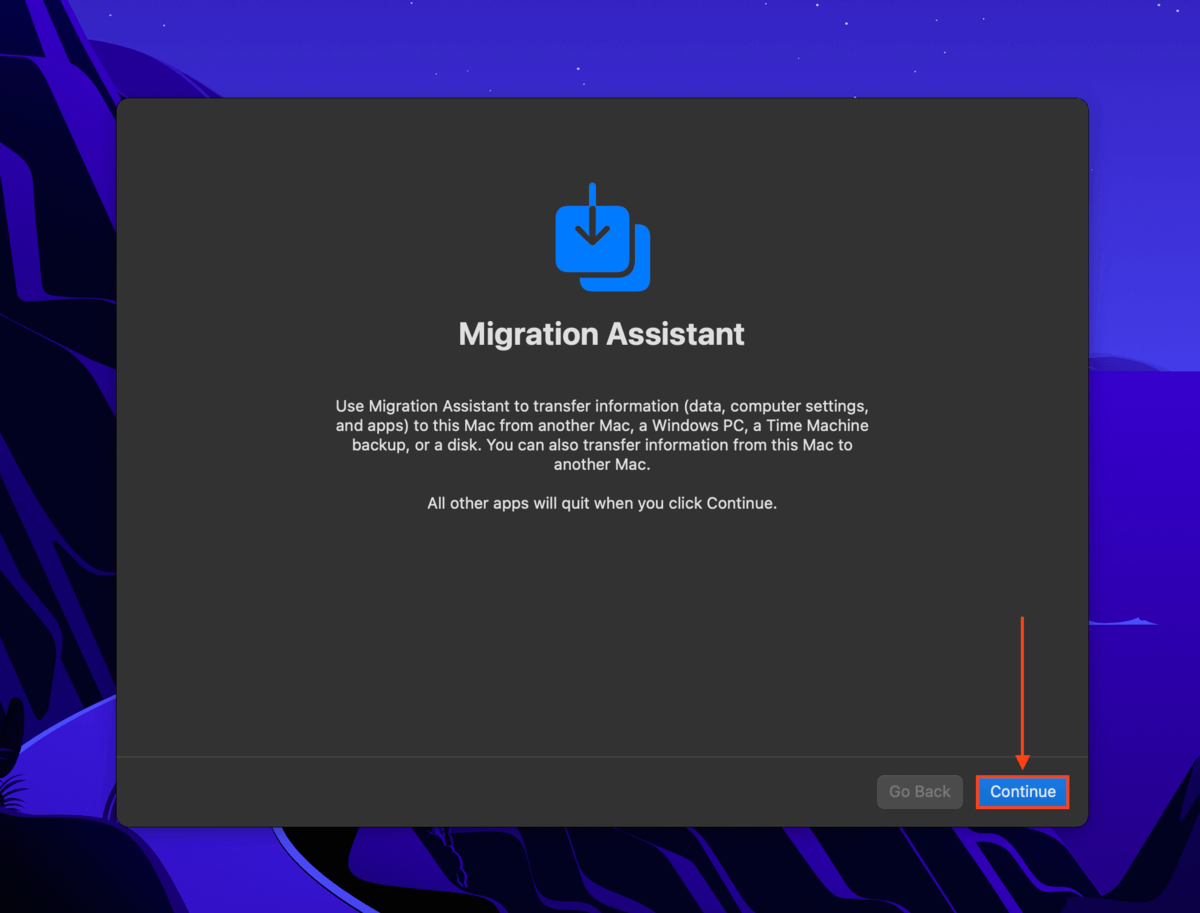
Step 2. Click Continue and enter your password when prompted. Note that this will close all currently running apps.
Step 3. Select From a Mac, Time Machine backup or Startup disk and click Continue.
Step 4. Select your Time Machine backup and click Continue.
Step 5. From the list, choose a Time Machine backup and click Continue.
Step 6. Tick the boxes beside the information you want to transfer and click Continue.
Step 7. Wait for the process to complete and close the Migration Assistant window. You should now be able to log in to the migrated account and access your files.
Method 7: Use a Professional Data Recovery Service
In the case of a smashed MacBook with a physically damaged drive, our best advice is to send your machine to a professional data recovery service. They have the tools, facilities, and specialists to take apart your computer (or drive) and extract your data safely.
If you’ve never used one before, here are a few things you should look for:
- Class 100 cleanroom. A class 100 cleanroom (or ISO 5 Class cleanroom) uses particle filters that maintain a level of air cleanliness at all times. This is non-negotiable – even a tiny particle can be disastrous if it lands on the sensitive inner mechanical parts of your drive.
- Free estimate. Some services will be able to tell you what you can roughly expect in terms of recoverability and even price – ideally, over the phone.
- No data – no charge guarantee. The best services won’t charge you at all if they are unable to retrieve any data from your Mac.
How to Recover Data From a Dead MacBook With SSD
If your MacBook uses an SSD (solid state drive) instead of an HDD (hard disk drive), you can still use the methods we demonstrated in the last section to restore your data. However, your chances of recovering DELETED data will be lower due to TRIM.
TRIM is a special command built into SSDs that wipes data blocks as soon as the user deletes a file. When TRIM isn’t activated (or available, in the case of HDDs), the drive normally stores deleted data and simply marks it for overwriting. This makes it a lot easier to recover data from an external hard drive rather than an SSD, as long as you don’t overwrite your files.
However, if you’re recovering non-deleted data from a completely dead MacBook, you still have a good chance of recovery as long as you act quickly. The longer you wait, the higher the risk of permanently losing your data.
Conclusion
Even if your MacBook died and won’t turn on, there are still a lot of ways to restore your data. However, there are many factors that can lower your chances of recovery – such as TRIM, physical damage, a lack of tools, etc. To avoid the consequences of data loss, we highly recommend that you routinely create backups using Time Machine and iCloud.


