
Backing up your Mac is one of the essential steps you can take to preserve your information. Not only does this step create a clone of your folders and files, but it also provides a backup method of rebooting your macOS computer if it stops working. If you purchase a new Mac computer, you can also use the backup to quickly and efficiently transfer your information.
The best way to accomplish these tasks is to use Time Machine. It’s reliable, easy to learn, and it keeps your data backed up automatically on a regular schedule when you have it activated.
This guide will take you through what it is, how to use it, and what alternatives you might prefer if you don’t like its functionality.
Table of Contents
What Is Time Machine and How Does It Work?
Time Machine is a service provided by Apple to ensure your macOS system gets backed up. It works by creating an image of your saved information. This task is sometimes referred to as a “snapshot.”
Your Mac operates Time Machine in the background. This option provides a straightforward way to preserve your data’s integrity if something unexpected happens. You must activate it to take advantage of these benefits. When Time Machine saves an image, you keep the last few versions available locally to revert back to a previous setup if an error develops on your computer.
If you didn’t turn this feature on during your macOS system’s initial setup phase, you could find it available in your System Preferences menu. Older operating systems sometimes have it as an independent option that you can select through Launchpad.
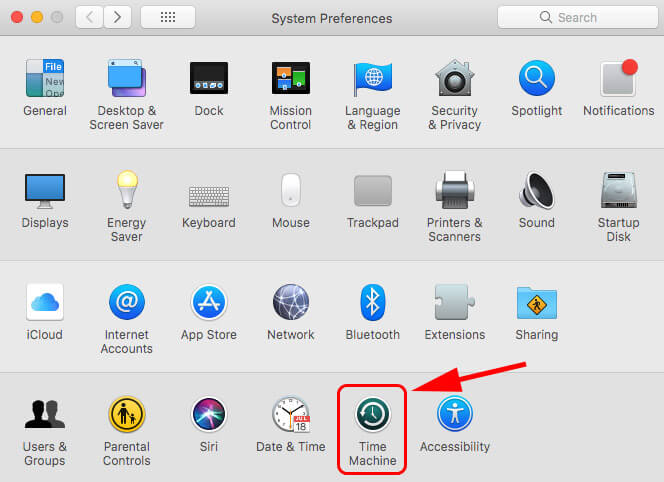
Click on the Time Machine option to begin the activation process. If it is already operating, you’ll see choices that reflect the actions you can perform with this service.
How to Set Up Time Machine on a Mac
For the average user, the only step you need to know for using Time Machine is to understand how to activate the service. Since the Time Machine backup operates in the background automatically, you don’t need to access the service repetitively to continue saving your folders and files.
You’ll want to follow these steps to ensure you can start using Time Machine on Mac successfully.
Step 1:Select the Apple logo from the left side of your menu bar.
Step 2:When the dropdown set of choices appears, you’ll want to select System Preferences.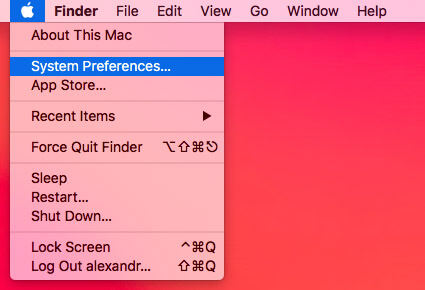
Step 3:You’ll receive another set of options, with Time Machine being one of them. Choose it.
How to Create a Time Machine Backup
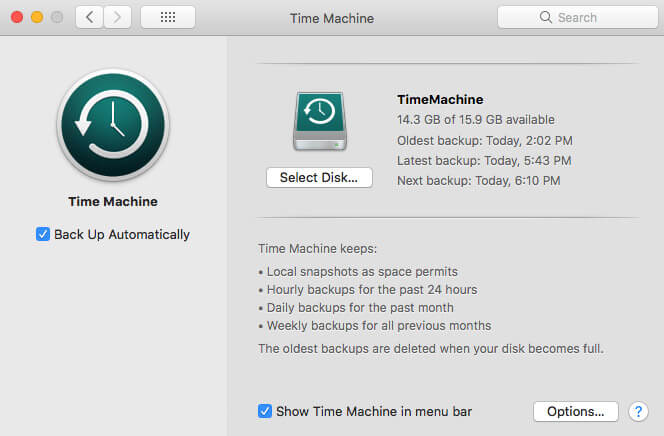
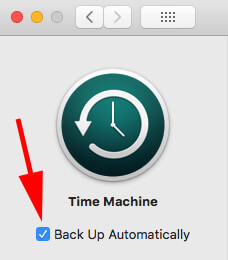
As part of your initial Time Machine settings, it’s a good idea to enable automatic backups first. Without this option activated, anything that causes an interruption of your macOS functionality could cause data loss.
It could be anything from a corrupted drive to unexpected power loss.
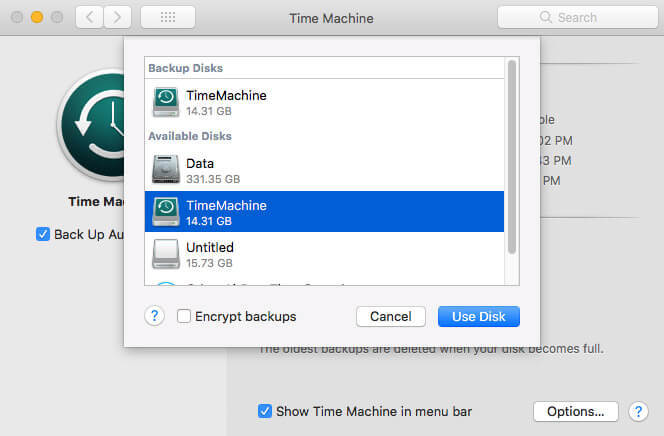
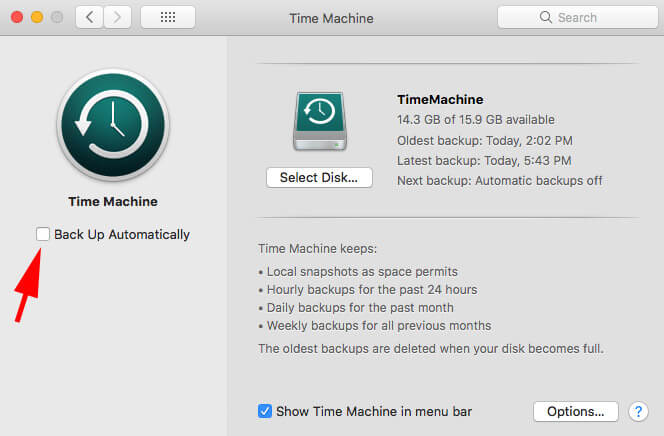
When you enter the Time Machine screen, you’ll see the logo appear on the left-hand side of the window. Underneath this icon is the option to Back Up Automatically. You’ll want to select this checkbox to activate the service.
Once you check the box, you can select the specific disk you want Time Machine to support. Unless you operate multiple drives or have an external HDD, there should be only one choice to make.
After selecting the disk, Time Machine gets to work. You’ll see the service start creating the backup disk image that you want on an automated schedule.
- It keeps local snapshots of your information whenever space permits.
- You’ll get hourly backups for the past 24 hours with the service activated.
- It also keeps daily backups for the past month.
- You’ll receive weekly backups for every previous month.
Although you don’t have any control over this schedule, the oldest backups that Time Machine creates get deleted once your disk becomes full.
If you want, you can also select to show Time Machine in the menu bar by checking the appropriate box.
How Much Space Does Time Machine Need?
Once you start using Time Machine to create information backups, you’ll discover that the service can begin taking up all of your internal storage. Unless you don’t want to keep any of your information local (defeating the need for Time Machine), an external storage drive is the best way to preserve the disk images that the service creates.
As a best practice, your setup should use an external HDD with 150% of the capacity your internal storage offers. That means an iMac with a 1 TB HDD setup would want to use a 1.5 TB external drive to manage the compressed files. You can also pick whatever number best suits your needs, but it should be equal to or greater than what you already have.
If you have macOS 10.12 or earlier, you have the option to limit the backup size that Time Machine creates by using terminal commands.
sudo defaults write /Library/Preferences/com.apple.TimeMachine MaxSize -integer XX
Replace XX by the number of megabytes that you want to use.

When you have macOS 10.13 or newer, you’ll need to limit storage space on the destination side. That means your oldest backups become automatically deleted. If you only want the latest options, a 1:1 storage ratio is likely suitable for your needs.
You can also create a partition that artificially limits how much space Time Machine uses. Once it reaches the limitations of that barrier, you’ll see the oldest backups disappear when new ones get created.
How Do I Turn Off Time Machine?
If you don’t have an external HDD to use for Time Machine, your internal storage can disappear quickly. When your Apple computer only contains 256 GB SSD, it might only take a couple of weeks before all of your extra space is gone. You might decide to turn off Time Machine if you are making manual copies of the files you want to preserve.
Time Machine can get turned off through the System Preferences menu. Select the Time Machine icon, and then use the slider to turn it off or uncheck the box underneath the icon.
Once it is off, you can still use it for manual backups when you want to capture an image of your disk to save. You can access this benefit even if the automatic backup functions stop.
How to Make the Backup Faster on Time Machine
When you initiate the first backup through Time Machine, you’ll notice that the process can take a long time. If you’ve used most of your drive already, the transfer to external storage can sometimes take more than 24 hours.
Love that duration…”About a day”
Copying a full 3TB #TimeMachine backup from one disk to another in MacOS.
4,819,482 files
It took 4.75 DAYS in “Preparing to copy…” mode.Curious that only 1.73TB is to be copied…magical directory entries in the TM structure! pic.twitter.com/jZXaspYsho
— Paul Jacoby (@pejacoby) September 4, 2020
Although you can still use your macOS device during the data transfer, you might notice some changes to its functionality. Your Mac might process commands more slowly, freeze when using apps, or develop unexpected errors. That’s why knowing how to make the backup faster can help you have a more positive experience.
You can schedule Time Machine backups to function when you aren’t usually using the computer. If you leave everything running and initiate a 2 AM command, you won’t need to worry about the processes slowing you down.
You can also configure Time Machine to use more of your processing resources to make the backup faster. If you choose this option, it will slow your Mac’s functions dramatically until the process is complete.
How to Use Your Mac’s Processor to Your Advantage
If you’re unfamiliar with using the Terminal on your Mac, you may want to use the primary set up Time Machine offers with automatic functions. These instructions require specific commands that might produce variable outcomes. If you don’t have a Time Machine backup available, create one before starting to reduce the risk of data loss.
Step 1:Use the spotlight function of your Mac to locate the Terminal. Once it pulls it up, click on it for access.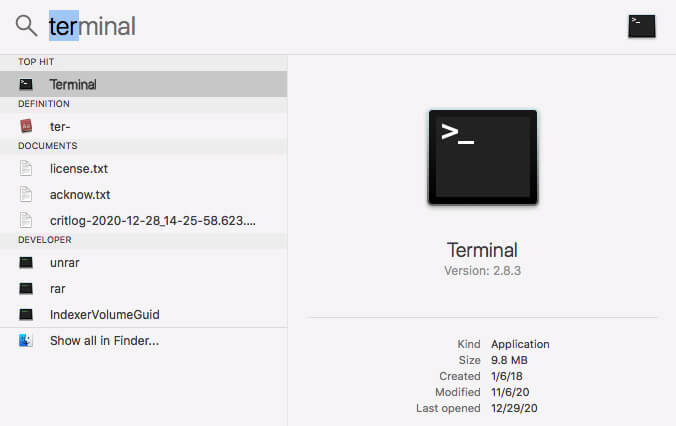
Step 2:Type this command in its entirety and verbatim:
sudo sysctl debug.lowpri\_throttle_enabled=0
Step 3:Hit Enter.
Step 4:Your Mac will ask for your password because of this system change, so you’ll need to provide this information to do a time machine backup faster.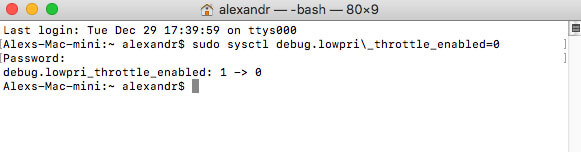
Step 5:After entering the password, you can close Terminal.
This command disables your processor’s throttle. It’s nice to have for a Time Machine backup, but you don’t want this issue around all of the time.
Once the backup is complete, you’ll want to enable the CPU’s throttle. That means you’ll need to go back to the Terminal.
After you get to the command prompt, type this command precisely:
sudo sysctl debug.lowpri\_throttle_enabled=1
and hit Enter.
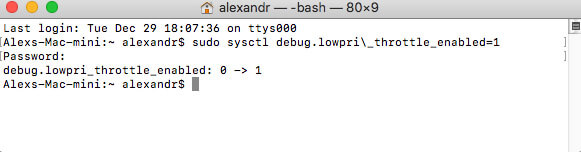
You’ll get asked to enter your password again. After you do, the changes will restore from Time Machine backup efforts to create the previous system environment.
Additional Ways to Speed Up the Time Machine Backup
If Time Machine is taking longer than expected to create the compressed disk image you want, you can take the following steps to improve your speed and overall experience.
| Method | Description |
|---|---|
| Check for Large Files | Some Mac apps store unusually large files that get frequently updated. Instead of adding these to your disk image, exclude them from the backup. You can find this feature under the Time Machine preferences under Options. Click the + button to select the folders or files. |
| Upgrade to macOS Big Sur | Running Big Sure on your Mac can improve Time Machine’s performance dramatically. You’ll need to use an AFPS-formatted drive to maximize the results. You can use the Disk Utility to erase your backup disk to change the formatting, although that option comes at the expense of previous backups. |
| Check for Apps that Keep the Backup Busy | If you use the external HDD for needs other than a Time Machine backup, the speed rises and falls based on use. Keep any utilities, including antivirus software, on other disks to maximize performance. |
| Review Your Network Performance | Some users operate Time Machine across a network. If your speed is unusually slow, it could be due to poor Wi-Fi performance. This issue is typically resolved by connecting the secondary drive to the Mac that requires a backup. |
| Inspect Your External HDD for Problems | If your external HDD has corrupted sectors or other problems, the Time Machine data won’t save. You’ll need to use the Disk Utility to examine the drive to determine if a repairable issue is present. |
How to Restore Backup from Time Machine
If your Mac starts performing poorly, it might be time to initiate a Time Machine restoration from a backup. This process is relatively straightforward, but it might not be your best option. Depending on the issues involved, it might take several days before your Mac is ready for use after initiating this feature. If you have the time to devote to this process, it’s worth undertaking. If not, you might consider an alternative solution.
Most people initiate a Time Machine restoration because they think they’ve lost a file. When you have access to professional file restoring software, you can often locate the missing information with a simple scan.
Disk Drill for Mac is a straightforward solution that lets you find and recover files quickly. It can even work when a corrupted drive interferes without utility services.
The primary reason why you’d want to use Time Machine to restore your Mac is because you’ve lost functionality.
If you need to complete a Time Machine restoration, you can follow these steps.
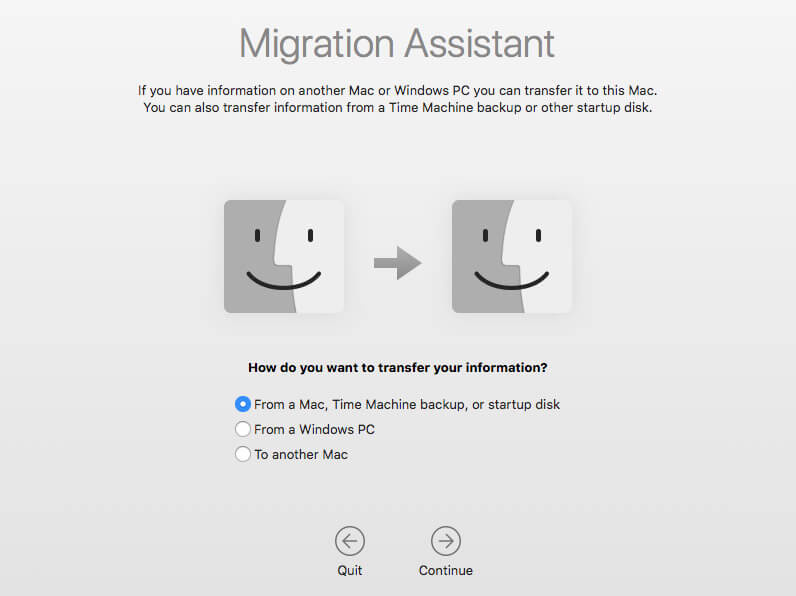
Step 1:Connect the external HDD with the Time Machine backup to the Mac that requires restoration.
Step 2:Open the Migration Assistant.
Step 3:Choose to transfer the information from a Time Machine backup when asked.
Step 4:You’ll get asked to choose the backup disk you want to use for this process. You must select the HDD with a compressed image of the disk you want to use.
Step 5:Once you’ve selected the information to transfer, click on the Continue button.
This process defaults to the most recent backup when using Time Machine to restore your Mac. If you need to go back further, open the utility to select the boot image you prefer. You’ll find a list of the available options.
Although you can’t define the folders or files except for large exclusions, it will give you the information access you need in an emergency.
How to Boot a New Mac from Time Machine
If you recently purchased a new Mac and want access to your previous information, Time Machine offers a straightforward solution.
You can follow these steps to start restoring from Time Machine to your new computer.
Step 1:Connect the backup disk to your new Mac.
Step 2:When you start the computer setup process, select the option that says From Time Machine Backup to initiate the process. You might see a command for a startup disk or From a Mac instead. All three solutions will start the process.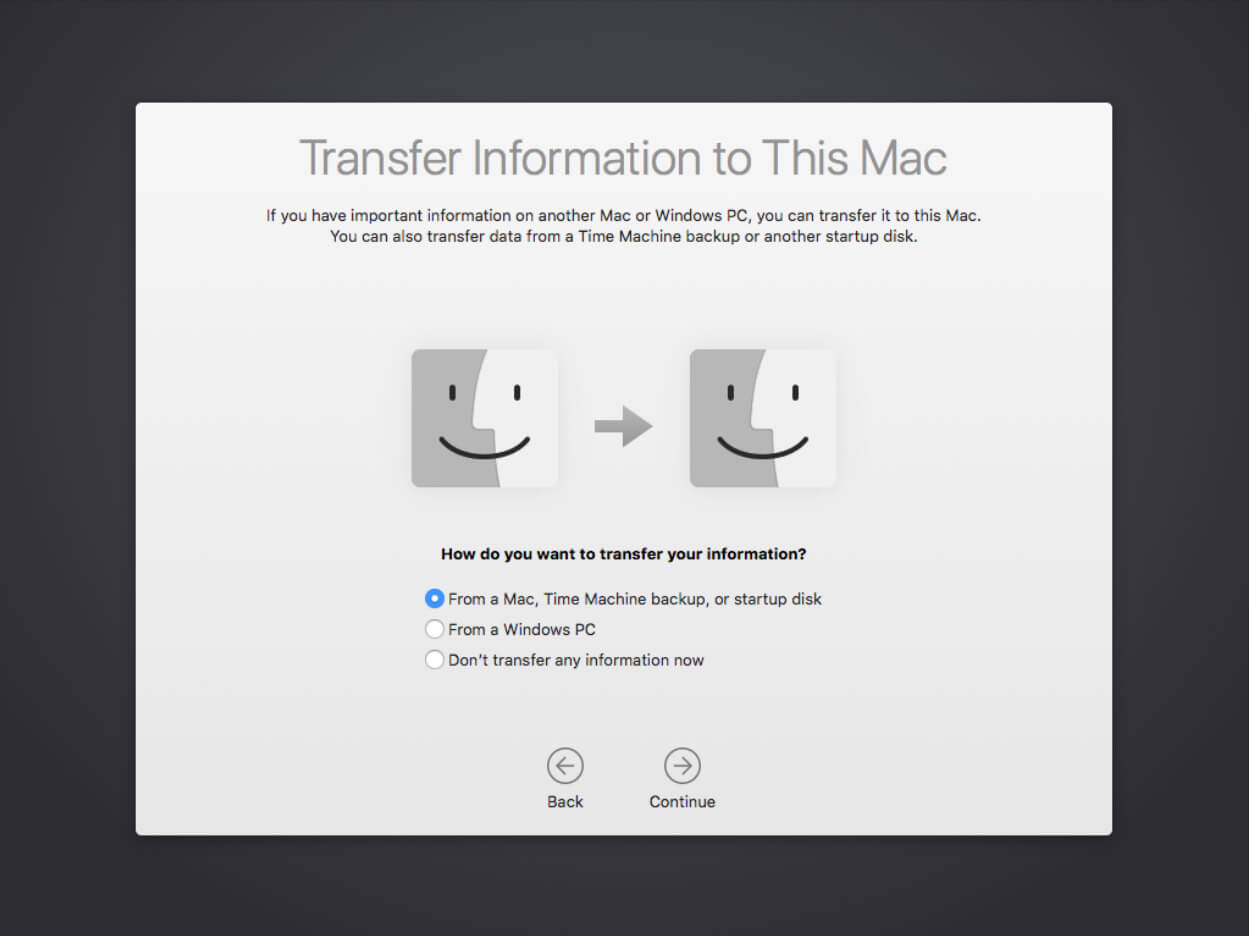
Step 3:The Mac will ask you to select the backup disk you want to use. You’ll choose the external HDD from the listed options.
Step 4:Click on the Continue button.
Step 5:You’ll be asked to confirm the data you want to transfer. After selecting the items, you’ll need to click on Continue again.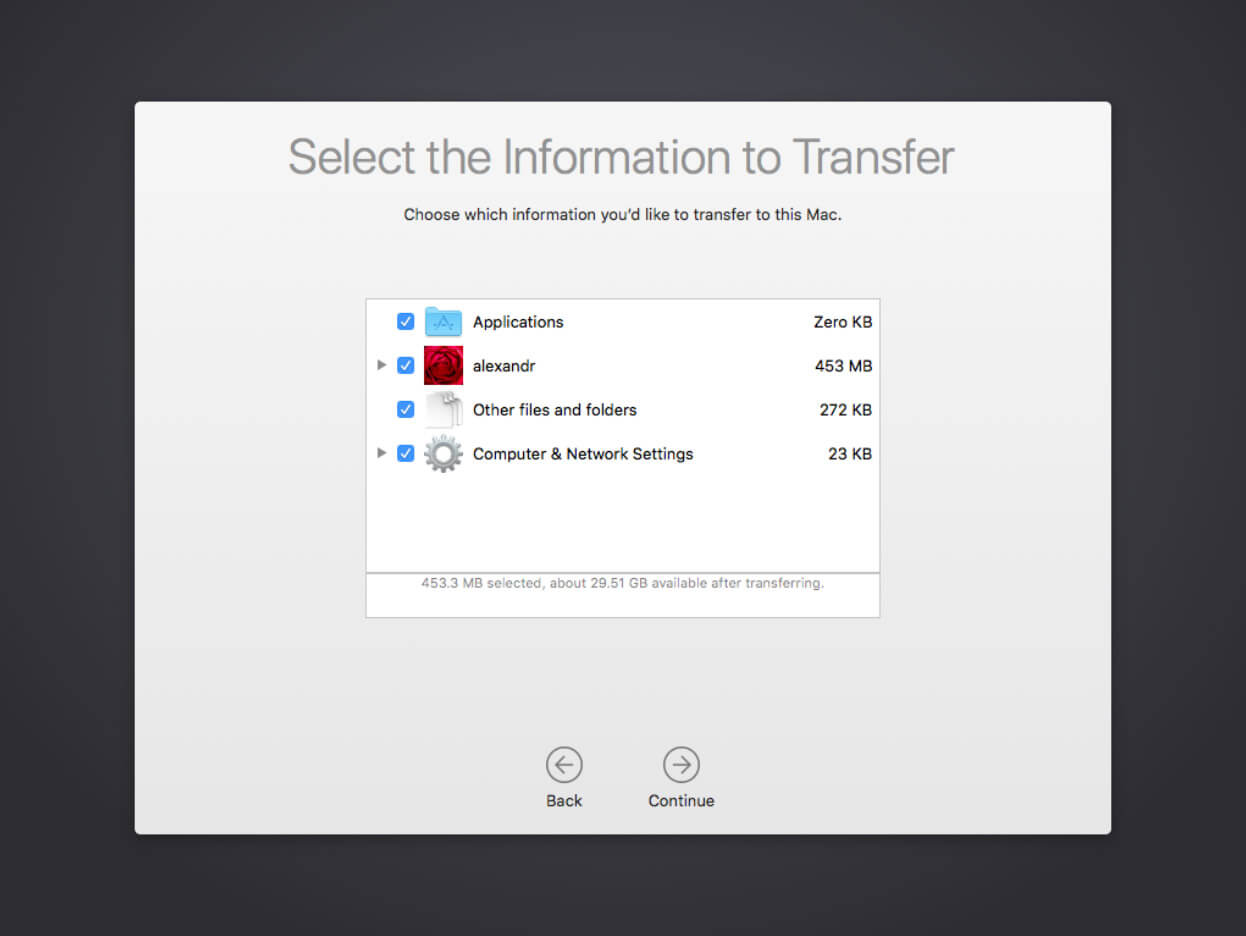
Once you complete those five steps, your Mac will start the process of transferring data from Time Machine on your behalf.
In Conclusion: How to Use Time Machine Like a Pro
Most people don’t think about having a backup disk available until they need one. By then, it is already too late! That’s why you should activate Time Machine now to protect your Mac.
When you know how to use Time Machine on Mac correctly, you’ll keep your disk images stored on an external drive so that you have portable access to your information. This utility allows you to create or restore macOS computers to a previous state when you experience unexpected errors, faults, or possible corruption.
If you only have a few files to find, it doesn’t make sense to use Time Machine because you won’t save any time! That’s why a recovery tool like Disk Drill for Mac makes more sense. File recovery tools scan your active drive for lost and missing files. You can preview the items it locates to see if it is available for restoration.
Please remember to keep this guide saved for future reference so that you can use Time Machine like a pro.


