
If your Mac folder is greyed out, you won’t be able to access the files inside until you fix it. It’s a common problem Mac users face because a lot of things can cause it. Fortunately, it’s usually easy to solve!
Based on the common causes of this issue (which I’ll quickly explain below), I compiled 7 proven methods to fix greyed-out folders on your Mac. Read on!
Table of Contents
Why is My Folder Greyed Out?
Greyed-out folders on Mac can happen for a bunch of different reasons. It may be an issue with macOS, Finder, your drives, or with the folder itself. Figuring out what caused your issue specifically can be super helpful with identifying the correct solution or at least knowing where to start (since multiple issues may be at play).
Here are the most common reasons for greyed-out folders on your Mac.
| Cause | Summary |
| Insufficient permissions | Folders can be assigned “permissions”, which dictate how much access certain users have. It’s possible that your user account does not have the necessary permissions to even “Read” or view the folder’s contents. |
| Interrupted copying/downloading process | Did you copy the folder from another location (like another folder or an external drive) or download it from the internet? Something may have interrupted the process, leaving your folder in a “partially copied” or incomplete state. It won’t work as intended. This is also the most likely scenario if your iCloud files are greyed out on Mac. |
| Corrupted creation date | A corrupted creation date (and other file attributes) may mess with macOS’ automated processes and sorting functions. This can cause the affected folder to behave abnormally (like appearing greyed out). |
| Faulty external drive | If the folder is stored on an external drive that your Mac is having trouble with (due to incompatibility, corruption, or an issue with ports or cables), you likely won’t be able to access it properly. |
| Finder glitches | Finder is the graphical user interface that you use to navigate through folders on your Mac. It can glitch out due to software bugs, lack of memory, corrupted Finder preferences, and more. This can lead to folders being displayed as greyed out. |
| Cache issues | If your cache gets overloaded with temporary files, it may affect the directory’s performance and cause issues like greyed-out or inaccessible folders. While not as common as the other causes on this list, I’ve found that it’s more likely to happen if you have limited disk space, work with large media files, or use resource-intensive applications (like 3D modeling programs). |
How to Fix Greyed-Out Folders on Mac
Below are the 7 most effective methods to fix greyed-out Mac folders based on the issues that caused them. Each method solves a specific problem but we recommend going through all of them in order (starting from simple steps to more drastic fixes) if you’re unable to pinpoint the exact cause.
Method 1: Try Copying the Folder Again
As we mentioned in the previous section, folders may malfunction if the copy or download process gets interrupted. File copies or downloads are greyed out on Mac because the folder is in an incomplete or partial state.
To fix it, you can simply copy or download the folder again. As long as there are no interruptions, the folder should appear and behave normally (unless the issue was caused by something else).
Method 2: Check Permissions
Incorrect permissions are the usual cause for greyed-out Mac folders and it’s one of the easiest problems to fix! As we glossed over previously, permissions dictate how much access certain users have to a folder.
Specifically, permissions on Mac include “Read” (opening the folder and viewing its contents) and “Write” (modifying the folder by adding or deleting its contents). Giving yourself Read permission should be enough to make your folder appear normal, but you ideally want both Read and Write permissions for full control.
To fix a user folder greyed out on Mac by modifying its permissions:
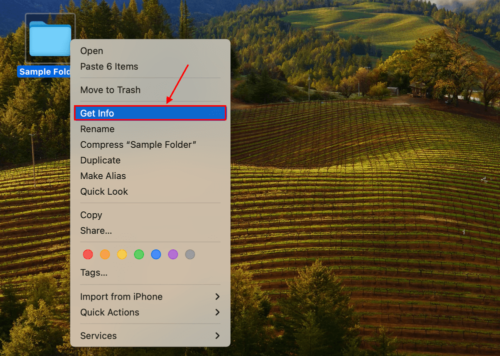
Step 1: Right-click your folder and click Get Info.
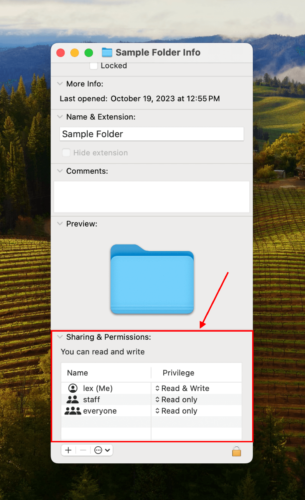
Step 2: Scroll down to the Sharing & Permissions section and ensure that the entry for Privilege beside your user account is Read & Write.
Method 3: Open the Folder Using Terminal
Finder glitches out sometimes, especially if you’ve got near-full storage capacity on your Mac. An easy way to bypass any Finder issues is to open your folder from the Terminal app. This process is very easy even if you’ve never touched Terminal before.
To open the folder using the Terminal app:
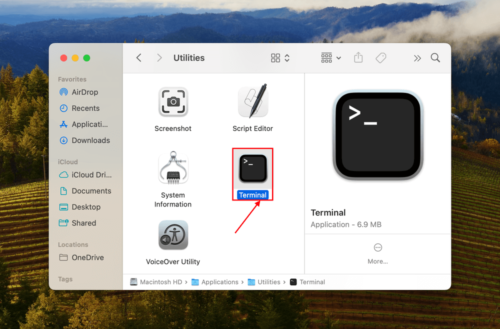
Step 1: Open the Terminal app (Finder > Applications).
Step 2: Type the following command and hit Return:Open
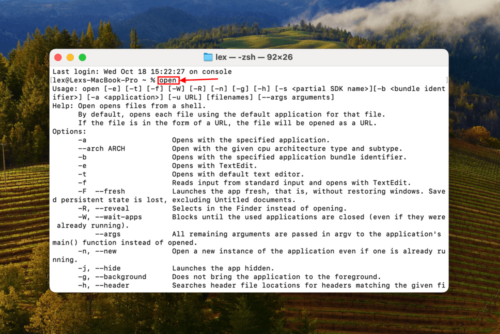
Step 3: Drag your folder inside the Terminal window. When its path appears, hit Return to open it.
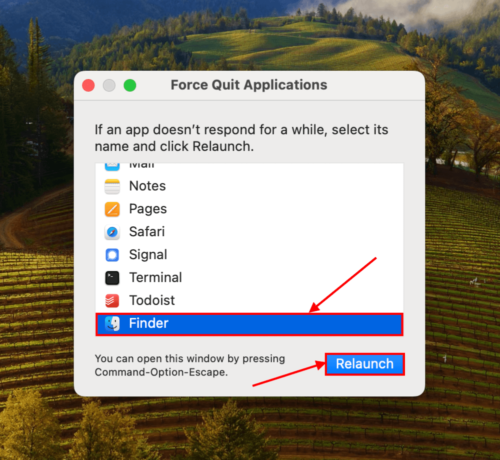
Method 4: Relaunch Finder
Another effective way to deal with Finder glitches is to relaunch it using the Force Quit menu. This is actually a better solution than bypassing Finder with Terminal; Force Quit will reset existing Finder preferences and restart Finder processes, which can effectively clear temporary glitches.
To fix Mac Finder greyed out folders by relaunching Finder:
Hit the Option + Command + Esc keys to open the Force Quit menu. Then, select Finder and click Relaunch.
Method 5: Clear Cache and Temporary Files
The cache is responsible for temporarily storing the files that your Mac needs to operate smoothly. macOS usually handles cache management on its own but a full storage capacity or random glitches may interrupt this process.
When the cache folder gets overloaded, it may result in performance issues and glitches that can indirectly cause greyed-out folders. Clearing your cache folder will usually take care of these issues.
To clear your Mac’s cache and other temporary files:
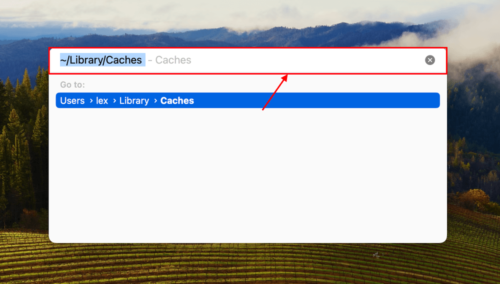
Step 1: Open Finder. In the Apple menu bar, click Go > Go to Folder. Then, type ~/Library/Caches in the field and hit Return.
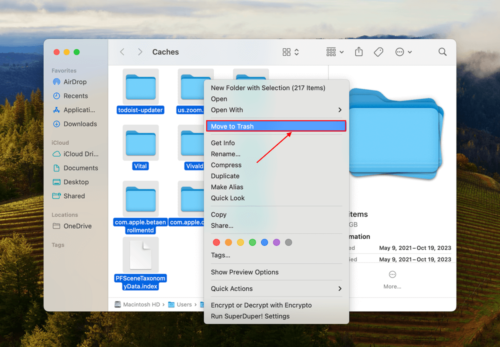
Step 2: Select all the files in this folder. Then, right-click > Move to Trash. Make sure to confirm the action.
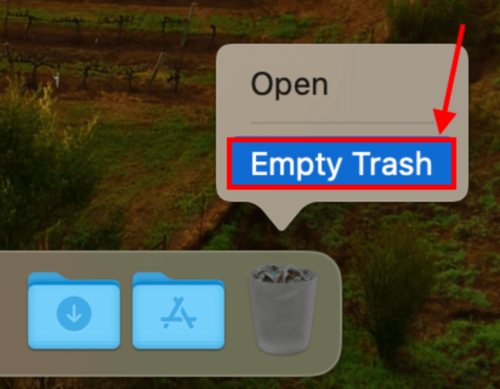
Step 3: Right-click the Trash folder’s icon in your Dock and click Empty Trash. Once you’ve emptied your Trash, reboot your Mac.
Method 6: Overwrite Creation Date
Your folder’s creation date isn’t just cosmetic or informational – it’s an important attribute that Finder uses to process and sort it properly. If it gets corrupted, Finder may have a tough time interpreting its data and displaying the folder properly.
Overwriting the folder’s creation date may clear the corruption and allow Finder to process it correctly.
To overwrite the folder’s creation date:
Step 1: Open the Terminal app (Finder > Applications > Utilities)
Step 2: Type the following command and hit Return:
SetFile -d 17/10/2023 /Your Folder Path
Replace Your Folder Path with your folder’s actual path.
Method 7: Repair Disk Using Disk Utility
Is your folder stored on an external drive your Mac is struggling to read? Your drive might be corrupted. This affects not only how the folder is displayed, but also its attributes and even the integrity of the data itself.
Fortunately, Disk Utility’s First Aid tool is really good at cleaning up most disk errors that lead to corruption. Once you fix that, there’s a good chance that your folder will be displayed correctly.
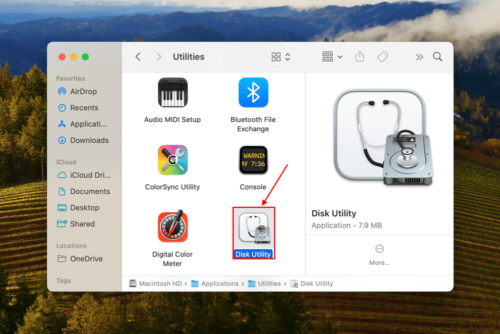
Step 1: Launch Disk Utility (Finder > Applications > Utilities).
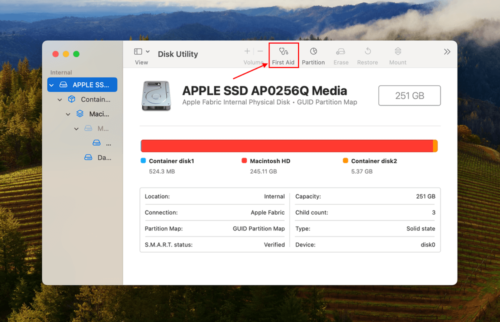
Step 2: On the left sidebar, select the drive that stores your folder (you can select your boot drive if the folder is stored there). Then, click First Aid at the top of the window.
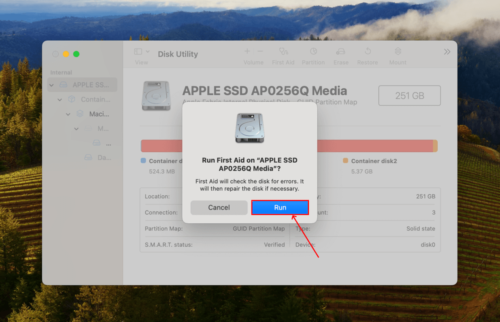
Step 3: Click Run to start the repair process.
How to Recover Data from a Missing Folder
If none of the methods in the last section worked for you, then the folder you see is likely just an “alias” or shortcut of the actual folder. It’s greyed out because it can’t find the folder anymore and can no longer give you access – likely because it’s missing or deleted.
In this case, the solution is to recover your original folder so you can regain access to its contents and fix the greyed-out alias at the same time. You’ll need a tool called data recovery software, which can restore deleted and corrupted data
For this article, we’ll be using Disk Drill. We chose it because it’s highly optimized for Mac, whether you’re using a MacBook Pro, MacBook Air, or a Mac desktop computer. It also recognizes most (if not all) native macOS file types and metadata. Disk Drill even works with corrupted and formatted drives, which may have caused your original folder to go missing. We’ll show you how it works.
To recover the data from your missing folder using Disk Drill:
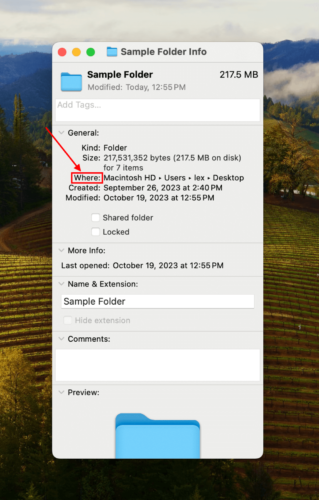
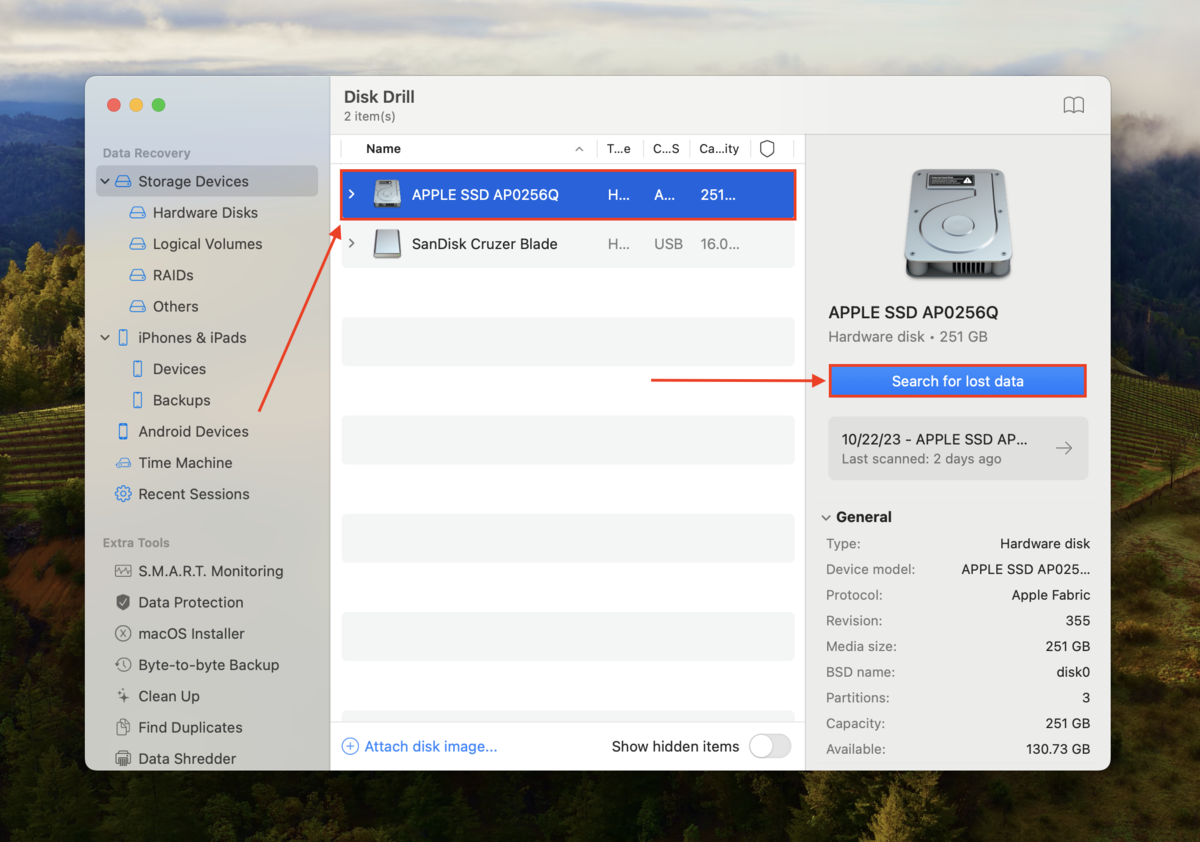
Step 1: Right-click your folder and click Get Info. Under General, note the path in the Where section. This is an easy and effective way to find files on your Mac. If the folder is located on your Mac’s boot drive, connect an external drive before proceeding (we’ll save the recovered folder there).
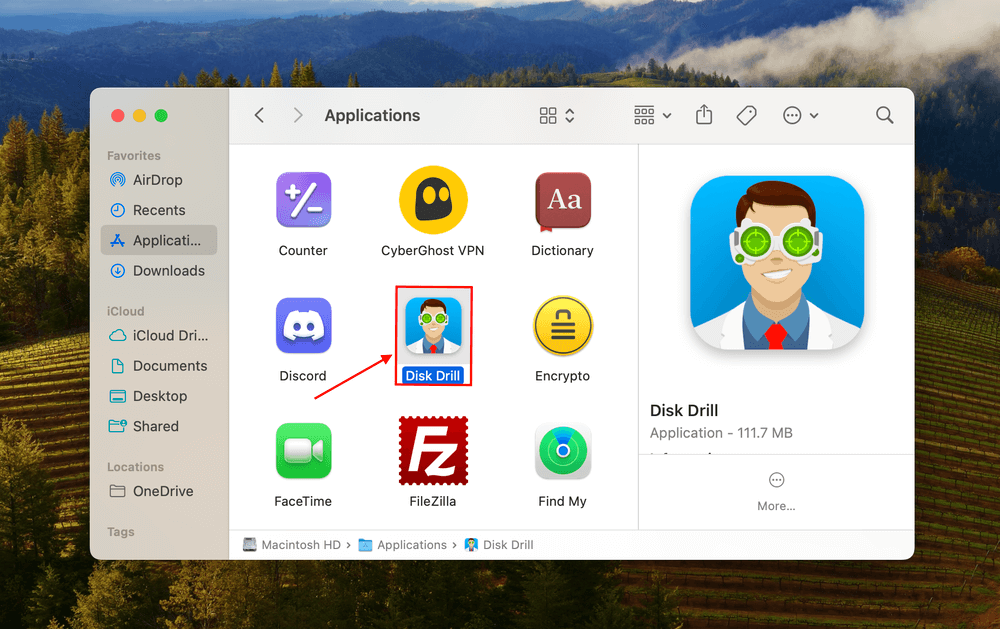
Step 2: Download and install Disk Drill. Then, launch it (Finder > Applications).
Step 3: Select the drive you noted in Step 1 and click Search for lost data.
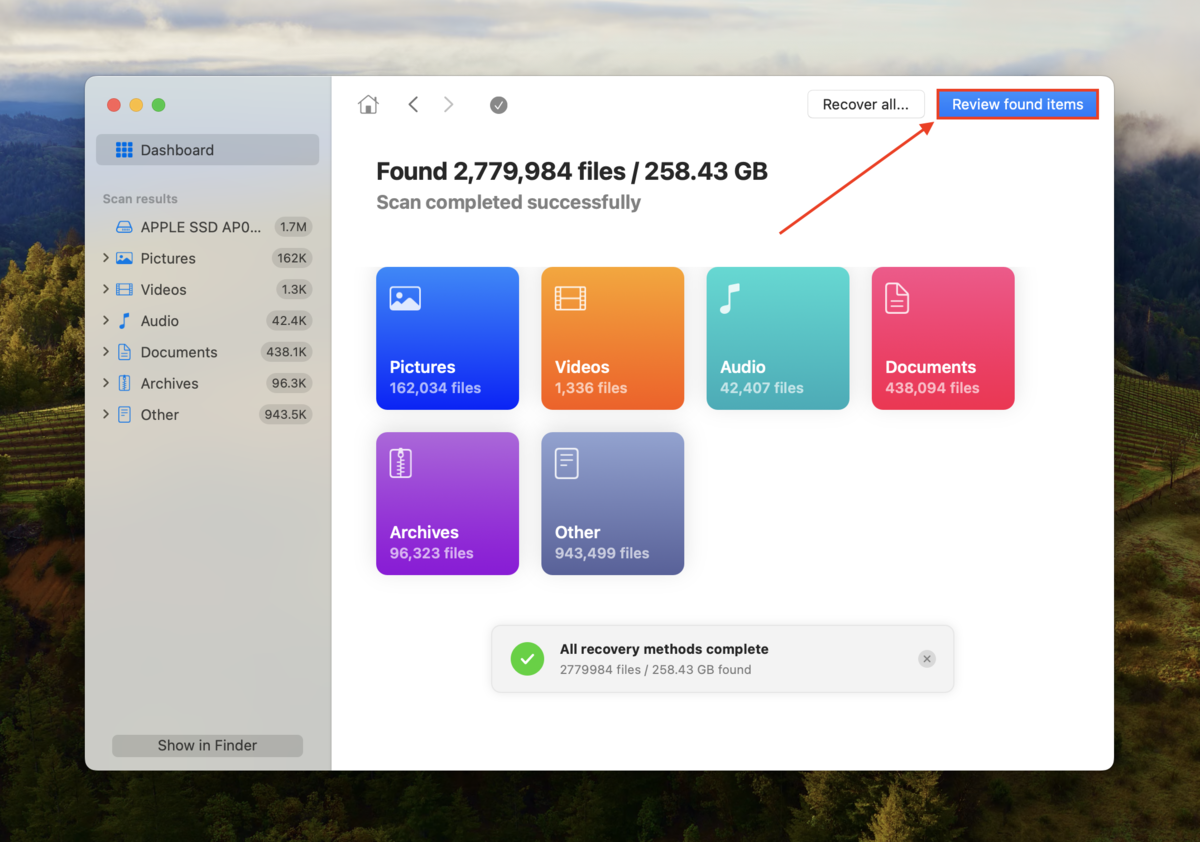
Step 4: Wait for Disk Drill to finish scanning your drive. Then, click Review found items.
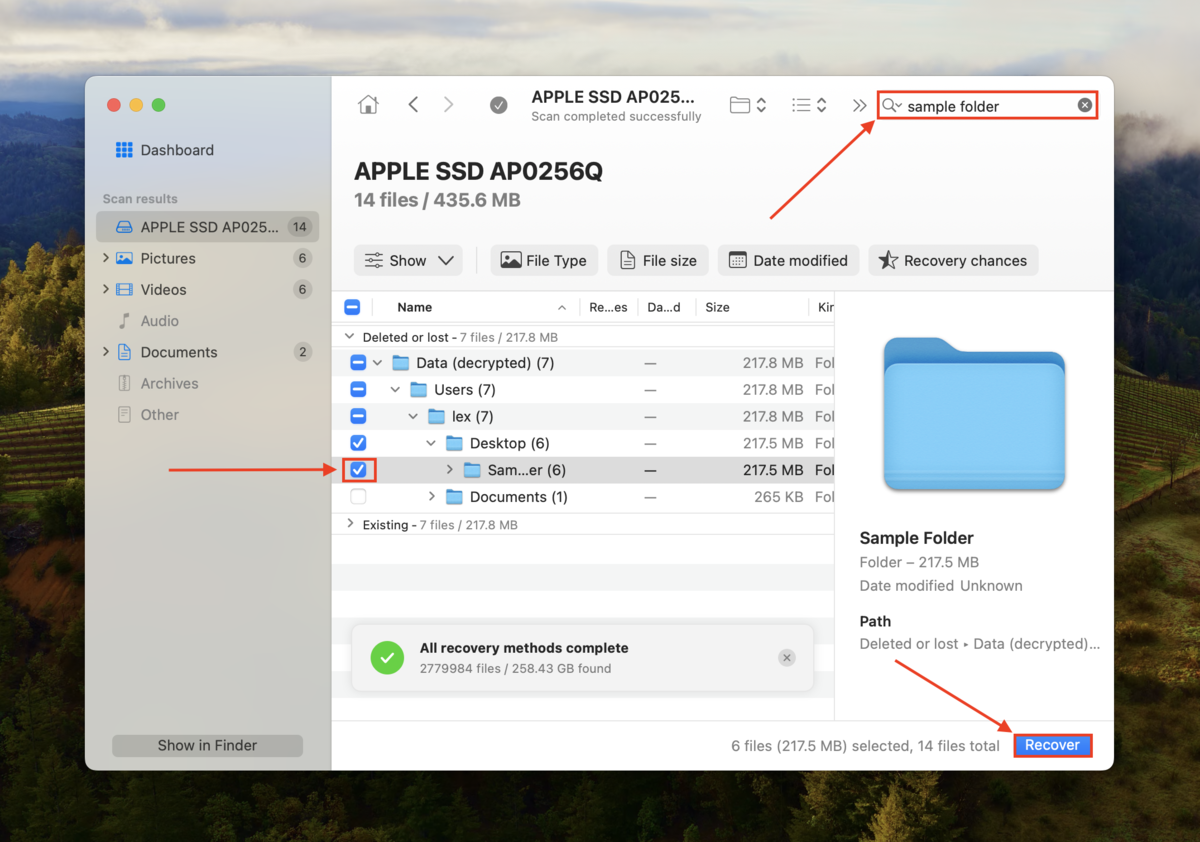
Step 5: Type your folder’s name in the search bar. Then, click the folder from the list of found data and click Recover.
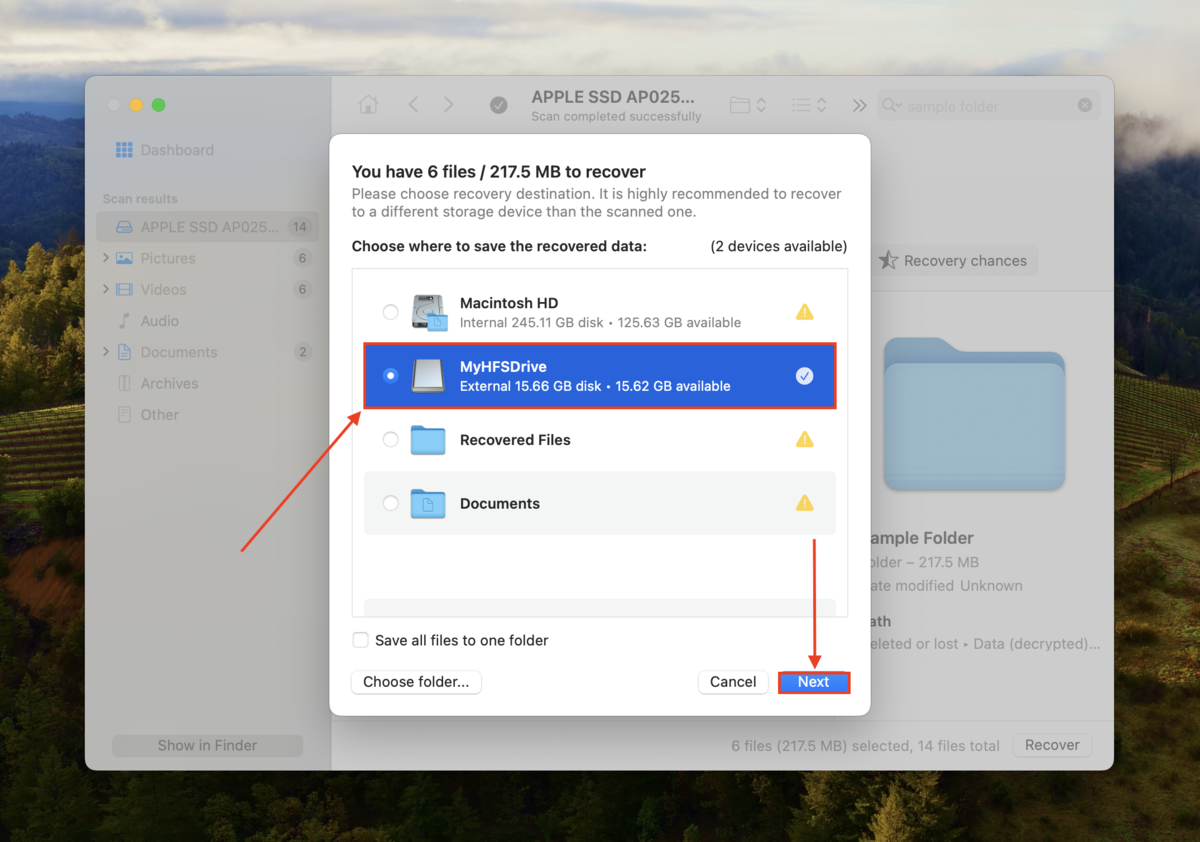
Step 6: Choose a location on a separate drive where Disk Drill will restore your recovered folder. Don’t restore it to the same drive – you may overwrite your data. Once you’re satisfied with your selection, click Recover.
Conclusion
Fixing a greyed-out folder on your Mac is all about figuring out what caused it and being willing to try multiple troubleshooting methods. It can be triggered by so many different issues, some of which are totally unexpected.
There are some things you can do to avoid this scenario, such as maintaining your storage space and taking care of your drives, cables, and ports. However, it can still happen if you do everything right.
To avoid having to deal with the problem directly, we suggest routinely backing up your data so you always have a copy of your files and can delete malfunctioning folders without issue.
FAQ
- Copy the folder again
- Check and modify folder permissions as necessary
- Open the folder using the “open” command in Terminal
- Relaunch Finder using the Force Quit tool
- Clear your Mac cache and any temporary files
- Overwrite the folder’s creation date
- Repair your drive using Disk Utility’s First Aid tool (if the folder is stored on an external drive)
- You don’t have the necessary permissions to access them.
- The files are corrupted.
- The file format isn’t compatible with macOS (e.g. files created using a Windows-only program)
- The file contains malware.
- If you updated iOS recently, files created with outdated software may no longer be compatible.


