
“First Aid could not unmount the volume for repair.” This is a tough error because unmounting is crucial for the operating system’s ability to interact with your drive. In this chicken-and-egg scenario, the drive has to be unmounted in order to fix it – but the error itself is preventing you from unmounting it.
What do you do?
In this article, we’ll show you 5 different methods of fixing the unmounting error so you can make your drive usable again. We’ll even show you how to preserve your data throughout the process. Read on!
Table of Contents
What Does Unmount Volume Mean?
To “Unmount” a volume means to logically detach a storage device or disk from the operating system. The process “tidies up” the file system by closing any open files or applications using the volume and completing any read or write operations currently running.
That way, your drive and data are protected from corruption and other errors.
There are loads of scenarios where macOS unmounts your drive. Recognizing them is key to avoiding corruption and other errors as well as troubleshooting possible reasons why you can’t unmount a drive.
- Safely ejecting drives. As we mentioned, macOS will “tidy up” your drive’s file system to make sure it’s safe to physically disconnect from the port.
- Disk Utility operations. Disk Utility operations like formatting, partitioning, or repairing a disk may unmount volumes as part of their processes.
- Time Machine backups. Whenever you set up or use Time Machine, it may mount and unmount designated volumes as part of the backup process.
- Encrypted volumes. As part of its security measures, encrypted volumes may automatically be unmounted when you shut down your Mac.
- Disk errors. Disk errors may cause the unmounting themselves or at least prompt macOS to unmount connected drives to prevent corruption.
- Manual unmounting. You may have unmounted the volume manually yourself (e.g. for privacy purposes)
How to Fix Could Not Unmount the Volume Error
As we described in the previous section, unmounting is crucial for macOS processes – especially if you want to repair a malfunctioning drive. However, there are scenarios where the unmounting process gets stuck or blocked because of errors (or other factors).
Fortunately, there are ways to forcefully unmount a volume that could not be unmounted. We’ll demonstrate all methods in the sections below.
Method 1: Check If Volume Is In Use By Other Apps
It’s possible that macOS is failing to unmount your disk because it’s struggling to close the apps or processes. If your drive failed to unmount because it is currently in use, you can help macOS by figuring out which apps are using the disk and closing it yourself.
To check the activity occurring on your external drive, open the Terminal app (Finder > Applications > Utilities) and execute the following command:
sudo fs_usage |grep yourdrivename
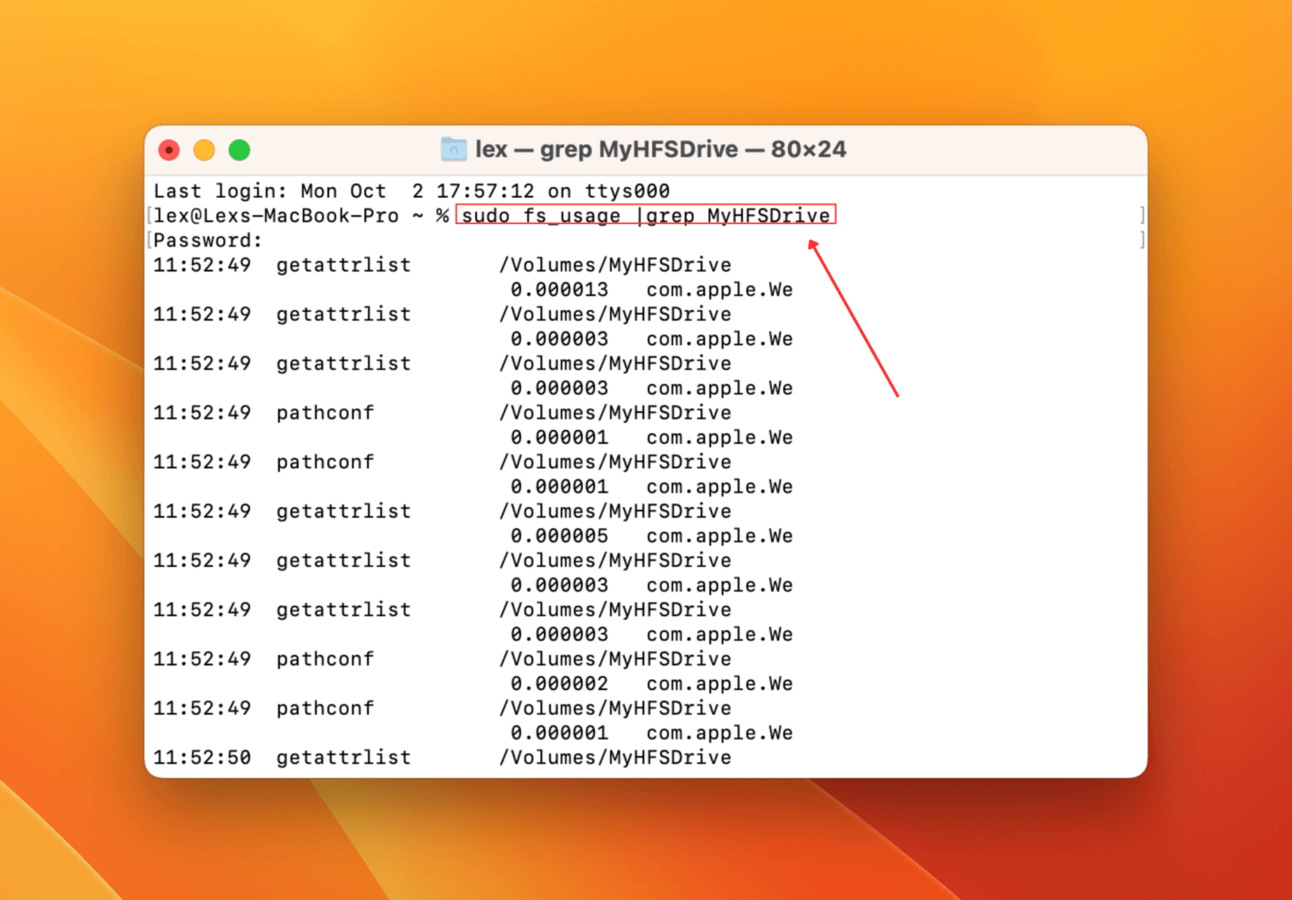
The Terminal app will then display all the activity affecting your external drive in real-time (as they happen).
Method 2: Manually Unmount Disk in Disk Utility
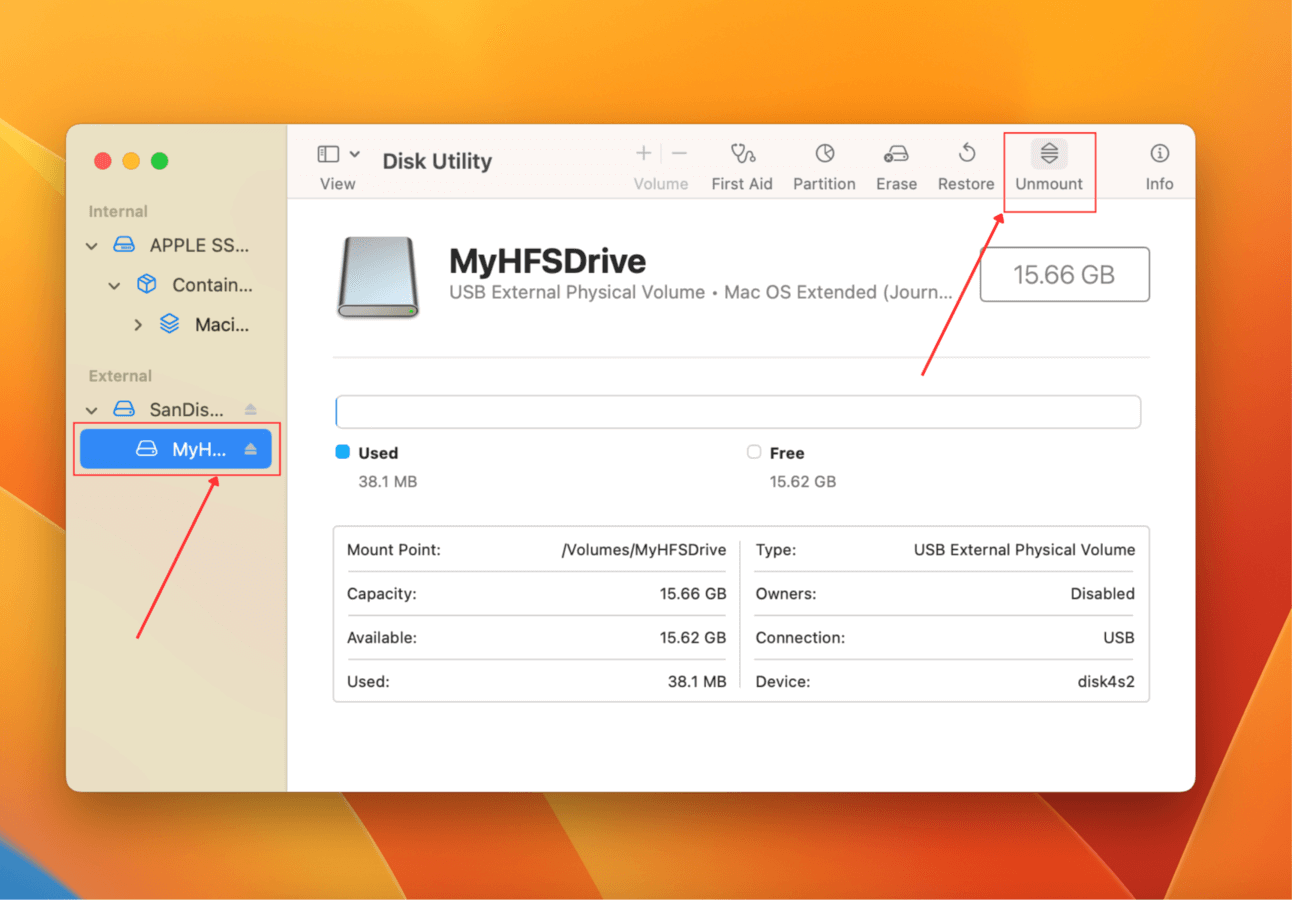
While the unmounting process is usually automated, it may get stalled or fail to initiate for various reasons. That means it won’t even attempt to close apps or processes using the drive. Fortunately, you can manually initiate the unmounting process yourself using Disk Utility.
To manually unmount a drive, launch Disk Utility (Finder > Applications > Utilities). Then, click on your drive in the left sidebar and click Unmount.
Method 3: Force Disk to Unmount in Terminal
If you can’t access Disk Utility tools for some reason or you simply prefer using the command line, you can use the Terminal app to execute the unmountDisk force command.
To force your disk to unmount using Terminal:
Step 1: Launch the Terminal app (Finder > Applications > Utilities).
Step 2: Type the following command and hit Return:
diskutil list
Note your drive’s IDENTIFIER.

Step 3: Then, type the following command and hit Return:
diskutil unmountDisk force /dev/diskx
Replace diskx with your drive’s IDENTIFIER.
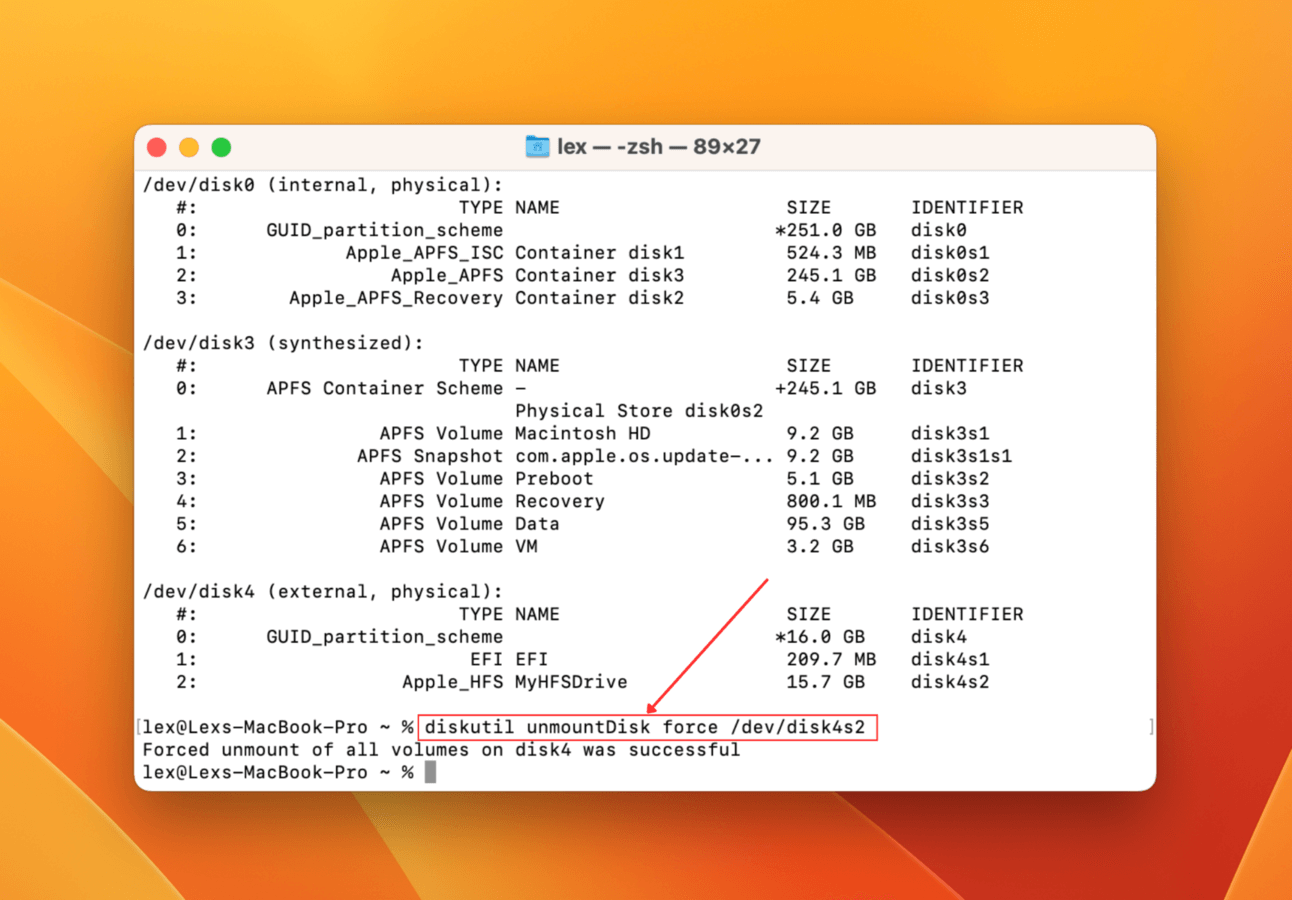
Your drive should now be unmounted. Try running First Aid again.
Method 4: Run First Aid From Boot Drive
First Aid is an excellent disk repair tool that can help detect and fix disk errors or filesystem inconsistencies that may be causing the drive to malfunction.
The key is to run First Aid in Disk Utility while you’re in Recovery Mode, which operates with elevated privileges. It may work on disks that may not be accessible in the “regular” macOS environment.
Apple Silicon
Step 1: Turn off your Mac. Then, boot it and quickly press and hold the power button as it starts up.
Step 2: Once you see the startup options screen, release the power button. Click Options and click Continue.
Step 3: Select a volume and administrator account, entering its password when prompted.
Step 4: Click Disk Utility and click Continue.
Step 5: Select the malfunctioning drive in the left sidebar and click First Aid. Confirm when prompted
Intel
Step 1: Turn off your Mac. Then, boot it and quickly press and hold the Command + R keys.
Step 2: Release the keys when you see the startup keys and enter your password if prompted.
Step 3: If prompted, choose an administrator and enter the account’s password.
Step 4: Select Disk Utility from the list of utilities and click Continue to proceed.
Once you’ve accessed Disk Utility in Recovery Mode, select your drive from the left sidebar and click First Aid. Confirm when prompted.
Method 5: Format the Disk
If you’ve tried all the previous methods in this article to no avail, your last resort is to format the disk. Formatting wipes everything – including whatever caused the drive’s unmounting error.
But in order to format a disk that refuses to unmount, you need to run Disk Utility in Recovery Mode. Recovery Mode’s special permissions will allow you to work with disks that are normally inaccessible.
Once you’re in Disk Utility (via Recovery Mode), click on your drive in the left sidebar and click Erase. Confirm when prompted to proceed with the formatting.
How to Recover Data After Formatting Disk
Formatting can oftentimes be the only solution you have left. It does a good job of getting rid of errors and corruption, but it wipes your data along the way.
However, you still have a small window to recover your lost files. The data still exists in your drive’s file system but it’s marked to be overwritten by new files. Using a tool called data recovery software, we can extract the data before that happens.
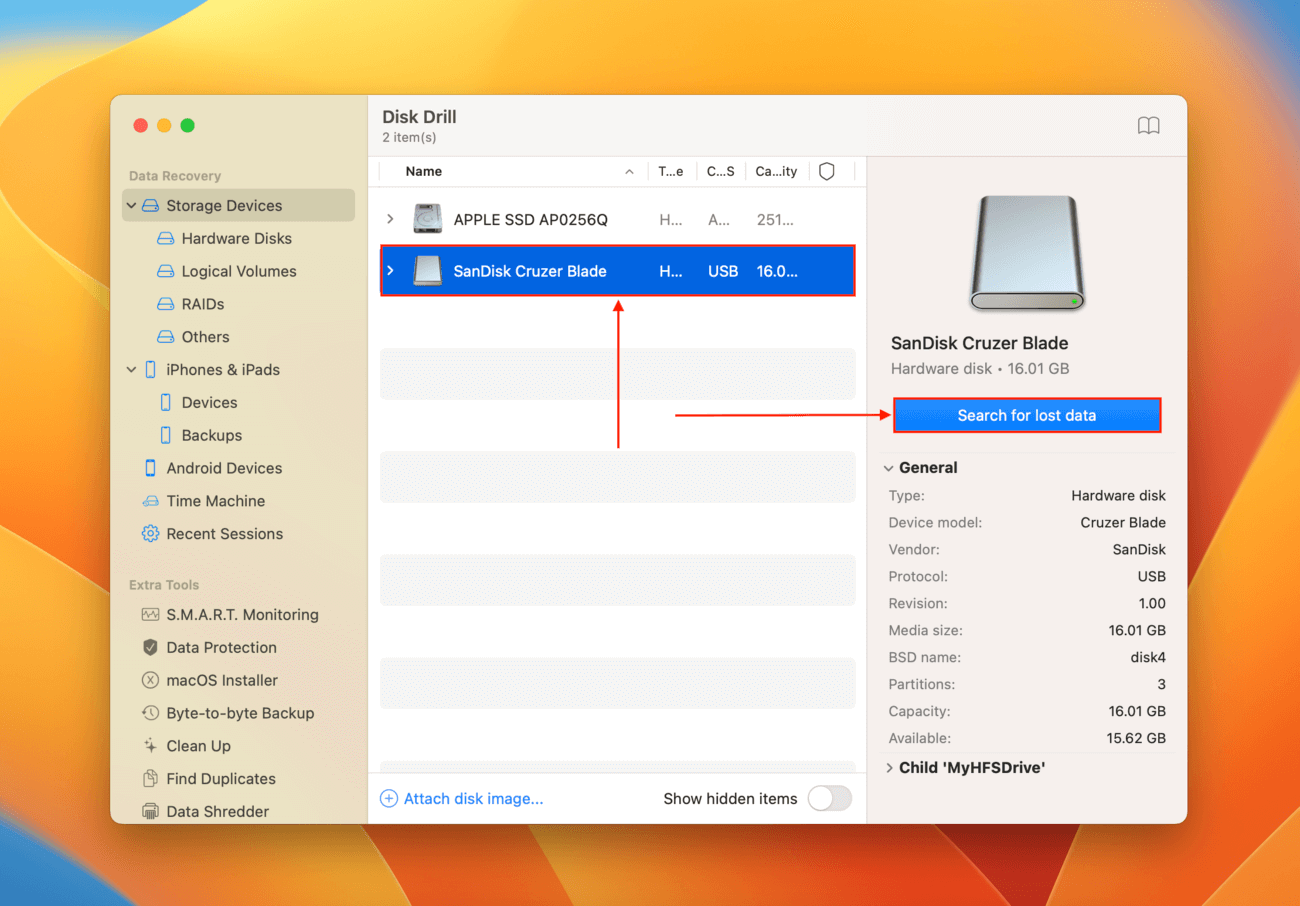
For this article, we’ll be using a tool called Disk Drill. It’s a well-known data recovery software that is both easy to use and powerful. It supports all common file systems, including ExFAT, FAT32, HFS+, and APFS. It can recover files that were lost due to formatting and even corruption and other logical damage.
To recover data from the formatted disk using Disk Drill:
Step 1: Download and install Disk Drill. Then, launch it from the Finder > Applications folder.
Step 2: Select your drive from the left sidebar and click Search for lost data.
Step 3: Wait for Disk Drill to finish scanning your drive. Once it’s done, click Review found items.
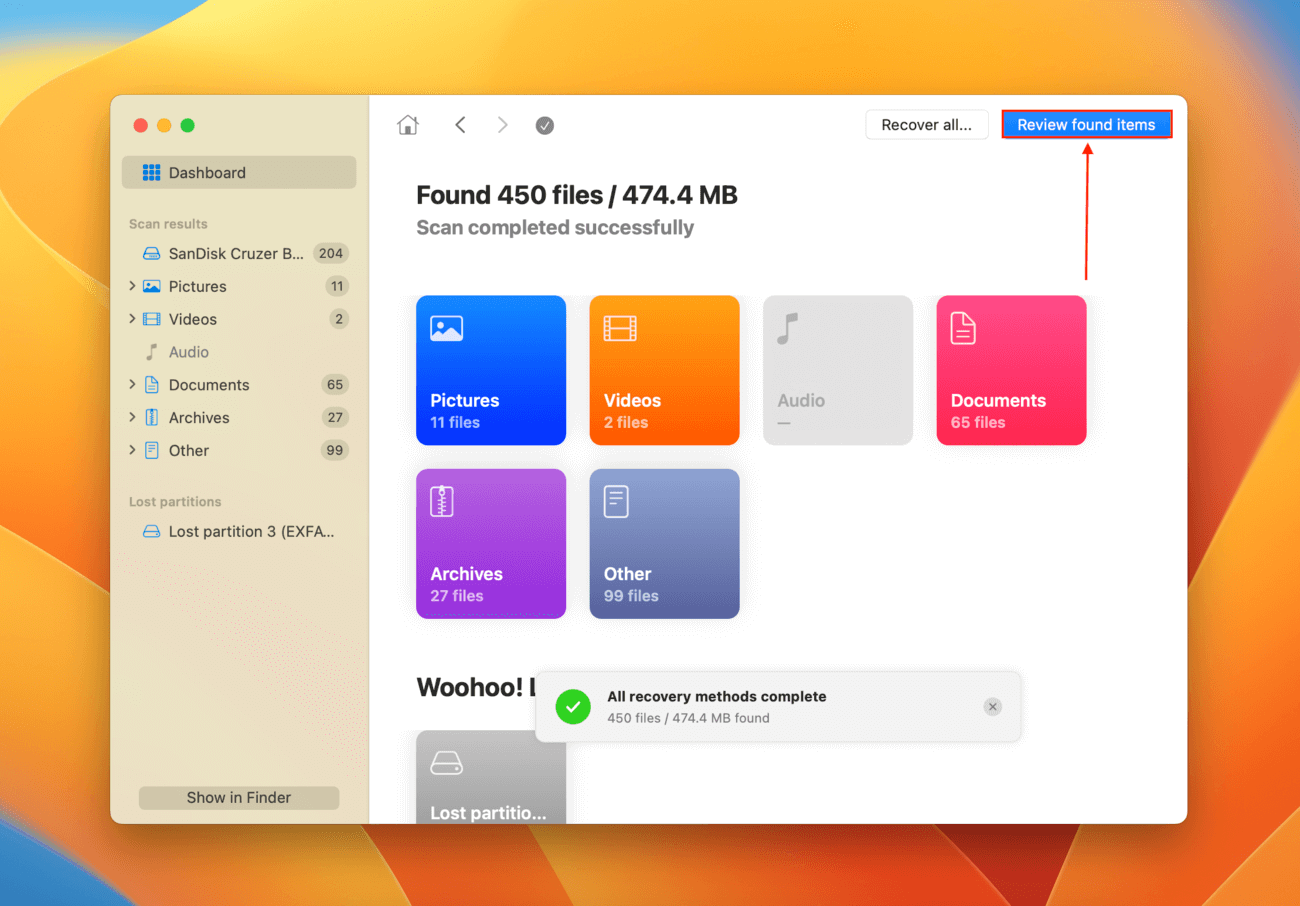
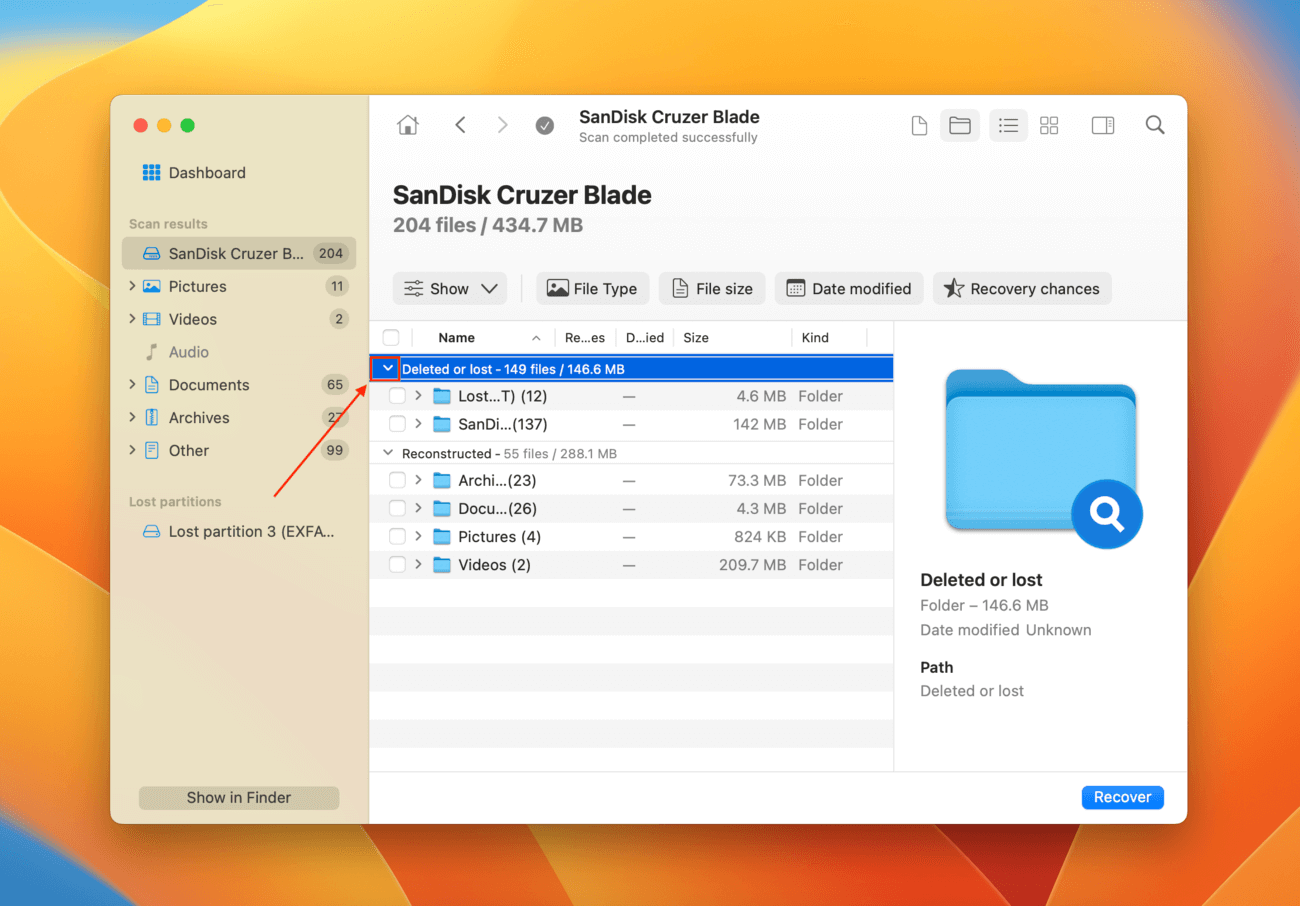
Step 4: Expand the Deleted or lost section to view the formatted data. If you suspect corruption may have caused the unmounting error, you may also benefit from checking the Reconstructed section as well. Click on any file once to preview it in the right pane. You can also click the magnifying glass in the preview window for a zoomed-in view.
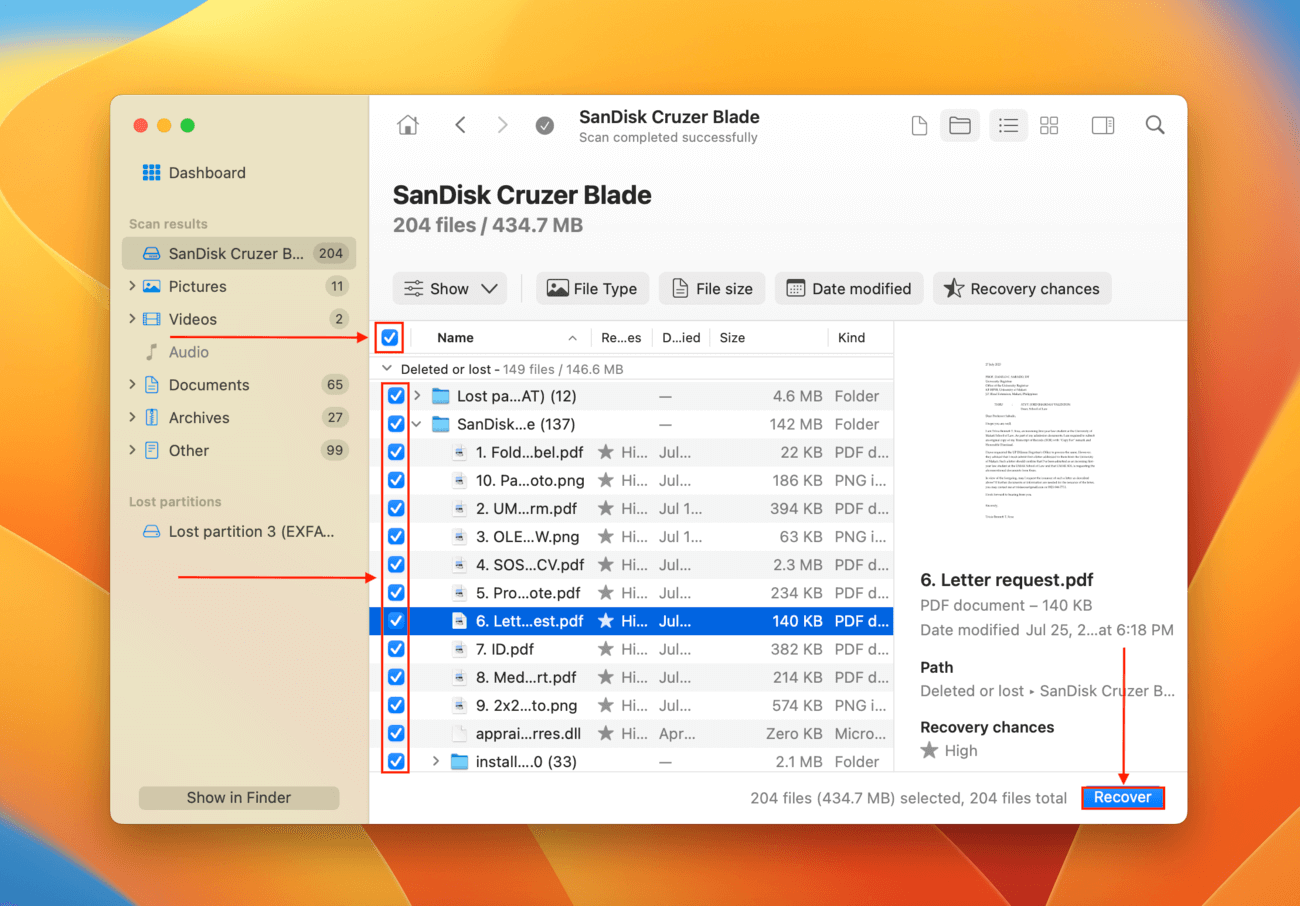
Step 5: Mark the boxes beside the files and folders you want to restore. You can also select all files by marking the box at the very top of the leftmost column. Then, click Recover.
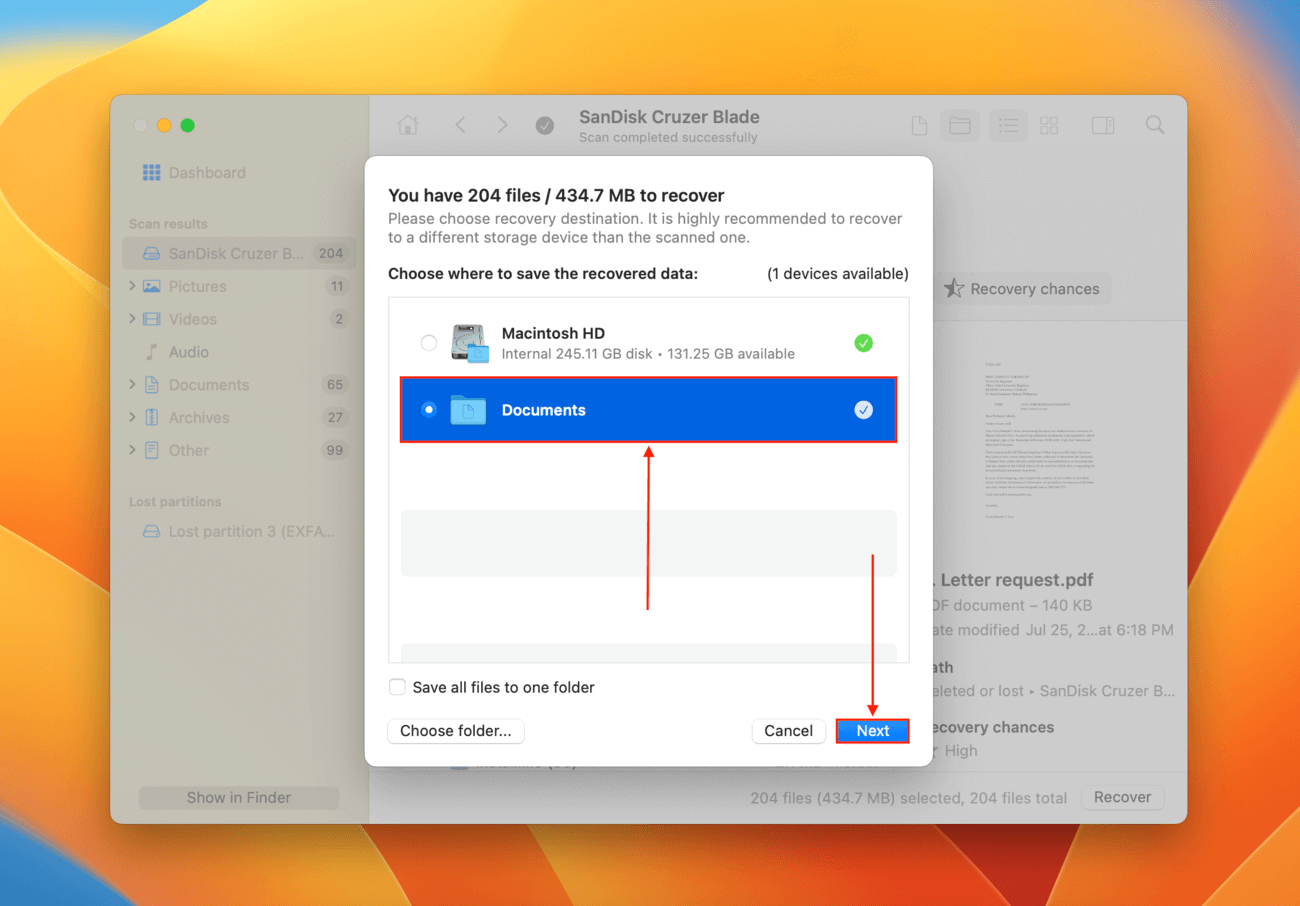
Step 6: Select a location on your computer where Disk Drill will save the recovered files. DON’T save it to the same drive you’re restoring – otherwise, you risk overwriting the data. Then, click Next.
Conclusion
Unmounting is a crucial process for macOS and a healthy drive should be able to unmount properly when required. Unfortunately, most drives will encounter errors sooner or later. Even if your drive won’t mount or unmount properly, the error can usually be fixed.
And while the unmounting error can usually be fixed, your data may become a casualty of the repair process.
Data recovery is never 100% guaranteed. So we highly encourage you to back up your data often so you can attempt to repair your drive without consequences.
FAQ
- Try running First Aid on the same disk again.
- If First Aid doesn’t work, make sure no apps or processes are currently using the disk (Command + Options + Escape.)
- Unmount the drive (using Disk Utility or the Terminal app). Once your drive is unmounted, try using First Aid again.
- Use Disk Utility’s Finder > Applications > Utilities) Unmount button
- Execute the diskutil unmountDisk force /dev/diskx command in Terminal (replace “diskx” with your disk’s identifier)
- Use First Aid in Recovery Mode
- Format your drive in Recovery Mode
- The drive you’re attempting to repair is severely corrupted.
- The drive you’re attempting to repair is physically damaged.
- macOS can’t unmount your drive, preventing the First Aid process from continuing.


