
It always sucks to lose an important file, but losing an entire partition and everything stored on it can be a traumatizing event, especially if you’re not familiar with Mac partition recovery. If that sounds familiar, then you need to read this article because it explains everything you need to know to recover a deleted partition on a Mac.
Table of Contents
Apple Disk Partition Types Explained
A partition is a logical region on a storage device that appears in macOS as a separate storage area, hierarchically structured under the associated storage device. Partitions are especially useful when working with large hard drives because they make it possible to segment the drive into multiple smaller units, which can then be used for different purposes.
To understand the Mac partition data recovery methods described in this article, you need to know the differences between different Apple disk partition types, also known as file systems. Like other operating systems, macOS supports multiple partition types:
| Partition Type | Description |
| Apple File System (APFS) | All Macs with macOS 10.13 or later use APFS as their default file system. This file system is fully optimized for modern flash and solid-state storage devices, and it offers robust encryption, snapshots, fast directory sizing, and many other useful features one would expect a modern file system to have. There are sub-types of APFS: plain APFS, encrypted APFS, case-sensitive APFS, and encrypted and case-sensitive APFS. |
| Mac OS Extended (HFS+) | HFS+ was the default file system in macOS 10.12 and earlier. This journaling file system (which is a file system that keeps track of changes so that it can better recover in the event of a system crash) lacks several important features that have come to be expected of modern file systems. While it’s still available in modern versions of macOS, Apple discourages its users from formatting their storage devices with it. |
| MS-DOS (FAT) and exFAT | These two file systems were developed by Microsoft, and macOS supports them to provide compatibility with external storage devices formatted in Windows. The former is a very simple file system that doesn’t support files larger than 4 GB, while the latter is the latest incarnation of FAT, offering optimization for flash-based storage devices and support for large file sizes. |
Regardless of which of the above-described partition types you choose, the information about them is always stored in a special subset of a storage device, called partition table. Without it, your operating system wouldn’t be able to tell where one partition starts and another begins, and you would have no way of accessing your files.
In such cases, it’s usually possible to recover the lost partitions and all data stored on them. But before you do that, you should save all important data from your lost partitions to a safe location.
How to Recover Important Data Before Fixing Partition
Before attempting any repairs on a Mac partition that has become inaccessible or is not functioning correctly, it’s critical to prioritize the recovery of important data.
For the retrieval of specific files from a Mac partition, third-party data recovery tools are required. Disk Drill is a good choice because it supports all Apple disk partition types and recognizes hundreds of file formats. It also has a straightforward user interface that even beginners can navigate without any problems.
Step 1. Download and Install Disk Drill.
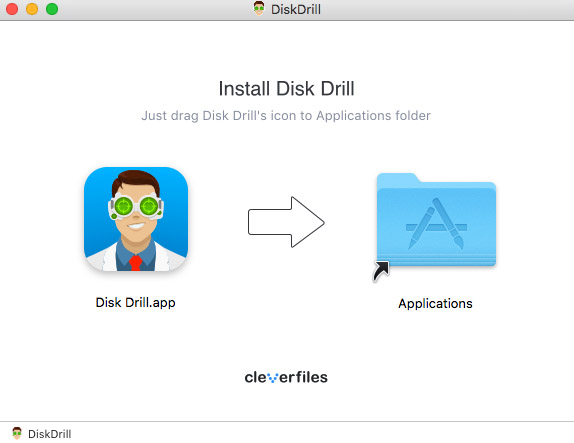
To get started, you need to download Disk Drill and install it on your Mac. We recommend you install it on a different storage device than the one on which the partition you want to recover is located.
Step 2. Launch Disk Drill and Scan Your Storage Device.
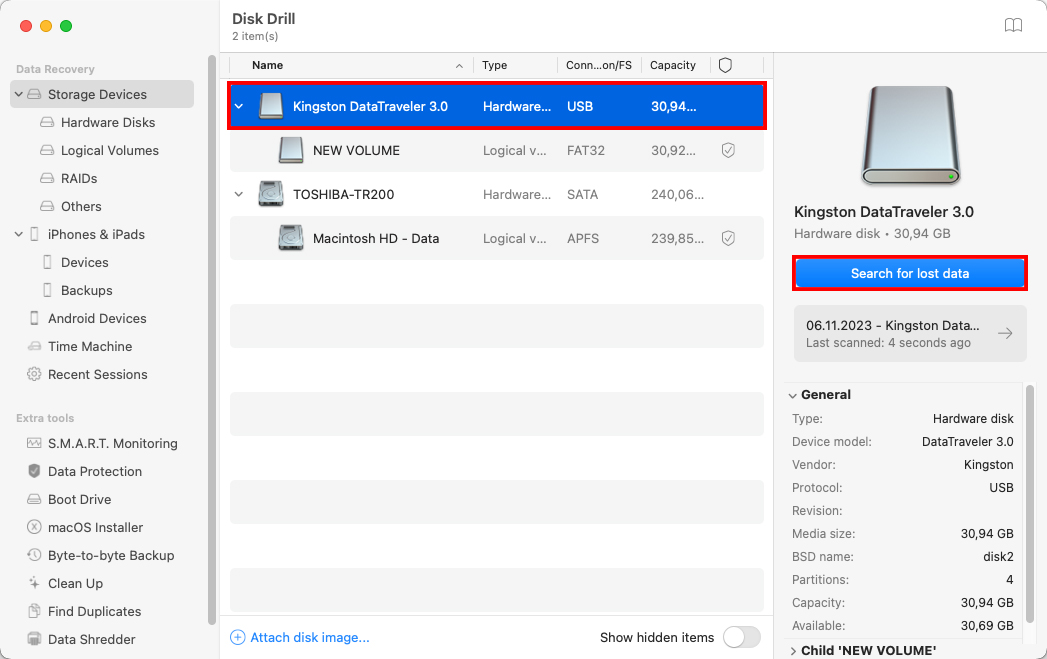
Next, you need to launch Disk Drill and click the Recover button next to the storage device on which the partition you want to recover is located. If you can see the partition listed in the Logical volumes section, you can scan it directly to save some time, but scanning the entire storage device works just as well.
Step 3. Select Your Files and Recover Them.
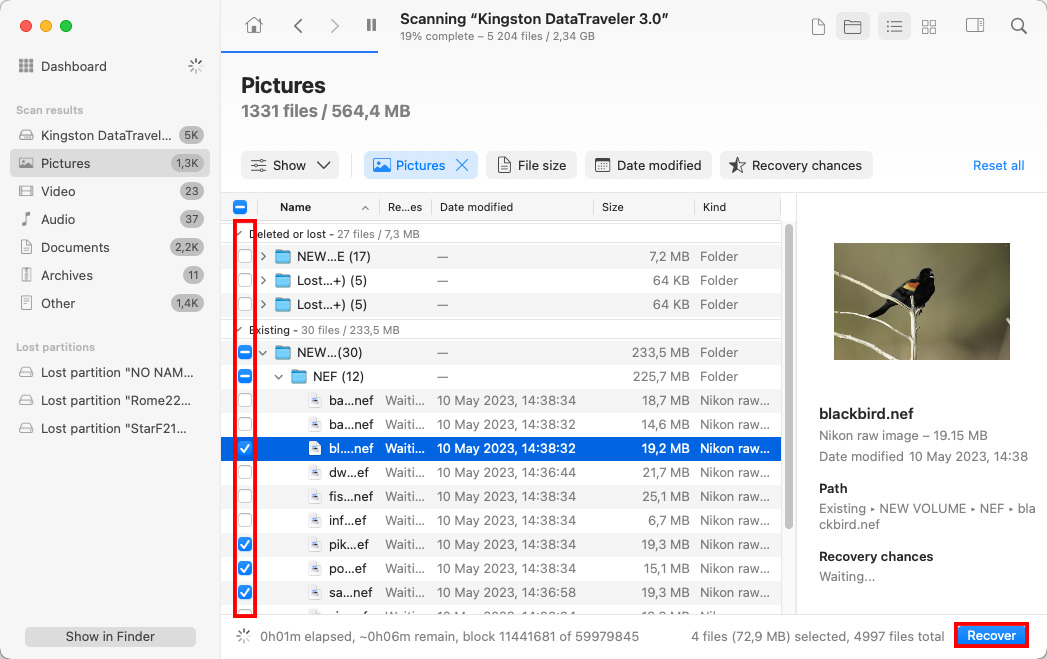
Finally, go through the recoverable files and select those you want to recover. You can preview recoverable files by clicking the little eye icon next to them, and you can also filter the scan results, which can be useful if you’re looking for a specific type of files, such as videos or documents. Once you have your files selected, click the Recover button and specify the recovery directory.
With your valuable files saved in a safe location, you’re now ready to repair/recover the lost partition.
How to Repair Partitions on a Mac
In some cases, it’s possible to repair partitions on a Mac to make them accessible again. You can do this using the Disk Utility app, which is preinstalled by Apple on every Mac, or you can use a third-party partition repair tool like TestDisk. In situations where previous repair attempts have failed or when the partition doesn’t contain any sensitive data, formatting can also be used as a last resort to restore functionality. However, this should be done with caution, as formatting will erase all data on the partition.
Method 1: Run First Aid
Running First Aid on a Mac partition can resolve a multitude of issues, including file system corruption and various disk errors. This built-in tool within Disk Utility checks the partition for errors and attempts to fix them automatically without any data loss. Here’s how to use the First Aid feature to repair your Mac partitions:
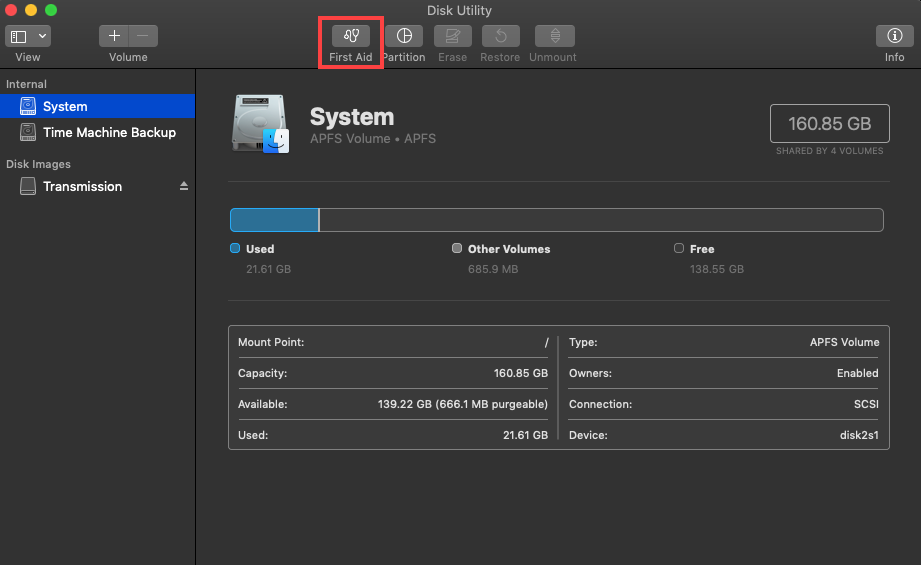
Step 1. Go to Finder > Application > Utilities and launch Disk Utility. If you want to repair the same partition on which your operating system is installed, you should boot into macOS Recovery mode and launch Disk Utility from there.
![]()
Step 2. Select the partition you want to repair from the list on the left and click the First Aid button.
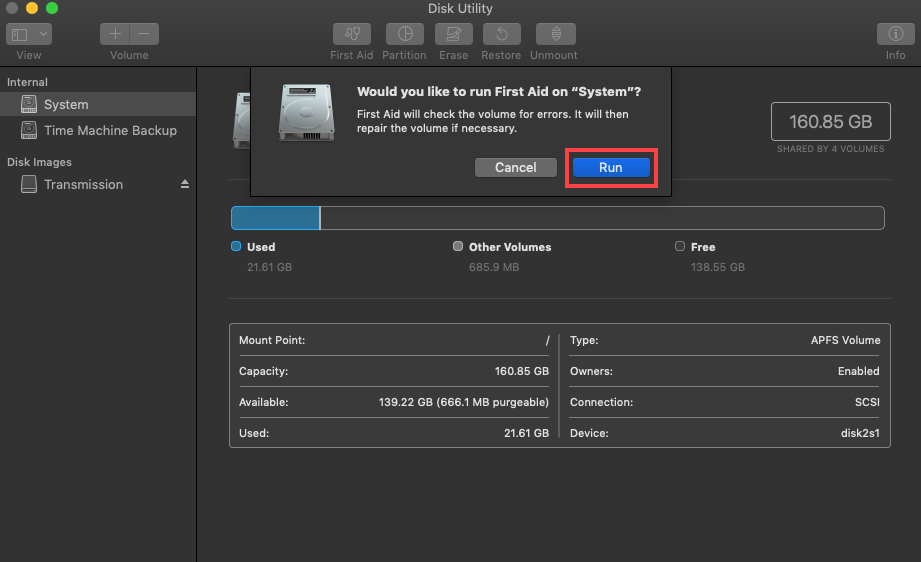
Step 3. Confirm that you want First Aid to check the partition for errors. If it detects any problems, it will automatically attempt to repair them.
Alternatively, you can use Disk Utility from Terminal:
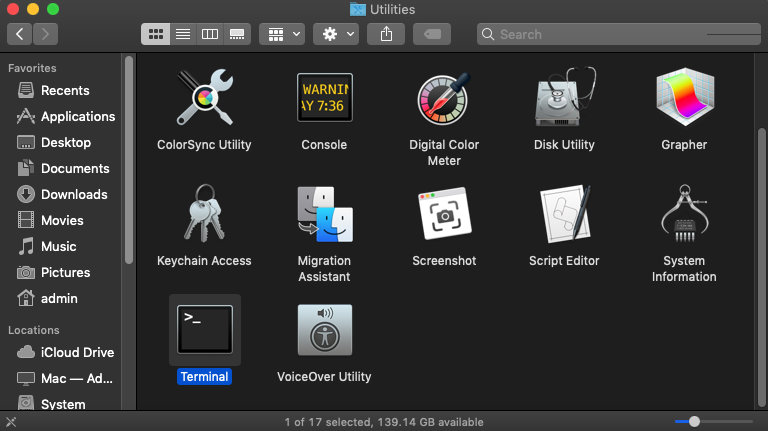
Step 1. Go to Finder > Application > Utilities and launch Terminal. Again, boot into macOS Recovery mode and launch Terminal from there if you want to repair the same partition on which your operating system is installed.
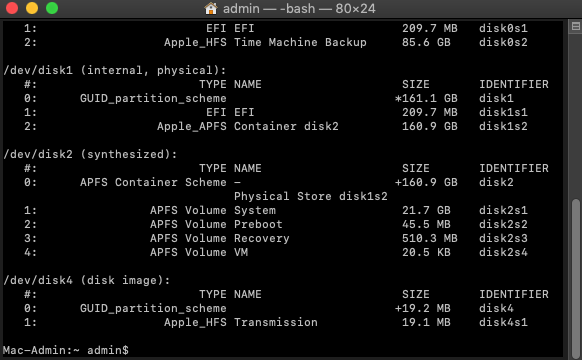
Step 2. Type “diskutil list” to list all available partitions and hit Return. Remember the identifier of the partition you want to repair.
Step 3. Type “diskutil verifyVolume ID” and hit Return. Make sure to replace the word ID with the identifier from the previous step.
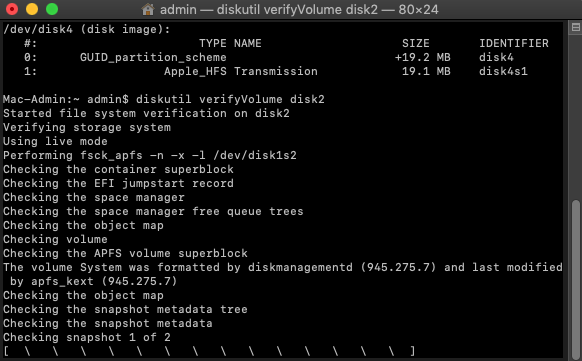
Step 4. If diskutil determines that your partition needs repairing, type “diskutil repairVolume ID” and hit Return.
Method 2: Attempt to Rebuild Partition Using TestDisk
When it comes to recovering entire partitions on a Mac, you would be hard-pressed to find a better solution than TestDisk. This free partition recovery software can fix partition tables, restore boot sectors, and do a lot of things to recover lost partitions and/or make non-booting disks bootable again.
Unfortunately, TestDisk doesn’t have a graphical user interface, so it’s not exactly easy to use. But if you follow our instructions, you have nothing to be afraid of.
Step 1. Install TestDisk Using Homebrew.
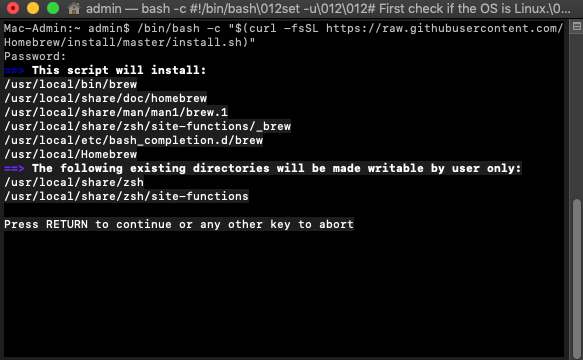
Arguably the easiest way to install TestDisk on a Mac is with Homebrew, a free and open-source software package management system that simplifies the installation of software on macOS. First, install Homebrew by pasting the following command in Terminal:
/bin/bash -c "$(curl -fsSL https://raw.githubusercontent.com/Homebrew/install/master/install.sh)"
Next, open Terminal and type brew install testdisk and hit Return to install TestDisk.
Step 2. Launch TestDisk and Search for Lost Partitions.
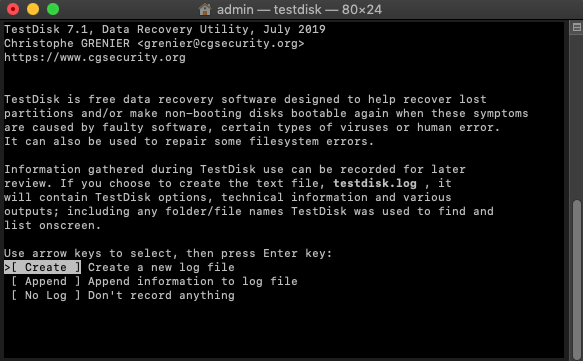
To launch TestDisk, type “sudo testdisk” in Terminal and hit Return to launch TestDisk as root. Once running, TestDisk will ask you to choose if you want to create a log file. We recommend you hit Return to create a new log file. Next, select the drive you want to scan and specify the partition table type. TestDisk will automatically suggest the right option, so feel free to just hit Return. On the next page, choose to analyze the current partition structure and search for lost partitions. Finally, press Return to begin Quick Search.
Step 3. Recover Your Partition.
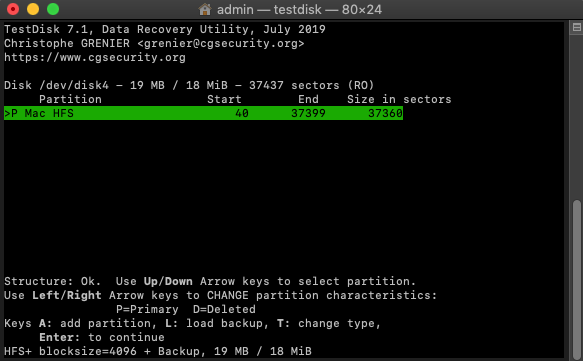
Once Quick Scan is done, TestDisk will display all recoverable partitions. Check if the partition you want to recover is among them and hit Return to continue. If the partition you want to recover was found, you can choose the Write option to save the partition structure. If it wasn’t found, highlight the menu Deeper Search and hit enter to proceed with a more comprehensive scan. You will then be presented with another list of recoverable partitions and the option to change their characteristics from deleted to Logical, Primary, or Bootable (here’s an explanation of what that means).
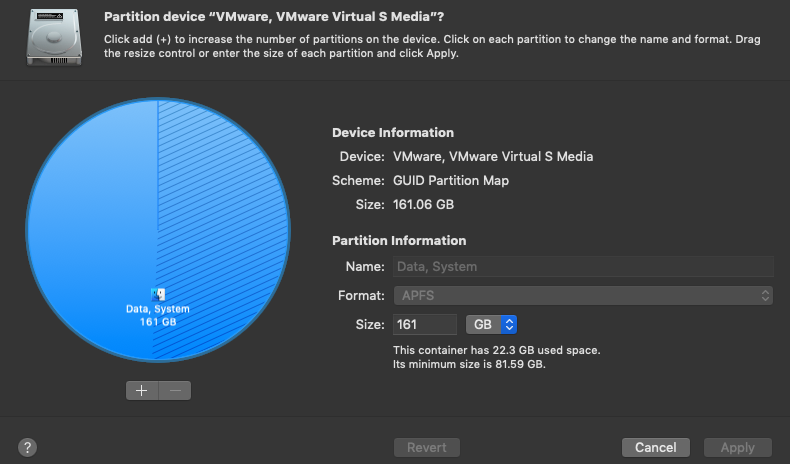
Method 3: Repartition Drive
As your last resort, you can choose to repartition your Mac’s drive. This process creates a new partition map and can help resolve issues not fixed by First Aid or TestDisk.
It’s important to note that repartitioning will erase all data on the drive, so make sure to back up anything important before proceeding. Also, if your goal is to repartition your system drive, you will need to boot into macOS Recovery mode first because you can’t modify the partition of a disk that’s in use, especially when it’s the one hosting your operating system.
Step 1. Open Finder, navigate to the Applications folder, proceed to Utilities, and launch Disk Utility. Should your objective be to mend the partition where your OS resides, you’ll need to restart your Mac in macOS Recovery mode before starting Disk Utility.
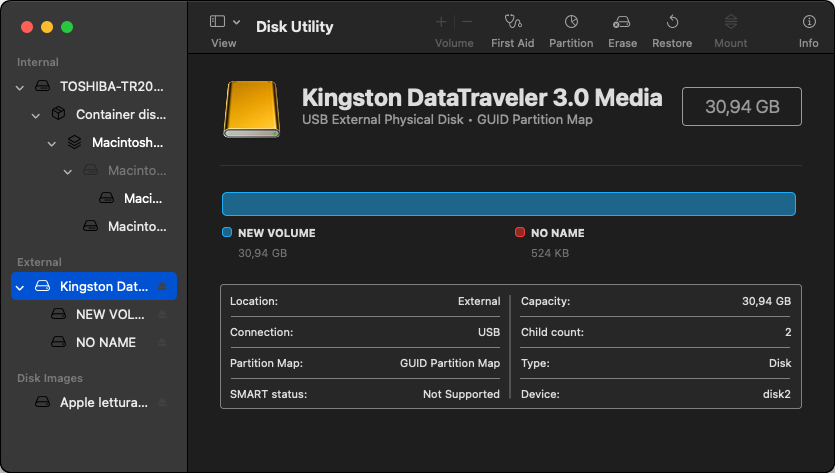
Step 2. Select the drive you wish to repartition from the sidebar in Disk Utility.
Step 3. Click the Erase button. Select the desired file system (APFS for storage devices used exclusively with Mac computers and ExFAT for storage devices shared with Windows and Linux computers) and the partition scheme (Apple Partition Map for storage devices used exclusively with Mac computers and GUID for storage devices shared with Windows and Linux computers).
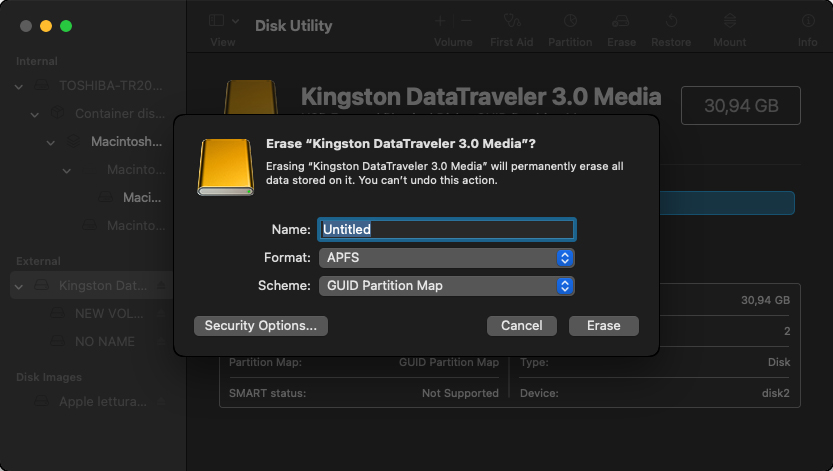
Step 4. Click Erase again to start the reformatting process and wait.
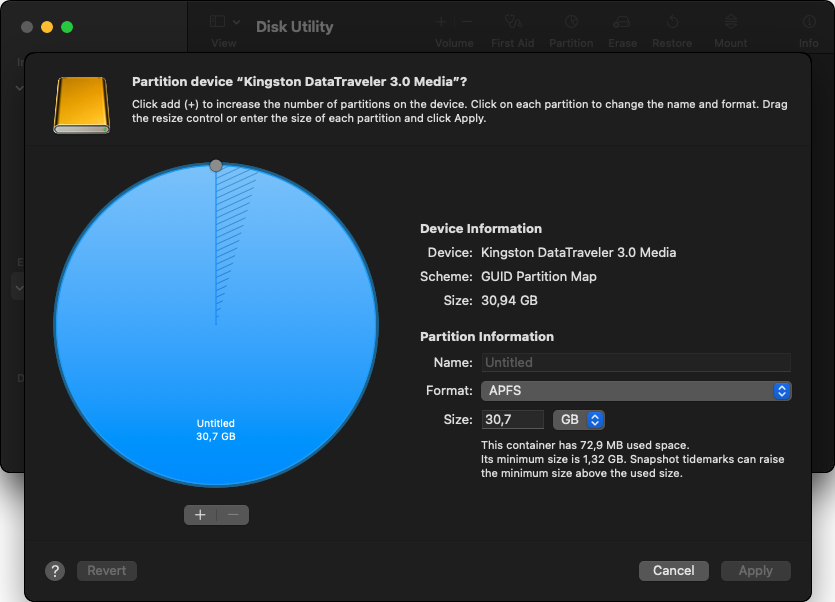
Step 5. With your device reformatted and blank, you can click the Partition button in the toolbar and create add a new partition by clicking the Plus button so that your storage device is partitioned just the way you want it to be.
How to Prevent Hard Drive Partition Loss?
Now that we’ve answered the question of “how do I restore a mac partition,” it’s time to talk about partition loss prevention because your goal should always be to avoid data loss. Here are five ways to keep your partitions from disappearing.
- ⏪ Back up your data: Only backups can prevent hard drive partition loss in the event of a natural disaster, physical damage, or theft. That said, not all backups are created equal, and it’s important that you implement a reliable backup strategy, such as the 3-2-1 method. In practice, this could mean a weekly byte-to-byte backup of your entire hard drive combined with a real-time cloud backup service like iCloud, OneDrive, Google Drive, or Dropbox.
- 🛡️ Use antivirus software: It’s true that Mac users don’t have to worry about viruses and other malware nearly as much as Windows users, but a new dangerous strain of Mac-specific malware appears once in a while, such as the recently discovered malware called EvilQuest, which combines ransomware and spyware capabilities into one package. To protect your partitions, and the data stored on them, from EvilQuest and other Mac malware, you should use a reliable antivirus software solution capable of detecting and eliminating the latest cyber threats in real-time. One great option is Malwarebytes, and this article lists many others.
- 🚨 Be careful during partitioning: A lot can go wrong during partitioning, especially if your experience with it is limited. To avoid partition loss, make sure you know what you’re doing and always double-check everything before you go ahead and partition your drive. When in doubt, consult online partitioning tutorials or ask more experienced users for help on sites like Stack Exchange and Reddit.
- 🍎 Avoid multi-booting: Multi-booting is the process of installing two or more operating systems on a single computer to gain the ability to switch between them during boot. Mac users often use multi-booting to install macOS and Linux on a single machine because Boot Camp can only install Windows. The problem with multi-booting is that Apple doesn’t officially support it, so things can easily go wrong in a catastrophic way, often leading to complete partition loss. Instead of multi-booting, consider installing Linux inside a virtual machine using VMware or VirtualBox.
- 💿 Store your data separately from the OS: It’s a good practice to store data separately from the operating system, either on a different partition or, better yet, a different storage device. This greatly reduces the chance of data loss when something goes wrong with your operating system, such as a bad update or malware infection.
Conclusion
With tools like Disk Drill for targeted file recovery and TestDisk for comprehensive partition restoration, you’re well-equipped to tackle even the most challenging cases of Mac partition loss at home and without making your credit card cry in pain. But remember, prevention is always better than cure. Adopting good habits like regular backups, using antivirus software, being cautious during partitioning, and more can significantly diminish the risk of partition loss.
FAQs
To recover a deleted partition on a Mac, you can use a special partition recovery tool like TestDisk, which is free and open source. Before partition recovery and repair attempts, you should always save all important data to a safe location using a data recovery tool like Disk Drill.
Fixing a corrupted Mac partition may be possible using Disk Utility’s First Aid feature, which can check and repair file system errors. If you can boot into macOS, you can run this tool directly. Otherwise, you should start your Mac in Recovery Mode to access Disk Utility and repair the partition. You can also try a third-party tool like TestDisk, which can rebuild corrupted partitions, or you can always format the partition and start from scratch (only if it doesn’t contain any important data!).
A hard drive partition may not show up on your Mac for several reasons: it could be due to a connection issue, file system corruption, or the drive may be failing. Start by checking the connections and trying a different port or cable. If that doesn’t work, use Disk Utility to see if the partition appears there; if it does, but it’s greyed out, you may need to run First Aid to repair it. If it can’t be repaired, then you should recover as much data from it as you can before it’s too late.


