
From accidental deletion to virus attacks, Seagate hard drives are prone to data loss-causing damage. When you can’t find any of your files or can’t even access your drive at all, what are you supposed to do? Stop using your drive right now and keep reading.
This short and sweet article is all about Seagate file recovery, possible causes of data loss, and what options you have depending on your specific case. By the end, you should have a clear idea of your next step.
Table of Contents
How to Recover Files From a Seagate Hard Drive
Fortunately, data recovery is possible for every case listed above. When files get deleted or infected, their data still resides in the file system – where intact or fragmented. Seagate data recovery tools are able to extract this data and rebuild it if needed, restoring files to a usable state. Some cases of Seagate file recovery for Mac can be addressed using DIY software, while others need professional servicing.
Method 1: Use Seagate Hard Drive Recovery Software
The most reliable way to restore files without sending it to a shop is to use data recovery software. These are powerful tools that can extract fragmented data from the file system and rebuild it so files become usable. They are best used for accidental deletion, formatting, and corruption (with a caveat). This is also the only way you can do Seagate recovery with do it yourself software.
Disk Drill is one example of this software and one of our favorite tools here at Macgasm. It has powerful data recovery capabilities packaged into an easy-to-use GUI (graphical user interface) so even beginners can use it at the onset.
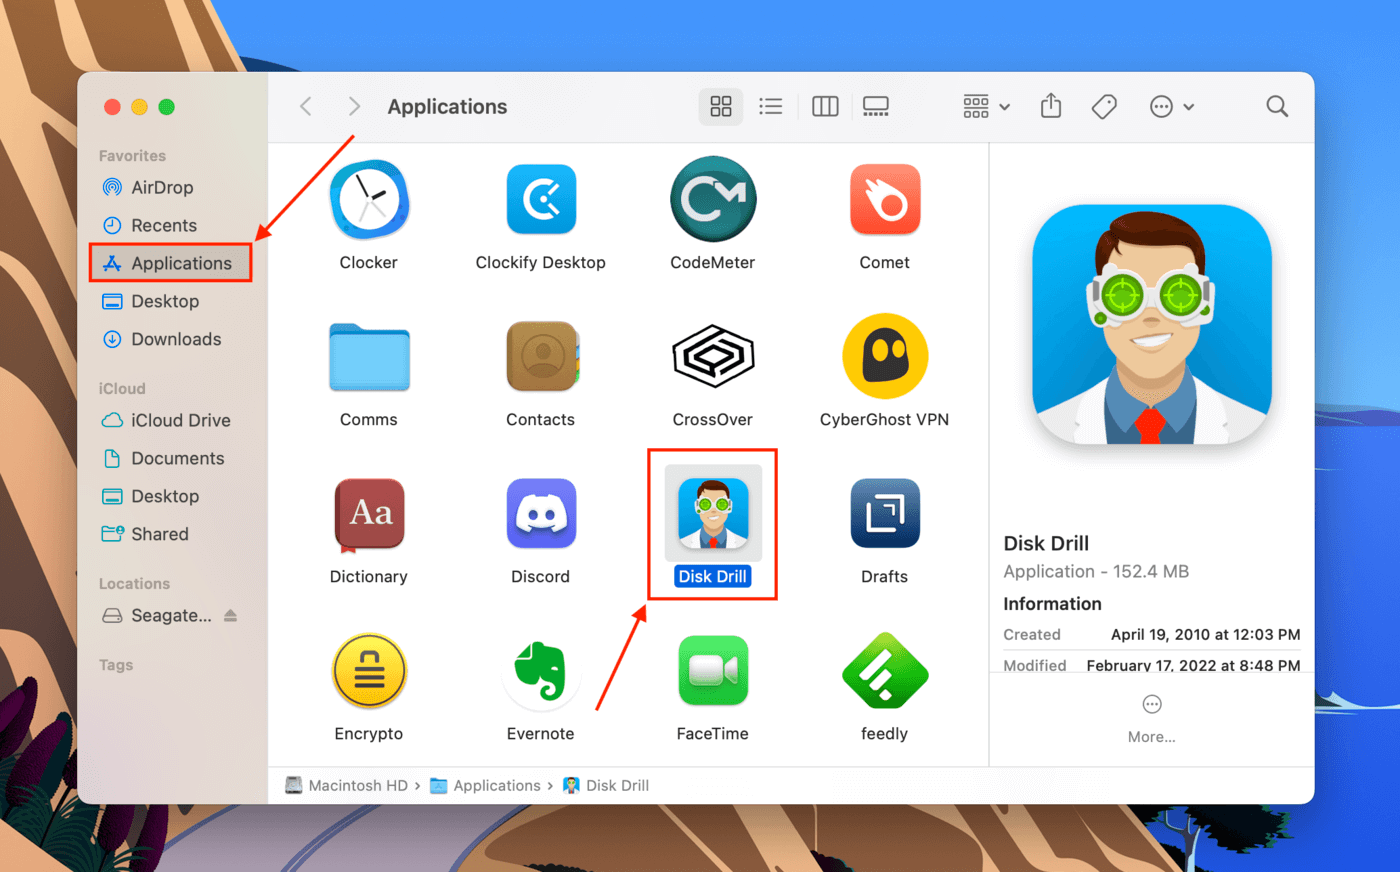
- Download and install Disk Drill as our Seagate recovery tool of choice. Then, launch the app (Finder > Applications > Disk Drill).
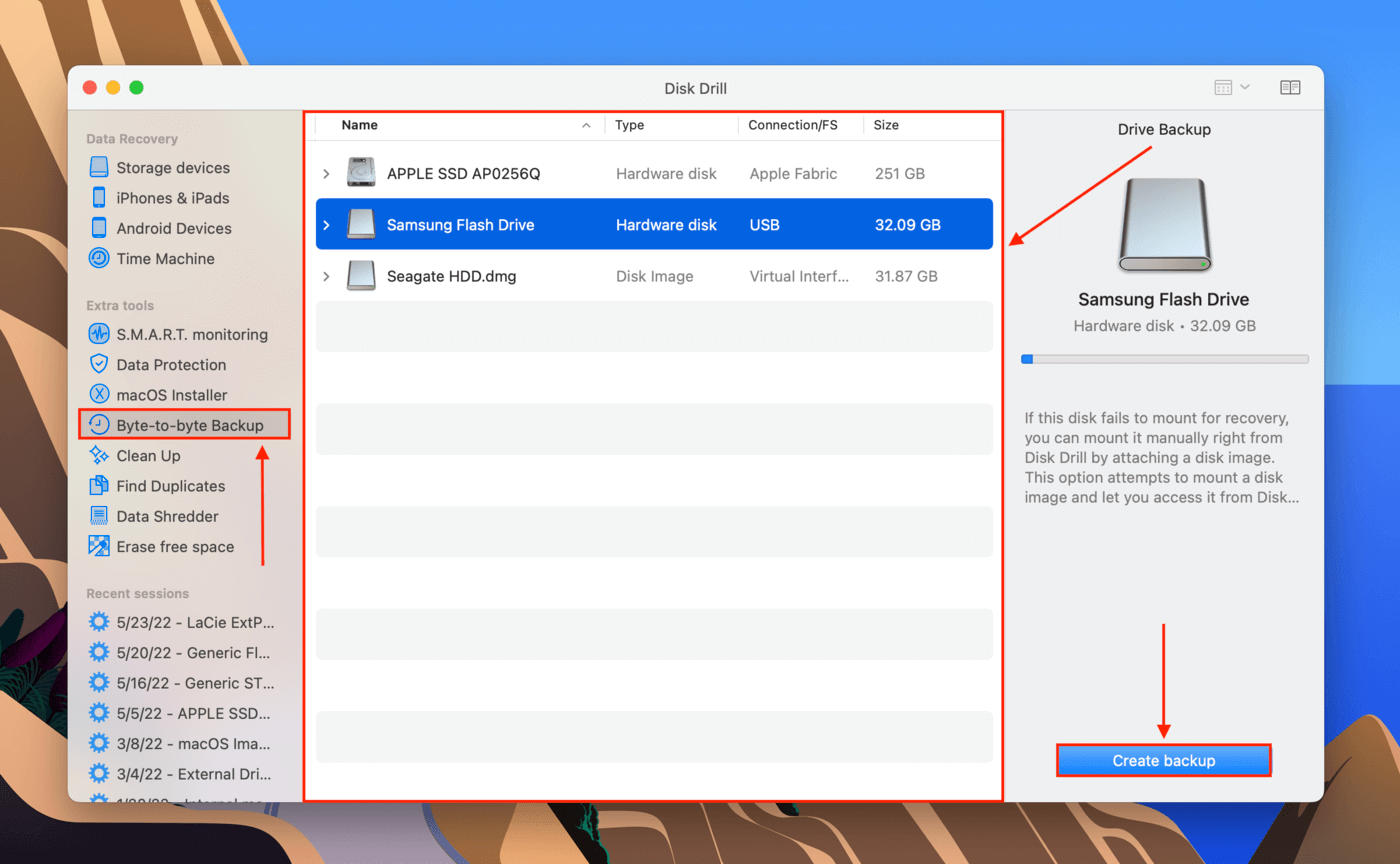
- If you accidentally deleted your data/formatted your drive, skip to step 5. If your drive has been corrupted, click “Byte-to-byte” backup in the left sidebar. Then in the middle pane, select the drive you want to clone and click “Create backup.”
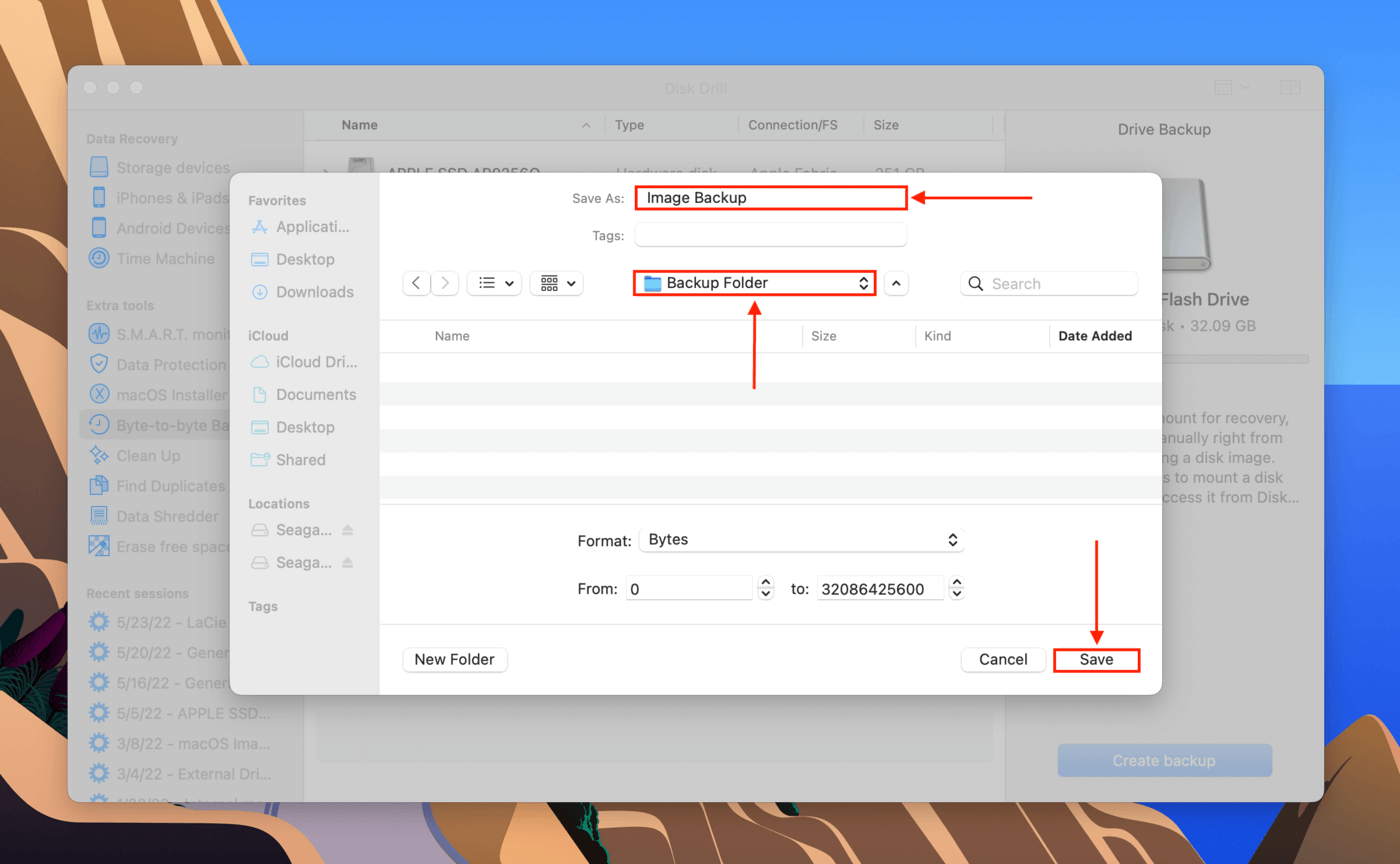
- Choose a destination on your computer where Disk Drill will save your backup image, name it, then click Save.
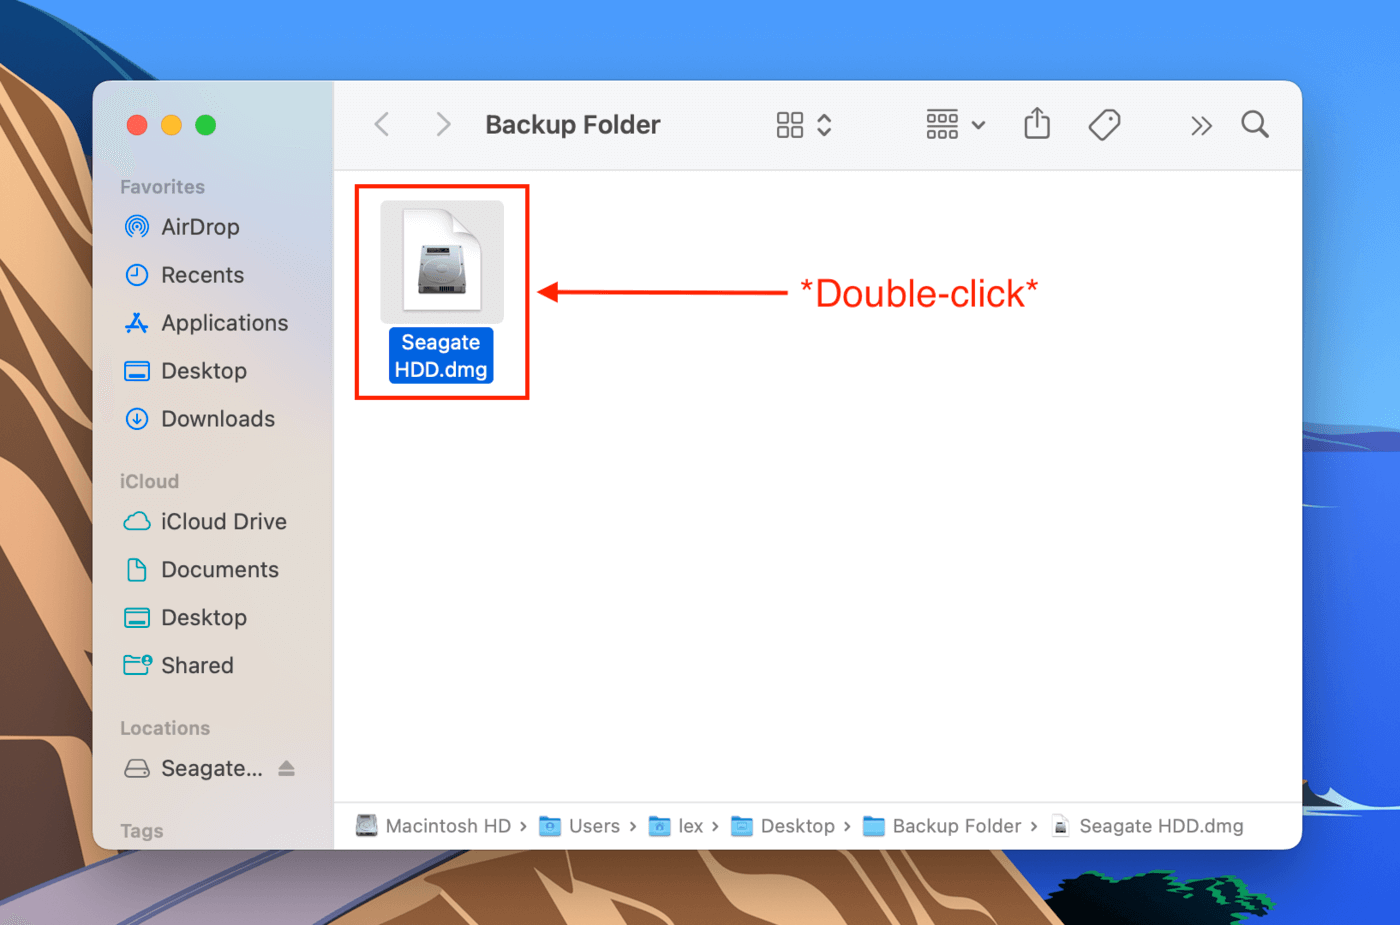
- In Finder, double-click your backup image to mount it. Then, return to the Disk Drill window.
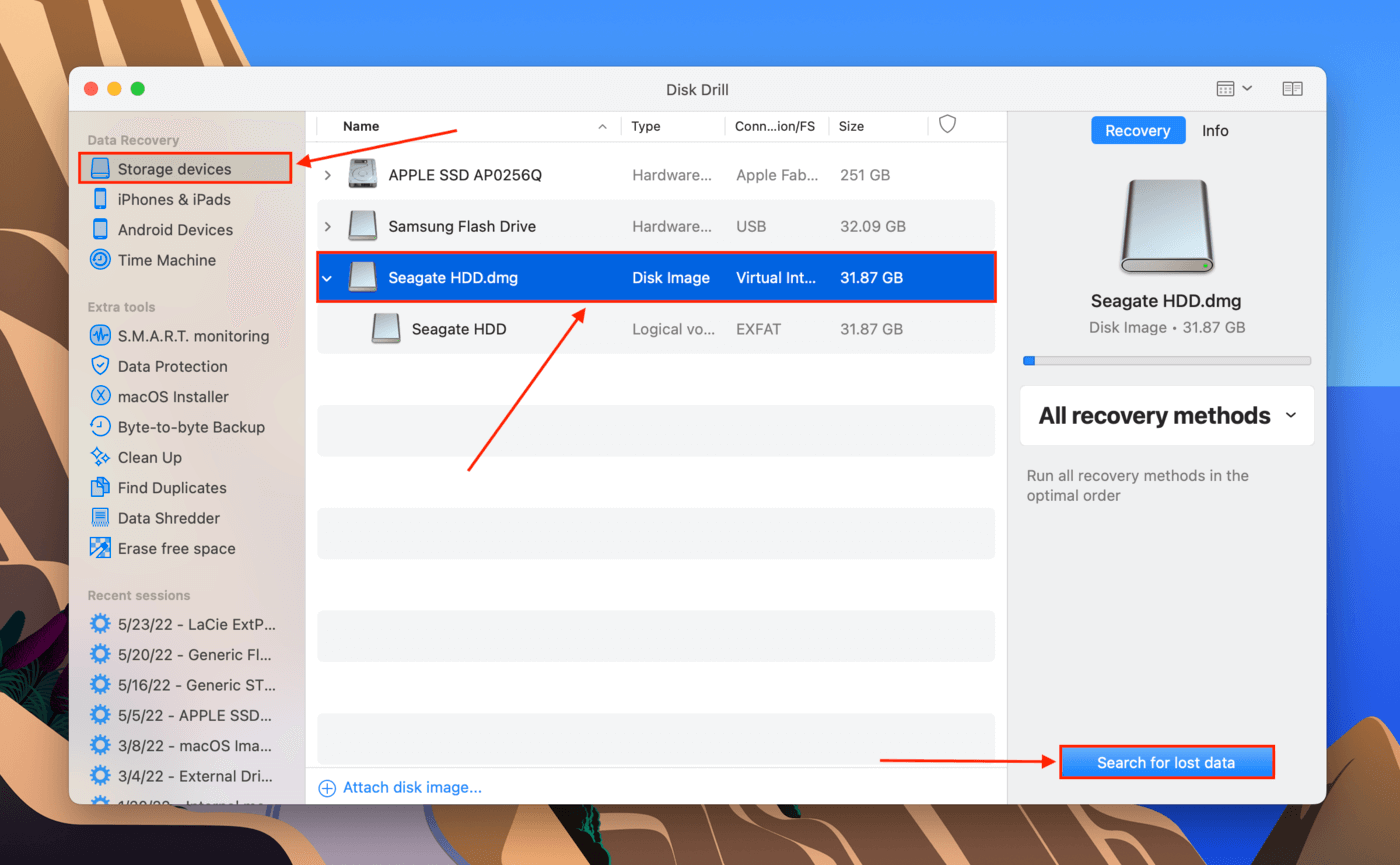
- Click “Storage devices” in the left sidebar. In the middle pane, select your hard drive or the backup image we just created. Then, click “Search for lost data.”
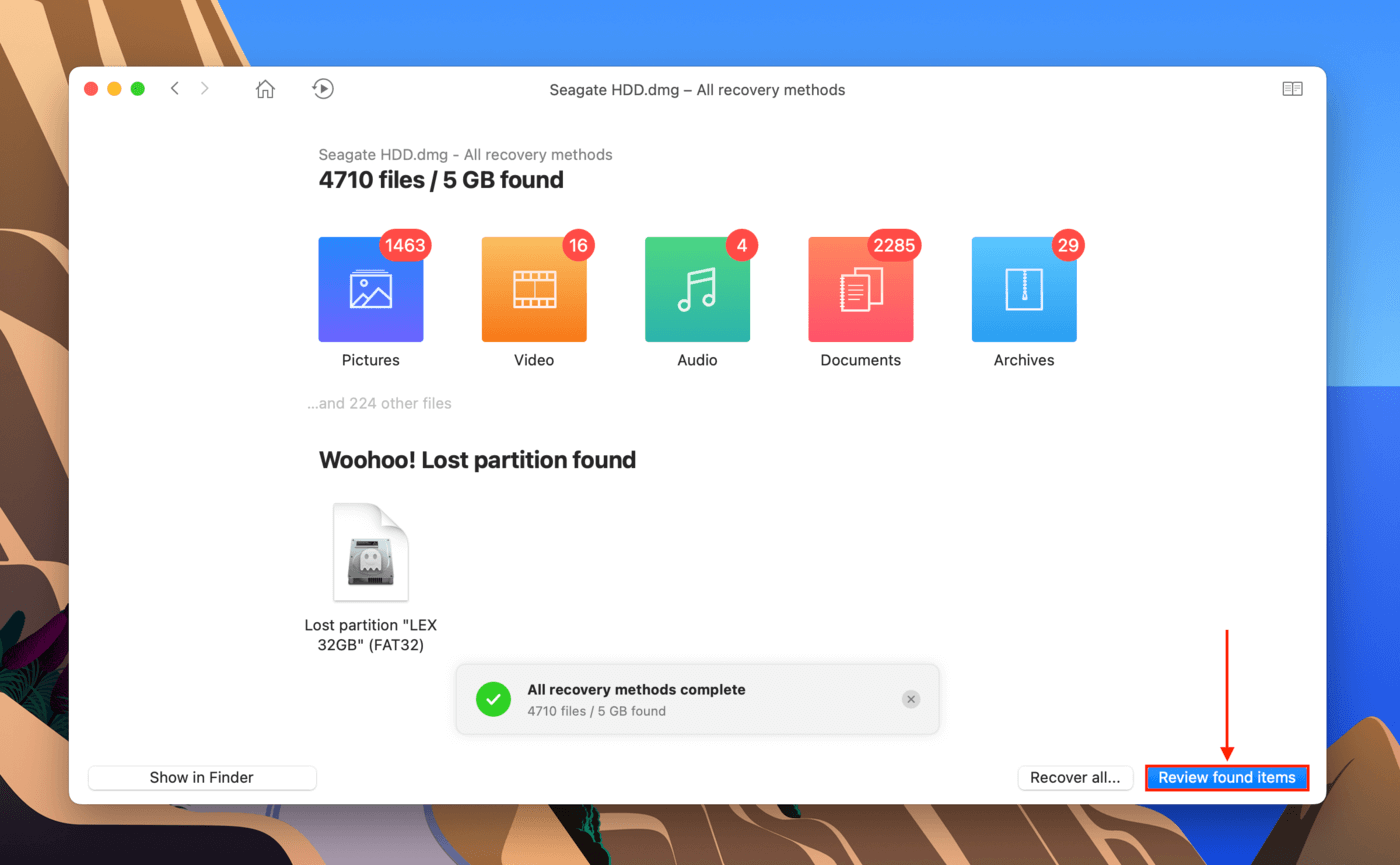
- Wait for Disk Drill to finish its scan. Then, click “Review found items.”
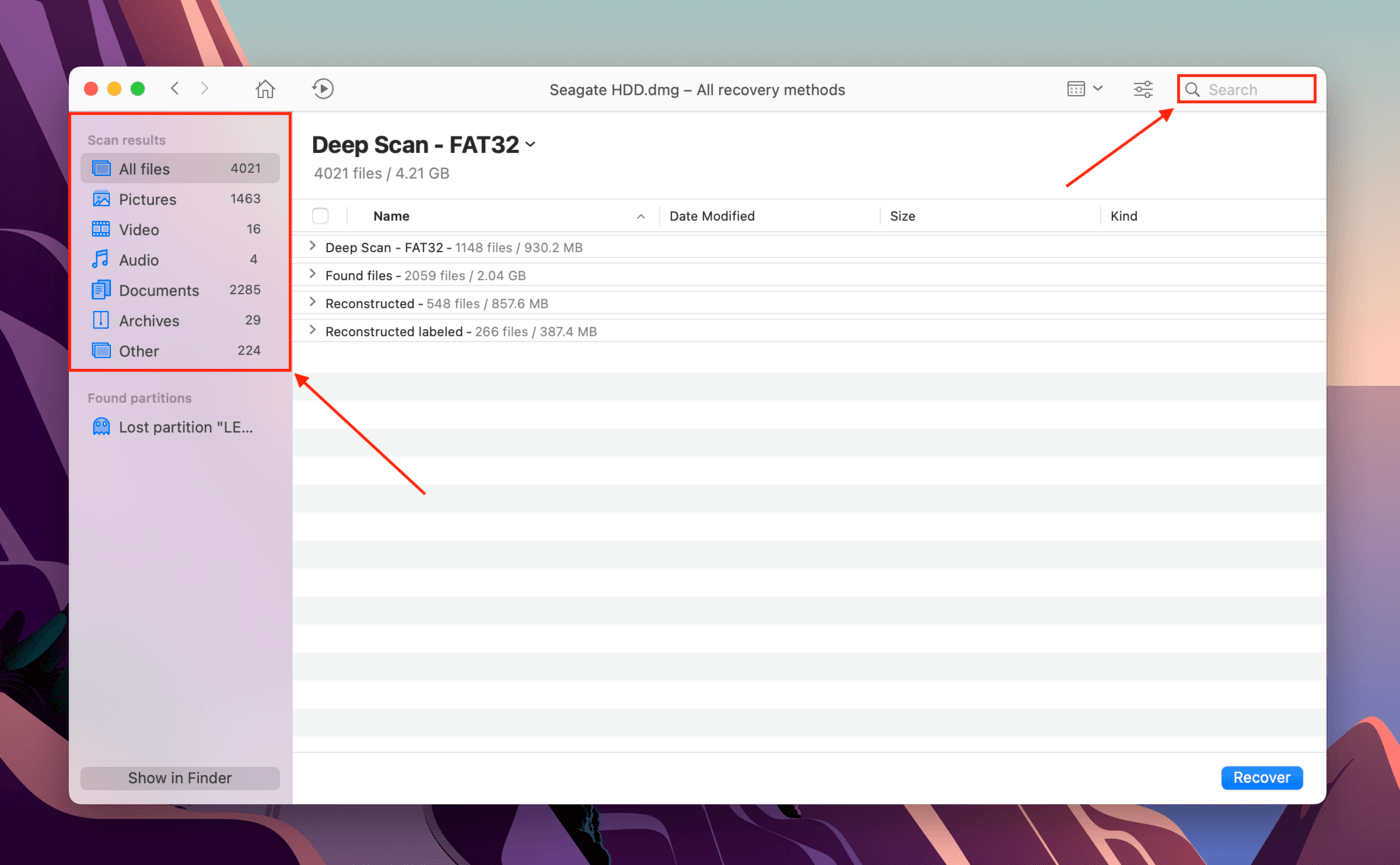
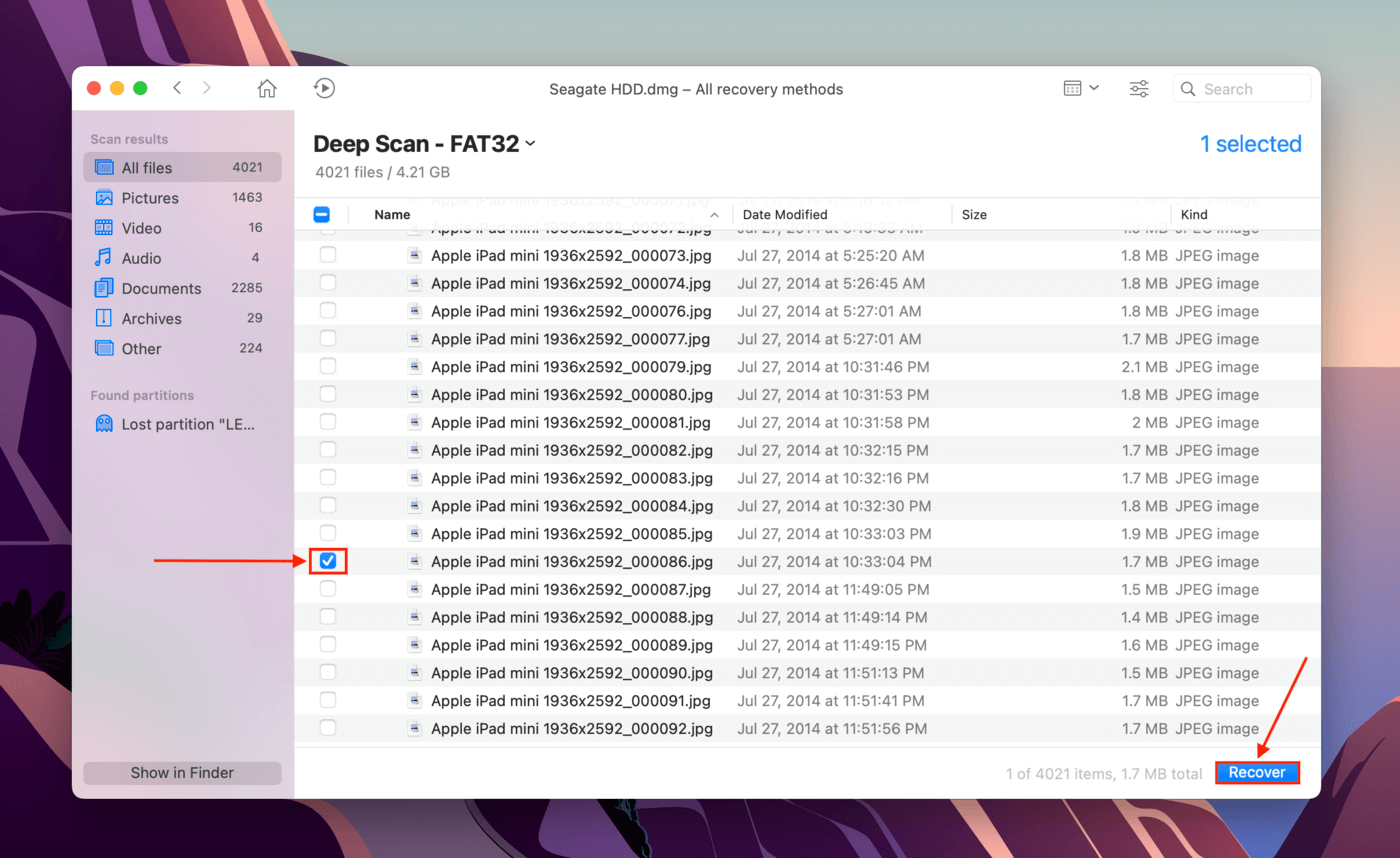
- Use the filter sidebar and the search bar to quickly locate the files you want to restore.
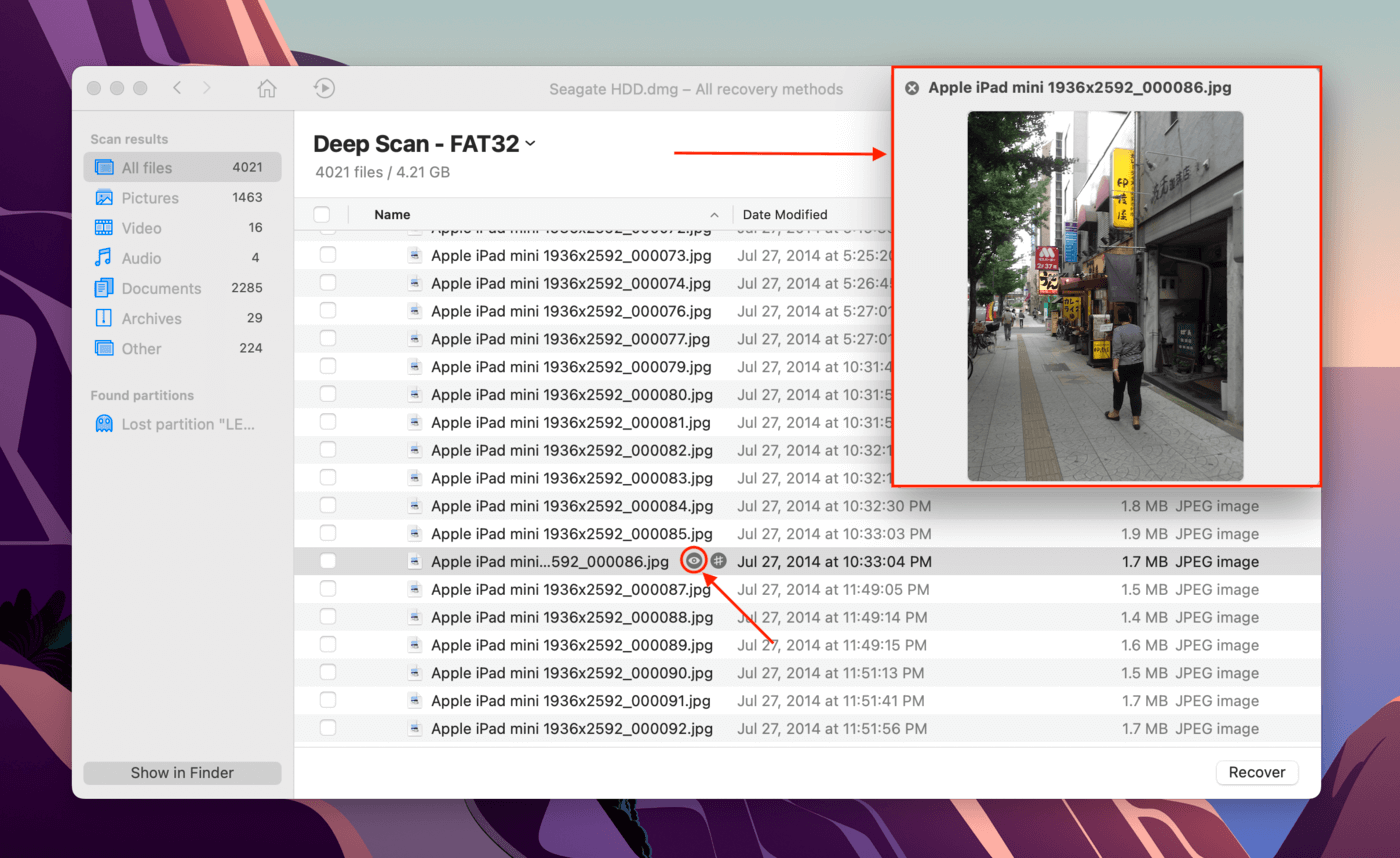
- Make sure you got the right files by previewing them. Hover your mouse pointer beside any file and click the eye button that appears.
- To select the files you want to restore, use the checkboxes in the left-mouse column. Then, click “Recover.”
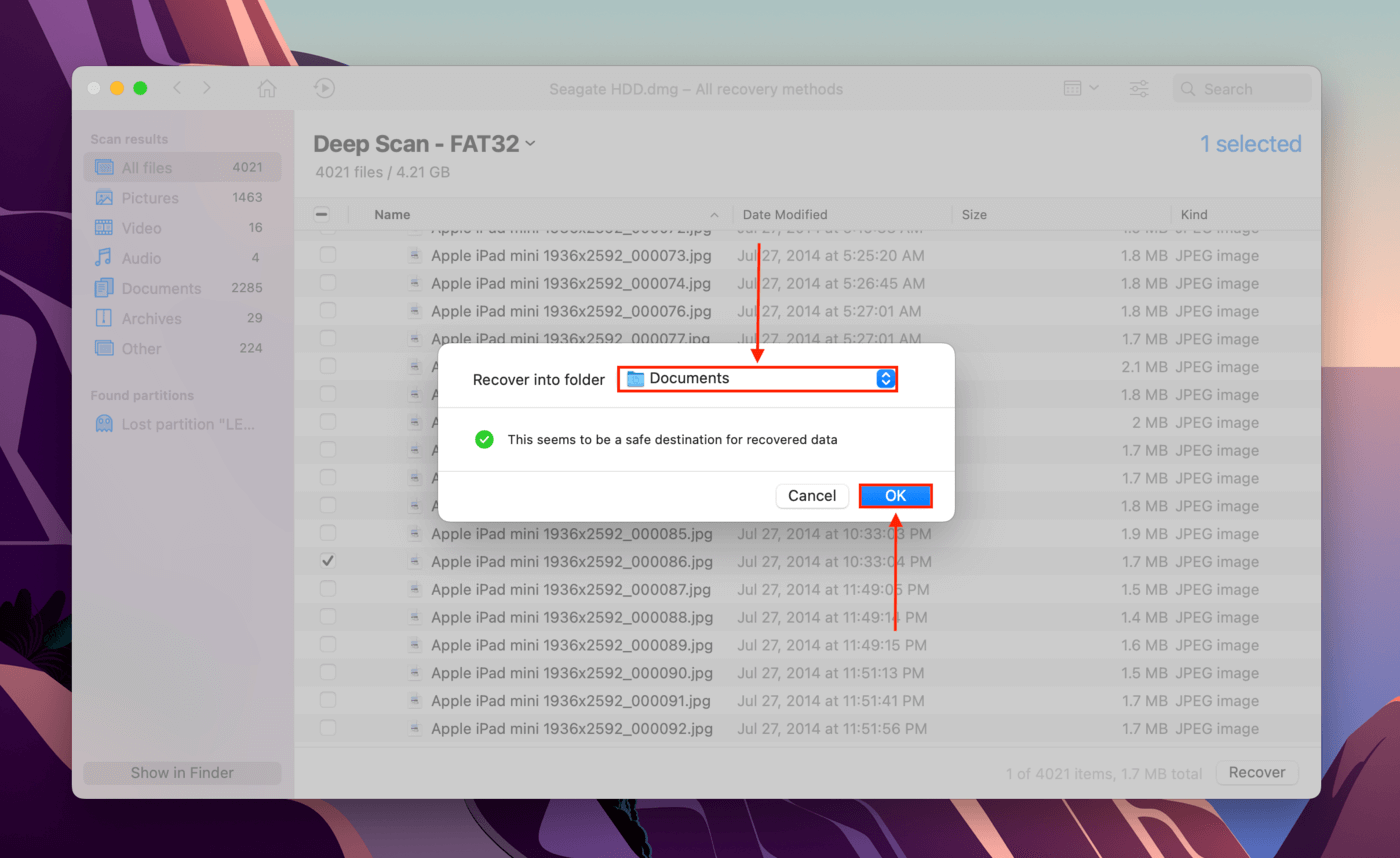
- Use the dropdown menu to choose a destination on your computer where Disk Drill will save the restored data. Then, click “OK.”
Now that you’ve secured your data, you can try disk repair software for Mac to attempt to fix your hard drive without having to take it to a shop.
Method 2: Apply to Seagate Recovery Service
If you weren’t able to restore your data using Seagate data recovery software, then your data is literally out of your hands… Because you’ll need a professional to recover it for you. Any more DIY attempts will just make it worse.
Fortunately, Seagate’s Rescue Services offers one in-lab attempt for free for devices that are still under warranty. You can check if you’re elibile here.
When Should I Use Data Recovery Services?
Sending your drive to a data recovery service is inconvenient, but we highly recommend it under the following conditions:
- Your drive is still under warranty.
- Your drive is physically damaged.
- You can’t access your drive on different computers and using different cords.
- You were unable to restore data from your drive’s image backup using Seagate file recovery software.
The gist is, if you are unable to secure your data (and your data matters to you) – forget trying to fix it. Have it serviced by professionals.
What is the Process of Using Data Recovery Services?
If this is your first time using a data recovery service, here’s what to expect from the process (specifically for Seagate):
- Initial Call. Contact Seagate’s customer support and describe the problems with your drive as well as the data you want to restore. Seagate will then send a prepaid shipping label through email. If your drive is no longer eligible for Rescue Services, prepare for a quote of at least $499 to $2,000.
- Repair/Recovery. Their specialists will begin work in the lab. Seagate provides status updates through email so you can track the progress yourself.
- Waiting. Allow up to 15 days for Seagate to attempt recovery. If successful, you’ll get your data back in an encrypted storage device. If unsucessful, you can ask them to destroy the drive or return it through mail.
How to Increase Chances of Successful Data Recovery
While data recovery never has a 100% certainty, there are certain best practices we can do to increase our success rate. Here are a few to keep in mind:
- Stop using your drive. The more you use a problematic drive, the worse it gets. Continuous operation may also cause overwriting.
- Create a backup image of your drive. This way, you can interact with the data on it without actually using the drive itself.
- Don’t defrag your drive. Defragging or “defragmenting” reorganizes data in the file system, which may overwrite your deleted files.
- Save recovered files to a different location. Saving files back to your drive during the recovery process will overwrite the existing files – even those in the recovery queue.
- Make sure to install data recovery software in a local directly – NOT on the problematic drive. This installation may overwrite existing data.
Common Reasons for Data Loss From Seagate Hard Drive
Data loss happens more suddenly than folks can see it coming. This makes it hard to determine what caused the data loss in the first place. Below are the most common reasons why it happens so you can figure out what went wrong or stay ahead of the problem.
Accidental deletion/formatting. The most common reason for data loss from a Seagate hard drive is accidental deletion or formatting a drive by accident (which wipes your data). In this case, it’s easy to restore files from a Seagate external hard drive as long as you act fast.
Power outages. Sudden power outages in the middle of reading and writing data can cause corruption. Corruption eventually leads to data loss or damage beyond repair when ignored. You can still recover data from a Seagate external hard drive even if it’s corrupted – but you need the right tools.
Virus attacks. Virus infections can delete and corrupt data, and even hold it hostage. A good anti-virus and Seagate data recovery tools can solve this problem.
Degradation. Both hardware and data degrades over time even if you don’t use your drive at all. A lot of people tend to overlook this issue if they don’t use or backup their drives often.
Not Mounting/Inaccessible. Your data may still be intact but your drive is inaccessible. This can be due to driver issues, incompatible formatting, etc.
Physical damage. Drives are prone to extreme temperatures, water damage, scratches, and a host of mechanical issues with the platter if you bump or drop the drive.


