
It doesn’t matter if you’re a student, office worker, or anyone who uses a Mac to work with documents because you’re guaranteed to encounter Microsoft Word documents on a regular basis, and it’s only a matter of time before you accidentally delete the wrong .DOC or .DOCX file or forget to save it before shutting down your Mac.
Instead of simply accepting the consequences of your mistake and starting from scratch (and potentially losing hours or even days of hard work), you should attempt to recover the lost Word document from your Mac’s hard drive or any other storage device using the six methods described in this article.
Table of Contents
How to Recover Word Document on Mac
Let’s describe six effective methods to recover deleted or unsaved Word files on your Mac.
But first, it’s crucial to stop using your drive immediately. Continuing to use your drive can overwrite the data, significantly reducing the chances of successful recovery. Now, let’s explore these methods and help you reclaim your lost work!
Method 1: Recover a Word Document from the Trash Folder
To prevent one wrong click from causing irreversible data loss, Mac computers place deleted files inside the so-called Trash folder, where they typically stay for 30 days before they are permanently deleted to free up storage space.
If it’s still less than 30 days since you deleted the Word document, and if you haven’t manually emptied the Trash folder, you should be able to get your Word document back in less than a minute:
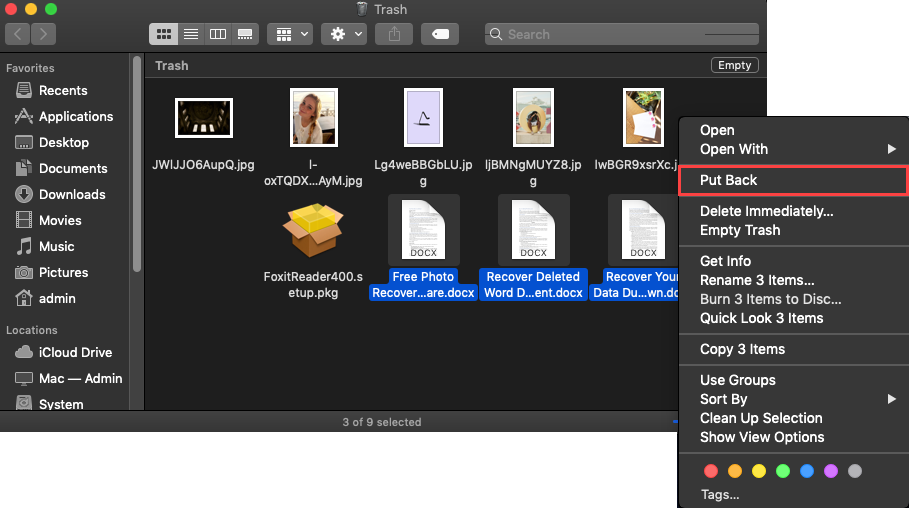
This is how to recover a Word document from the Trash folder:
Step 1. Click the Trash icon on the Dock to open the Trash folder.

Step 2. Find the Word document you want to recover.
Step 3. Right-click on it and select the Put Back option to restore it to its original location. Alternatively, you can drag the document to your desktop or any folder.
Help! I can’t find the Trash icon.
If the Trash icon is missing from the Dock, you can reset the Dock by running the following command in Terminal:
rm ~/Library/Preferences/com.apple.dock.plist
Method 2: Use Time Machine to Recover a Word File
Time Machine is an incremental backup tool that makes it possible to restore a specific folder or the whole computer to an earlier date. All modern Macs come with it, and you can easily use it to restore a specific file from a backup if you had activated Time Machine before the data loss incident and configured it to back up the drive on which the file was stored.
This is how to recover a lost Word document on Mac using Time Machine:
Step 1. Check that your Time Machine backup drive is connected to your Mac.
Step 2. Open the folder that contained the deleted Word file.
Step 3. Choose the Enter Time Machine option from the Time Machine menu.
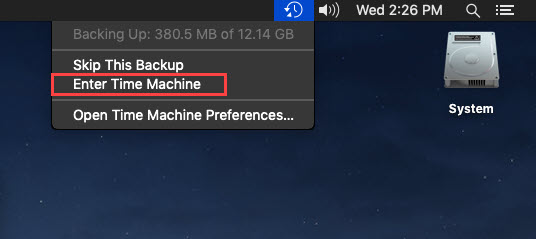
Step 4. Find the Word file you want to restore and click Restore.
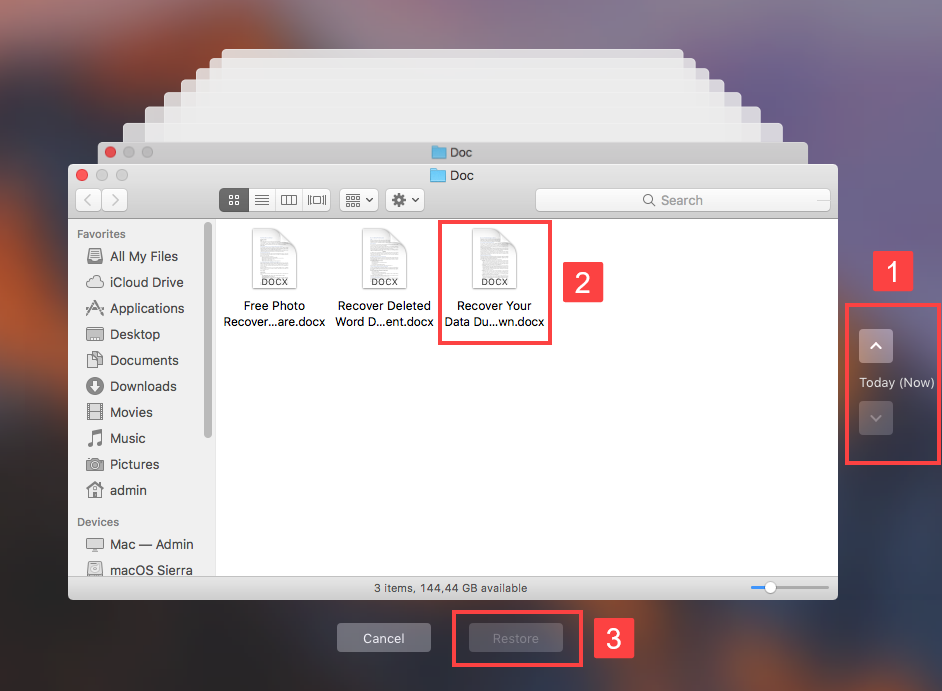
How do I find my Word document in Time Machine?
To find a file in your Time Machine backup, you need to first open Time Machine in the correct folder (for example, if your Word document was in the Documents folder, open Time Machine in that folder) and then go back in time until you find a previous version of the folder that still contains the deleted file. To do that, use the timeline on the edge of the screen.
Method 3: Use the Word AutoRecovery Feature
Is it possible to recover a Word document that was not saved on Mac? If you’re looking for an answer, then you’re in luck since there is a quick solution.
A special built-in feature called AutoRecovery Word on Mac can help in this situation. It is turned on by default and helps users to avoid losing files by regularly creating a copy of the document that they’re working on. This tool usually does it every 10 minutes, but you can use the Word settings to change how frequently you want it to make a copy of your document.
The Word AutoRecovery feature is a quick and easy way to recover unsaved Word documents on Mac. So if either Word or your Mac unexpectedly shut down while you were working on a Word file, this feature should be able to restore it.
Typically, Word automatically opens the recovered document the next time you launch the app. But if this didn’t happen, you can manually find the recovered document.
Here are the steps that you should take to succeed in recovering an unsaved Word document on Mac:
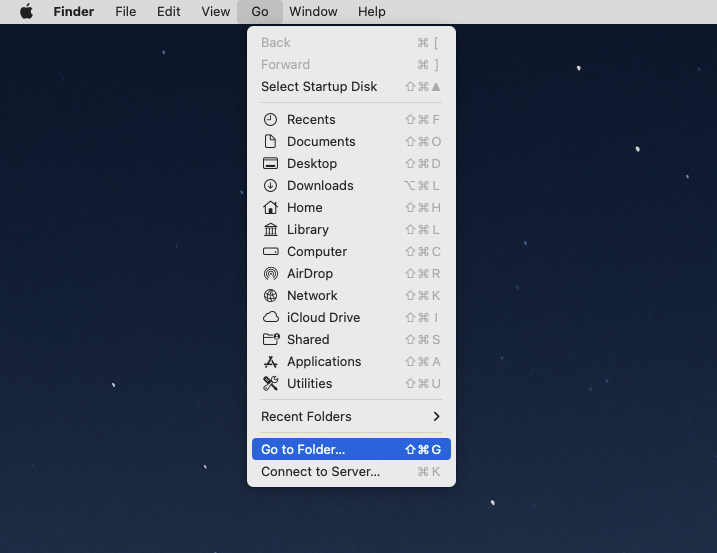
Step 1.Launch Finder on your Mac.
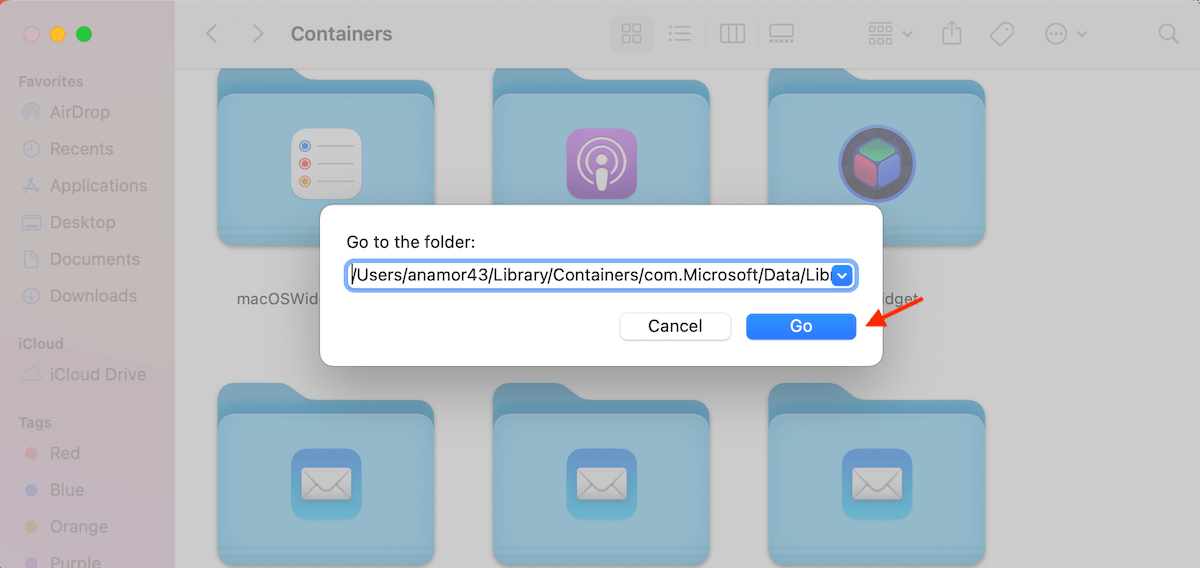
Step 2.From the menu on the top of the screen, click Go > Go To Folder.
Step 3.Instead of username, type in your own username. Then copy and paste this folder path in the window:
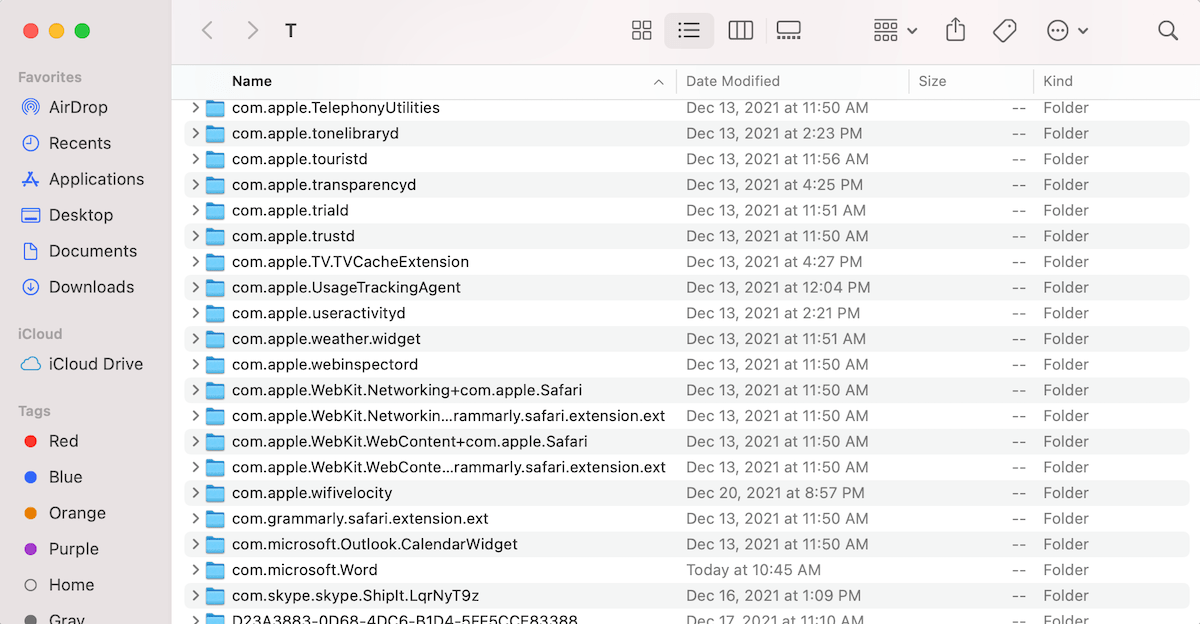
/Users/username/Library/Containers/com.Microsoft/Data/Library/Preferences/AutoRecovery
Step 4.Double-click the needed file to open it.
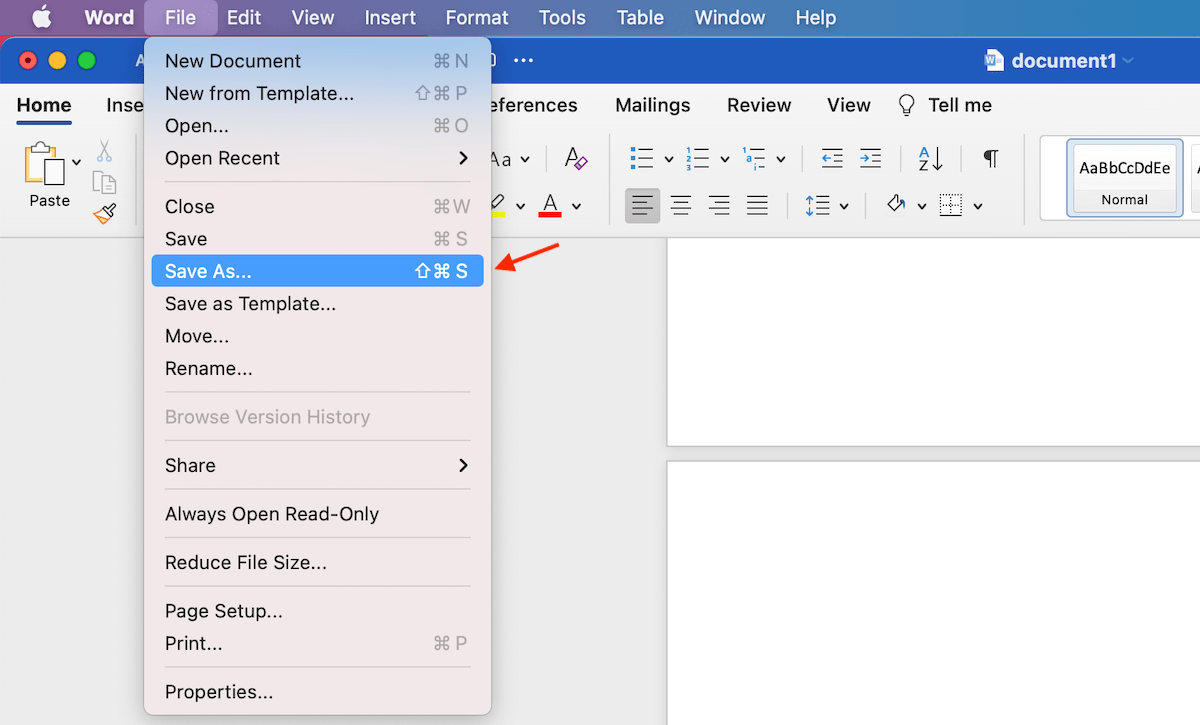
Step 5.Head to File > Save As, enter a new name for the recovered document and choose where you want to store it. Click Save.
Method 4: Check the Mac Temporary Folder
Temporary folders are created automatically by your Mac’s operating system and apps. In such a folder, you can find both cache files and temporary files.
There is a chance that Word has created a temporary file with your lost document, and it’s still stored in that folder.
Here’s how to access the Temporary folder on your Mac and recover a Word file:
Step 1.Go to Launchpad and open Terminal.
Step 2.Type in echo $TMPDIR and hit Return. The app should provide a directory path.
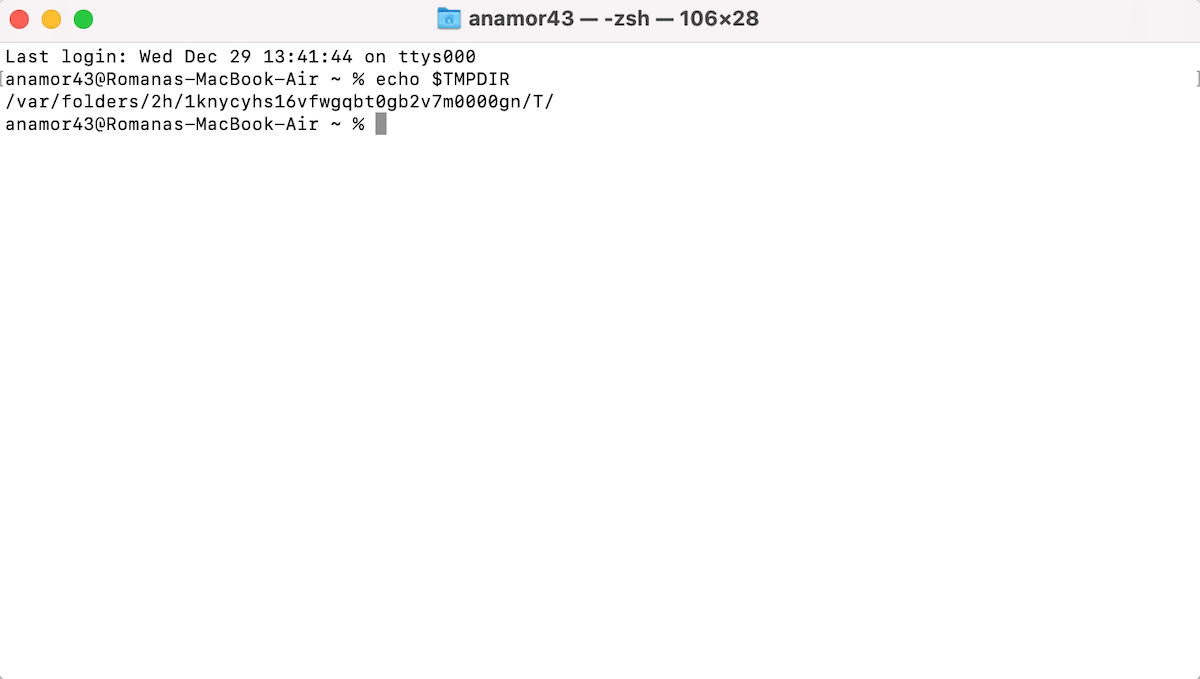
Step 3.Type in open $TMPDIR and hit Return to access the Temporary folder. Your lost document should be located in the TemporaryItems folder.
Step 4.Look through the files to find the needed one. Once you’ve located it, save a copy of the file into a different folder or just drag and drop it into a different location.
Method 5: Get Back Microsoft Word Documents with Data Recovery Software
Whenever you need to recover deleted Word documents on a Mac, it’s always best to start with solutions that don’t require any additional software to be installed on your computer, but such solutions can usually get you only so far.
If you need to get back permanently deleted Microsoft Word documents (in other words, documents that are no longer present in the Trash folder) and you don’t have a Time Machine backup, you need to use a third-party data recovery tool capable of performing an in-depth scan of your file system to discover all recoverable files your operating system can no longer see.
As a Mac user, you can choose from many different third-party data recovery software solutions. To save you time, here are three popular options that cover a variety of budgets.
1. Disk Drill for Mac
The first third-party data recovery software we want to recommend is Disk Drill. This professional-grade yet easy-to-use application is perfect for all Mac users who just want to get back their lost Word documents as quickly and painlessly as possible without worrying about the technical aspects of data recovery.
Disk Drill can recover both .DOC and .DOCX files, as well as over 400 other file formats, including all commonly used document, image, video, audio, and archive file formats. Regardless of if your Word documents were stored in the Documents folder or on a USB flash drive, it always takes just a single click to start a scan so you can recover them.
To recover Microsoft Word documents with Disk Drill:
Step 1.Download and install Disk Drill for Mac.
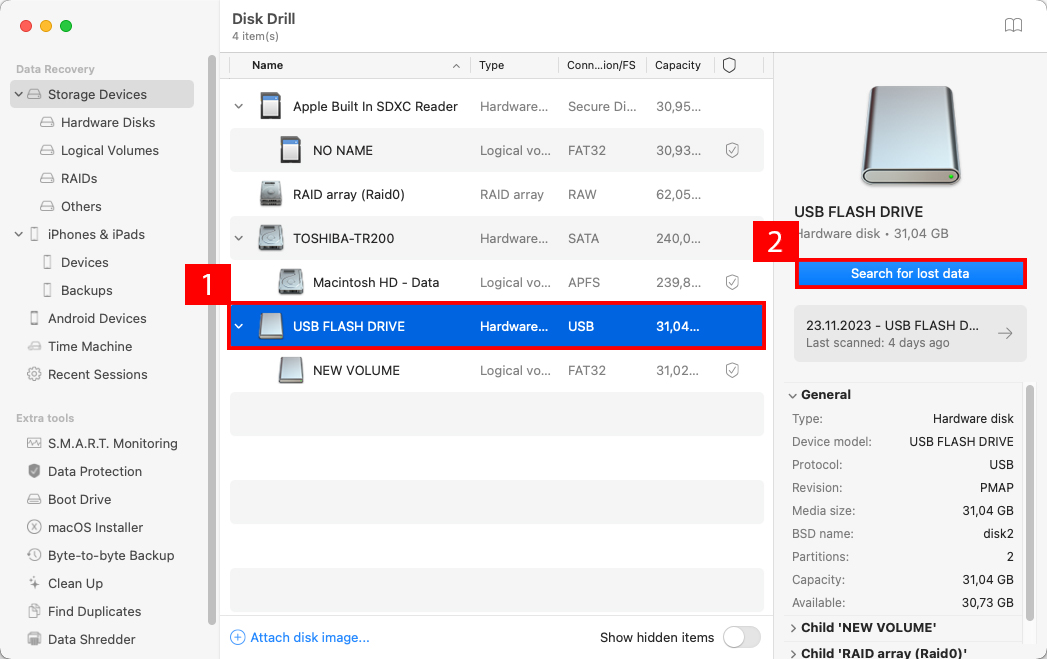
Step 2. Click the Recover button next to the storage device on which your Word files were stored.
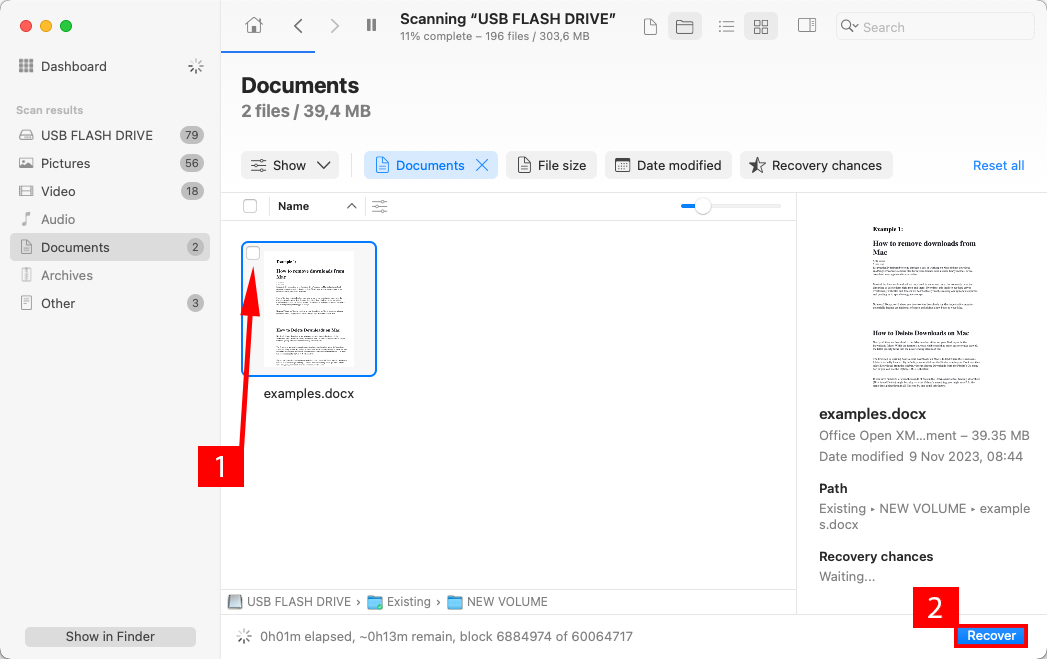
Step 3. Select the files you want to recover, then click recover button
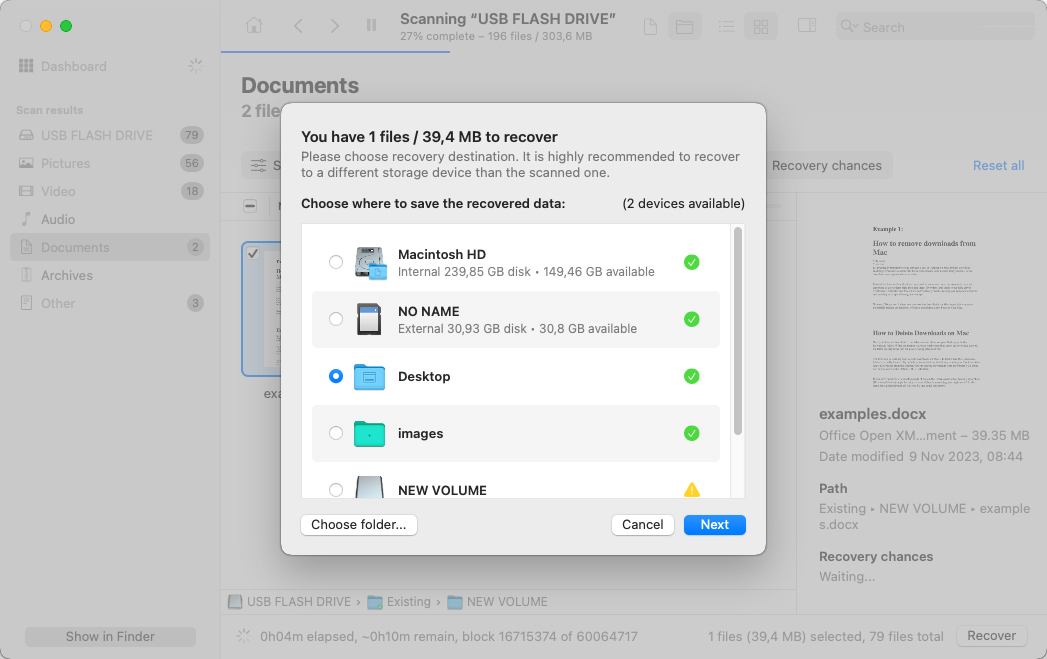
Step 4. Specify the recovery destination.
2. Lazesoft Mac Data Recovery
Lazesoft Mac Data Recovery offers a functional, no-cost solution for recovering permanently deleted Word documents on older macOS versions. While it effectively retrieves files from HFS/HFS+, FAT, FAT32, NTFS, and exFAT file systems, it’s important to note that Lazesoft has not been updated to support Apple’s current APFS file system. This lack of updates means that Lazesoft is best suited for macOS versions predating Ventura and Sonoma, as the application may not even install on these newer systems.
Despite its limitations with the latest macOS versions, Lazesoft remains a viable option for users with older Macs. Its user-friendly interface ensures that even average Mac users can navigate the recovery process with ease.
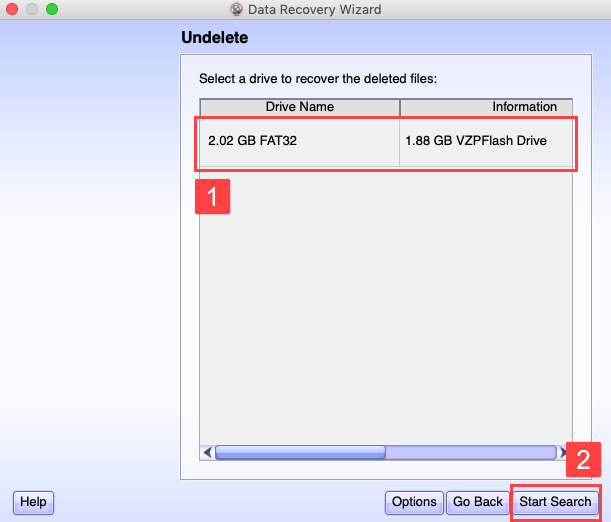
To recover Word files with Lazesoft Mac Data Recovery:
Step 1. Download and install Lazesoft Mac Data Recovery.
Step 2. Launch the tool and select the Undelete option.
Step 3. Select a drive to recover the deleted Word files and click Start Search.
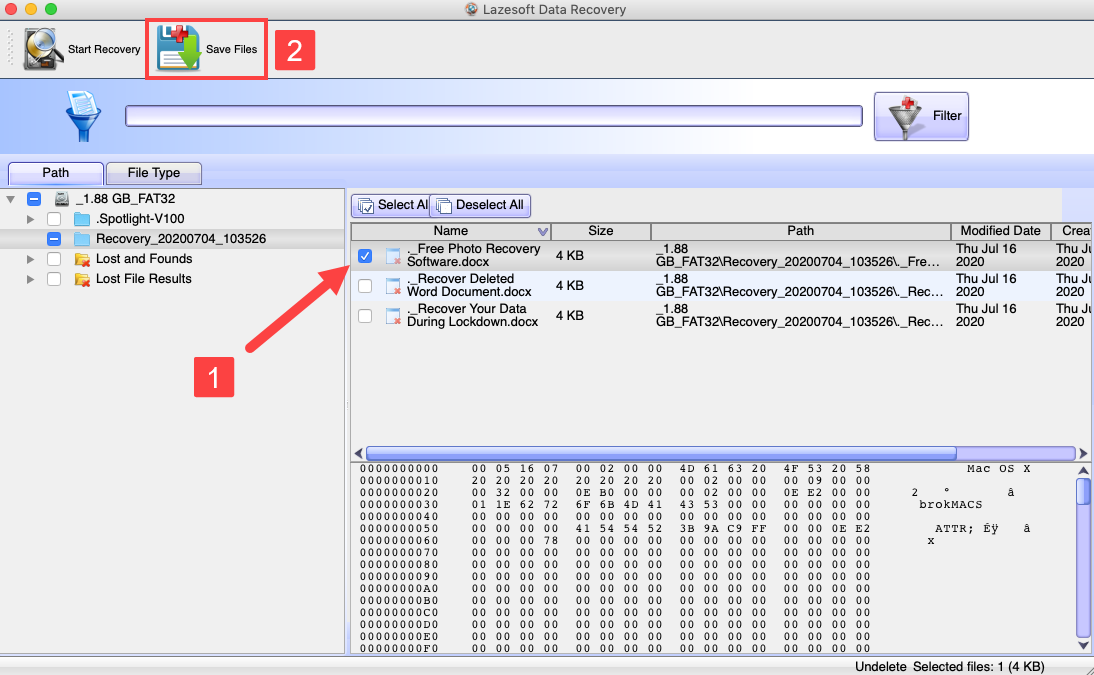
Step 4. Wait for the scan process to finish and select the deleted files.
Step 5. Click Save Files to restore your Word files.
3. PhotoRec
Your Mac has a powerful command-line interface, and you can use it to recover permanently deleted Word documents with the help of an open-source data recovery software application called PhotoRec. While its name suggests that PhotoRec can recover only image file formats, it actually supports about 300 file families, and you can find their list here.
To restore your Word documents with PhotoRec:
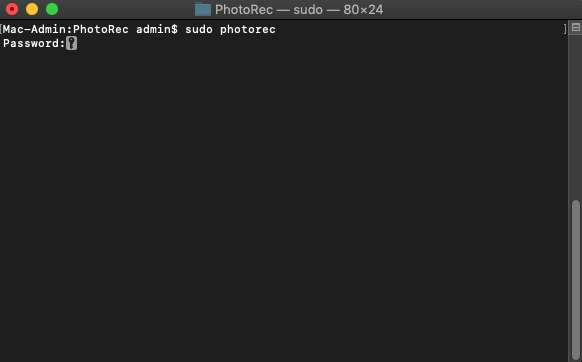
Step 1. Install TestDisk using the Homebrew package manager. (PhotoRec is included in the TestDisk package).
Step 2. Open Terminal and type sudo photorec to launch PhotoRec.
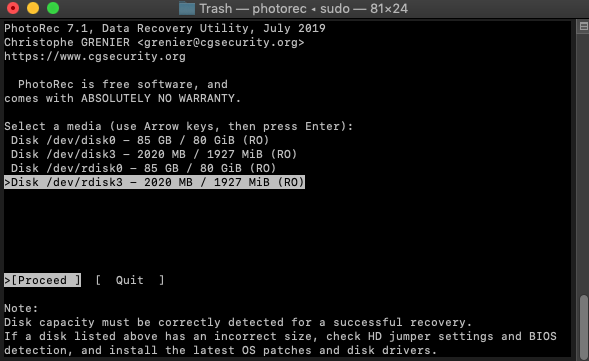
Step 3. Select the storage device on which your Word files were located.
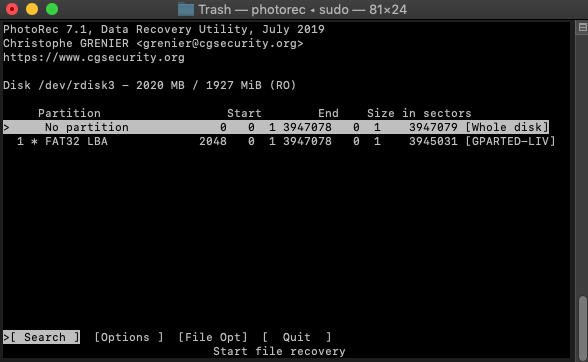
Step 4. Select your partition. Choose the No partition option to scan the whole device.
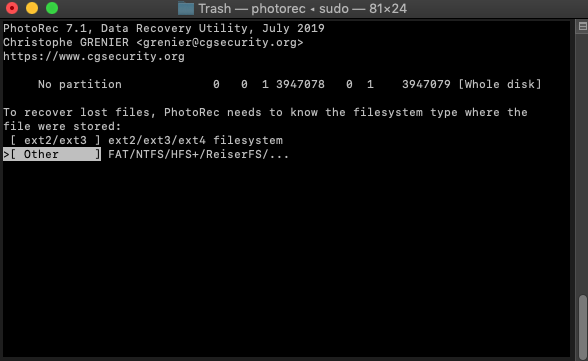
Step 5. Select the right file system and press Enter.
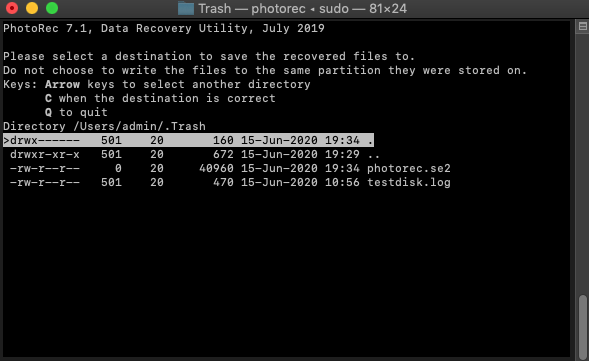
Step 6. Select a destination to save the recovered Word files to and press C on your keyboard when done.
Method 6: Restore a Previous Version of a Mac Document
Have you ever accidentally overwritten an important Microsoft Word document instead of using the Save As option? Many Word users have, which is why Microsoft introduced the ability to recover a previous version of a Word document on Mac.
This feature, called Version History, works only when the file is stored on OneDrive, OneDrive for Business, or SharePoint Online and the AutoSave option is enabled. If the file is not saved in the cloud, it’s not possible to use it. Since the AutoSave option keeps track of all changes automatically, you can follow the steps below even if you need to recover a Word document that was not saved on a Mac manually.
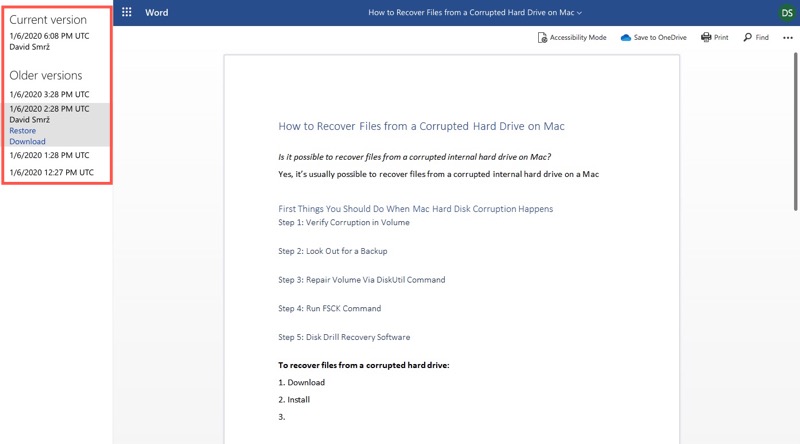
Here’s how to recover a Word document on Mac using Version History
Step 1. Open the Word document you want to restore to a previous version.
Step 2. Select File and click Browse Version History.
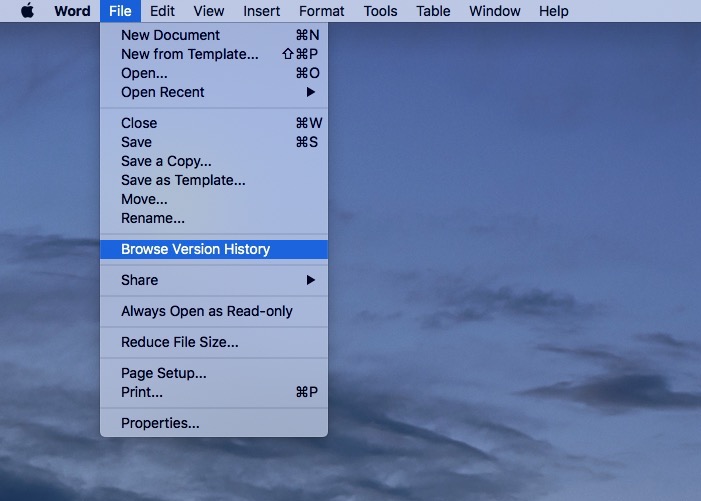
Step 3. Select the version you want to recover and click save it to your computer or click the Restore button.
Repair Corrupted Word File
Sometimes, the journey of recovering a lost Word document doesn’t end with its retrieval. It’s not uncommon for recovered files to come back partially corrupted. This corruption can manifest in various ways – from jumbled text and missing sections to an inability to open the file at all.
This presents a new challenge: learning how to repair a corrupted Word file to salvage as much intact data as possible.
Method 1: Copy & Paste to a New Document
If the damaged Word file can be opened on your computer, you can try copy-pasting everything from the document to a new one. The trick here is that you should copy the whole text except for the last paragraph mark.
So, first, you should create a new document File > New > Blank document > Create. Then open the damaged document and change it’s view to draft view (View > Draft), copy the text, and paste it into the new document.
Method 2: Use the Recover Text Feature
If the corrupted Word file does not open, the best solution in such a case is to use the Recover Text feature to restore your document. However, you must be aware that this method will recover only the text from your document. The formatting along with all non-text items (graphics, drawing object, etc.) won’t be restored.
Here’s how to recover text from a damaged file in Word on your Mac:
Step 1.Launch Word and head to File > Open.
Step 2.Click Original near Open to reveal a drop-down menu. Click Recover Text.

Step 3.Choose the file that you wish to recover and click Open.
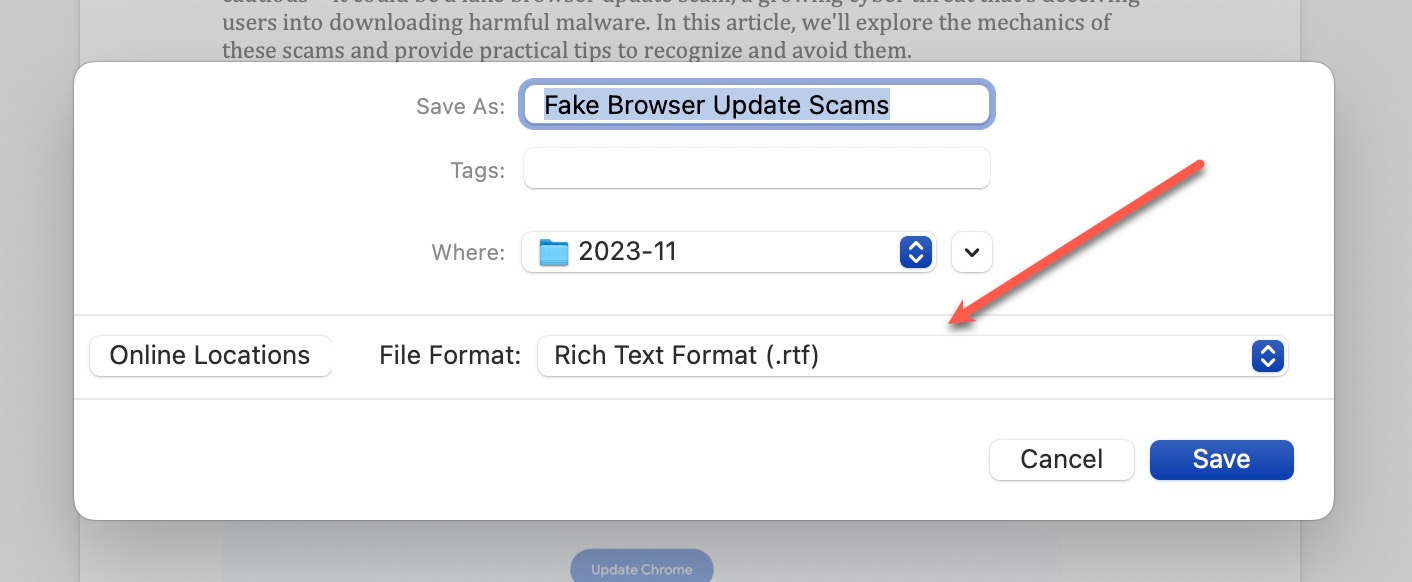
Method 3: Save the Document as RTF
Converting a corrupted Word document to Rich Text Format (RTF) can sometimes help resolve issues. RTF files discard some of the more complex formatting, which could be the source of corruption. To do this:
- Open the corrupted Word document.
- Go to File > Save a Copy and select Rich Text Format (RTF) from the format dropdown.
- Save the document and then try reopening the RTF file in Word. If it opens successfully, you can then save it again as a Word document. Just know that you will likely format the document nicely again. But that’s still better than having to recreate it again from scratch—right?
Method 4: Use an Online Word Recovery Tool
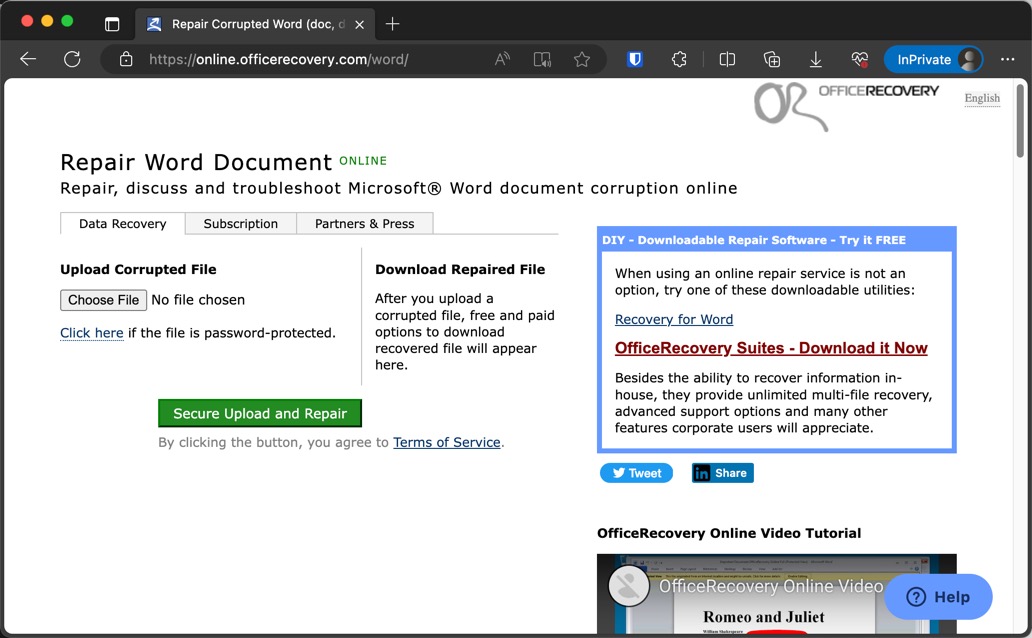
Websites like OfficeRecovery Online for Word offer services to repair corrupted Word documents. Simply upload your file, and the tool will do its best to fix the corruption and recover your data.
It’s important to note that many of these online repair tools are available for free, primarily because they serve as a promotional gateway for various paid products and services. By offering free repairs, these websites can showcase the effectiveness of their technology, encouraging users to consider their paid offerings for more advanced recovery needs.
However, the biggest disadvantage of online repair tools is the need to upload your document to a third-party server. This raises concerns about data privacy and security, especially if your document contains sensitive or confidential information. Unlike offline recovery tools like Disk Drill, which perform recovery operations directly on your computer without data leaving your system, online tools require transferring your files over the internet. This aspect is critical to consider, especially for business documents, personal information, or any data subject to privacy regulations.
Conclusion
Losing a vital Word document can be a stressful experience, but fortunately, it’s often not a lost cause. With the array of effective file recovery methods available, there’s a solution for nearly every situation. Whether you need to restore an unsaved Word document, recover a damaged file, or retrieve a deleted document from the Trash on your Mac, these methods provide a safety net. So, take a deep breath, select the most appropriate solution for your scenario, and confidently follow the step-by-step instructions outlined in this guide.
FAQs
Yes, you can recover an unsaved Word document on a Mac using the AutoRecovery feature in Word. If Word or your Mac crashes, this feature typically autosaves your document every 10 minutes. You can find the autosaved version when you restart Word.
To recover a Word document that was saved over, you can use the Version History feature if the document is stored on OneDrive or SharePoint. This allows you to revert to a previous version of the document. If not available, check if you have a Time Machine backup that includes the older version of the document.
In Word for Mac, AutoRecover files are usually stored in the following location:
/Users/username/Library/Containers/com.Microsoft/Data/Library/Preferences/AutoRecovery
To recover permanently deleted Word documents, you can use data recovery software like Disk Drill or Lazesoft Mac Data Recovery (for older macOS versions). These tools scan your drive to find recoverable files that are not visible but still exist on the drive. For best results, use these tools as soon as you realize the document is missing.


