
Despite being invented nearly half a century ago, email still remains one of the most useful communication tools in the world. The only problem is that email is not exactly bullet-proof, and it doesn’t take much for critically important messages to become accidentally deleted or lost, which is why so many Mac users are desperate to learn how to recover deleted emails on Mac.
If you’re among them, then this article is for you because it describes multiple solutions that you can use to recover permanently deleted emails on any Mac.
Table of Contents
How Are Emails Stored on Mac?
When you add an email account to Apple Mail, the email client creates a local cache with email messages in the following hidden location (you can open it using the Go to Folder option in Finder):
~/Library/Mail/
Inside this folder should be at least one subfolder with a cryptic alphanumerical name. This subfolder will contain a .mbox file, which is essentially a file archive holding a collection of email messages. You can open it using Finder and then navigate through its various subfolders until you reach a subfolder with .emlx files.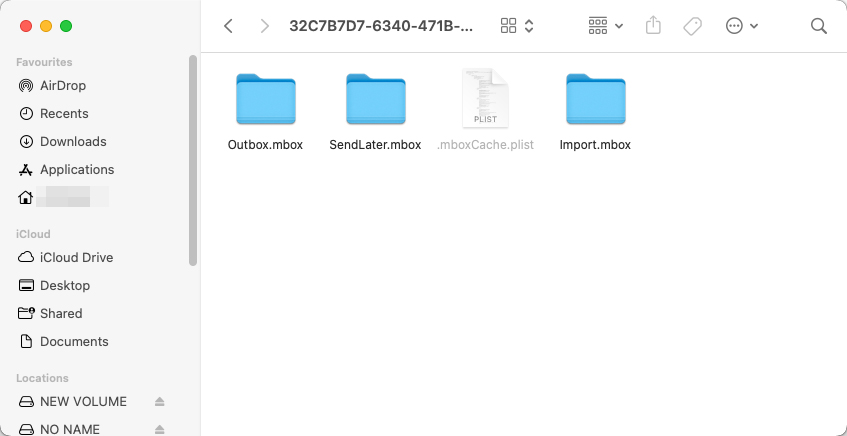
Files with the .emlx extension are simply text files created by Apple Mail corresponding to individual email messages, and you can open them using any text editor, such as Apple’s TextEdit.
Just don’t expect to see a nicely formatted email message. Instead, you’ll see the source code of the message displayed as plain text, and you need to decipher what’s formatting and what’s the actual content of the message.
When is it Possible to Recover Deleted Apple Mails?
There are a few “safety nets” that allow lost emails to be recovered by the user using specific methods. However, recoverability varies depending on which of these safety nets apply to your situation. To confirm that your emails are recoverable, make sure that at least one of these conditions are met:
- A backup of the deleted emails must exist (solution: recovery from a backup).
- The deleted emails must still be physically present on the hard drive (solution: data recovery software).
- The deleted emails must be stored on the email server (solution: recovery from the cloud).
These solutions will only work if their specific conditions are met. If none of these apply to you, the methods in this article will not work (and your mail is likely permanently lost).
4 Ways to Recover Apple Mails
In this section, we’ll cover 4 different ways to recover Apple Mails. Each solution depends on certain factors, like whether or not you have a backup, the presence of the email on the cloud server, etc. We also provide a solution that works without any backups or cloud-based copies, as long as the mail data hasn’t been overwritten on your drive.
You can start with the solution you think is most applicable to your situation but you can safely try them all.
Method 1: Check Trash Folder
The first place you should look for your deleted emails is the Trash folder. Whenever you delete an email, it gets sent to your mail client’s Trash folder. Depending on which mail client you use, the deleted mail is automatically permanently erased after a certain period. For Apple Mail, it’s 30 days.
You’ll usually find your Trash folder in your mail client’s sidebar underneath its mailbox.
Method 2: Restore Deleted Emails with Data Recovery Software
Data recovery software allows you to take advantage of the fact that deleted files, including deleted .emlx files from ~/Library/Mail/, physically remain on the hard drive until they are overwritten by new files.
As long as you begin the recovery process in a timely manner and use a reliable data recovery software application, you should be able to recover a deleted Mailbox file created by Apple Mail on Mac without any issues.
We recommend Disk Drill because it offers leading data recovery performance, support for the Apple Mail message format, polished user interface, and many extra features intended to make recovering deleted emails and other data on Mac computers painless.
How to Recover Your Mail Files
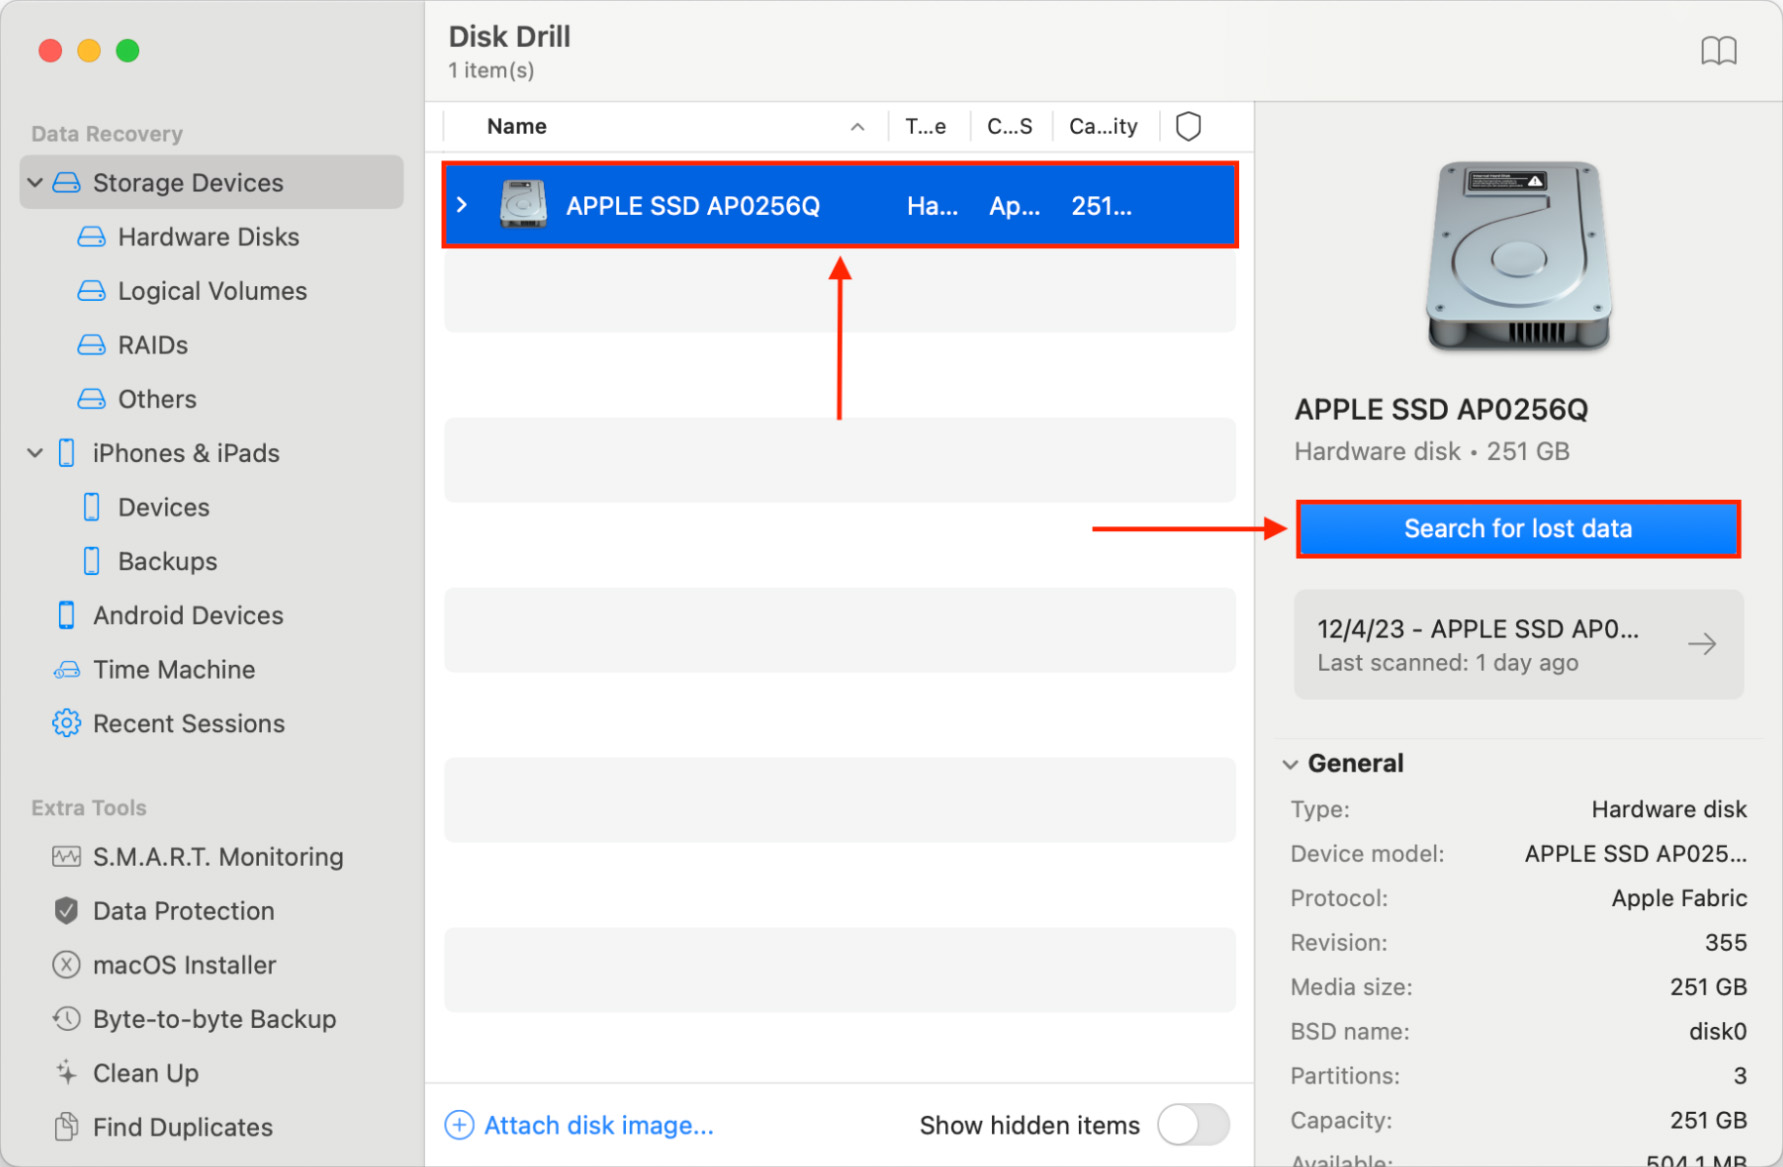
- Download and install Disk Drill. We recommend downloading and installing it on an external storage device to avoid overwriting the deleted mail’s data.
- Launch Disk Drill and select your Mac from the drive list. Then, click Search for lost data.
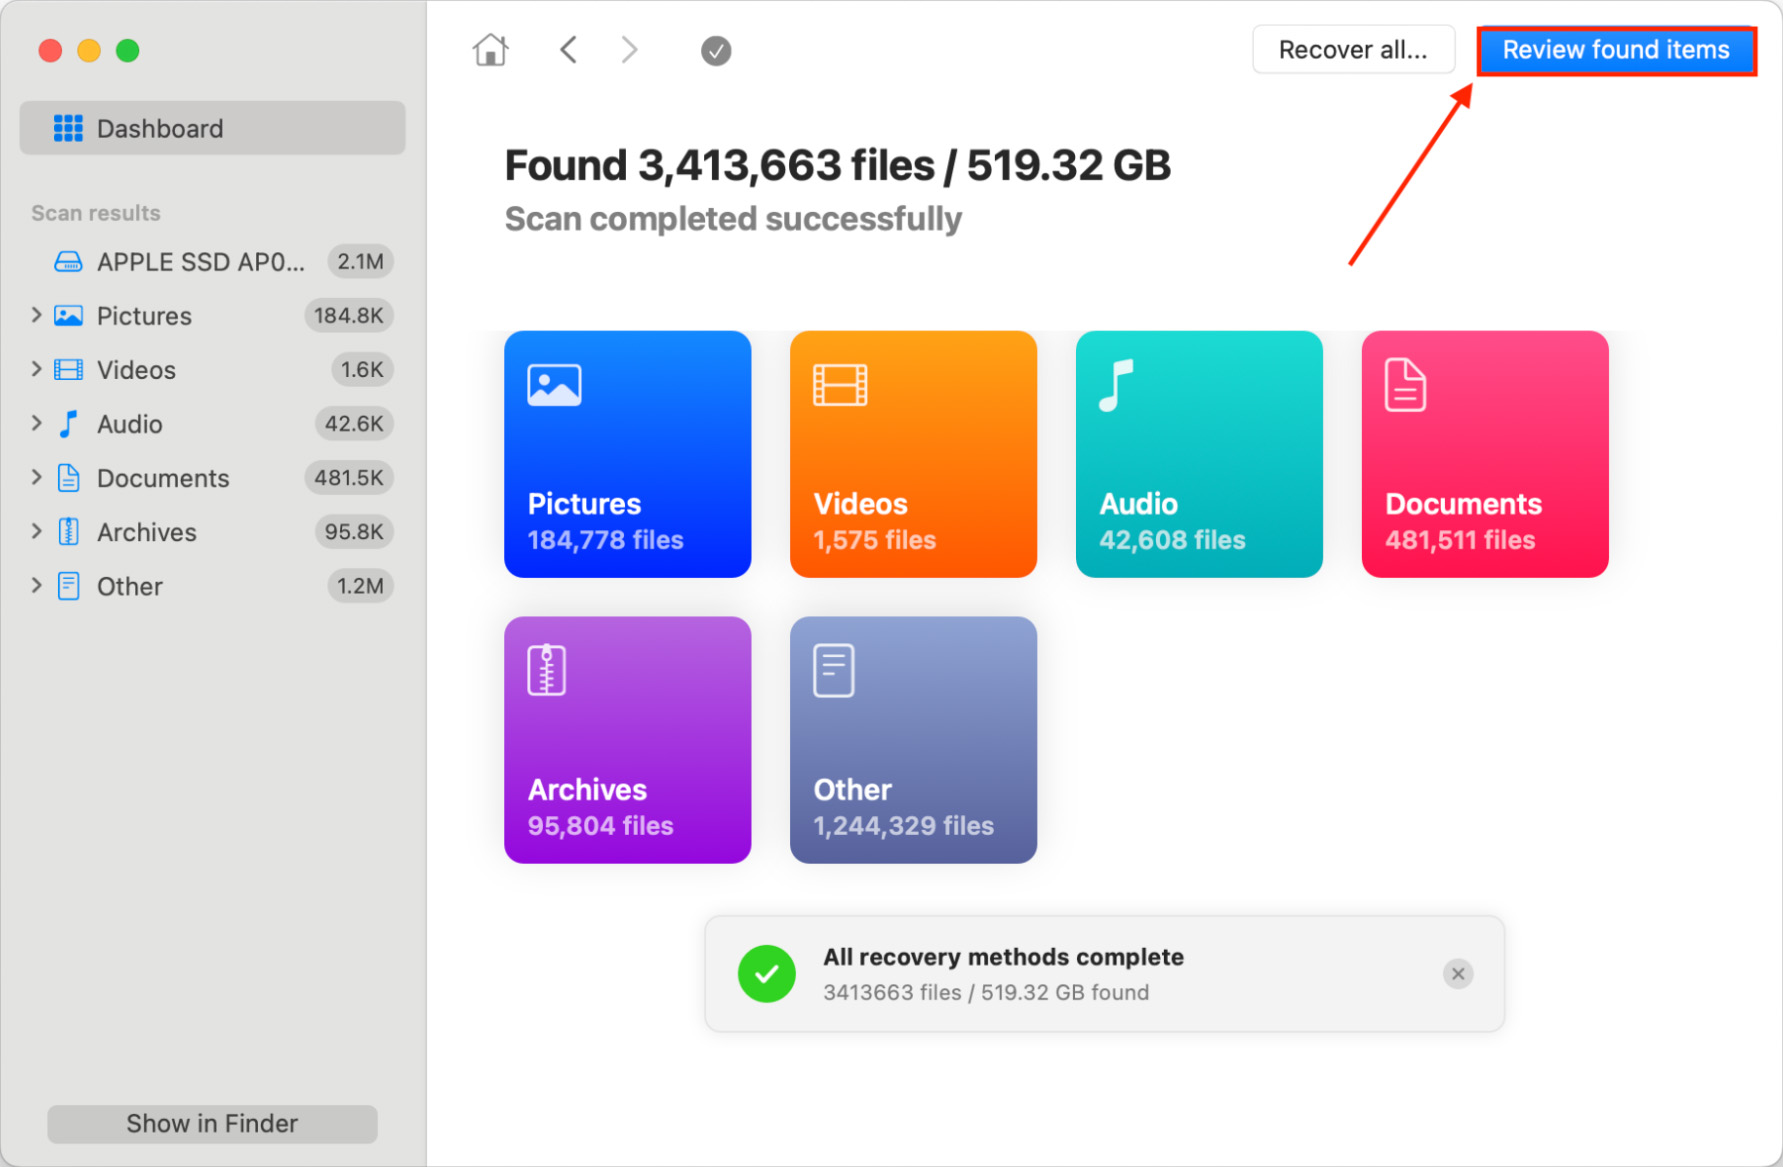
- Wait for Disk Drill to finish scanning your drive and for the file categories to stop populating. Then, click Review found items.
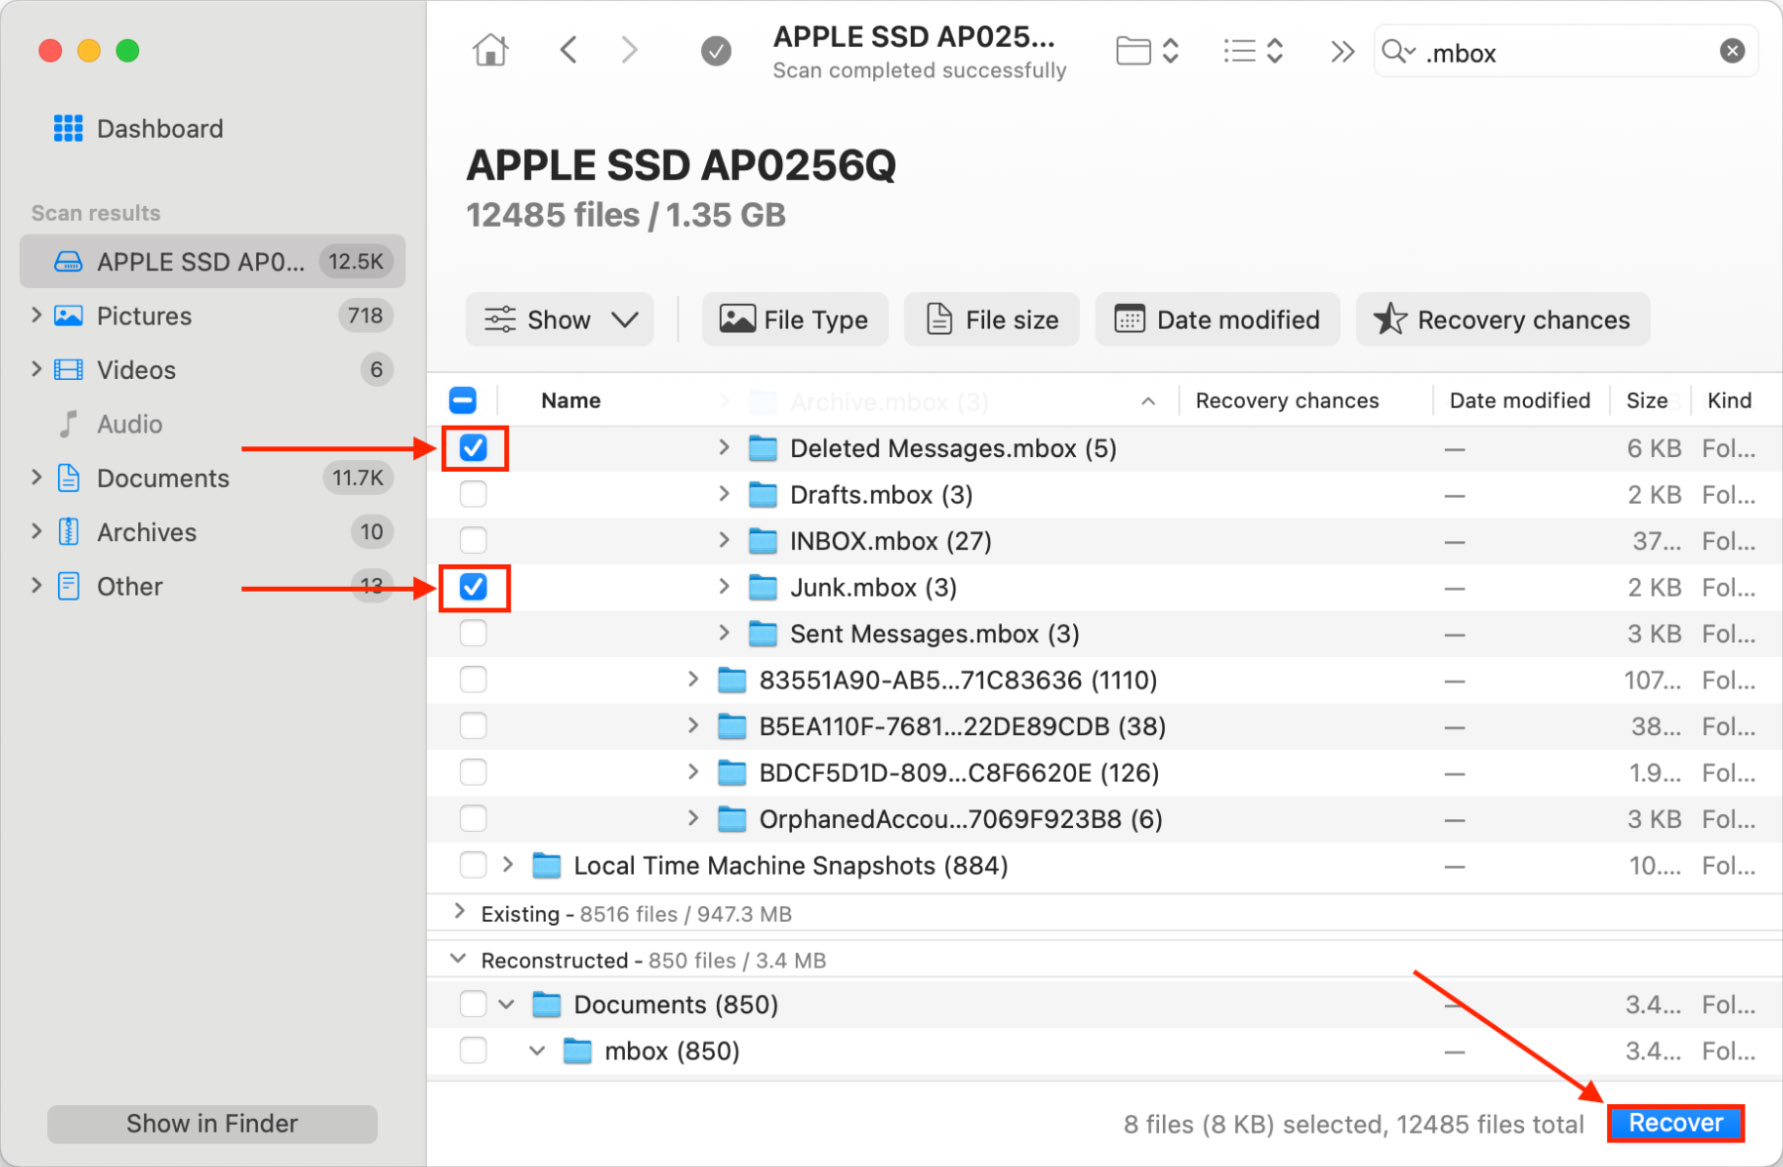
- Click the Search tool in the top-right corner of the window and type .mbox in the field. This tells Disk Drill to only show files/folders with the .mbox extension. Alternatively, you can search for emlx files if you only want to see the email’s text contents. Then, expand the Deleted or lost and Reconstructed sections and start browsing for your mail file.
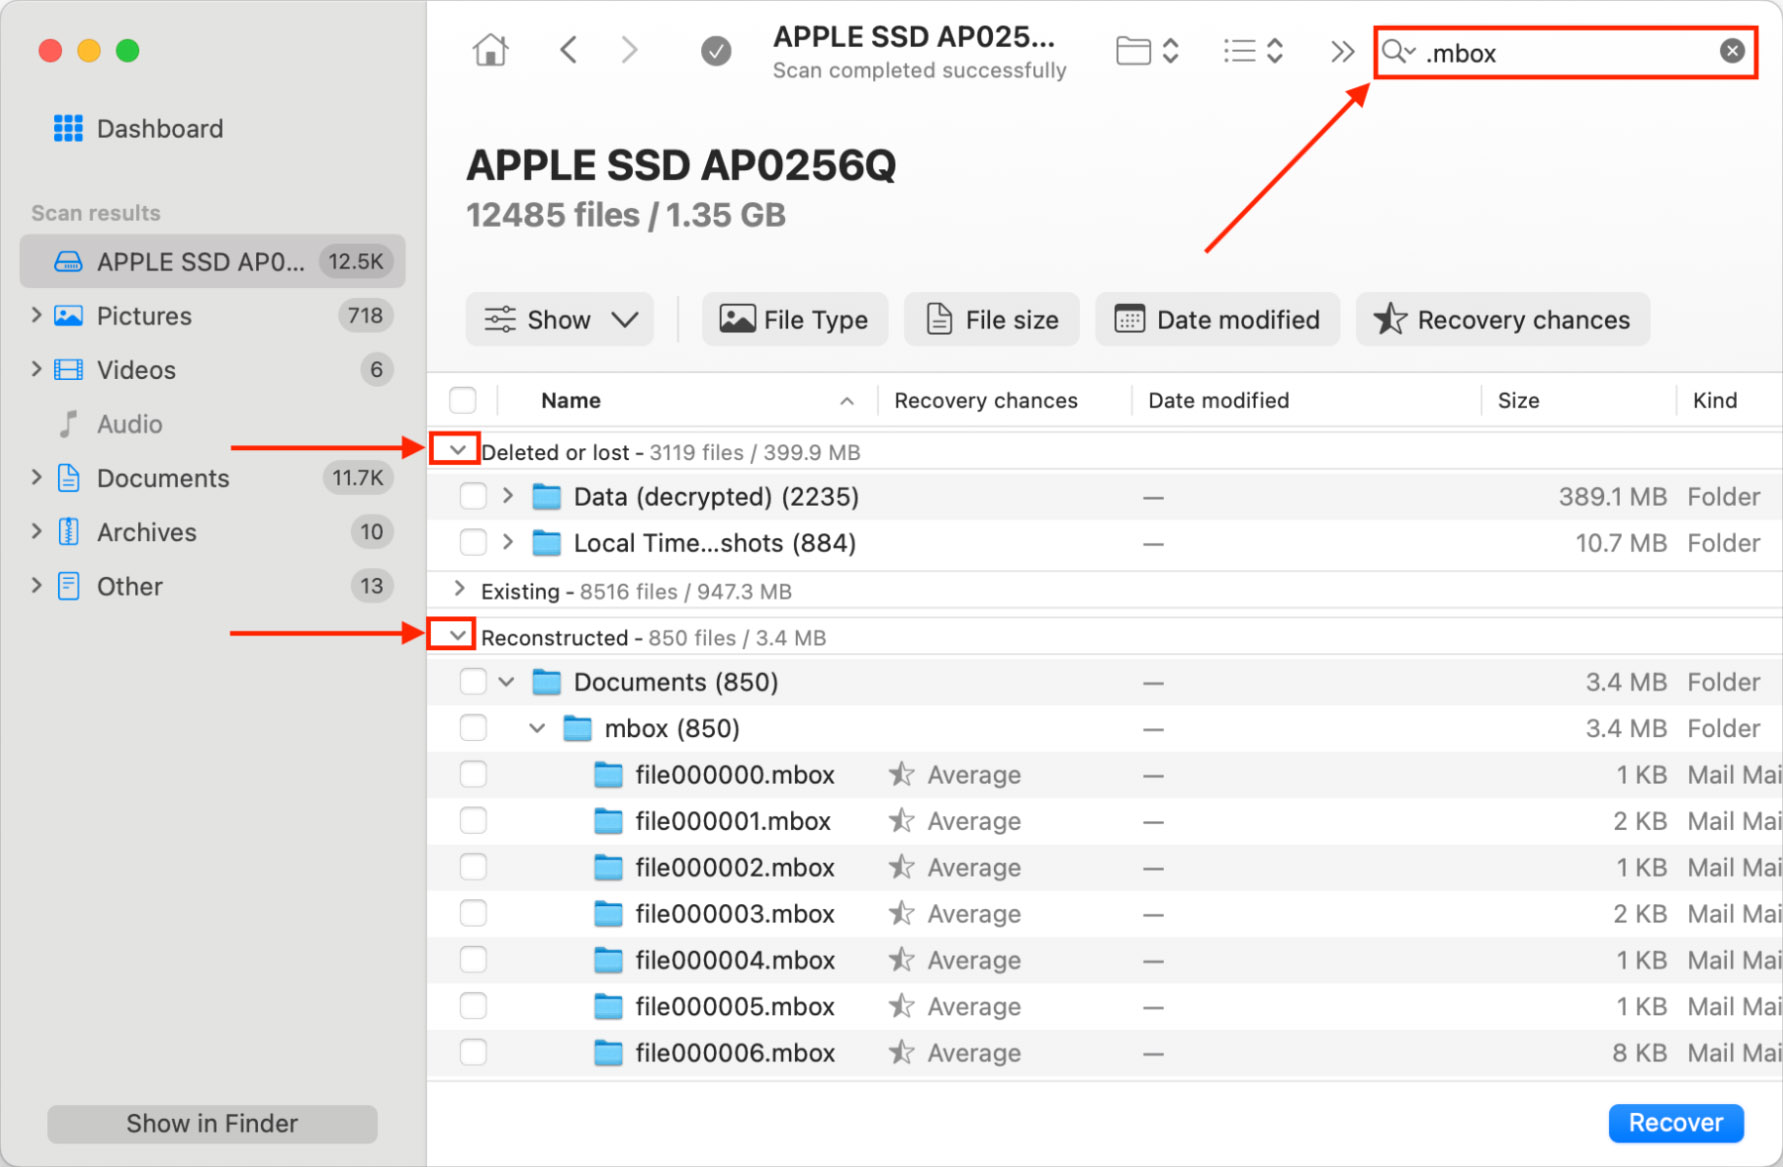
- Once the mbox file is located, mark the box beside it. Then, click Recover.
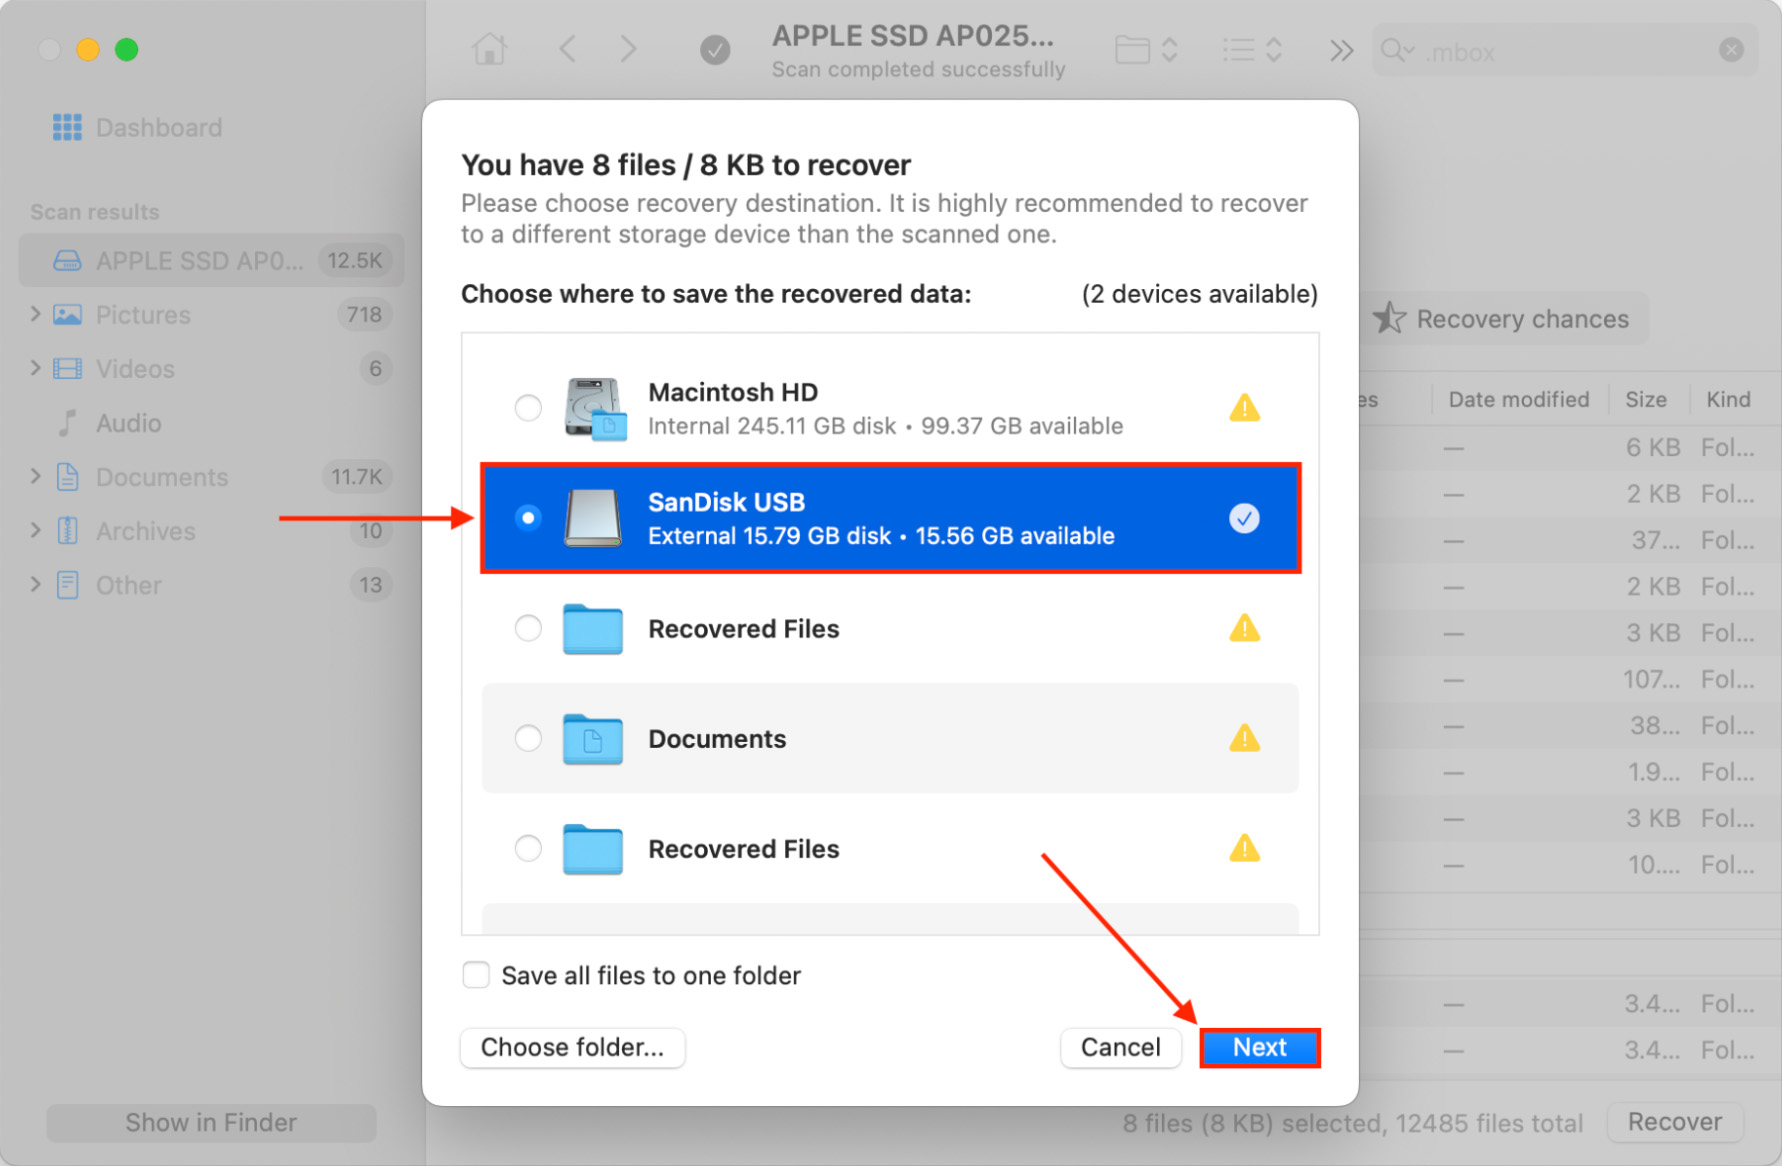
- Select a location where Disk Drill will save the recovered file. We suggest saving it to an external storage device to avoid overwriting. Then, click Next to start the recovery process.
How to Import Your Recovered Mail
To import your deleted email back to your mail client:
- Open the Mail app. On the Apple menu bar, click File > Import Mailboxes…
Select Apple Mail and click Continue.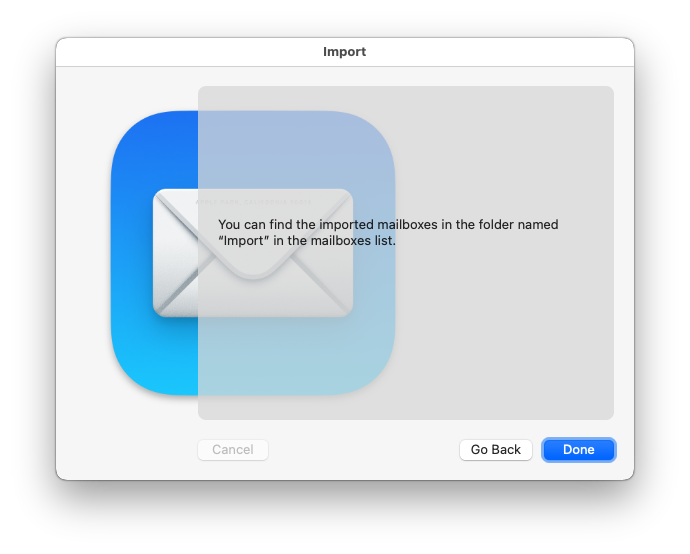
- Locate the mbox file you recovered in the last section and click Choose.
- You’ll find the new Import mailbox in the left sidebar. From this mailbox, you can move your emails to whichever folder you want.
Method 3: Recover Emails from a Backup
If you’re using Apple’s backup utility, Time Machine, to keep your data safe, then you should be able to relatively easily recover your deleted or lost emails without any third-party software.
To recover emails from a Time Machine backup:
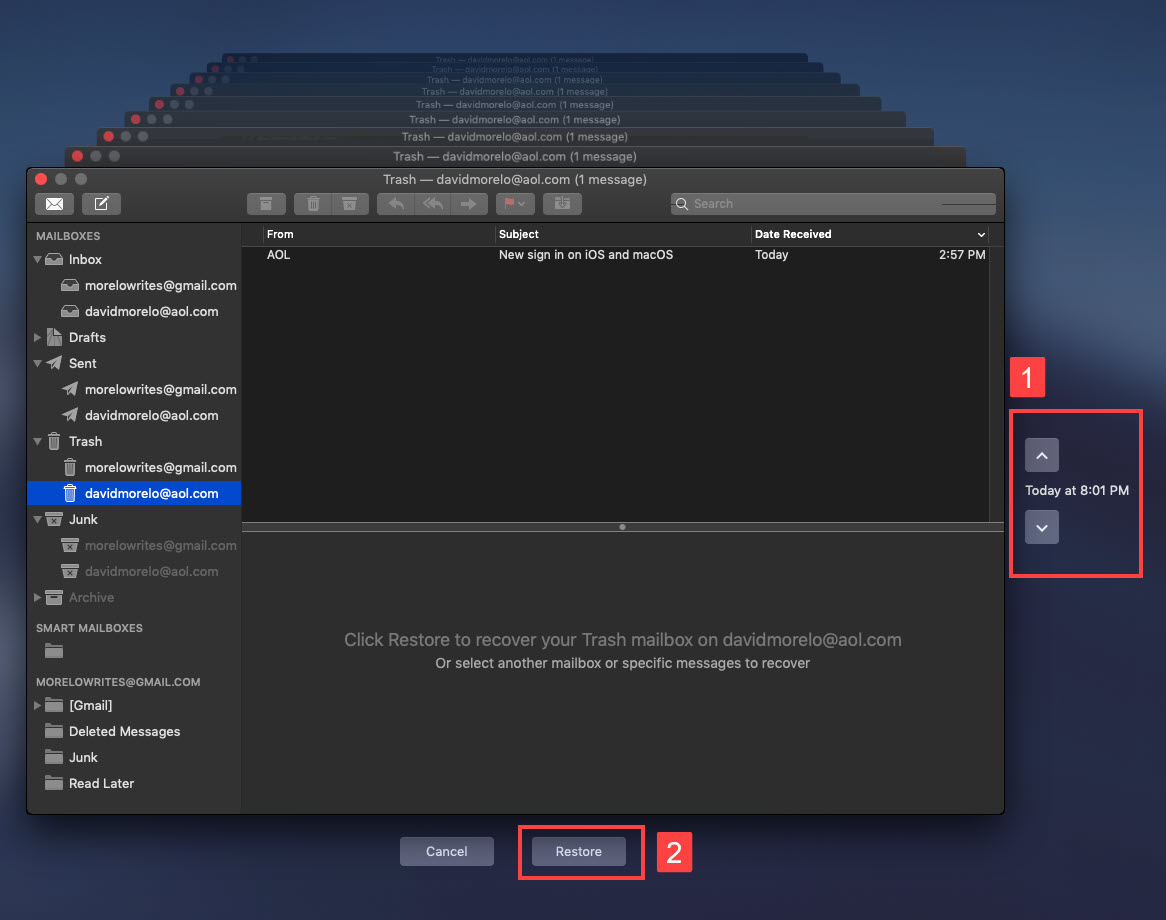
- Launch the Apple Mail app.

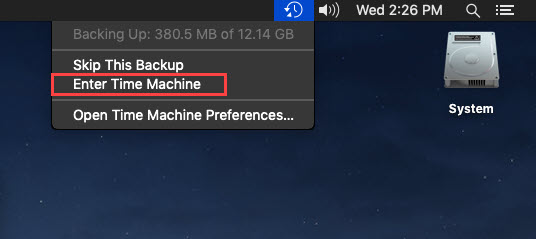
- Click the Time Machine icon located in the Menu Bar and choose Enter Time Machine.
- Go back in time using the timeline on the right edge of the screen until you find a backup containing the deleted emails.
- Click Restore to recover your emails.
You can, of course, use any backup software you want, but Time Machine comes with all recent versions of macOS, so there’s a good chance that it will help you get back your emails.
Method 4: Retrieve Emails From the Cloud
In many cases, it’s possible to retrieve emails from the cloud a long time after you’ve deleted them in Apple Mail. That’s because various email service providers offer their own methods for retrieving deleted emails, and Apple Mail doesn’t always let you take advantage of them.
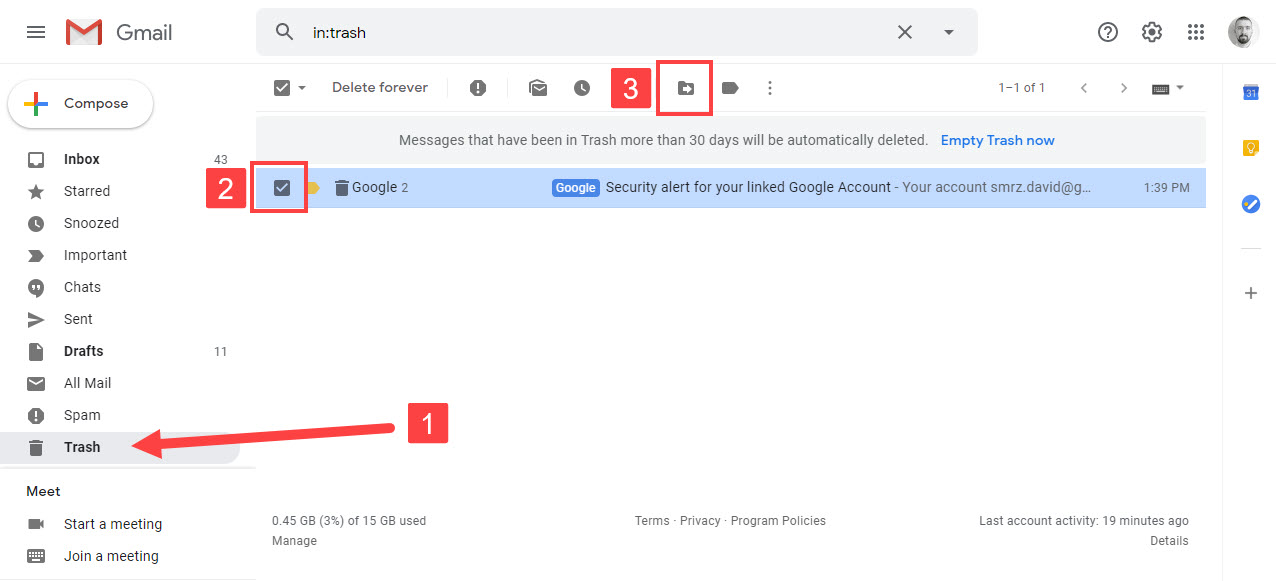
To retrieve deleted Gmail emails:
- Open Safari and go to: https://mail.google.com/
- Log in with your username and password.
- Open the Trash folder.
- Select the email message you want to retrieve and move it back to your inbox.
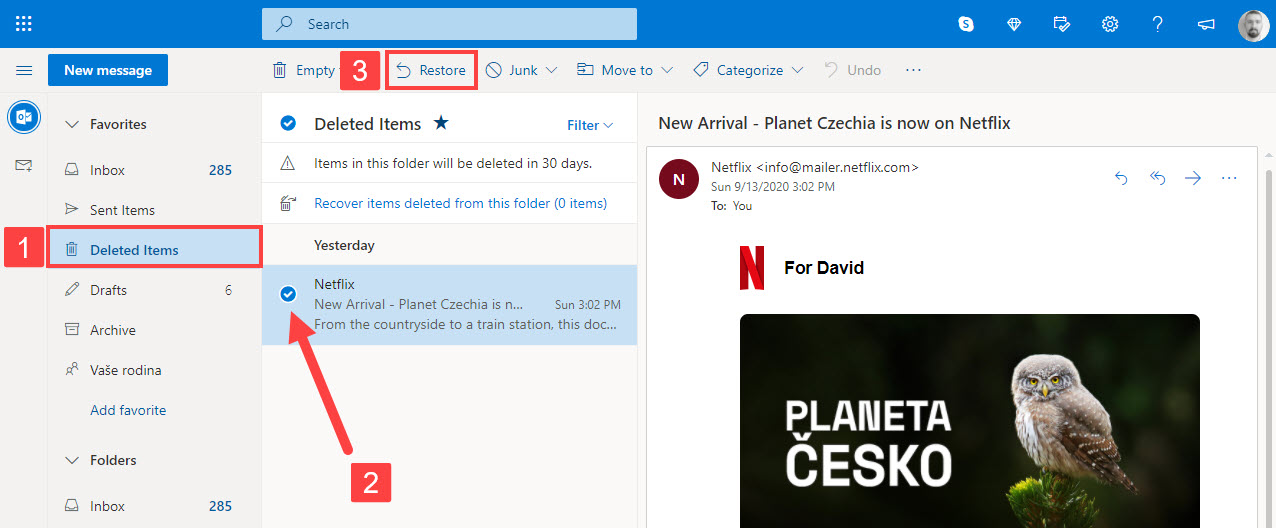
To retrieve deleted Outlook emails:
- Open Safari and go to: http://outlook.com/
- Log in with your username and password.
- Open the Deleted Items folder.
- Select the email message you want to retrieve and choose the Restore option to move it back to your inbox.
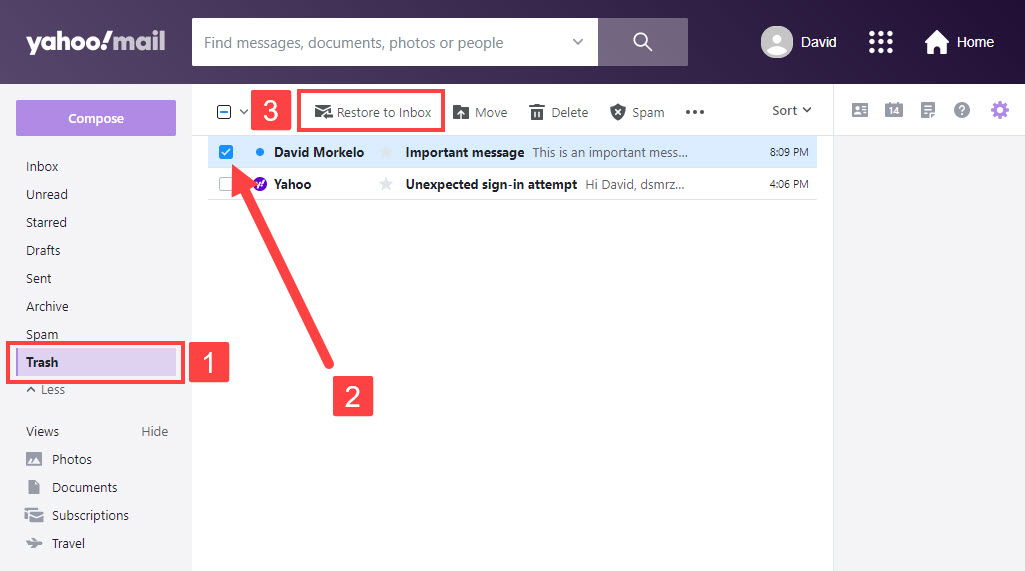
To retrieve deleted Yahoo emails:
- Open Safari and go to: https://mail.yahoo.com/
- Log in with your username and password.
- Open the Trash folder.
- Select the email message you want to retrieve and choose the Restore to Inbox option to move it back to your inbox.
Most other email service providers make it similarly easy to recover deleted email messages, but the individual recovery steps might be slightly different.
Conclusion
Restoring a deleted email is not only possible but there are many ways to do it as long as certain conditions are met. So make sure you evaluate your situation thoroughly before giving up! Even if you don’t have any backups in the cloud or on the mail server, your mail isn’t totally lost as long as its data is physically on the drive and hasn’t been overwritten.
But data recovery is never 100% guaranteed. So make sure you review your selection before deleting anything and consider using a backup tool like Time Machine to ensure you always have a reliable way to get your mail back.
FAQ
Deleted drafts are treated differently than email messages by Apple’s mail program. Drafts that are deleted are not sent to the Trash. If you act quickly, you can recover a deleted draft email using the Mac’s undo command.
After deleting a draft email, if you immediately execute the Command-Z keystroke combination, your draft will be recovered.
There are several options for recovering permanently deleted emails in Outlook on Mac.
- You can use data recovery software to scan your storage device and search for lost deleted emails.
- You can recover an older version of the Outlook mailbox from a Time Machine backup.
- Use an internal Outlook feature as demonstrated here:
- Launch Outlook and open the Deleted Items folder.
- Select Home and then Recover Deleted Items From Server.
- Choose the items you want to recover.
- Click Restore Selected Items > OK.
The most efficient method of recovering a deleted mail folder on Mac is with data recovery software like Disk Drill.
- Download and install Disk Drill for Mac.
- Launch the program and select the disk containing the lost mail folder.
- Click the Search for lost data button to scan the device.
- When the scanning process completes, type mbox in the search field to find the Mail folders. They have an mbox extension.
- Select the mailbox to be recovered and choose a safe location where it will be saved.
- Click the Recover button.


