
If you’re not familiar with how email clients work, it’s pretty hard to figure out why emails disappear in Thunderbird and how to fix it. There are simply a lot of things that could have gone wrong both on the software side and even on your local Mac storage.
This article covers all you need to know about Thunderbird email recovery. You’ll gain a strong understanding of how email works in relation to data loss so you’ll never have to face this problem again. Read on.
Table of Contents
Common Reasons for Thunderbird Email Loss
There are a number of reasons that you might not expect to be the cause of email loss on Thunderbird, which makes it tough to figure out what you should do to fix it. This list should help you get started on the right foot:
- Accidental deletion (Thunderbird). – If you’re tired, stressed, or you lend your computer to your kids, your email might just have been sent to the Trash. Check there if your Thunderbird inbox messages disappeared!
- Accidental deletion (Finder). – Thunderbird stores email data in a local folder on your Mac. If these files get deleted or corrupted, your emails won’t appear properly or even at all in the app. We’ll show you how to find this folder in the next section.
- Deleted from server. – If your account uses POP in Thunderbird, its default behavior is to delete an email from the server when you retrieve it. Instead, it gets stored locally. This means that if you retrieve an email using Thunderbird on your Mac, it won’t appear on your iPhone. You should find it using another email client though, such as Gmail.
- View settings. – You might have set your view settings to only Unread, Favorite, or Recent. You can change it by clicking the View button on the Apple menu bar while Thunderbird is open.
- Deleted by Anti-virus. – If you store emails locally, your anti-virus might have automatically deleted Thunderbird’s “infected” folders if it detected any malicious files. If Thunderbird local folders are missing, your emails won’t display in the app. Solutions below.
Where are Thunderbird Emails Stored on Mac?
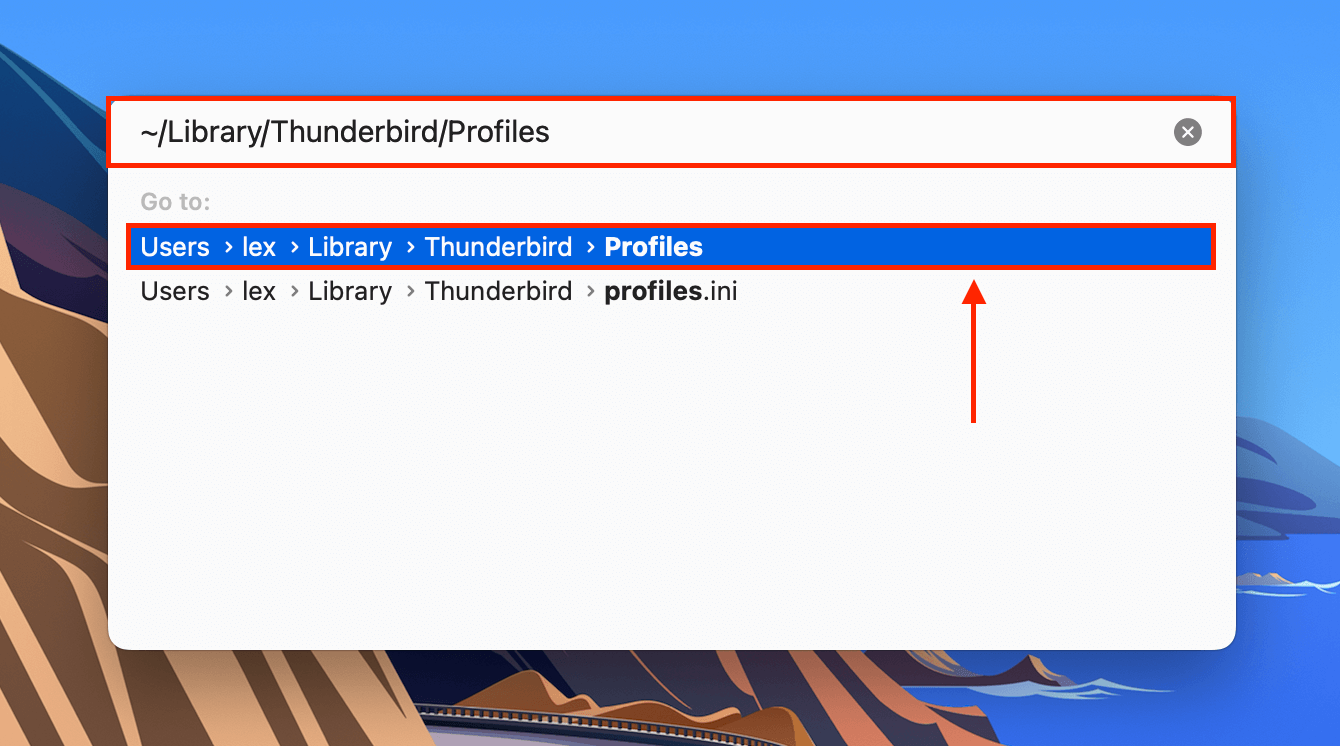
Thunderbird emails are stored in the local Profiles folder. You can navigate to this location by opening Finder > Go > Go to folder… and typing the following path into the box:
~/Library/Thunderbird/Profiles
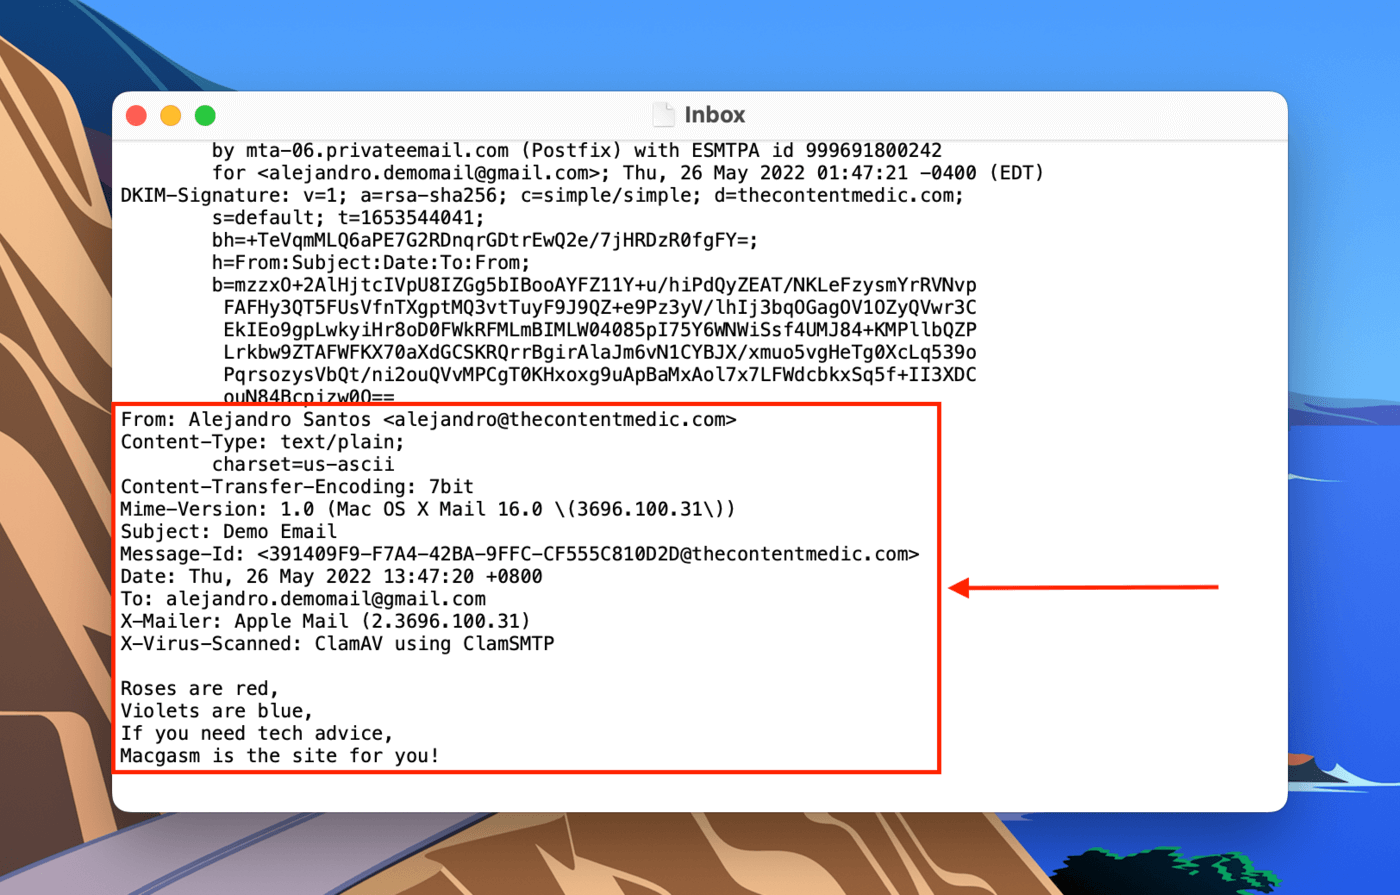
Each folder in this location has their own “Mail” folders, where you can dig for TXT files that contain the content of your messages. For example, I found Inbox.txt in Mail > pop.gmail.com. Here’s what it looks like when opened with a text editor:
How to Restore Deleted Thunderbird Emails
Depending on what caused the data loss in the first place, we can try recovering Thunderbird emails using different methods:
Method 1: Undelete Deleted Thunderbird Emails from Trash
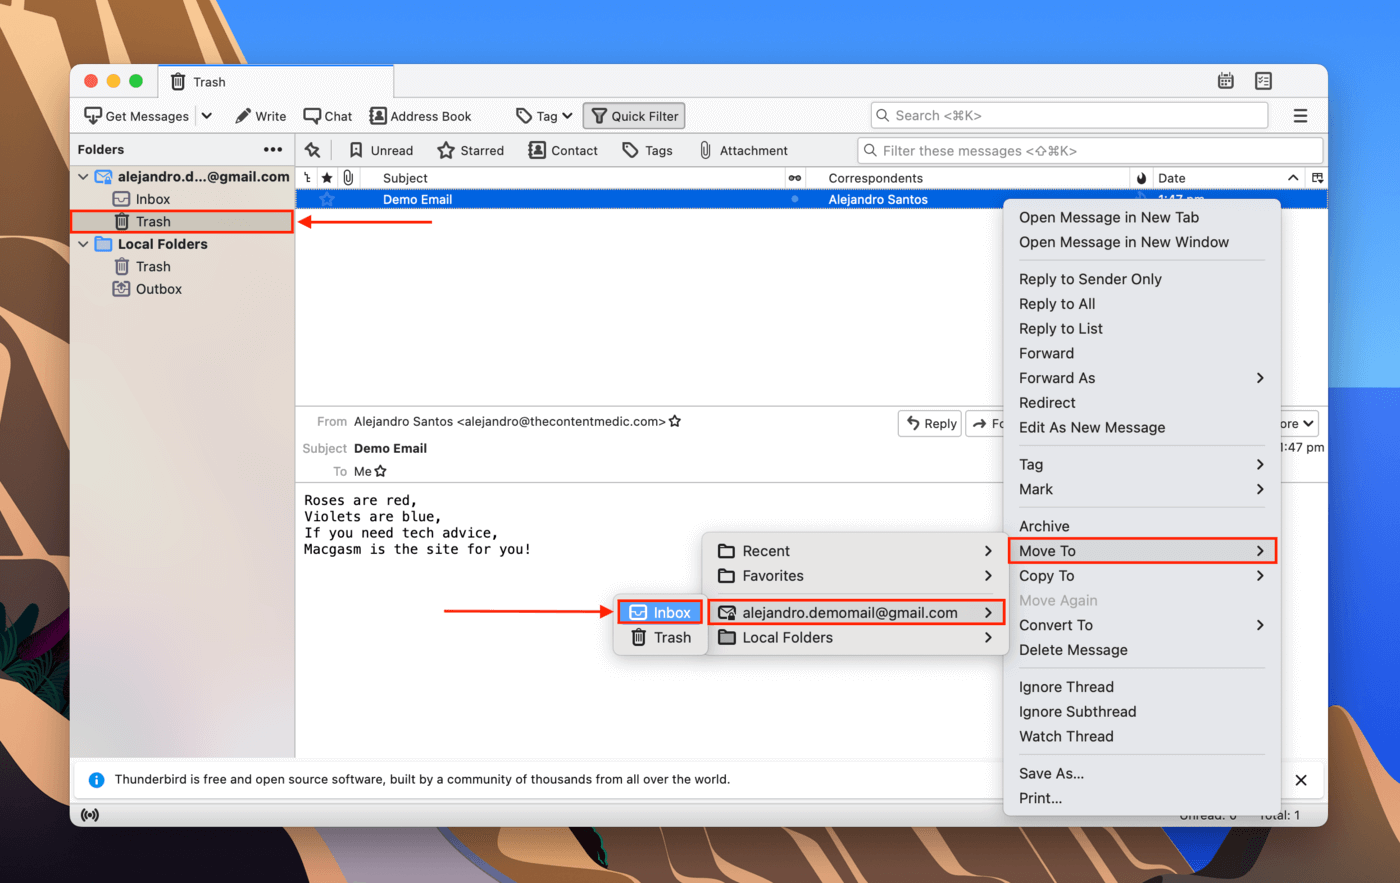
If you accidentally deleted an email within the app, you can simply undelete it. he only exception is if you have deleted it again from the Trash folder. On Thunderbird’s left sidebar, expand your account and click “Trash.” On the main window, right-click the email you want to restore and click Move To > “Profile” > Inbox.
Method 2: Restore Thunderbird Backup Copy
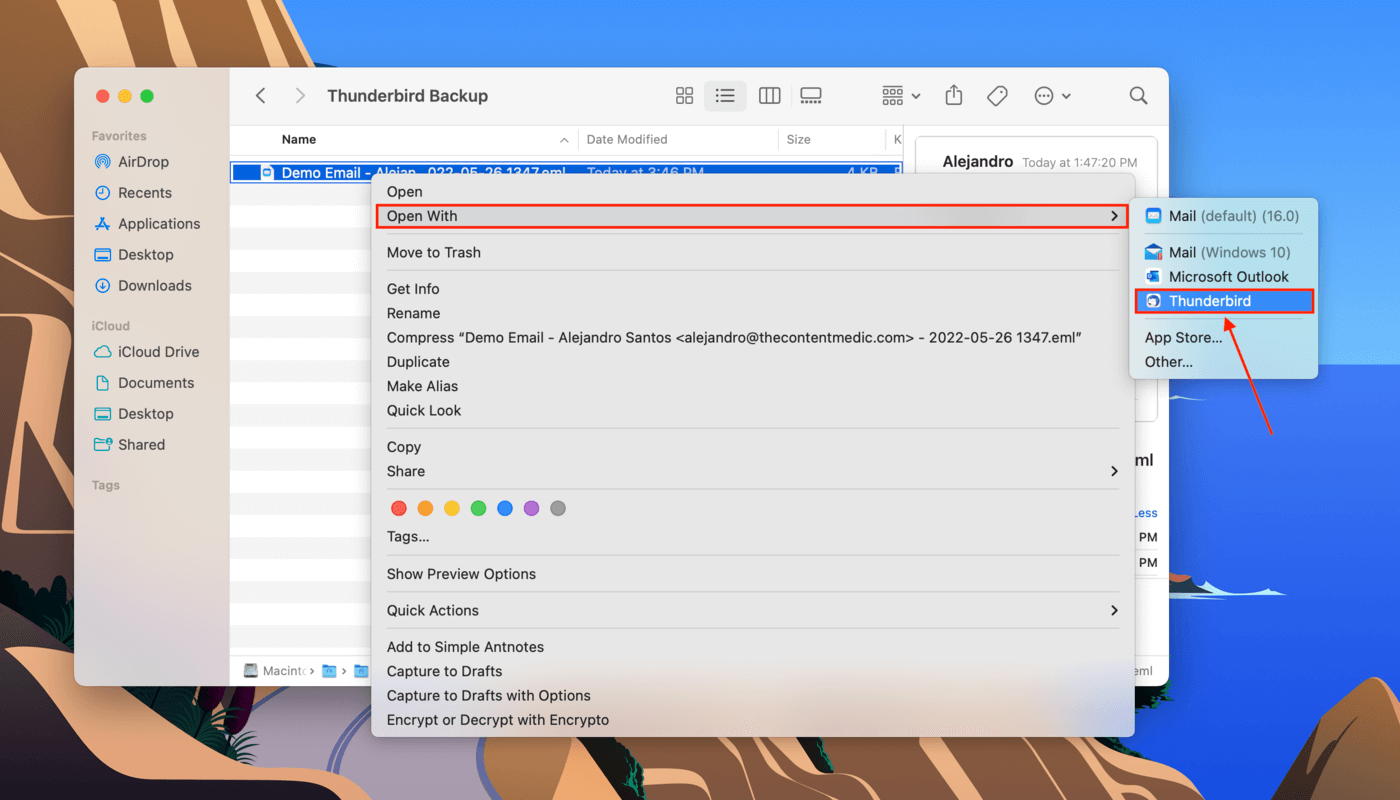
There are methods for backing up and restoring Thunderbird emails. First, you can save individual emails as EML files (right-click email > Save As…). To restore your email from an EML file, right-click the file and click Open With > Thunderbird.
The second common type of backup is where you copied or compressed the entire Profiles folder. If this is the case, decompress the folder and paste it in ~/Library/Thunderbird/ to get your emails and settings back in the app.
Method 3: Restore Thunderbird Folder From Time Machine Backup
If your email is not in your Trash folder in the app and you weren’t able to create EML backup files, Time Machine may be your best solution. Time Machine backs up everything except for cache files and exclusions set up by the user.
Using a Time Machine backup, we can restore a previous snapshot of the Profiles folder where your emails are still intact. This is the perfect method to restore Thunderbird email after a reinstall, or if Thunderbird is missing emails after compacting.
Step 1. Open System Preferences > Time Machine.
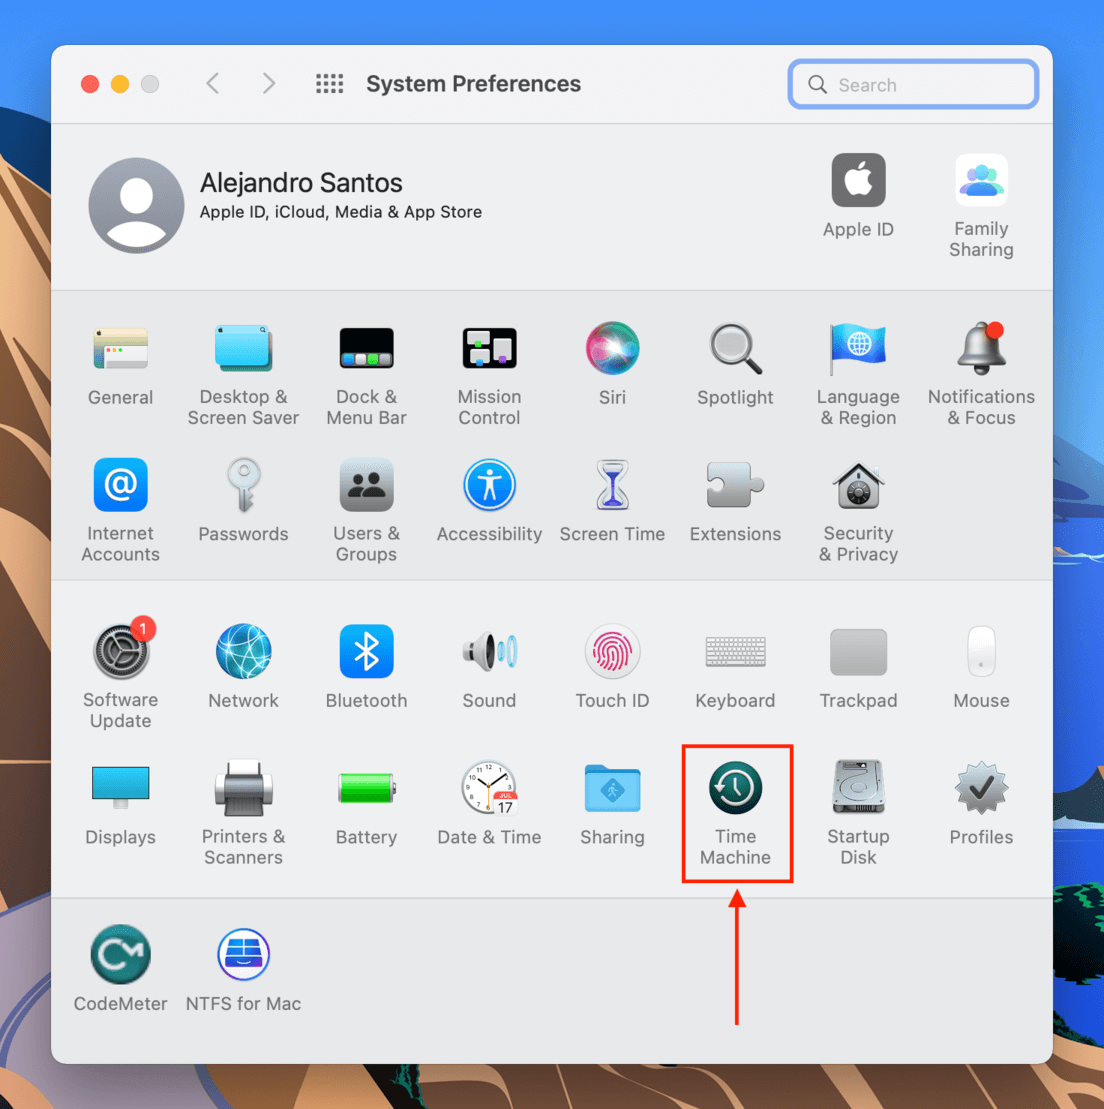
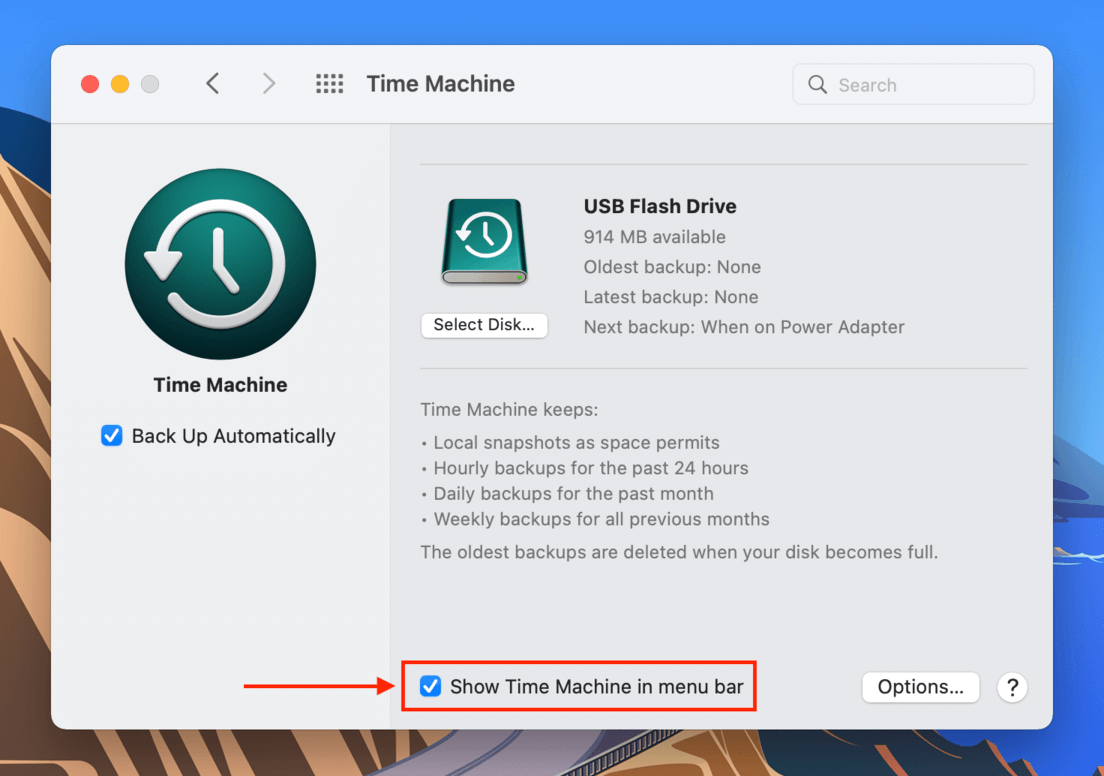
Step 2. Tick the box beside “Show Time Machine in menu bar” and close the window.
Step 3. Open Finder. Then, on the Apple menu bar, click Go > Go to folder…
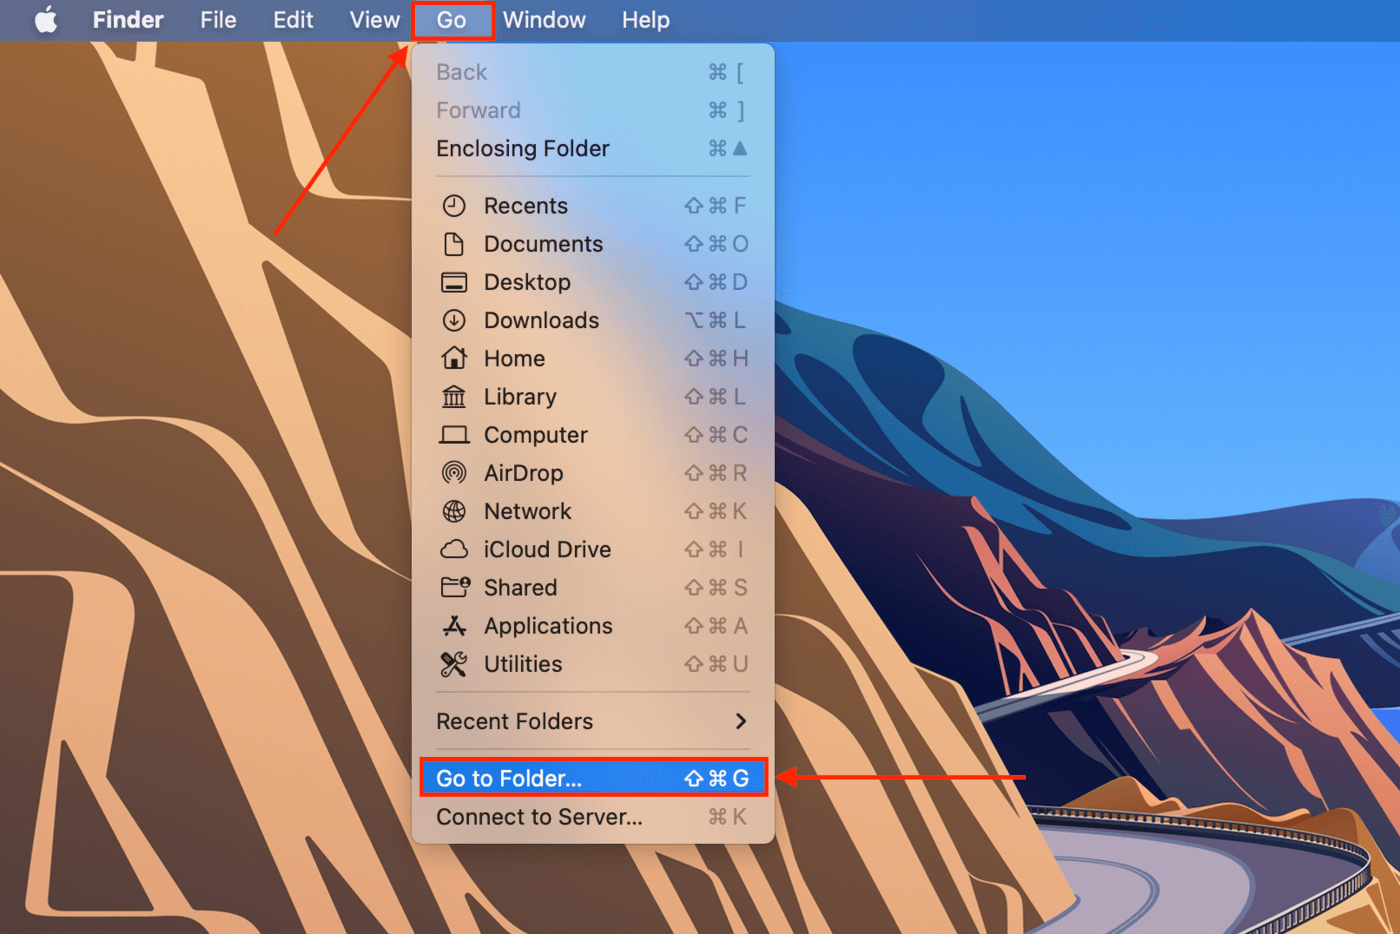
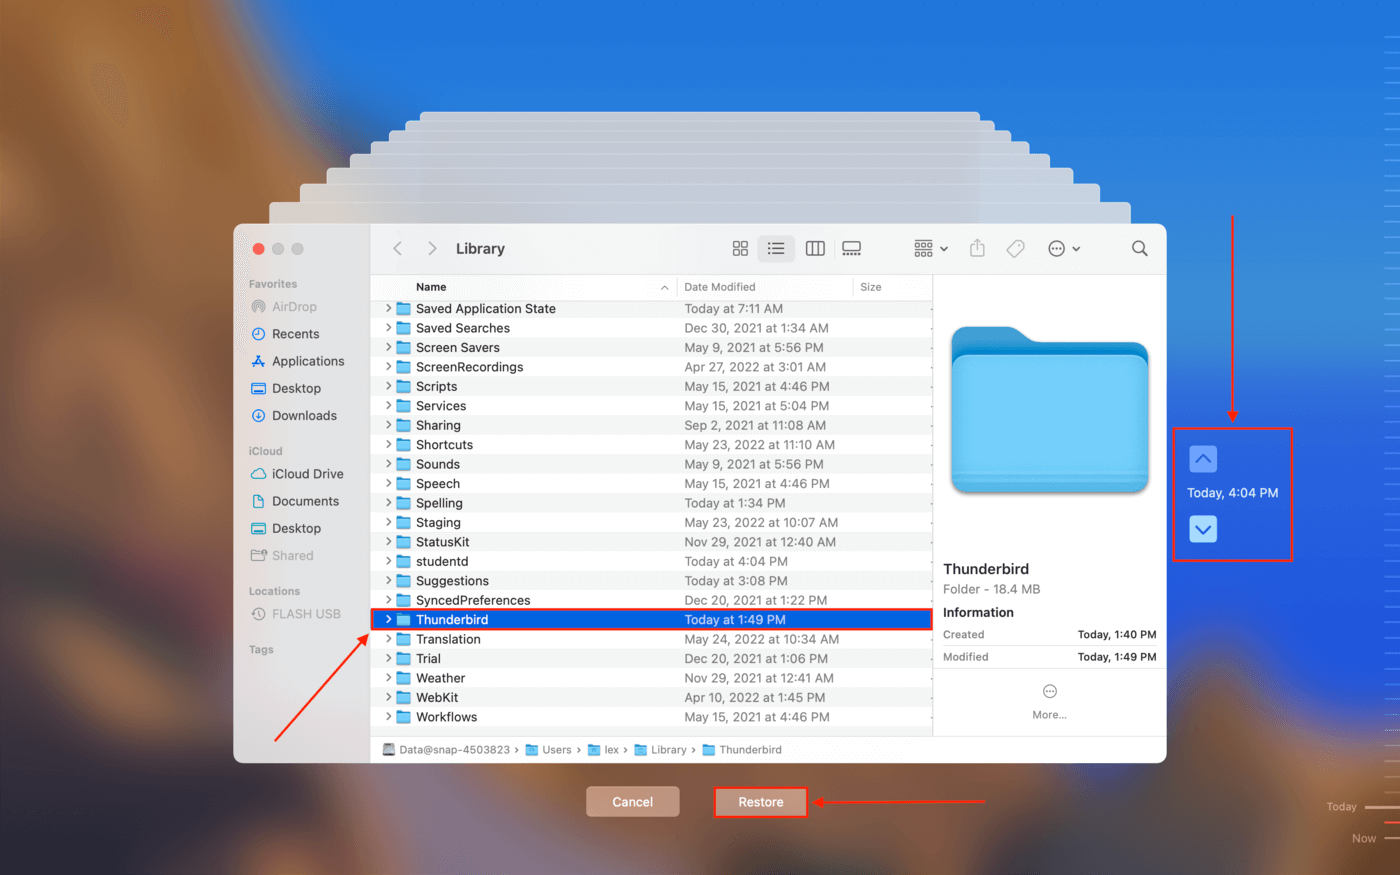
Step 4. Type the following path into the field and hit return: ~/Library/Thunderbird/Profiles.
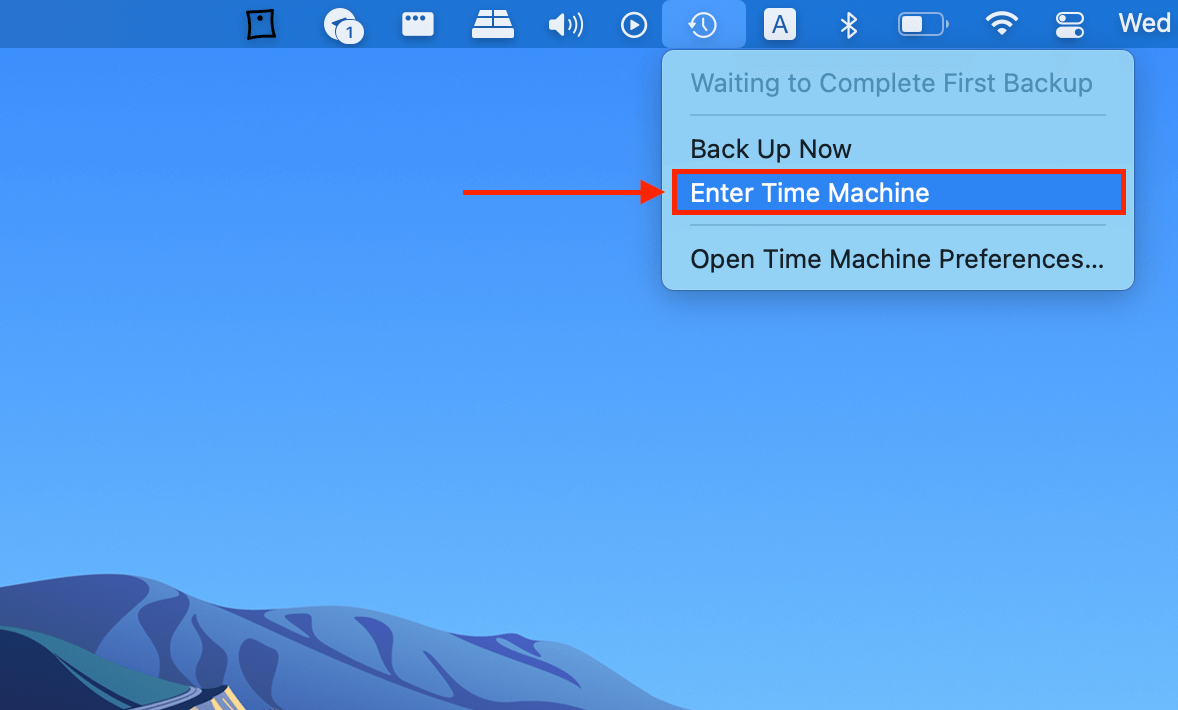
Step 5. On the Apple menu bar, click the Time Machine button > Enter Time Machine.
Step 6. Use the arrows on the right to browse through snapshots until you find one that was saved before you lost your emails. Click the profile folder you want to restore, then click “Restore.”
Method 4: Restore Thunderbird Email Files Using Data Recovery Software
If you didn’t set up Time Machine before your emails got deleted, you won’t have a backup to recover from… But there’s another way. We can use data recovery software to recover deleted emails on Thunderbird. These tools are capable of extracting and rebuilding data, even after this data is manually deleted by the user or by software/viruses.
For the sake of demonstration, we’ll use a software called Disk Drill. Disk Drill has very powerful data recovery capabilities packed into a beautiful GUI (graphic user interface), making it easy for even the most novice users to successfully restore their files. Let’s try using Disk Drill for Thunderbird email recovery:
Step 1. Download and install Disk Drill.
Step 2. Launch Disk Drill (Finder > Applications).
![]()
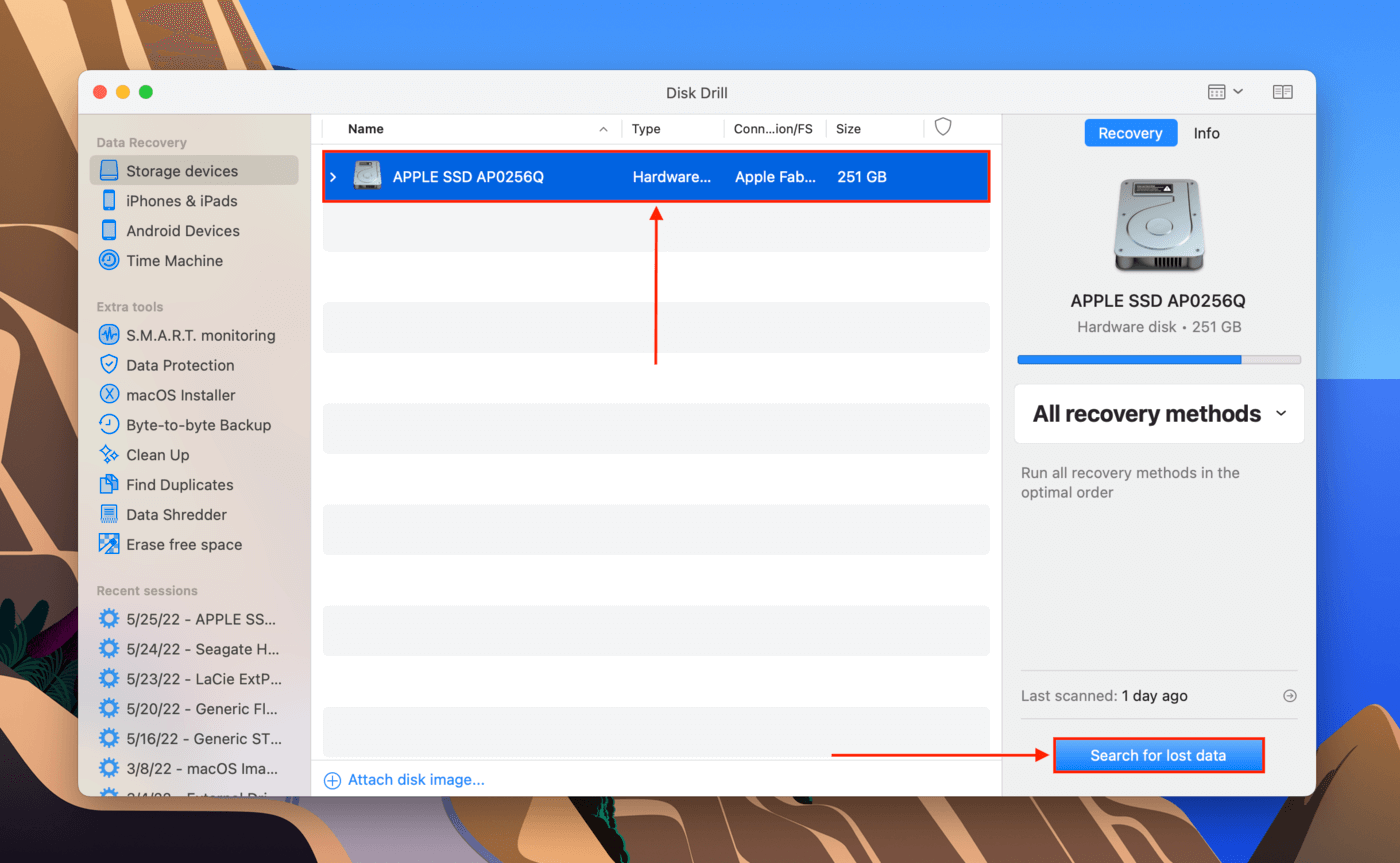
Step 3. In the middle pane, select your system drive (usually labeled as “Apple SSD”), then click “Search for lost data.”
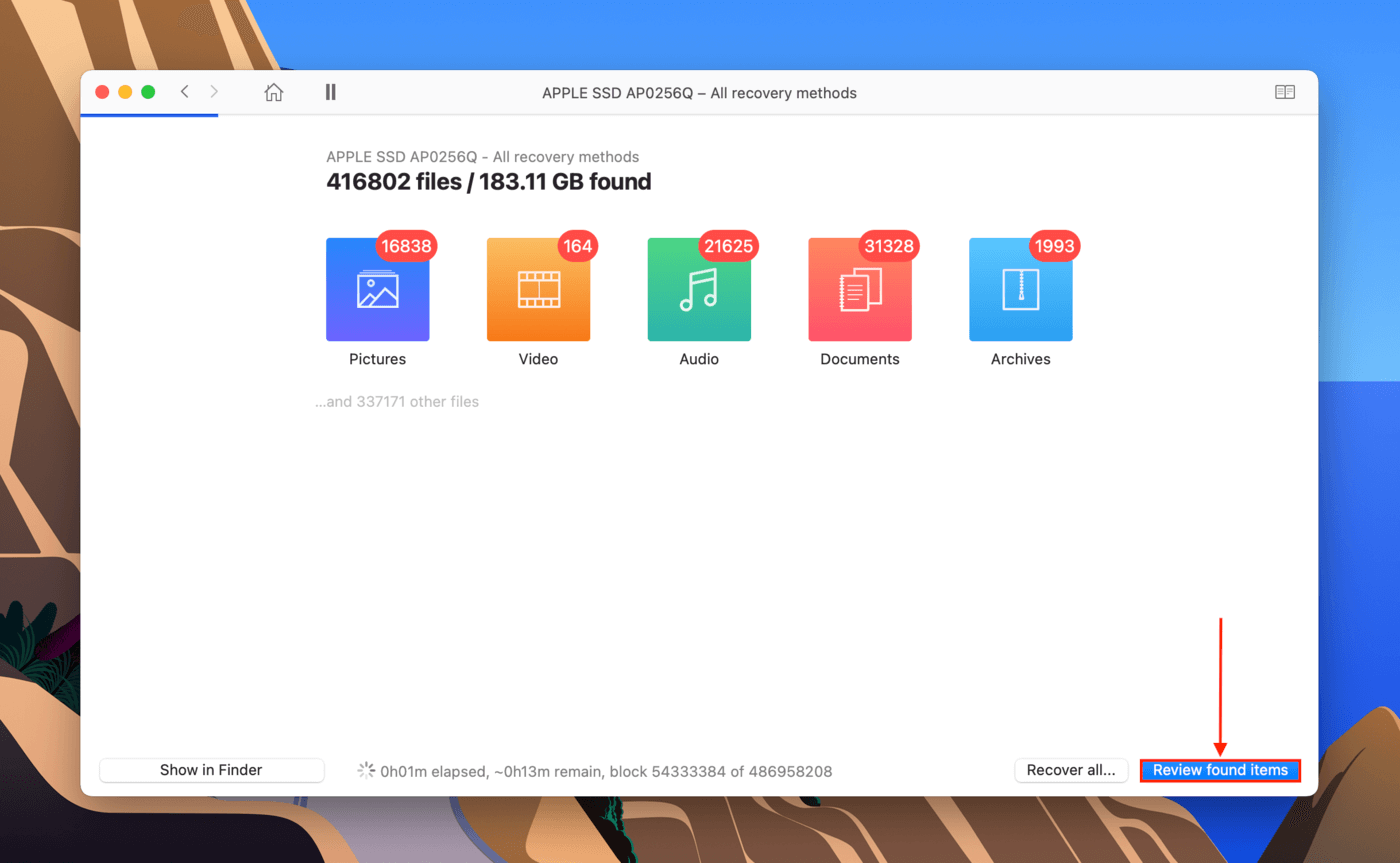
Step 4. Wait for Disk Drill to complete its scan, or immediately click “Review found items” to browse files as the app continues to populate the list.
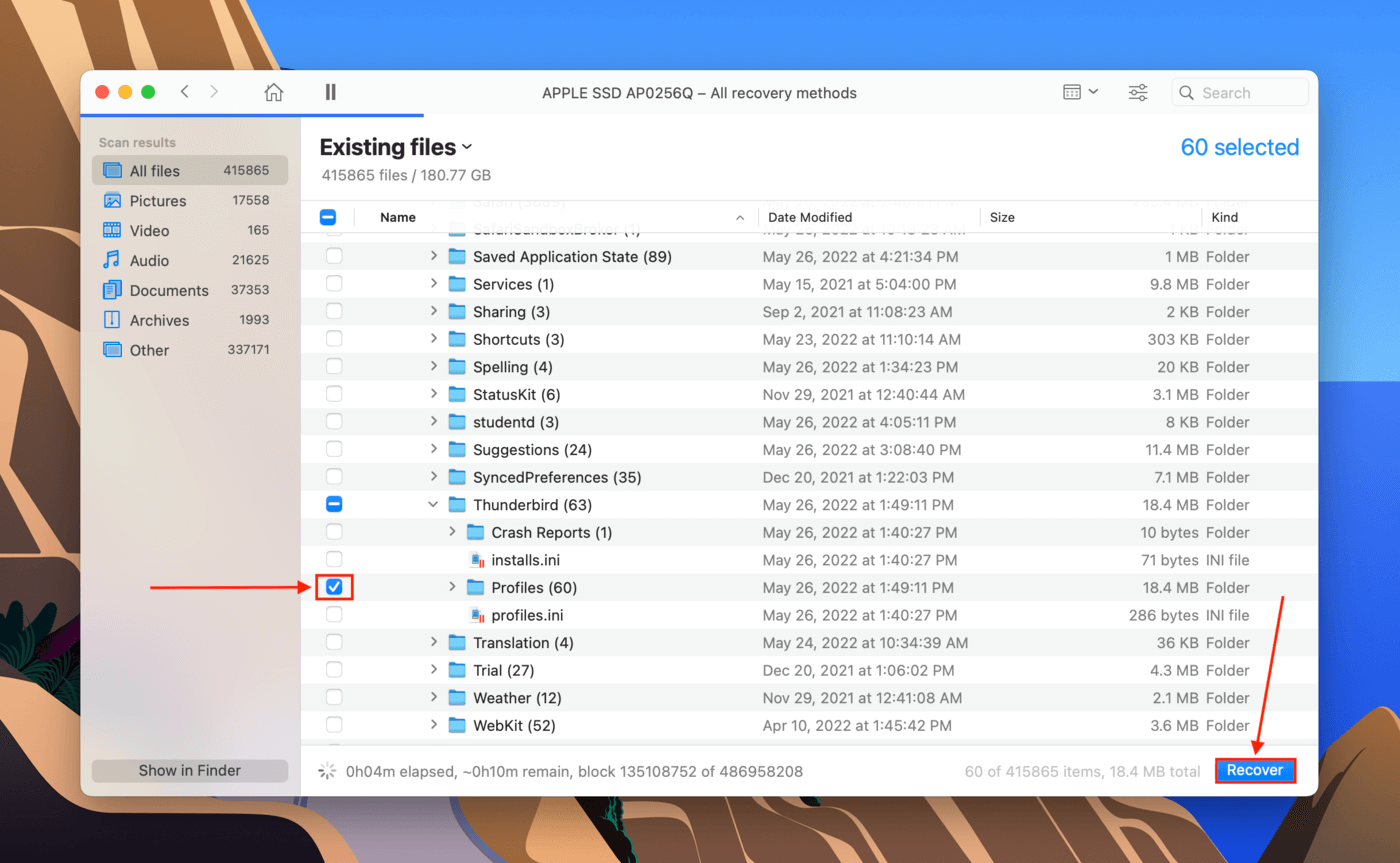
Step 5. Locate your Profiles folder and tick the checkbox beside it. Then, click “Recover.”
Step 6. Use the dropdown menu to select a destination for the recovered data. I suggest connecting a separate storage device (like a USB) and saving the files there to avoid overwriting data on your system drive. Click “OK.”

Step 7. Copy your restored Profiles folder to ~/Library/Thunderbird/ or to the correct subfolders.


