Viruses, hardware issues, and settings on your Mac may be the reasons why no Time Machine backups were found when you tried to restore your data. For the average user who isn’t sure how to use Time Machine, it’s tough to figure out why this happened in their case – and most importantly, how to fix it.
This article is all the information you need to figure out why you got that error in the first place, as well as a guide for every single fix available to get your backup working again. Read on.
Table of Contents
Why Time Machine Can’t Find a Backup
“No Time Machine Backups Were Found” can mean a few things: (1) your Mac can’t access the drive that contains your Time Machine backup, (2) something is preventing Time Machine from working, or (3) there is no working backup on your drive due to accidental deletion or corruption. Below, we break down these issues even further so you can easily figure out what’s going on with your backup.
- Faulty connection. There may be a problem with the actual contact points of the drive that contains your backup disk and your Mac.
- Incomplete software/drivers. Your Mac may be lacking the required software and drivers needed to recognize your drive, which is why Time Machine is not recognizing the backup disk.
- Incomplete software/drivers. Your Mac may be lacking the required software and drivers needed to recognize your drive, which is why Time Machine is not recognizing the backup disk.
- Stuck while refreshing. Your Mac may have gotten stuck while refreshing itself, preventing it from reading, recognizing, or mounting your drive, which is why Time Machine backups are not visible.
- Wrong backup disk. Time Machine may have the wrong backup disk selected. It’s not that Time Machine can’t find the backup disk – you may have just connected a different drive.
- Accidental formatting. Formatting wipes all data on a drive, but that data still exists in the file system until it gets overwritten. Regular ways of searching for Time Machine backups won’t work – you’ll need to use data recovery software.
- Corrupted backup disk. Your drive may have been corrupted by a virus infection, power outage, software issues, or even physical damage – this can cause Time Machine not recognizing the backup disk or your Time Machine backup not showing up.
- Unmounted backup disk. Your Mac failed to mount your drive, which is why Time Machine can’t find your disk.
How to Fix “No Time Machine Backups Were Found”
Below are all the possible ways to fix “no Time Machine backups were found.” Each method fixes a specific problem – you can avoid trial and error if you can pinpoint your issue in the last section… But it’s safe to try them all one-by-one if you aren’t sure. Don’t worry, we have screenshots to guide you along the way.
Fix #1: Check Drive Connections
The problem may be hardware-related. Make sure your cords work, try other ports on your Mac, and use a dry microfiber cloth to clean out any contact points.
Fix #2: Connect Your Time Machine Backup Drive to Another Mac
If you have access to another Mac, it’s a good idea to connect your Time Machine backup drive to that. IIf your Mac can’t access Time Machine backups but another can, then you might have to update macOS on your own machine.
Fix #3: Restart Your Mac With Your Time Machine Backup Drive Connected
A computer constantly refreshes itself as you use it to make sure temporary files don’t bog down the system. In some cases, the computer’s state gets stuck or won’t refresh properly, which can affect how it’s able to access and recognize external drives. This might be why your Time Machine backup isn’t showing up.
Restart your Mac while your drive is connected and see if you can access it. If you have a big backup, leave your drive connected to your Mac for a few hours after restarting it.
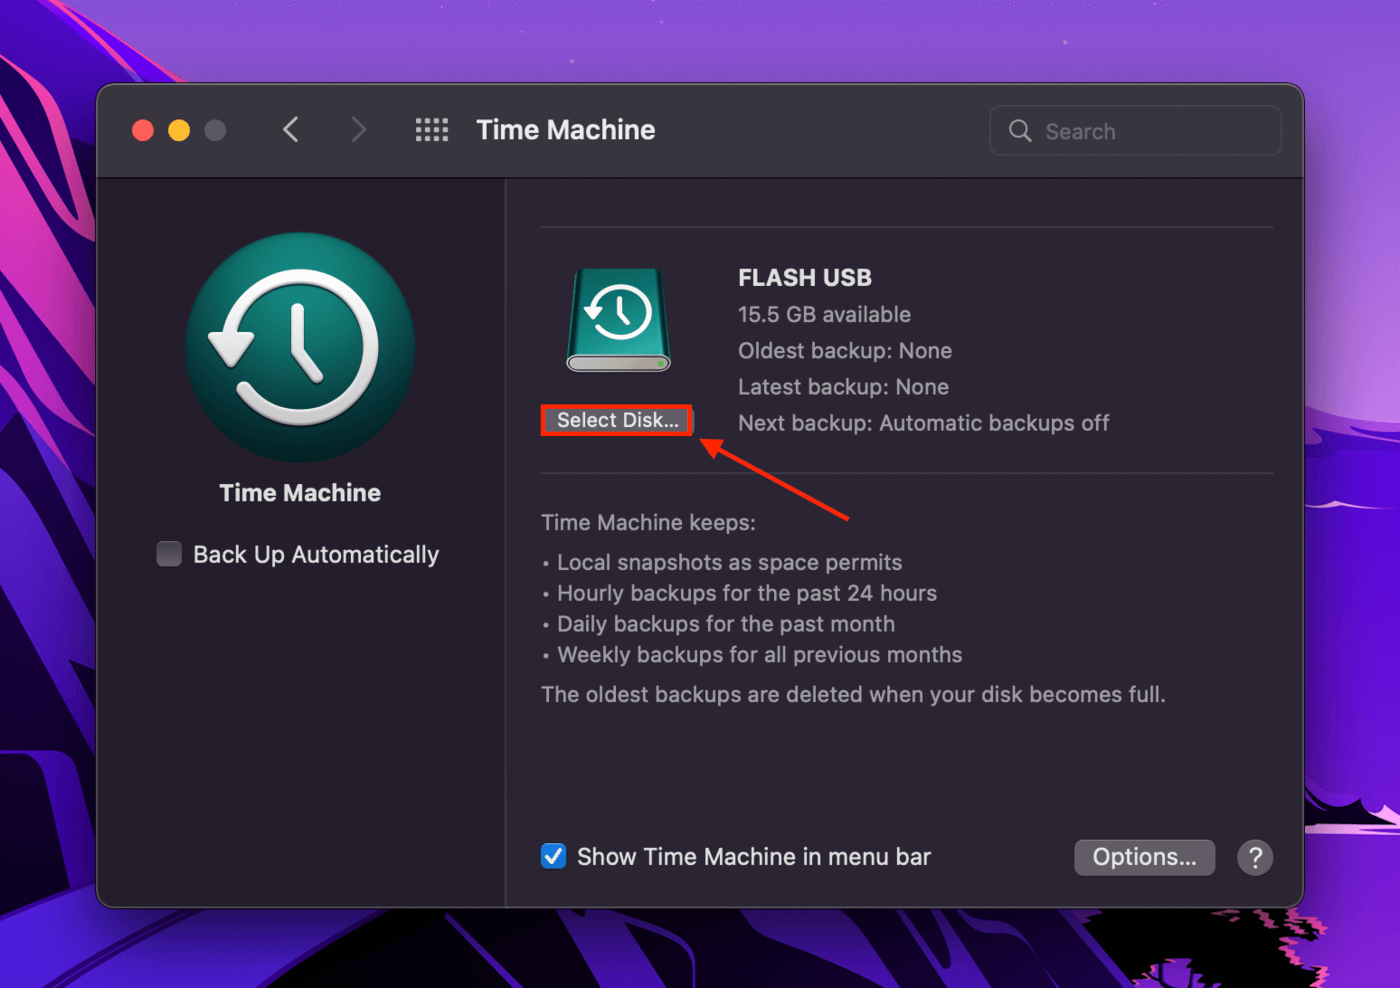
Fix #4: Check Time Machine Settings
It’s also possible that Time Machine is looking for the wrong backup disk. Open System Preferences > Time Machine and click “Select Disk…” Then, make sure that the selected backup disk is the same one connected.
Fix #5: Recover Deleted Time Machine Backup With Data Recovery Software
If you formatted the drive that contained your Time Machine backup, the process wiped the data – which is why Time Machine can’t find your backup disk. Fortunately, that doesn’t mean the files on your backup are gone forever. Deleted data stays in the file system until it gets overwritten by new files. You just need a special tool to extract that data and rebuild it if needed.
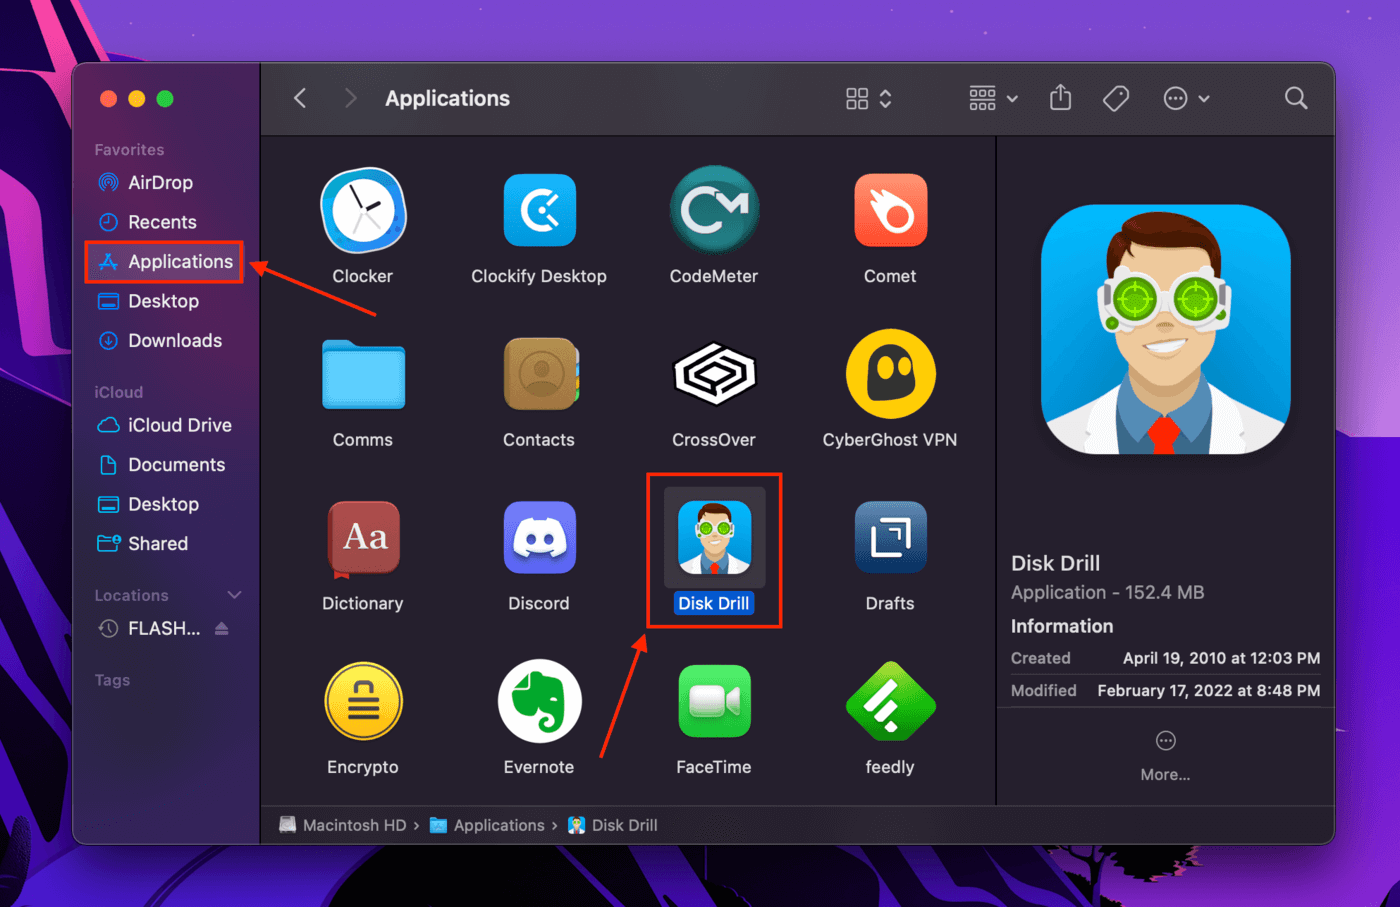
For this article, we’ll be using Disk Drill to restore your deleted Time Machine backup. Disk Drill is a well-known data recovery software, it has a great recovery rate, and it’s easy-to-use even for beginners. It’s the best fix if no macOS system backups were found.
Step 1. Make sure your drive is securely connected to your MacBook.
Step 2. Download and install Disk Drill.
Step 3. Launch Disk Drill (Finder > Applications).
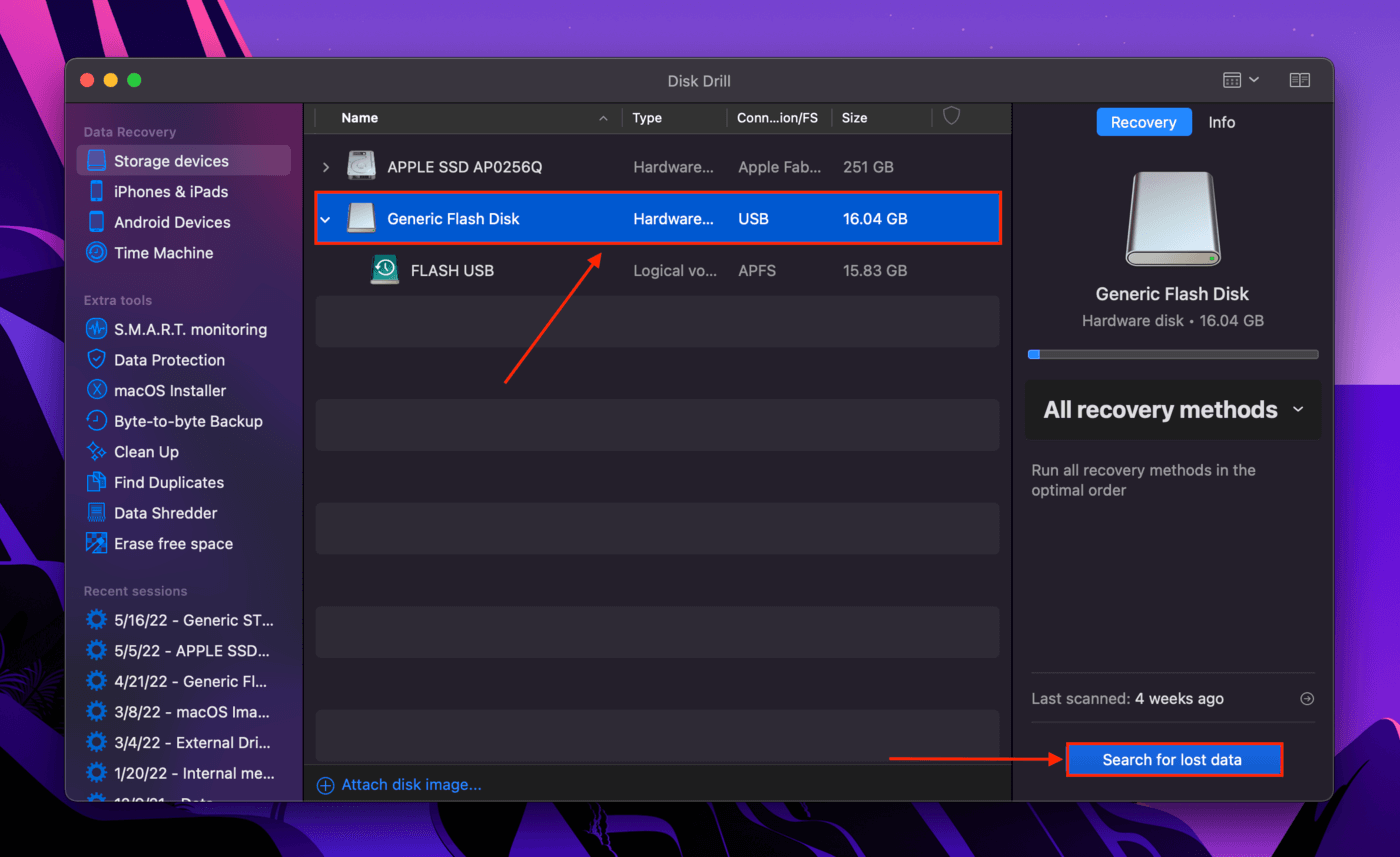
Step 4. Select your drive from the list in the middle plane, then click “Search for lost data.”
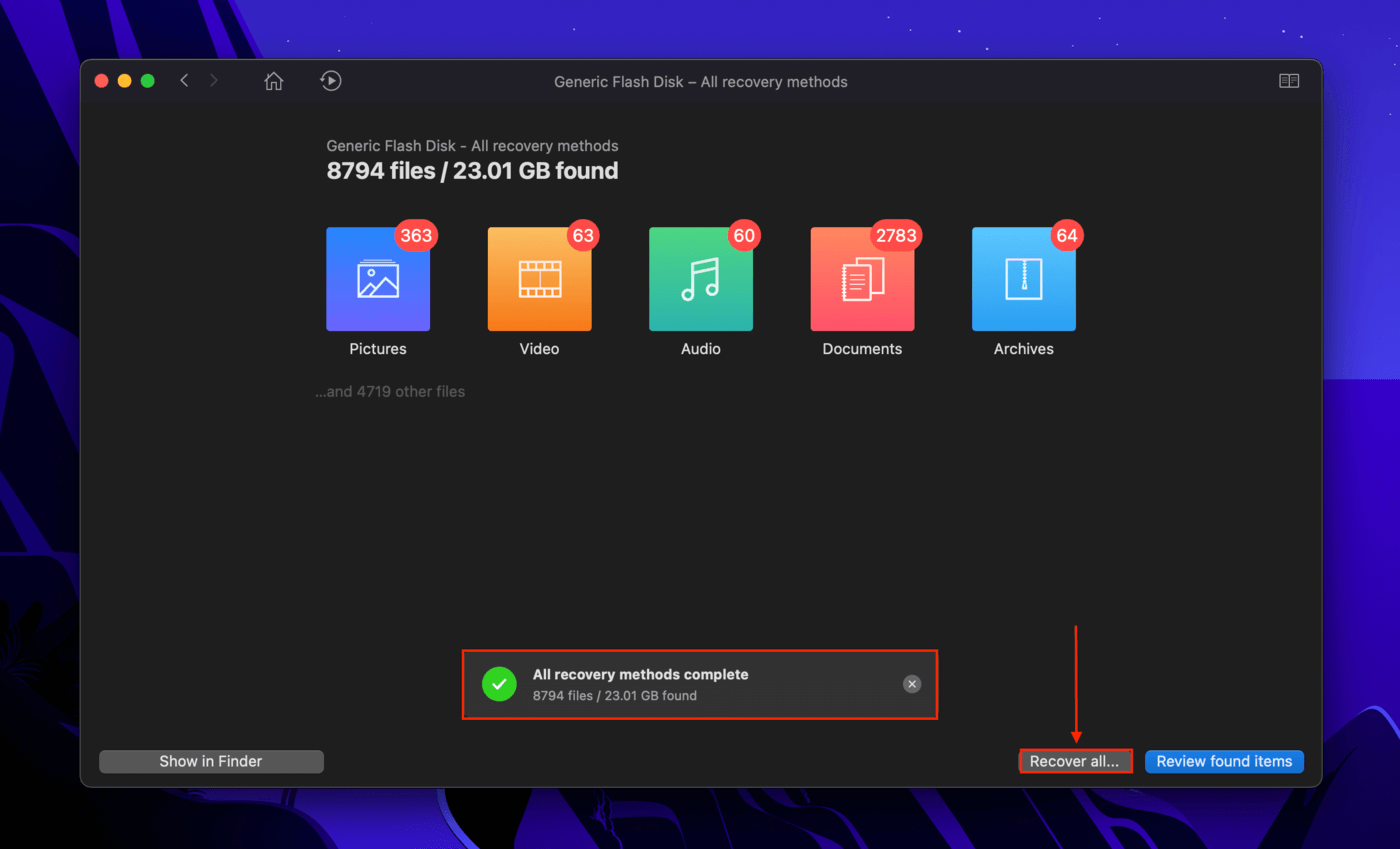
Step 5. Once the scan is complete, click “Recover all…” in the bottom-right corner of the screen.
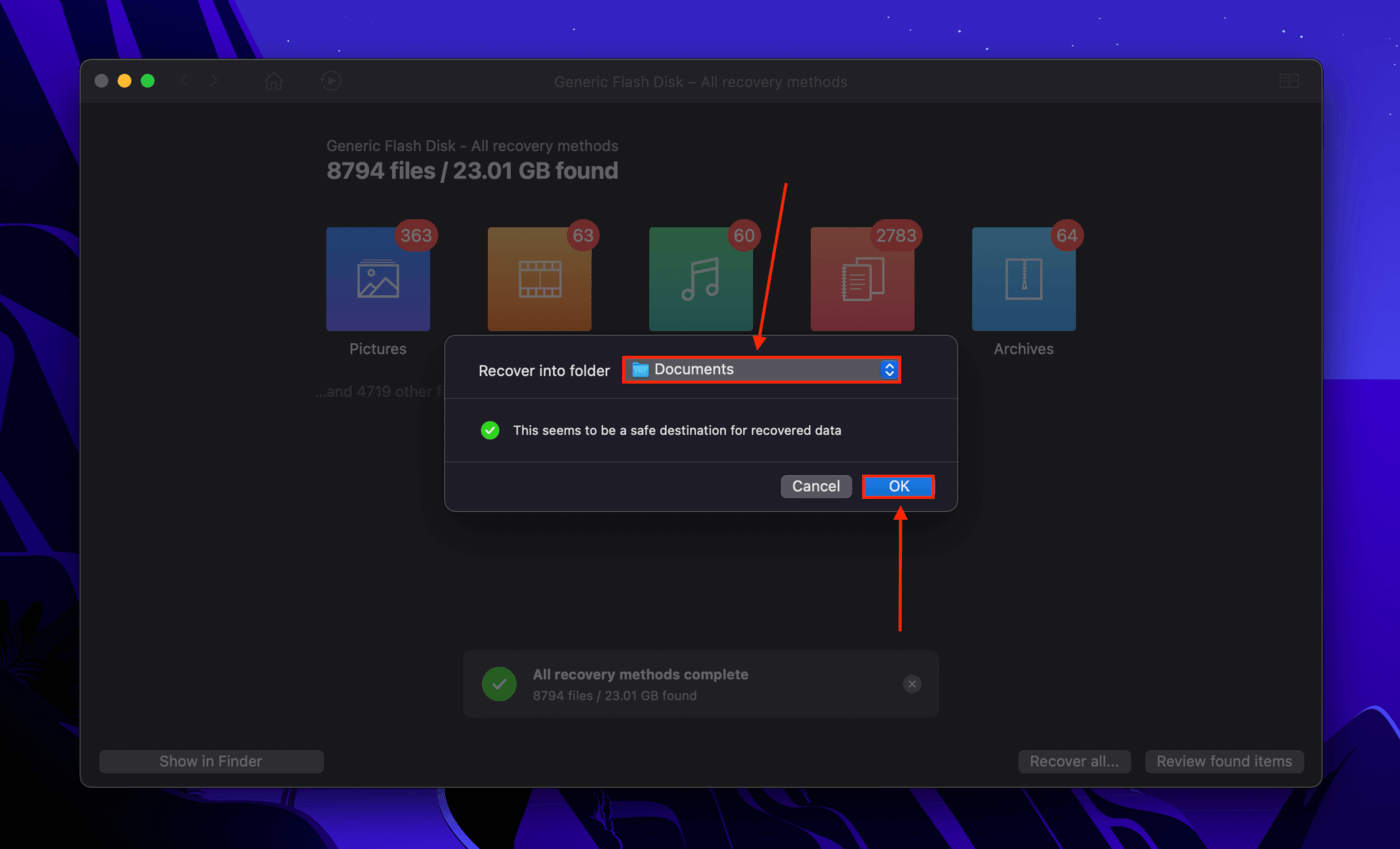
Step 6. When prompted, select a folder location on your Mac where Disk Drill will save the recovered files. Then, click “OK.”
Fix #6: Use First Aid to Repair Your Time Machine Drive
‘Disk Utility is a powerful disk management software that comes installed on macOS out of the box. Corruption is a common reason why Time Machine backup disk is not available. Its First Aid feature scans for and automatically repairs disk errors where it can. It may get your Time Machine backup drive back to working order.
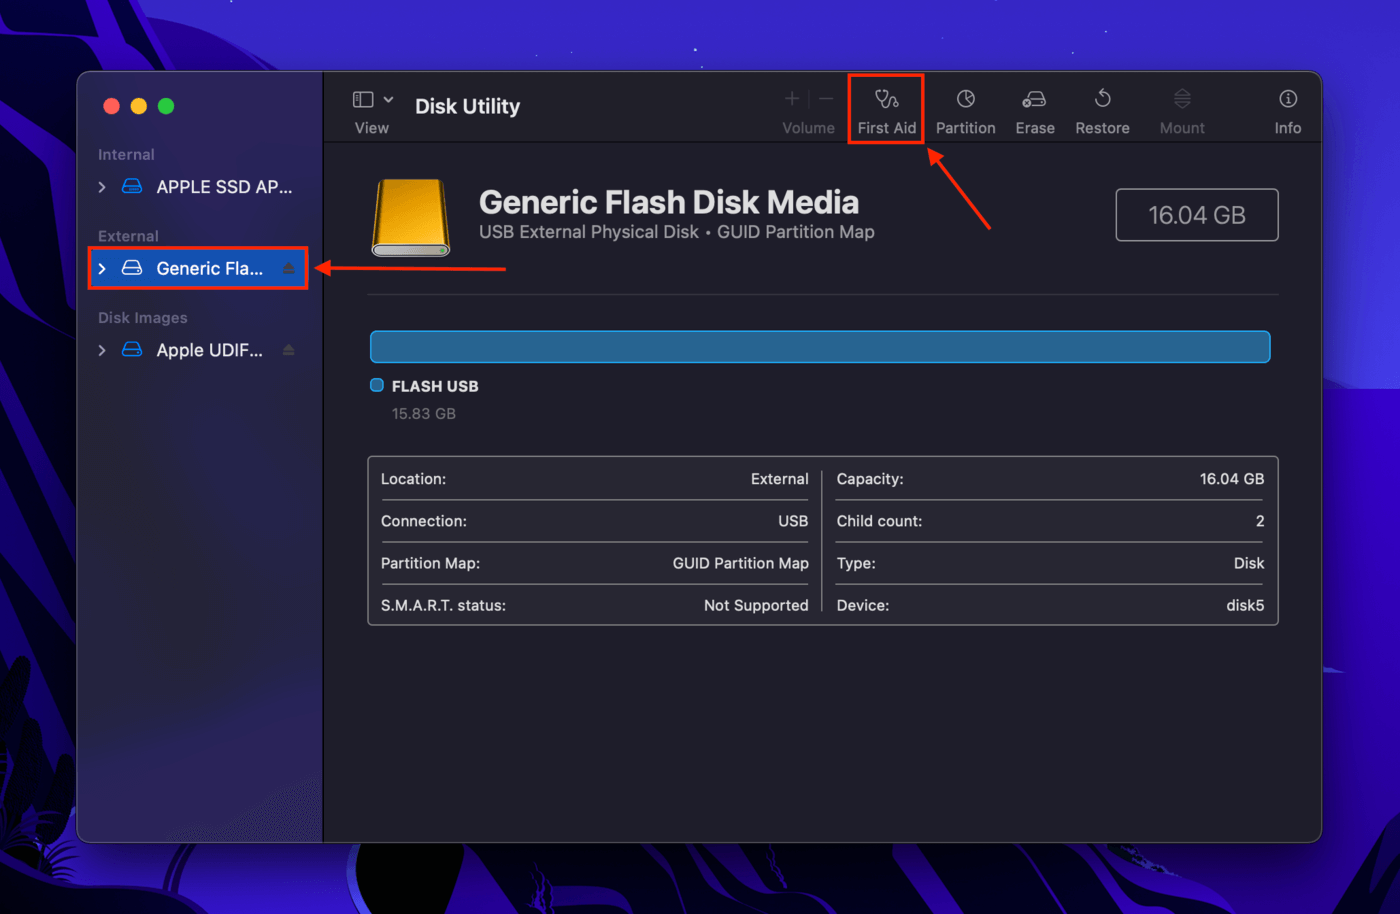
Step 1. Launch Disk Utility (Finder > Applications > Utilities).
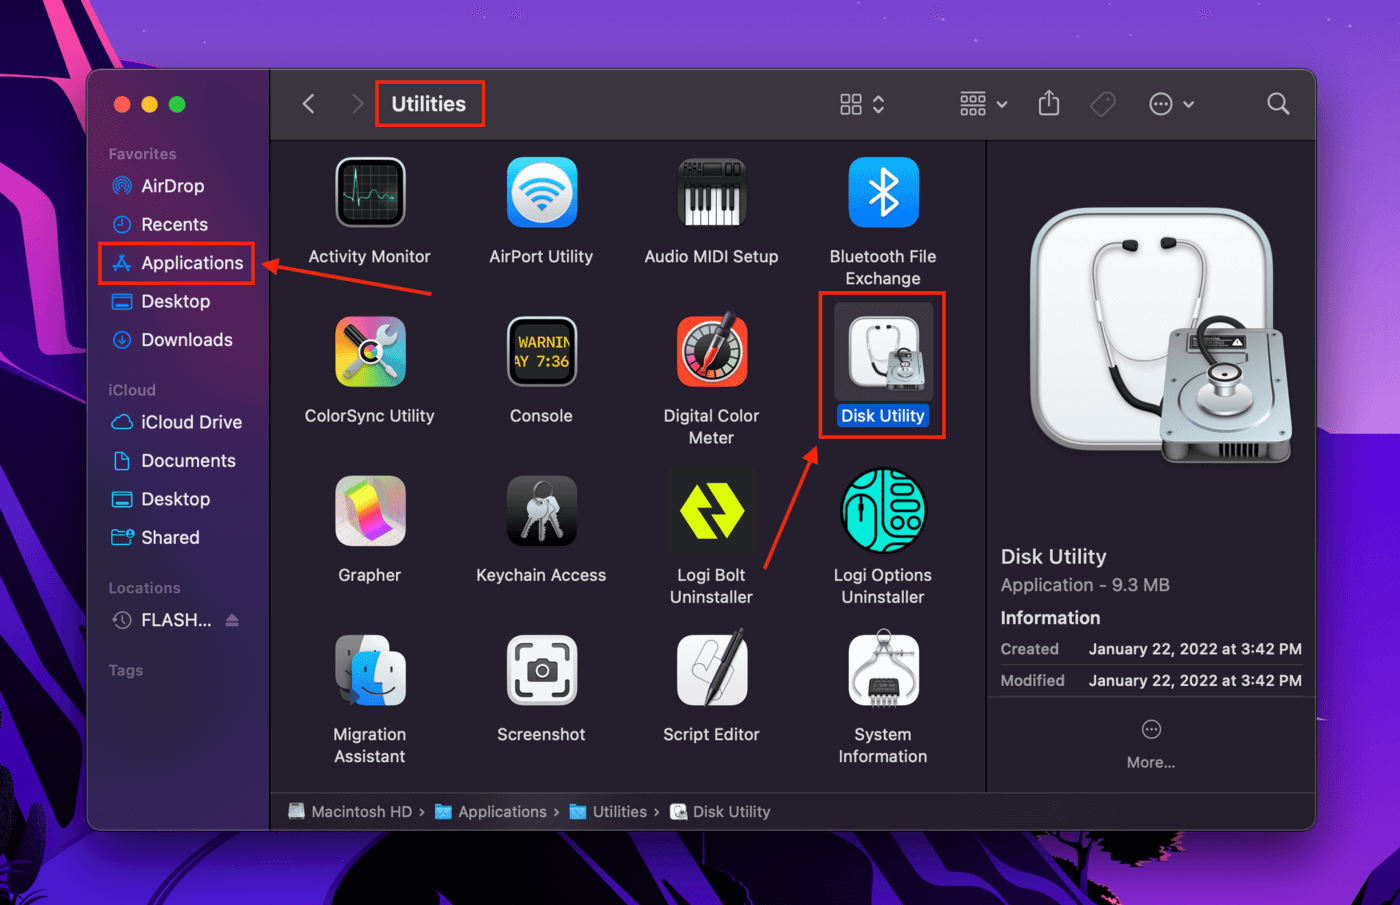
Step 2. Select your drive from the left sidebar. Then, click the “First Aid” button at the top of the window.
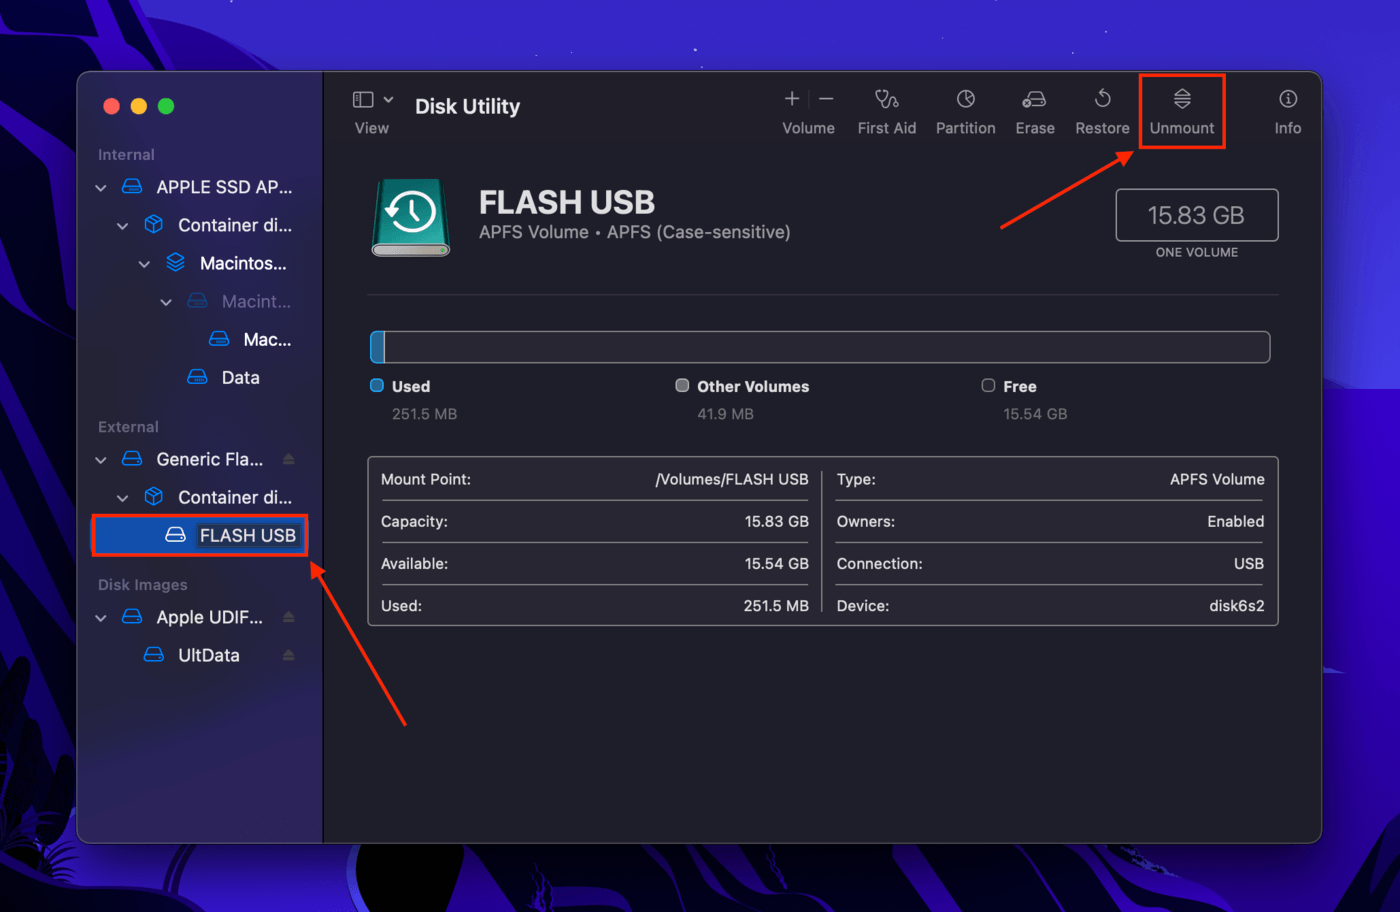
Fix #7: Mount/Remount Your Time Machine Drive
It’s also possible that your backup drive is properly connected to your Mac, but it failed to mount. In this case, your Mac can’t properly interact or even access the files on your drive. This is also Use Disk Utility to mount (or remount) it.
Step 1. Launch Disk Utility (Finder > Applications > Utilities).
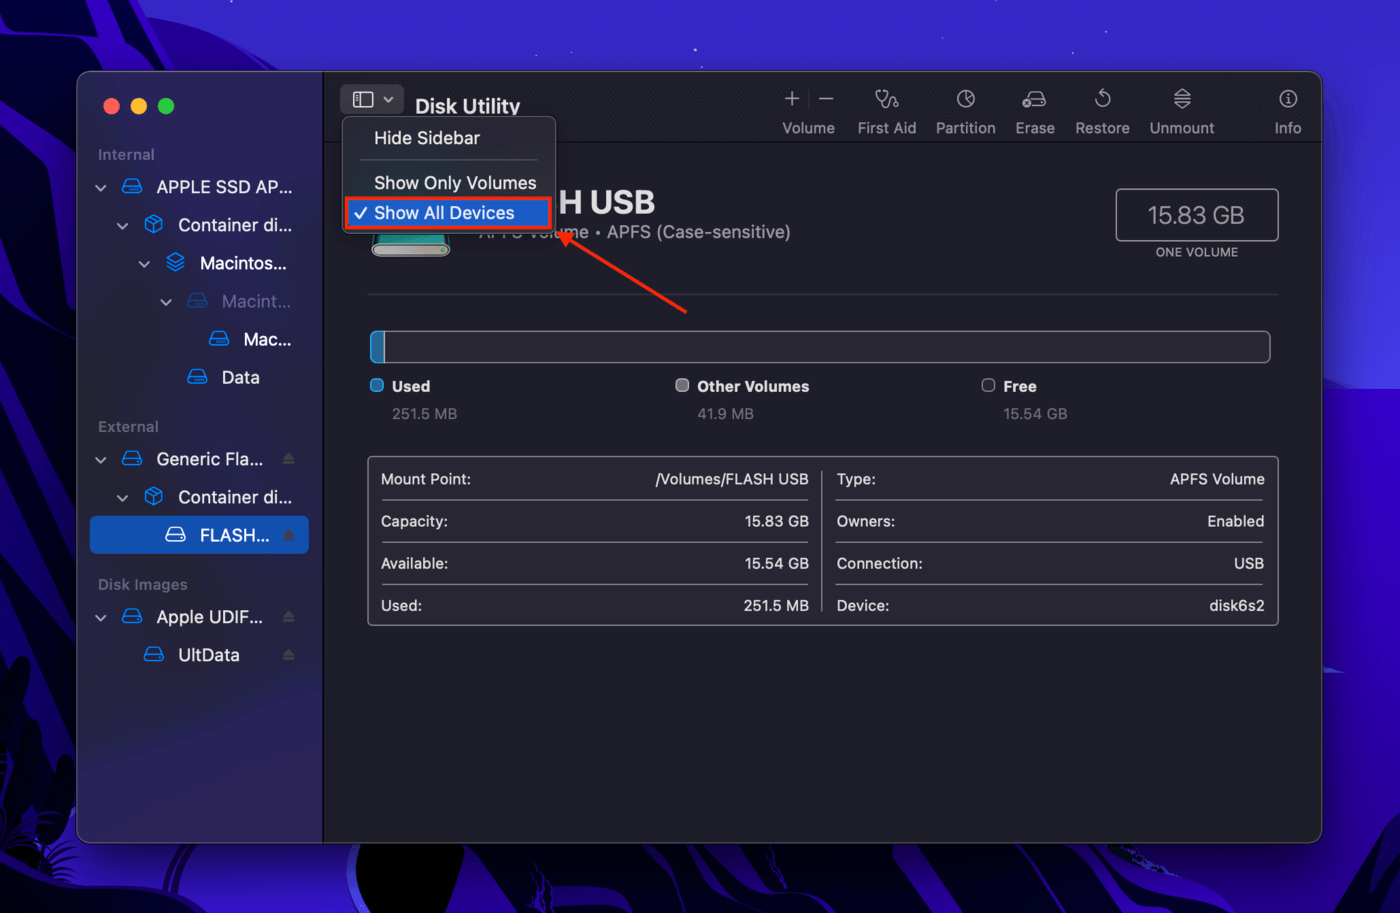
Step 2. Click the “View” button beside the sidebar, then click “Show all devices.”
Step 3. Select the volume that contains your Time Machine backup, then, click the “Mount” button at the top of the window. If it says “Unmount”, click it twice to remount it.