
Thanks to the Notes app, Mac users can quickly write down important information, capture promising ideas, keep a daily journal, and more. Of course, users can not only create notes but also delete them, which is where mistakes can happen. Indeed, there are many threads online asking the same question: How to recover deleted notes on a Mac?
To provide a comprehensive answer to this question, we describe multiple ways to recover deleted notes on Mac, allowing you to choose the one that best fits your situation. Regardless of which method you pick, we highly recommend you start the recovery process as soon as possible to increase the chance of successful recovery.
| Method | When It’s Most Useful |
| 💻 Data Recovery Software | Apply after accidental formatting of the system drive or deletion of the NotesV7.storedata-wal file |
| ⏳ Time Machine | When the notes files have been overwritten |
| ☁️ iCloud Backup | When a hardware malfunction or accidental formatting occured |
| 🕓 Recently Deleted Folder | When iCloud synchronization was enabled |
Table of Contents
Why Did My Notes Get Deleted?
When users complain that their notes disappeared from Mac, it’s usually possible to point the finger at one of the following causes:
- 👨💻 Accidental deletion: By far the most common cause of important notes going missing are users themselves. When managing a large collection of notes organized in multiple folders, it’s easy to accidentally select the wrong note and notice the mistake only when the note is already gone.
- 🍏 Unsuccessful OS update: When updating macOS to the newest version, it’s important to not interrupt the update process. A sudden shut down caused by a power outage or forced restart may have many unintended consequences, including notes getting lost.
- 💻 Hardware failure: The Notes app keeps its data on the main hard drive, so notes can go missing if the hard drive becomes corrupted or damaged.
- 🚧 App crashes: It’s not unheard of for newly released versions of macOS to have issues with stability and apps crashing. Every crash creates a small but not insignificant possibility of data loss occurring and notes disappearing.
- 🦠 Malware: From traditional viruses to modern ransomware, there are many kinds of malware that can prevent you from accessing your notes.
But can you recover permanently deleted notes after an unsuccessful update, sudden crash, accidental deletion, and the rest of the above-described events? Absolutely! Regardless of why your notes are no longer accessible, the good news is that there are multiple methods for recovering deleted notes on Mac that you can try without any special technical skills.
4 Ways to Restore Deleted Notes on Mac
Now that you know where notes are stored on Mac, it’s time to explain several working methods that you can use to get deleted or lost notes back. Again, no matter which method you choose, we highly recommend you don’t delay the recovery process more than absolutely necessary.
Method 1: Data Recovery Software
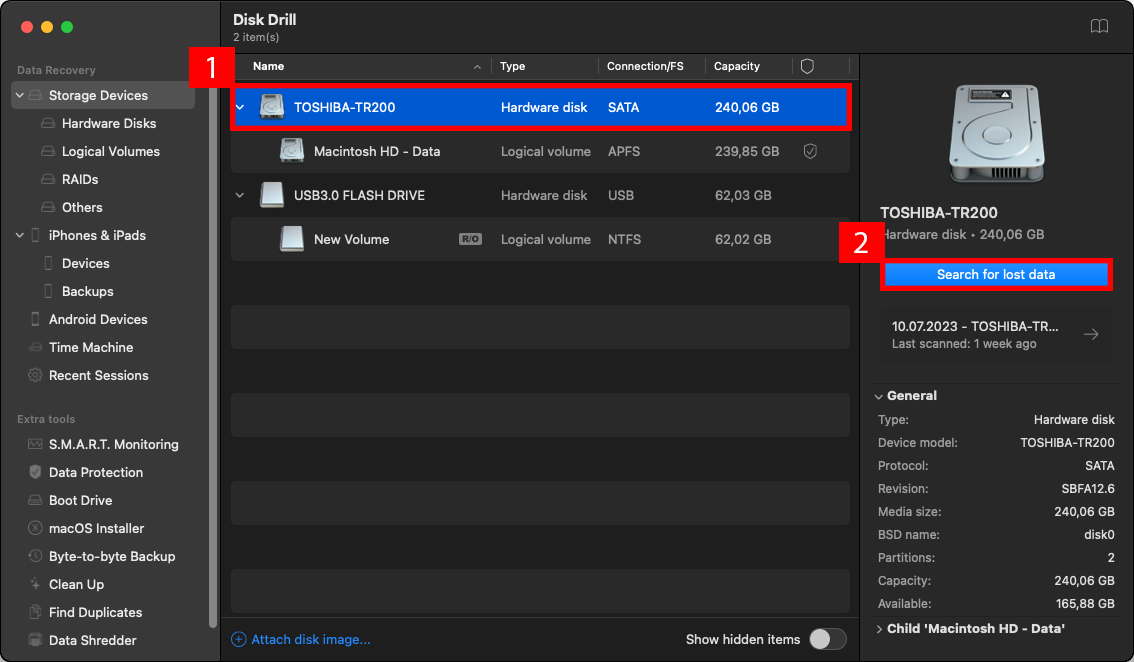
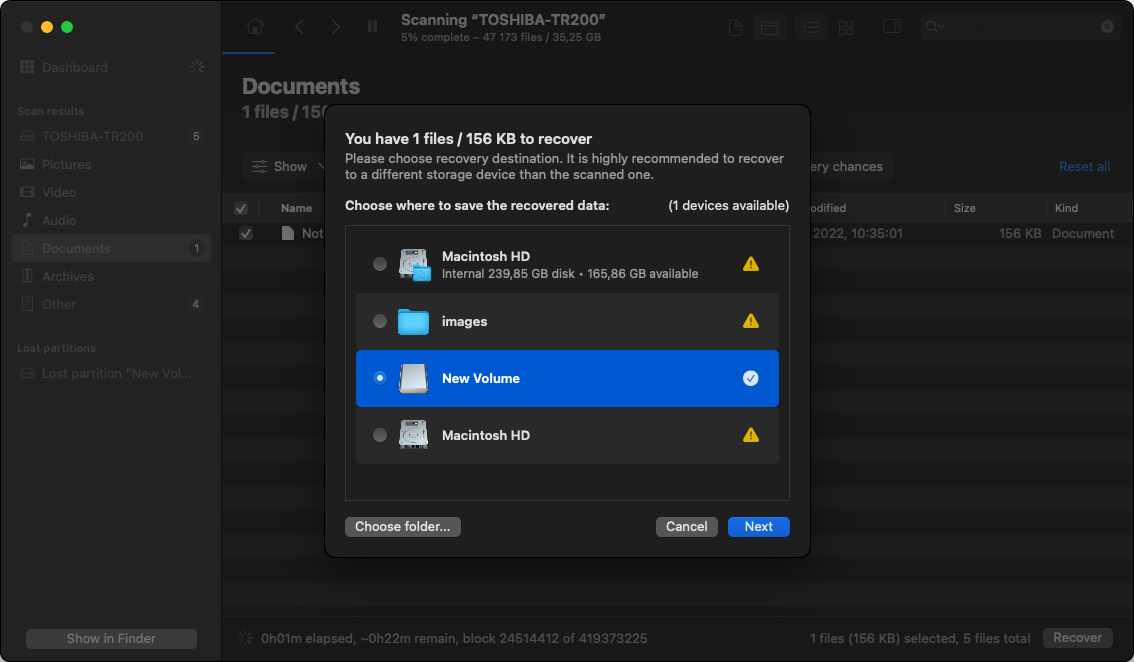
![]() The first method we want to describe is perfect for recovering notes after accidental formatting of the system drive or deletion of the NotesV7.storedata-wal file.
The first method we want to describe is perfect for recovering notes after accidental formatting of the system drive or deletion of the NotesV7.storedata-wal file.
By using data recovery software like Disk Drill, you can quickly and easily undelete the content of the Notes folder and get back even permanently deleted notes. This method delivers the best results when used immediately after the data loss incident, before the deleted files become overwritten.
We use Disk Drill because its simple and intuitive user interface makes it suitable even for users with no previous data recovery experience, while its powerful recovery algorithms deliver excellent results where other similar solutions fail.
To retrieve deleted notes with Disk Drill:
- Download and install Disk Drill for Mac.
- Select your system drive and click Search for lost data.
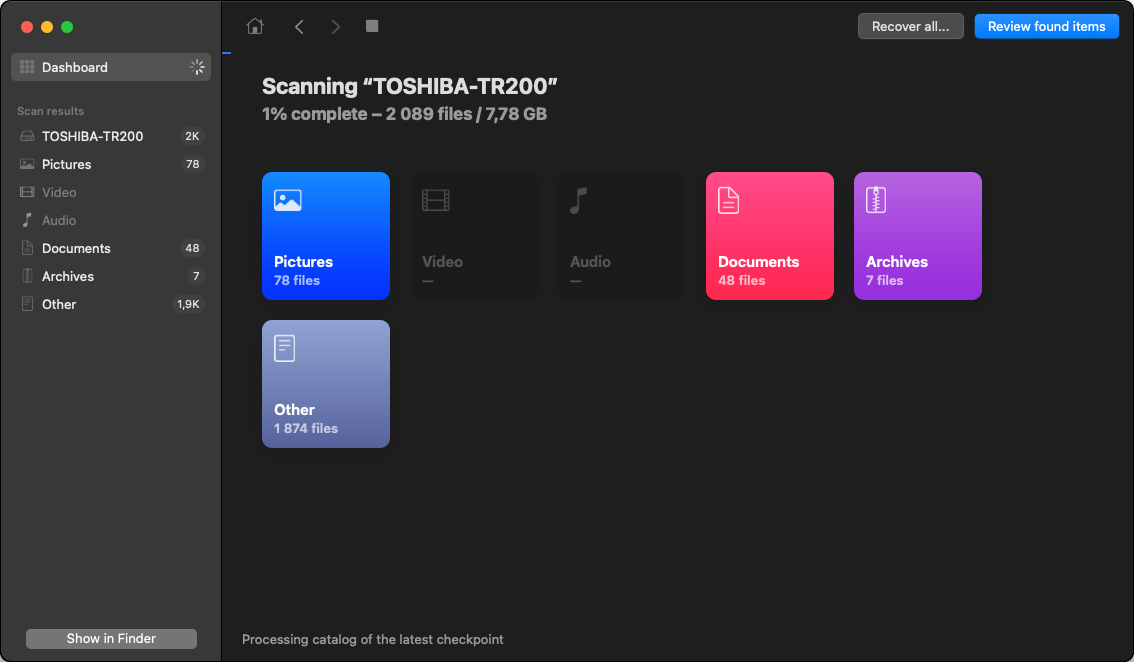
- Give Disk Drill some time to finish scanning for lost files.
- Use the search bar in the top-right corner to find the NotesV7.storedata or NotesV7.storedata-wal file, select it, and click Recover.
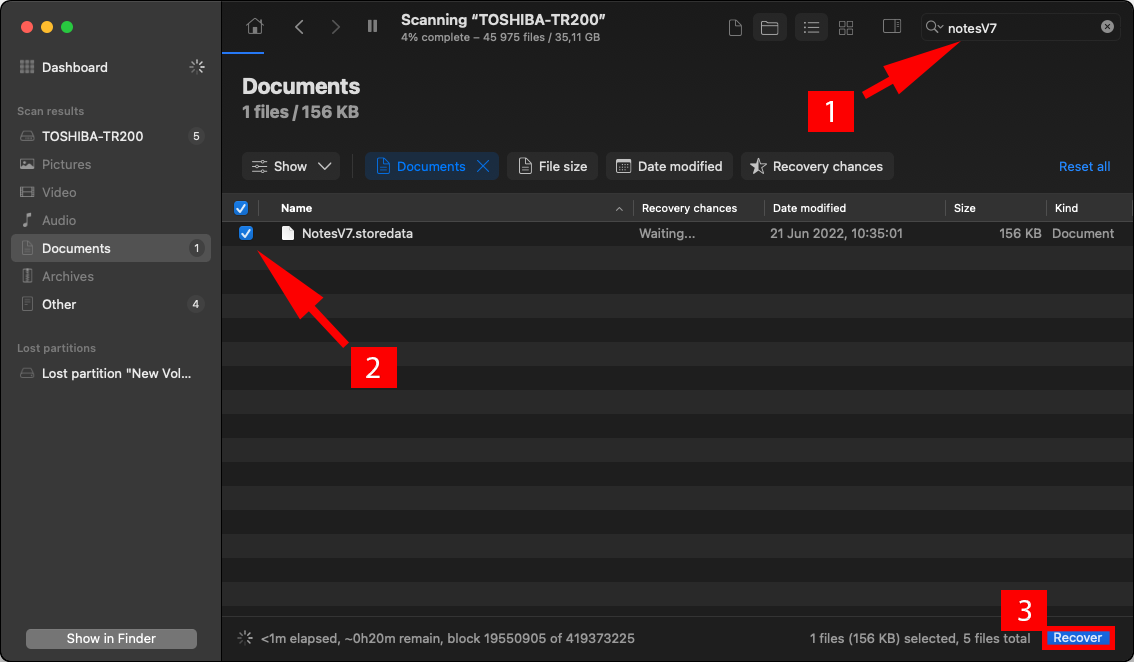
- Specify the recovery destination and confirm. DON’T save the file on your system drive because you could overwrite it and make it unrecoverable.
The free version of Disk Drill for Mac lets you preview all recoverable files, and you can unlock unlimited recovery by upgrading to the PRO version, which you can activate on up to three devices at the same time.
Method 2: Time Machine
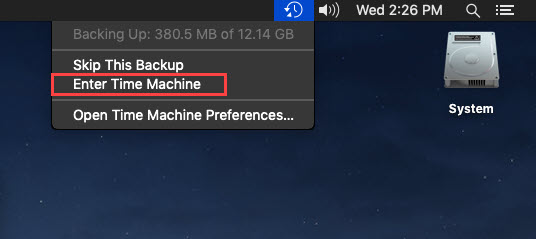
![]() If Disk Drill fails to recover your notes because they’re already overwritten, then you should try to recover them from a Time Machine backup. What’s great about Time Machine is that it’s included in all recent versions of macOS, so you can simply launch it and use it to get back all Apple notes regardless of whether they’ve been deleted recently or a long time ago.
If Disk Drill fails to recover your notes because they’re already overwritten, then you should try to recover them from a Time Machine backup. What’s great about Time Machine is that it’s included in all recent versions of macOS, so you can simply launch it and use it to get back all Apple notes regardless of whether they’ve been deleted recently or a long time ago.
To restore notes from Time Machine:
- Connect your Time Machine backup disk to your computer and launch Finder.
- Select Go from the Menu bar and click Go to Folder.
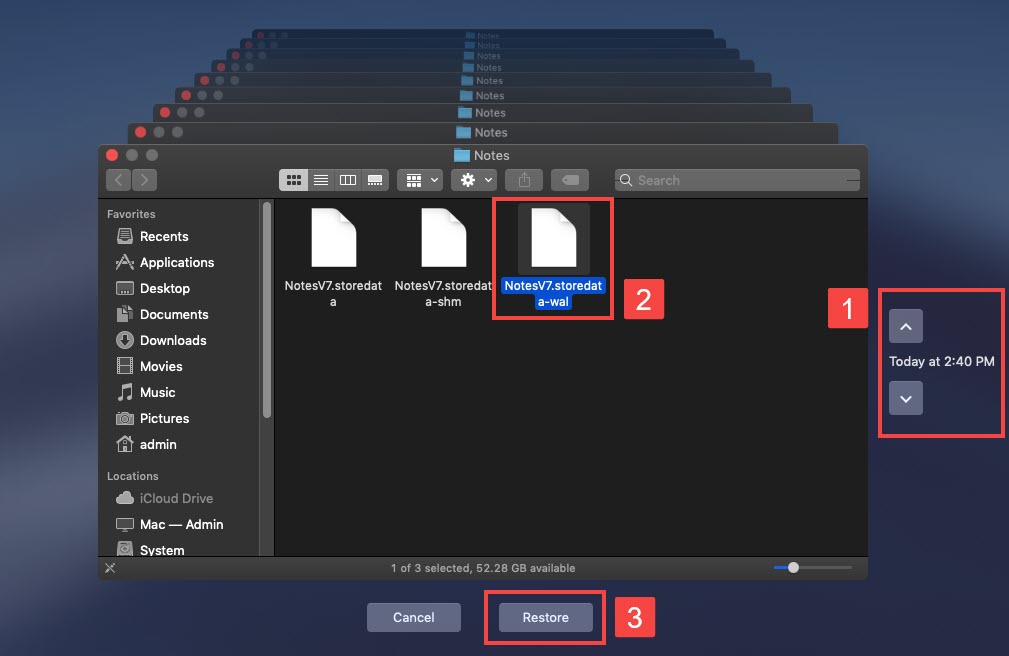
- Copy & paste the following location: ~/Library/Containers/com.apple.Notes/Data/Library/Notes/

- Click the Time Machine icon located in the Menu Bar and choose Enter Time Machine.
- Go back in time using the navigation arrows on the right.
- Select an older version of the NotesV7.storedata-wal file and click Restore.
From start to finish, retrieving lost notes using Time Machine shouldn’t take you more than a couple of minutes, and the results are guaranteed.
There are many other backup solutions for Mac similar to Time Machine, but it would be beyond the scope of this article to describe them all. If you’re using a third-party data backup app and need to recover deleted notes, we recommend you read its manual or look for an online tutorial.
Method 3: iCloud Backup
![]() iCloud, Apple’s cloud backup solution, is perfect for recovering lost notes after a hardware malfunction or accidental formatting. This method works only if you keep your notes synchronized across various Apple devices, which is why we haven’t described it earlier.
iCloud, Apple’s cloud backup solution, is perfect for recovering lost notes after a hardware malfunction or accidental formatting. This method works only if you keep your notes synchronized across various Apple devices, which is why we haven’t described it earlier.
To restore notes from an iCloud backup:
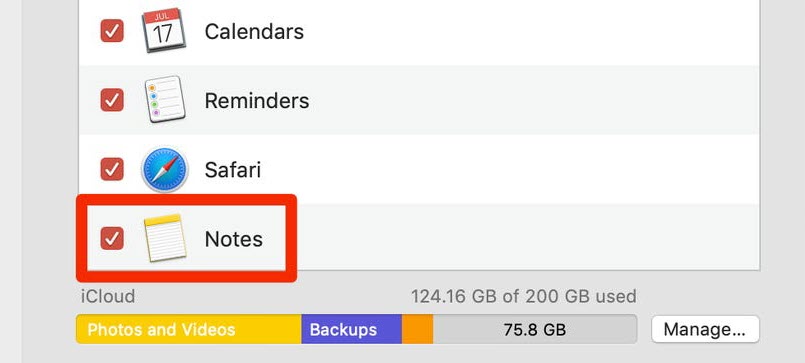
- Open System Preferences on your Mac and go to iCloud.
- Log in to iCloud.com with your Apple ID and password.
- Check the checkbox next to Notes.
All notes will be transferred from your iCloud account to your computer and displayed in the Notes app. By keeping iCloud synchronization enabled, you can avoid future data loss incidents and the need to restore notes from a local backup. You also unlock one additional way to recover notes from iCloud, and we describe it in greater detail in the bonus chapter below.
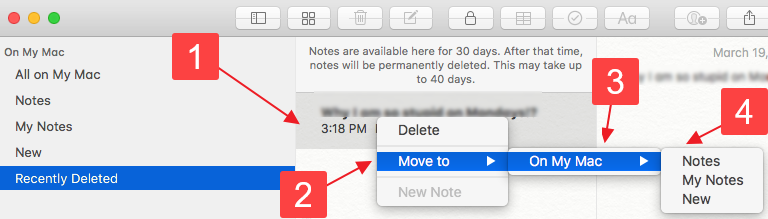
Method 4: Recently Deleted Folder
![]() When you delete a note in the Notes app without syncing your notes to iCloud, it simply disappears, and there’s no obvious way how to recover it, forcing you to use one of the recovery methods described above.
When you delete a note in the Notes app without syncing your notes to iCloud, it simply disappears, and there’s no obvious way how to recover it, forcing you to use one of the recovery methods described above.
With iCloud synchronization enabled, deleted notes are moved to the Recently Deleted folder for that iCloud account, and they stay there for up to 40 days. This means that you can undelete them just as easily as you can recover recently deleted files from Trash.
To restore notes from iCloud’s Recently Deleted folder:
- Launch the Notes app.
- Open the Recently Deleted folder.
- Right-click the note you want to restore.
- Choose Move to > the desired folder.
What if there is no Recently Deleted folder in Notes?
If there’s no Recently Deleted folder in the Notes app, then you’re most likely not signed in to your iCloud account, or you haven’t enabled the synchronization of your notes.
FAQ:
To save notes on Mac as PDF files:
- Open the Notes app.
- Select the note you want to save as a PDF file.
- Choose the File option from the Menu bar and click Export as PDF.
- Give the PDF file a name and pick where you want to save it.
- Click Save.
You can now open the saved note using any PDF reader and print it just like you would a regular document.
As a Mac user, you can choose between three main backup methods to protect your notes from deletion:
- Manual backups: To manually back up all notes created using the Notes app, all you need to do is copy the content of ~/Library/Containers/com.apple.Notes/Data/Library/Notes/ to a safe location. This method is simple, effective, but it’s far from reliable because it depends on how often you remember to back up your notes.
- Time Machine: Instead of backing up your notes manually, it’s much more reliable to activate Time Machine and let it automatically create incremental backups of your entire hard drive. That way, you gain the ability to go back in time and recover notes from a specific date with a simple click.
- iCloud: If you don’t mind your personal notes being stored on Apple’s servers, then you should consider selecting the checkbox next to Notes in System Preferences > iCloud. Not only are cloud backups highly reliable, but they also enable you to view your notes on any device.
You can, of course, combine two or even three backup methods, such as Time Machine with iCloud, for the ultimate sense of security.


