
If you deleted a video on your Mac, you still have a chance to recover it in most cases – especially if it happened recently. There are several ways to do this depending on how your Mac is set up. And while 100% recovery is never guaranteed, you may be able to recover everything flawlessly depending on several factors.
In this article, we’ll quickly break down what happens to your videos when you delete them in Finder, why recovery is possible, and what factors affect its success. Most importantly, we’ll demonstrate 4 methods to recover deleted videos on Mac. Read on!
Table of Contents
How to Find Videos on a MacBook
This section covers all the ways to locate your videos on your Mac. It’s a good idea to try these methods first because your video may not actually be deleted, just missing… But it’s also useful to learn them so you always know how to find your videos. Fortunately, Mac’s file system provides users with powerful tools to manage and locate any file – even if you don’t remember its file name. How? Read on.
Default Folder
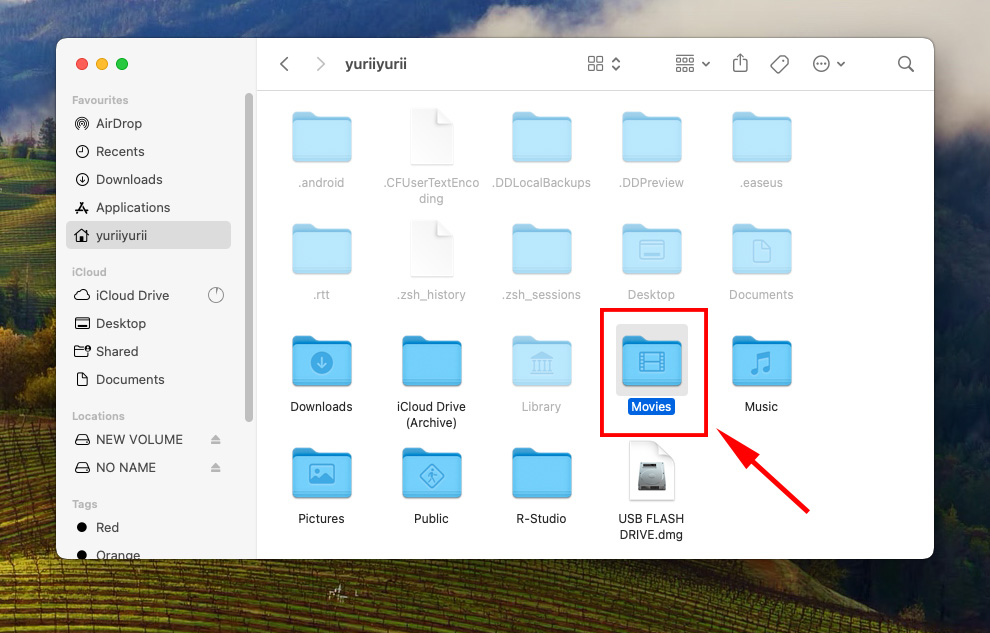
Just for reference, videos on Mac are stored in the “Movies” folder by default. You can navigate to that folder by:
- opening Finder > Go > Home > Movies
- Finder > Go to folder…
Then enter the following path into the box: /Users/”username”/Movies and replace “username” with your own username on your Mac.
Finder
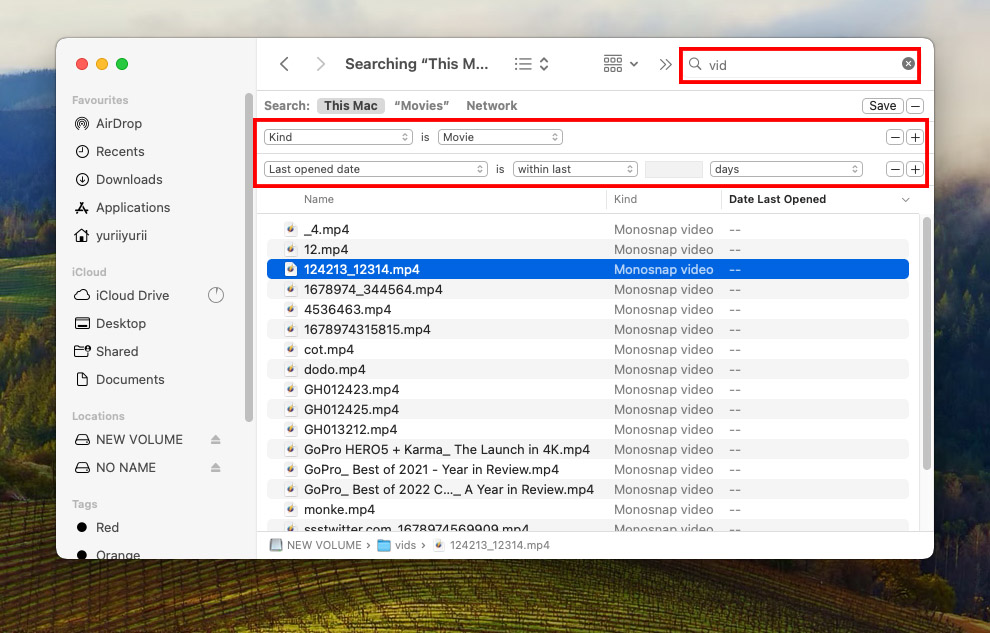
Finder has an advanced search bar that lets you efficiently find your videos by defining specific parameters (name, kind, date, author). To start defining parameters, open Finder, type something in the search bar, and click the + sign in the top-right corner of the window.
Spotlight Search
Spotlight is Mac’s powerful search technology where you can use different queries (name, kind, date, author – basically, Finder advanced search parameters) to more easily find your video.
Hit (CMD + Space) and type “kind:mov date: this week” in the Spotlight search bar to sift through .MOV files you created yesterday. Swap out queries based on what you know about the file.

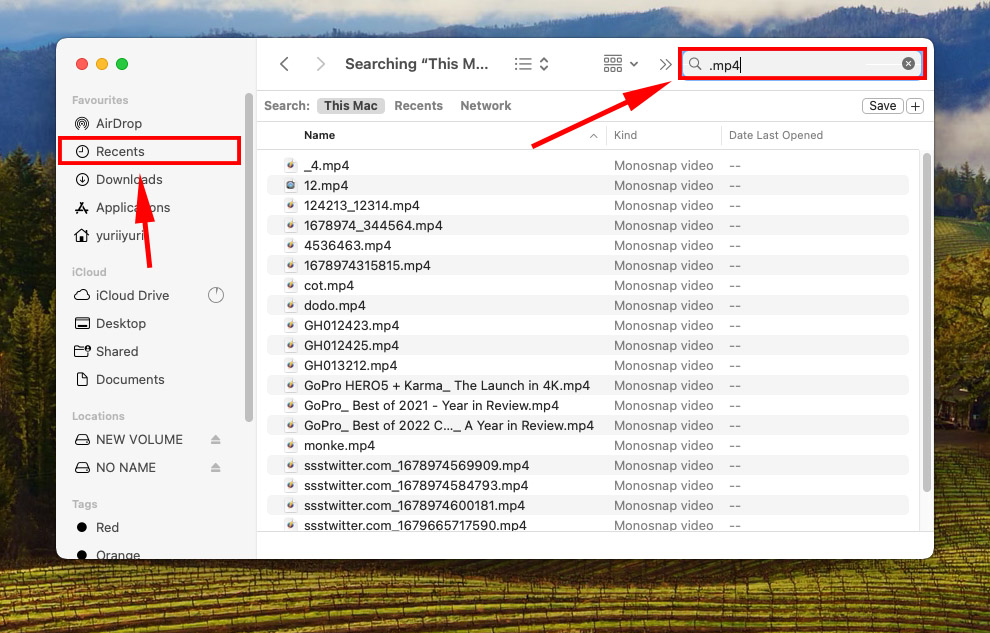
Recents Folder
Mac also stored files you recently created or opened in the “Recents” folder, which you can find in the left sidebar of your Finder window (under Favorites). You can use the search bar here as well to find your video faster. If you can’t find it, you may need to enable it in Finder Preferences.
Open Finder, then on the Apple menu bar, click Finder > Preferences… and navigate to the Sidebar tab. Enable “Recents” under the Favorites section.
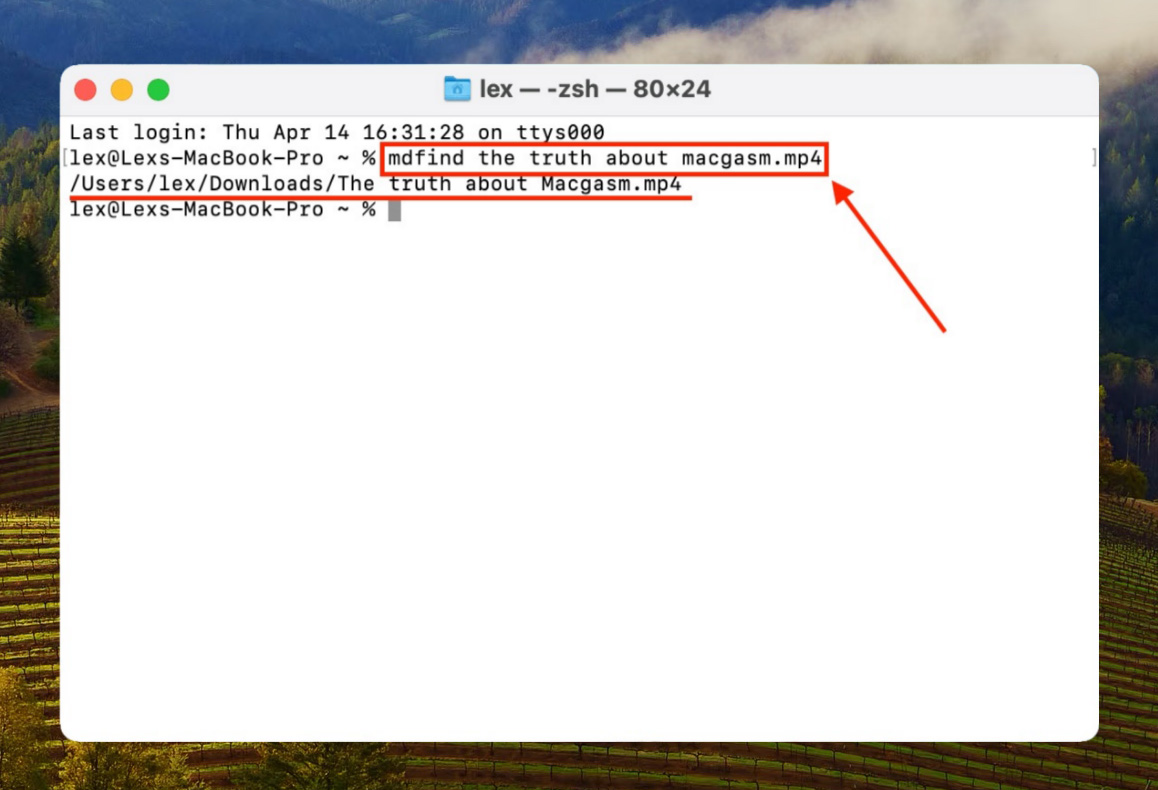
Terminal
You can use the “mdfind” command to the path to specific files and folders. Here’s a demonstration of both the command in action:
If after trying all these methods to search for your videos, you still can’t find them… Then that confirms that they’re not just missing – they’ve really been deleted. From this point forward, the content of this article will focus on video data recovery for Mac. Read on.
Is it Possible to Recover Deleted Videos from Mac?
Yes! It’s possible to recover deleted videos on Mac. However, there is one major factor that affects your chances of success: overwriting.
On a traditional hard drive, deleted files aren’t immediately erased from the file system. The data still remains on the disk, but it’s marked to be overwritten by any new files you save. Successfully recovering your files is dependent on retrieving that data before it’s overwritten.
On a solid state drive (SSD), the “garbage collection” behavior has a crucial difference. Instead of marking your “old” data for overwriting, it proactively clears the data block in order. This feature is called “TRIM” and it was designed to improve drive performance. However, it makes data recovery MUCH harder.
You can check if TRIM is enabled by opening the Apple menu > About This Mac > More Info > System Report NVMExpress OR SATA/SATA Express. If the entry for TRIM Support is Yes, the feature is enabled.
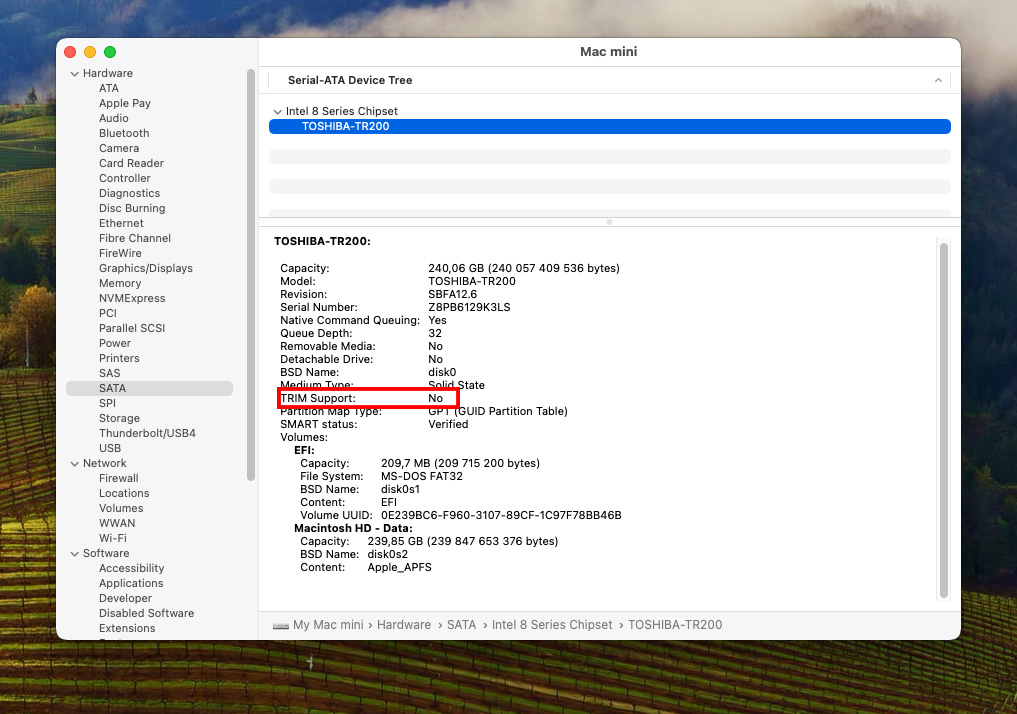
Tip: To disable TRIM, open the Terminal app and use the command sudo trimforce disable. Switch “disable” with “enable” to turn it back on.
How to Recover Deleted Videos on Mac
There are several methods to recover deleted videos on Mac. The method you choose depends on several factors – how much time has passed, whether you have backups, if you have iCloud enabled, etc. The solutions we demonstrate cover every scenario, giving you the best chance of recovering your videos.
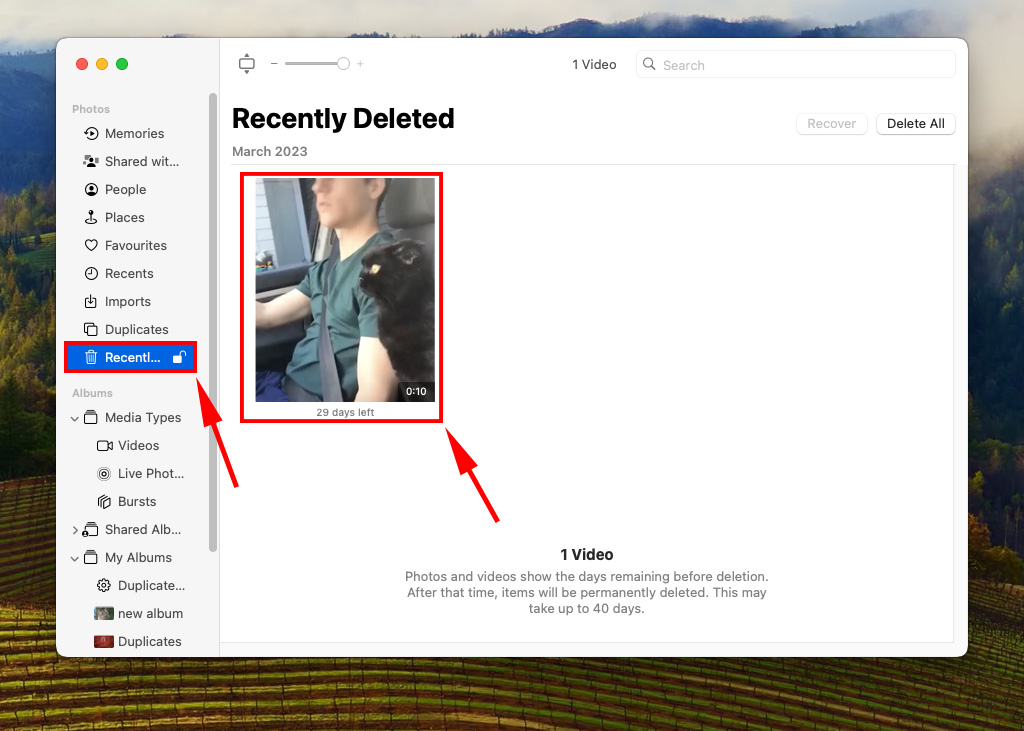
Method 1: Restore Videos in iPhoto/Photos App
If you imported your video to the Photos app but you didn’t enable iCloud, a deleted video will appear in the app’s Recently Deleted album. Photos and videos in this album may stay there for up to 40 days, and you can find how many days they have left displayed under their thumbnails.
To recover deleted videos from the Photos app’s Recently Deleted album, click on their thumbnails to select them and hit “Recover.”
Method 2: Recover Videos from iCloud Photos
If you enabled iCloud to store your videos, your deleted video may be still in the cloud – and you still have a chance to recover them from the Recently Deleted album via browser. By default, iCloud stores deleted items for 30 days. Here’s how to recover them:
Step 1. On your browser, go to iCloud.com and login.
Step 2. Click “Photos.”
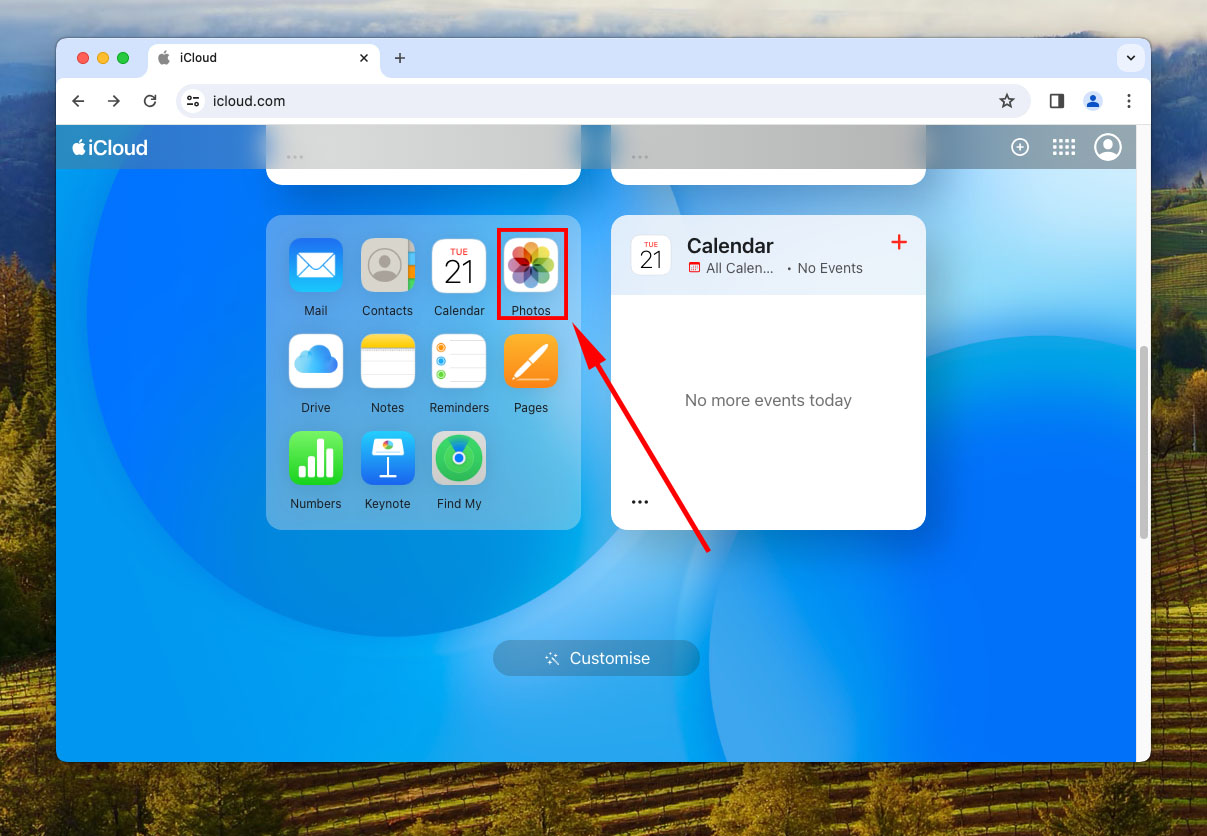
Step 3. On the left sidebar, select “Recently Deleted” and click the thumbnails of the videos you want to recover. Finally, click “Recover” in the top-right corner of the window.

Method 3: Use Time Machine
Time Machine is a powerful backup utility natively available in Macs. This section assumes that you set up Time Machine beforehand, and we’ll be using Snapshots to locate the point in time where your file was saved to its original folder. We’ll then restore that version of the folder in order to extract the file.
Step 1. Open System Settings> General > Time Machine.
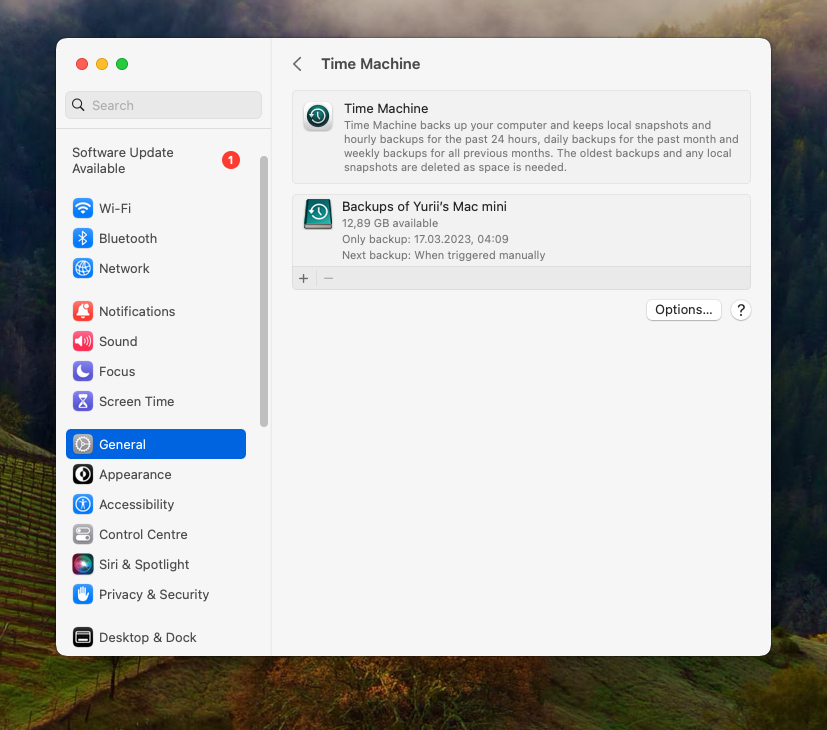
Step 2. In older versions of macos on the bottom of the window, tick the box beside “Show Time Machine in menu bar”, then close the window.
Step 3. On Finder, navigate to the folder that you want to view the timeline history of.
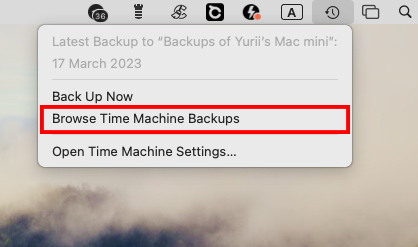
Step 4. On the top-right corner of the Apple menu bar, click the Time Machine button and hit “Browse Time Machine Backups.”
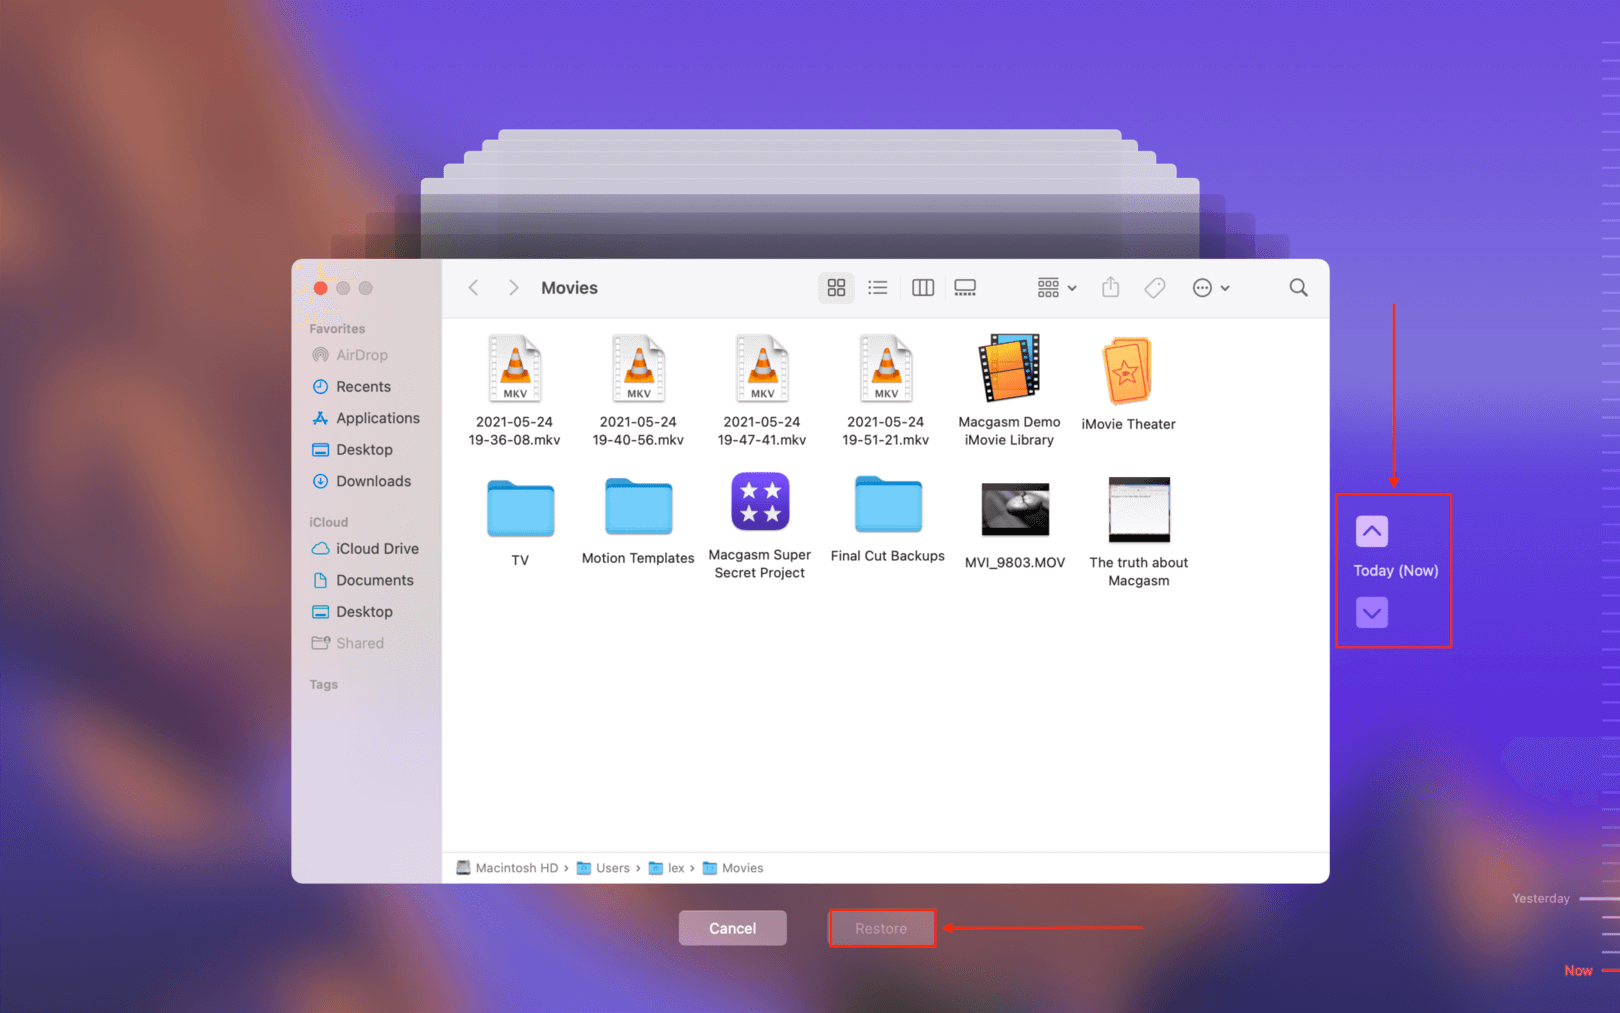
Step 5. Use the arrows on the right to navigate through the timeline of the folder you have open. Select the file you want to recover by clicking it, then hit “Restore.”
Method 4: Use Data Recovery Software
Data recovery software is a useful tool designed to extract data directly from a drive’s file system in order to restore lost files. There are a lot to choose from on the internet, but we’ll be using Disk Drill for this demonstration because it’s optimized for Mac, easy to use for beginners, and it has one of the largest databases of video file signatures among its competitors (including RAW file types).
Tip: Even if you want to try other apps, the steps in this guide are generally applicable to most modern data recovery software.
Step 1. Connect an external storage drive to your Mac – such as a hard drive or USB stick.
Step 2.Download and install Disk Drill. To avoid overwriting the lost videos, we recommend installing Disk Drill on your drive by dragging the app icon to your drive icon (on your Desktop) instead of the Applications folder when prompted during the installation process.
Step 3.Open Disk Drill. Then, select your Mac drive from the list and click Search for lost data.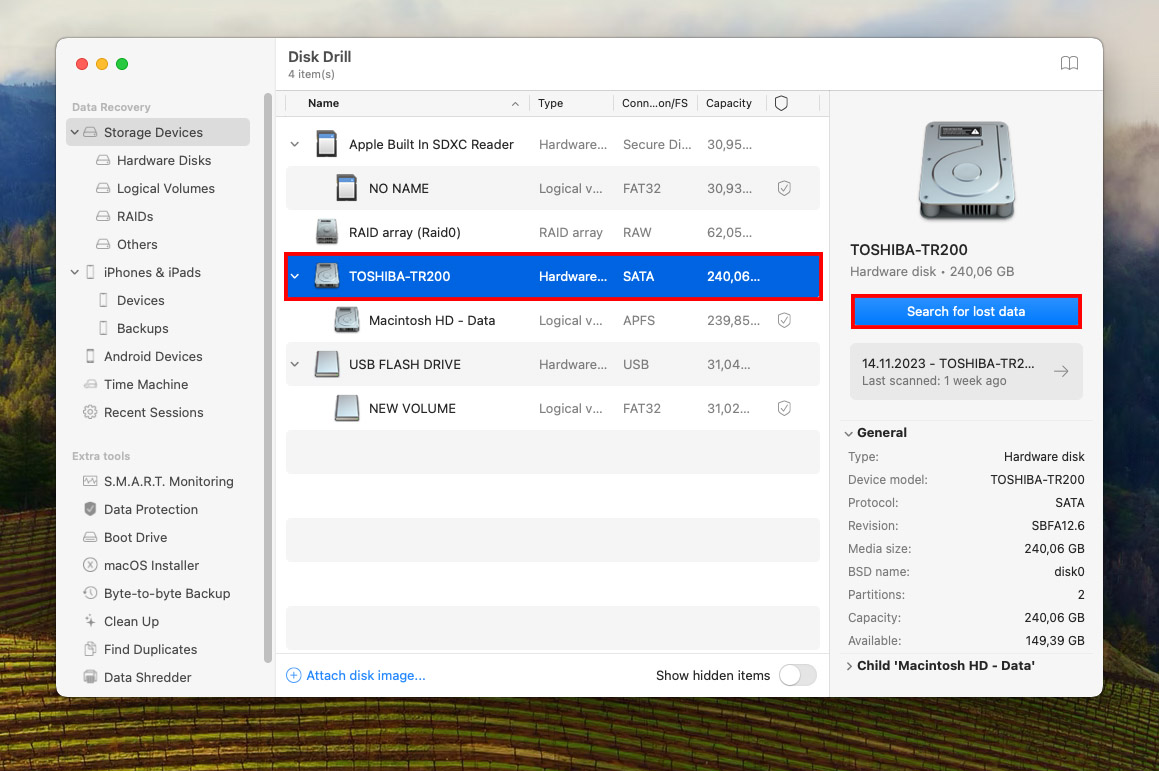
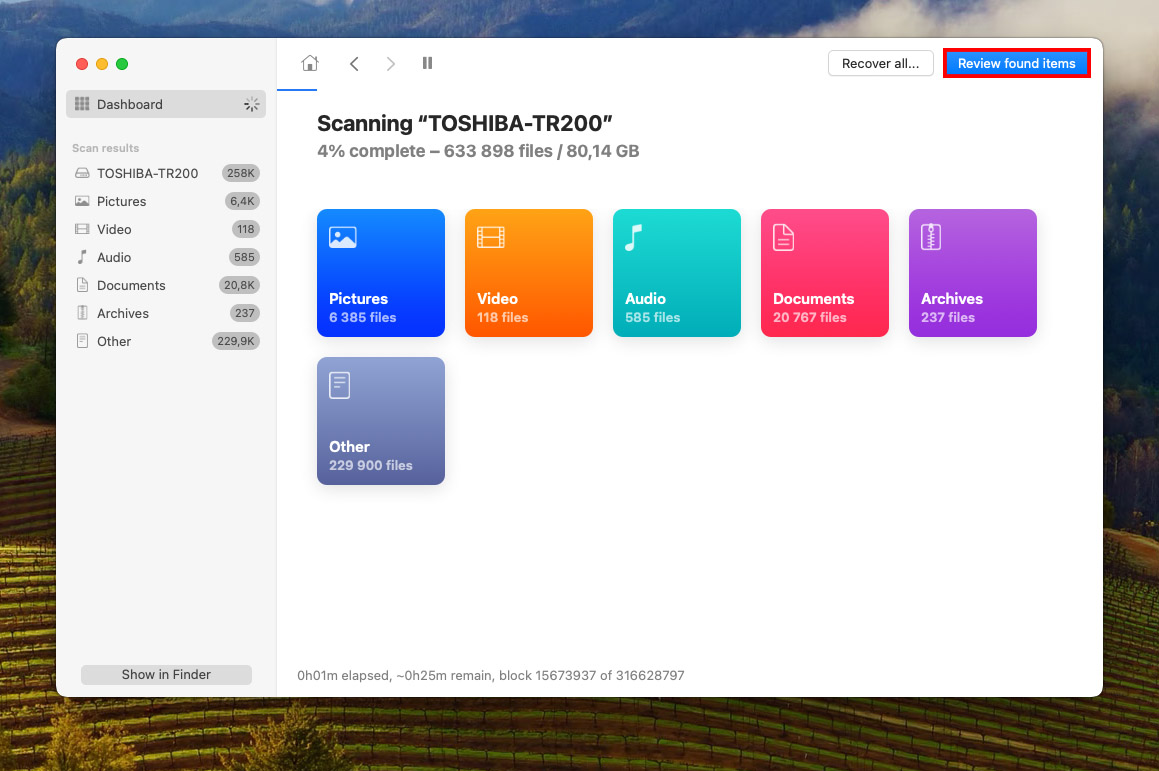
Step 4.Once Disk Drill finishes scanning your drive, click Review found items.
Step 5.On the left sidebar, click on the Videos category so Disk Drill only shows video files. You can also use the search tool to filter the results further. Browse the Deleted or lost, Reconstructed, etc. folders one by one until you find your lost videos.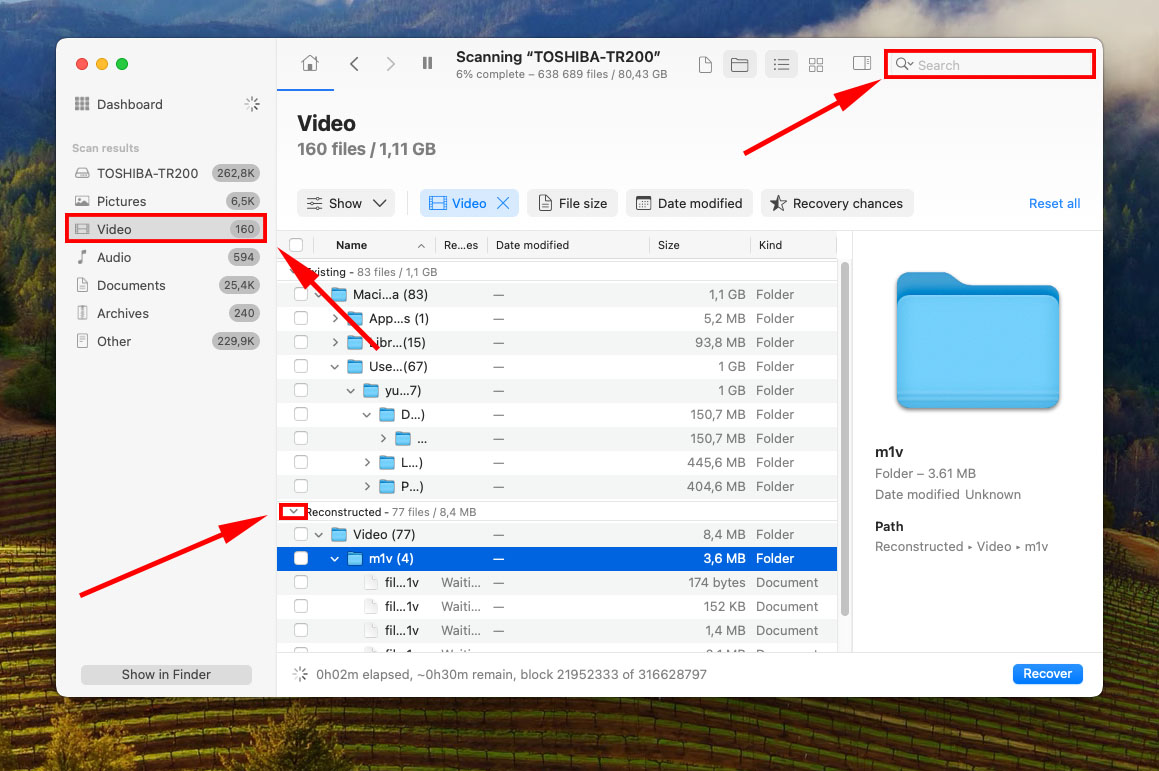
Step 6.Hover your mouse beside a video to preview it, which ensures they are recoverable. Then, Mark the boxes beside your videos to make your selection. Then, click Recover.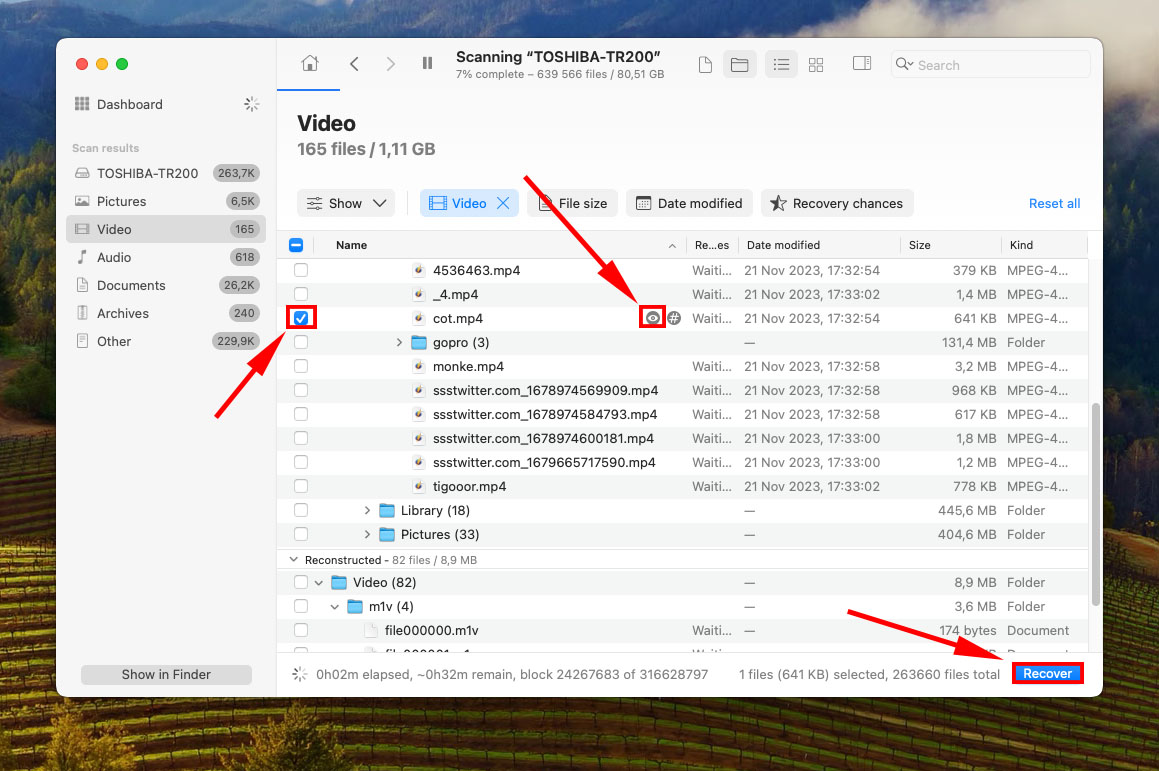
Step 7.Choose a location on the drive you connected in step 1 where Disk Drill will save the restored videos. Click Next to start the recovery process.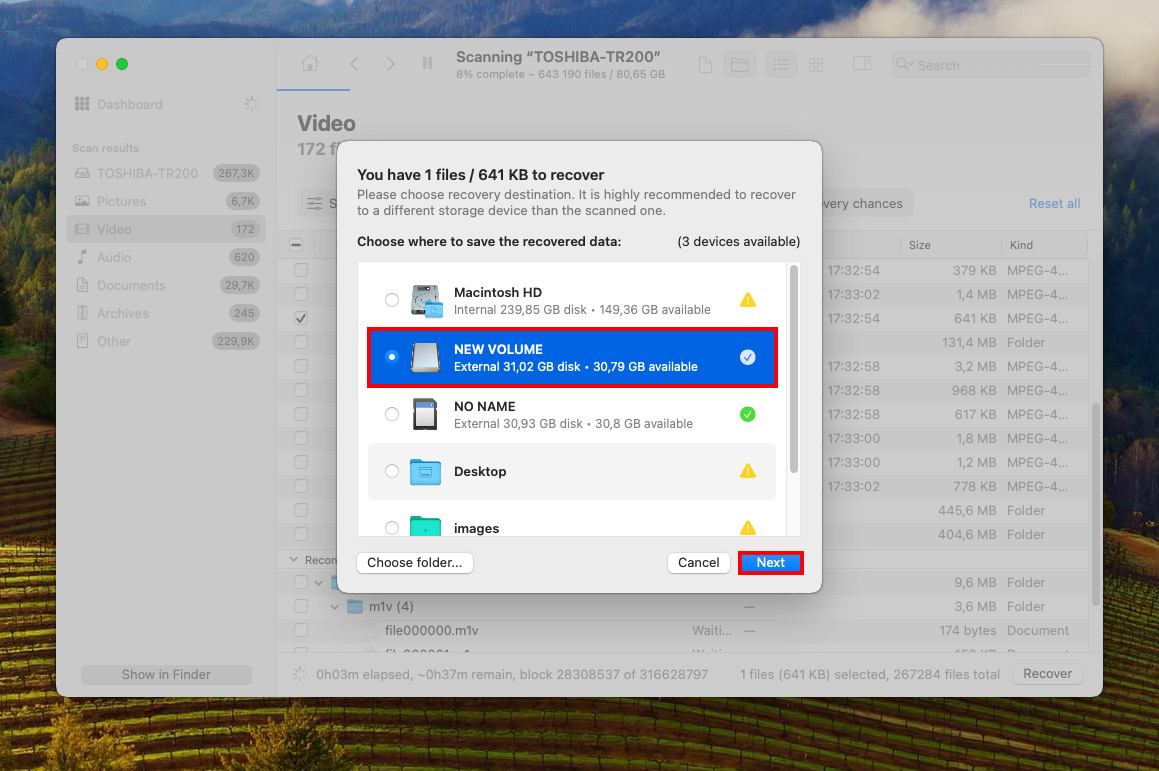
How Can I Protect Important Videos on a Mac?

Mac computers are loved by professional and amateur video editors alike for their ease of use, stability, and high-end screens that make spotting small imperfections and adjusting colors effortless.
Unfortunately, only a relatively small number of Mac users know how to protect important videos and minimize the consequences of their accidental deletion or hardware failure.
Here are a few useful tips from professionals:
- Activate Time Machine: Time Machine is Apple’s backup solution, and all Mac users who are not willing to risk losing important video files should activate it. Once activated, Time Machine automatically creates incremental backups on an external backup storage device, allowing you to restore specific video files with a few simple clicks.
- Avoid non-native file systems: While it’s technically possible to access NTFS drives on macOS with the help of Paragon NTFS and other similar solutions, professionals avoid non-native file systems because they don’t want to deal with random errors and data corruption. That also includes the exFAT file system, which lacks journaling, so any interruption during data transfer may result in data loss. In other words, use HFS+ or, even better, APFS.
- Setup a Network Attached Storage (NAS): You can think of a NAS as a special-purpose server that you can connect to your home network and use to back up all your video files. You can buy one from a company like Synology and equip it with multiple high-capacity hard drives to meet your storage requirements. While more expensive, a NAS is a better backup solution than a RAID array.
Conclusion
Deleted video recovery on Mac is not only possible but it can be highly successful if the odds are in your favor. However, it’s never guaranteed – especially if you have TRIM enabled. To make sure you never have to worry about data loss, we highly recommend that you regularly back up your data using Time Machine, enable iCloud for an extra layer of protection, and consider disabling TRIM if the slight performance hit doesn’t matter to you.
And if you’re ever in a situation where you just deleted your videos, make sure to stop downloading or saving new files to your Mac until you’ve recovered your data.
FAQ
The best way to transfer data from a GoPro to a Mac is to detach its memory card (usually SD or microSD/SDHC/SDXC) and connect it to your Mac via a card reader. This is because memory cards use file protocols that give other devices (like computers) full access to its file system.
In non-geek speak, that means you won’t have any problems reading and writing data without any additional software or drivers (aside from SD card drivers).


