I hear people talk incessantly about how great lossless compression is, but the vast majority of people can’t tell the difference between an MP3 from The Pirate Bay, and a pristine vinyl copy of that same song. The tiny percentage of people who obsess over audio quality try to convince everybody else that they need to have big bloated files. To that concept, I say “Feh.”
We’ve been dealing with digital audio for a long time. We’ve figured out how to make small files without having to sacrifice significant quality. I’m speaking, of course, about High-Efficiency Advanced Audio Coding (HE-AAC). I’m not going to bore you with the technical details of how it compresses your audio. We have Wikipedia for the nitty gritty. I’m just going to tell you that using HE-AAC will give you nice tiny audio files with minimal degradation in quality. That’s sweet, right? Right.
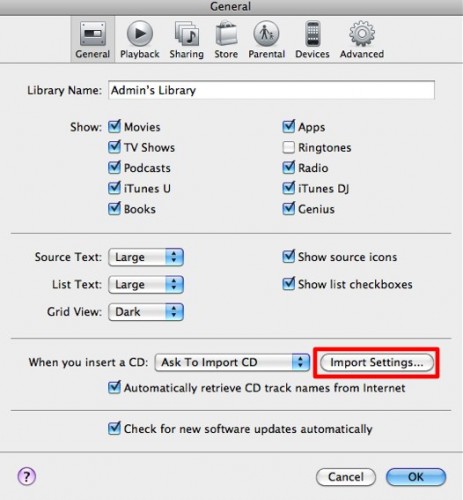
First, bring up the General preference pane in iTunes by using CMD+,. Next, press the Import Settings… button.
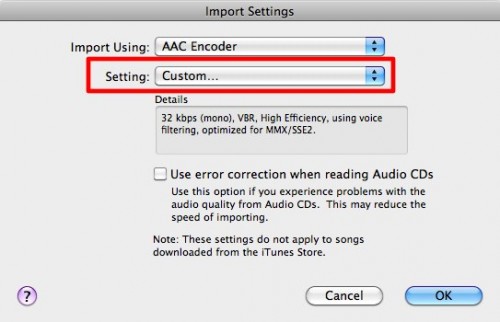
From the first dropdown menu, make sure “AAC Encoder” is selected. From the second, select “Custom.”
Now, set the dropdown menus as such: 80 kbps, Auto, and Auto. Make sure the “Use VBR Encoding” and “Use HE Encoding” are both checked. The third checkbox is optional. Leave it alone if you’re compressing music. Only use it only if you’re compressing talk programming.
Done! Now when you transcode audio files in iTunes, you’ll end up with great sounding audio without all of the bloat.
All audiophiles can send their hatemail to null@null.null. Everyone else can comment on this post or hit me up on Twitter.


