
Did you get a com.apple.diskmanagement.disenter error when you tried to mount your external hard drive on Mac? This indicates a problem with either your external hard drive or macOS. Unfortunately, either case may lead to data loss – but don’t lose hope!
In this article, we’ll explore the possible reasons we encounter DiskManagement Distenter 49135 and how to fix it (without losing your data), as well as other common disk errors.
Need to recover data from the drive? Go to data recovery section ⤵
Table of Contents
What is DiskManagement Disenter error 49153?
When you plug in your external hard drive, the system mounts it and makes its contents viewable in Finder. If it doesn’t show up there, you should still see it in Disk Utility (Finder > Applications > Utilities) where you can also attempt to mount it.
But there are cases when your external hard drive won’t mount, even using Disk Utility. In this scenario, you’ll probably encounter an error that says “Could not mount *name of the drive*”(com.apple.DiskManagement.disenter error 49513).
Several factors could lead to this problem. Here’s a brief look at the most common ones:
- Incompatible file system: Your Mac can only understand limited amount of file systems these include: APFS, HFS+ and exFAT, it also can only read NTFS formatted drives commonly used in Windows.
- Corrupted drive or system files: Damaged files on the drive itself or within the macOS system files responsible for disk management can cause mounting issues.
- Software glitches: Temporary bugs with macOS or other software can interfere with the mounting process.
- Time Machine backups: In some cases, Time Machine backups might be causing conflicts.
Don’t worry – we’ll show you how to get rid of this pesky error in the next section.
How to Fix com.apple.diskmanagement.disenter error 49153?
There are several ways to address this specific error code, but most fixes can potentially harm your data. We suggest opening your external hard drive in read only mode and copying your files to a separate storage device or to the cloud.
Method 1: Connect Your Drive to Another Mac
Disk Utility errors can be caused by either your drive or your Mac. To figure out which methods to try first, connect your drive to another Mac or even a PC. If your drive doesn’t work on other machines, then the problem likely lies with your drive.
If it works on another Mac, then your Mac might be experiencing glitches due to a faulty update or other issue. If it works on a PC, then it’s likely a formatting problem – we wrote more about that in the section of this article that covers other common DiskManagement Disenter errors.
Method 2: Use First Aid in Disk Utility
First Aid is a useful tool that finds and repairs disk errors – specifically, it scans the drive and its partitions for issues related to its structure and formatting. These may prevent your drive from properly mounting.
Fortunately, First Aid is a feature of the Disk Utility app, which can recognize unmountable drives or partitions. To repair your drive using First Aid:
Step 1.Launch Disk Utility (Finder > Applications > Utilities).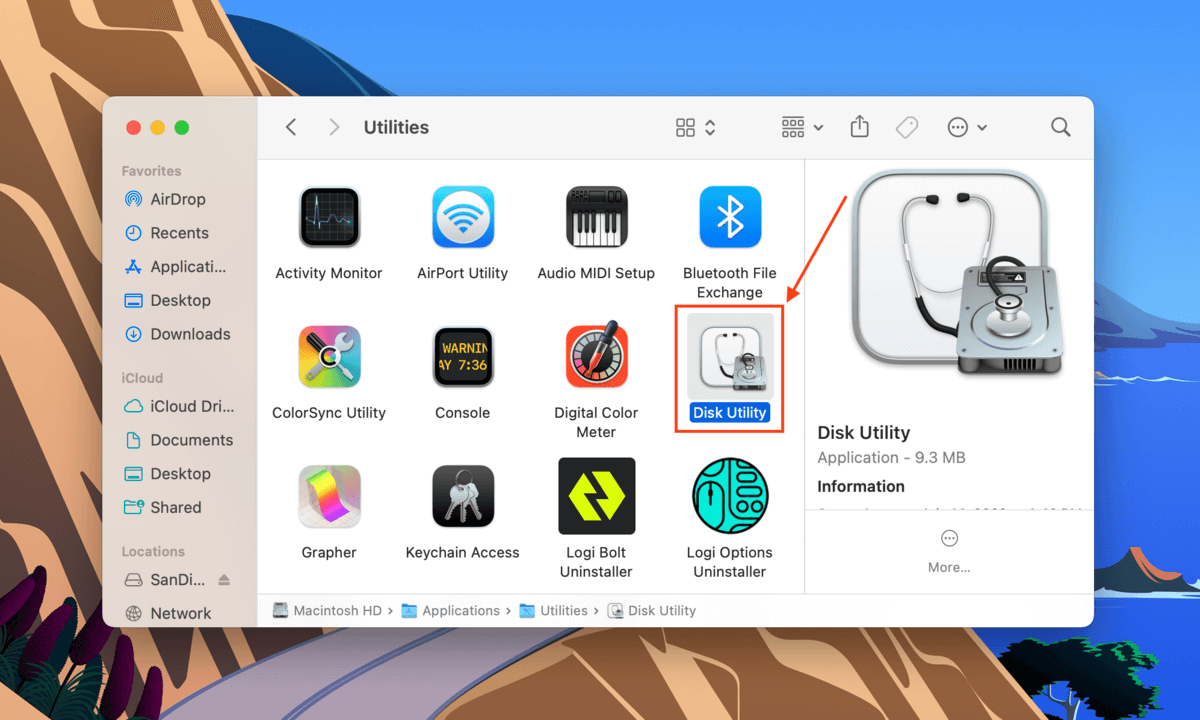
Step 2.Select your drive from the left sidebar, then click the First Aid button at the top of the window.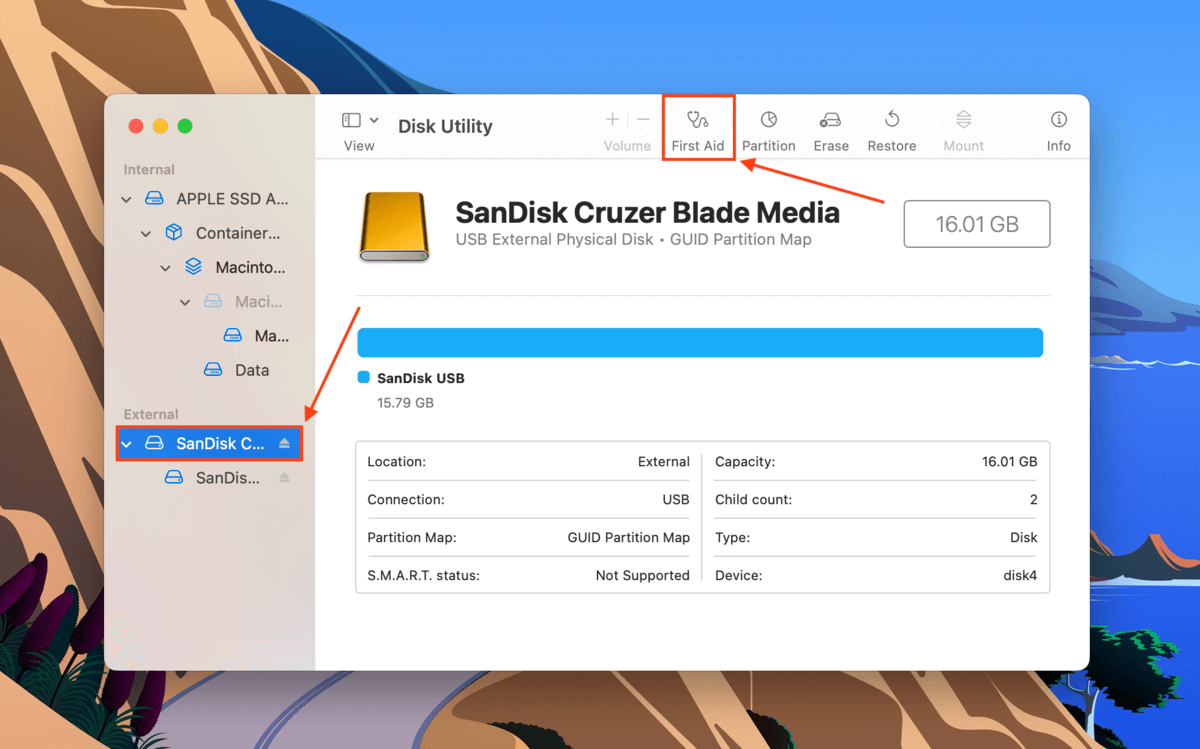
Step 3.In the dialogue box that appears, click Run.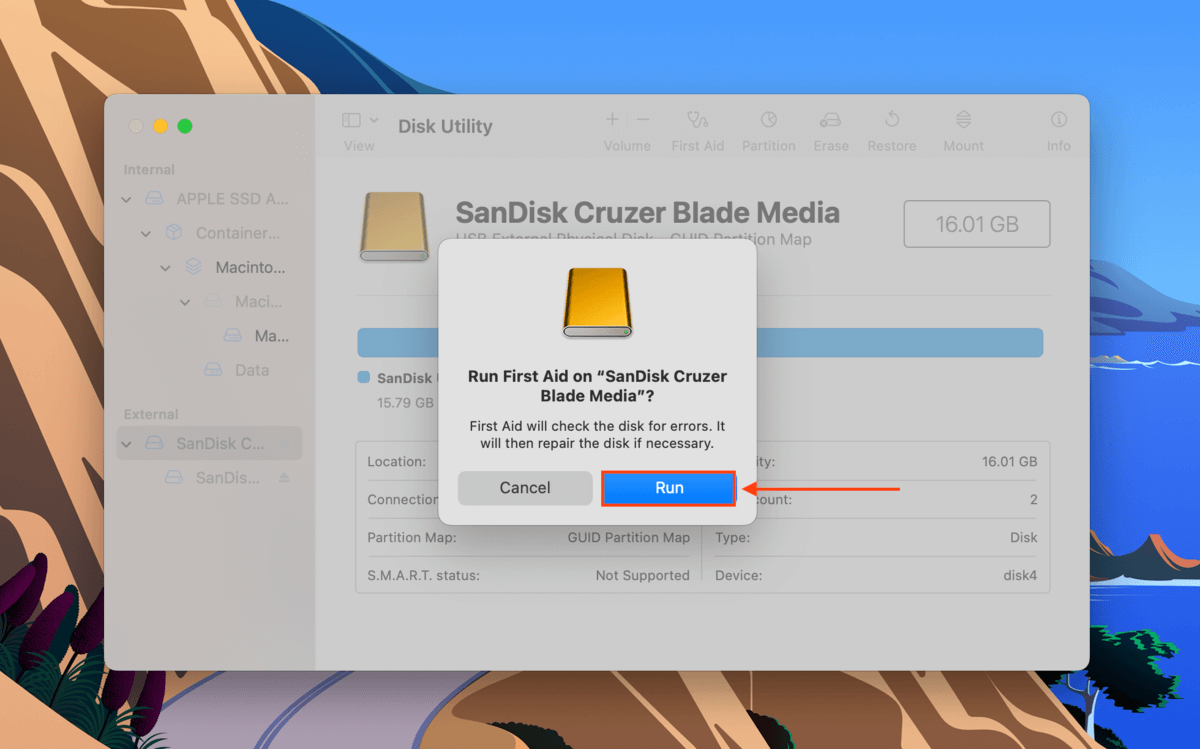
Step 4.Wait for the process to finish. Then, manually mount your hard drive in Disk Utility by selecting your drive or volume in the left sidebar and clicking the Mount button.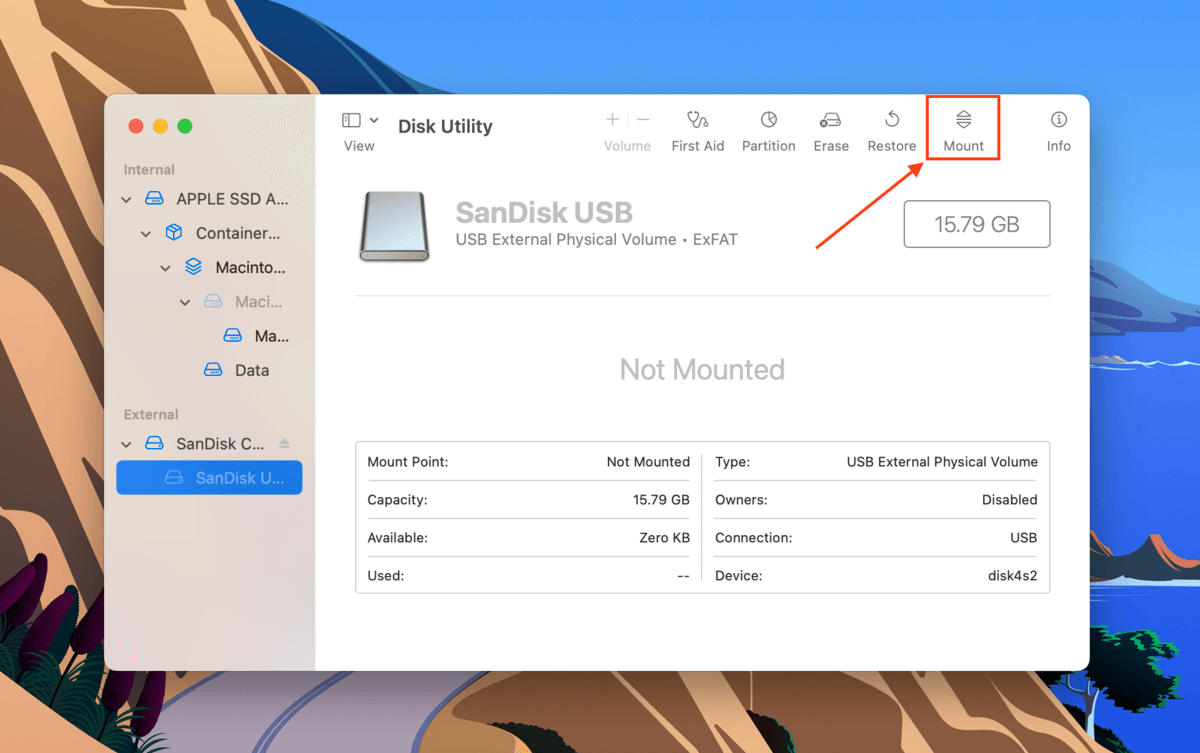
Method 3: Use the fsck Command in Single User Mode
Your external hard drive may not be mounting because of a file system issue. To resolve this problem, you can use Mac’s File System Check command or FSCK through Single User Mode. Here’s how:
Step 1.Enter Single User Mode. To do so, restart your Mac. As soon as it starts to reboot, press and hold the Power button and the CMD + S keys at the same time.
Step 2.You’ll know that you’ve successfully booted into Single User Mode when you see a window that looks like the Terminal app. Once the white text stops appearing, type the following command and hit Return.
/sbin/fsck -fy
Step 3.Once the process is complete, type reboot. This will command your Mac to restart itself.
Method 4: Disable Time Machine
Time Machine is a Mac built-in tool that regularly backs up your data, usually automatically. It works well, but on bad days, it can cause the operating system to get stuck while preparing your backup drive. Try disabling Time Machine to free your drive from this process and hopefully allow it to get mounted.
To disable Time Machine, open its settings window by launching System Preferences > Time Machine.
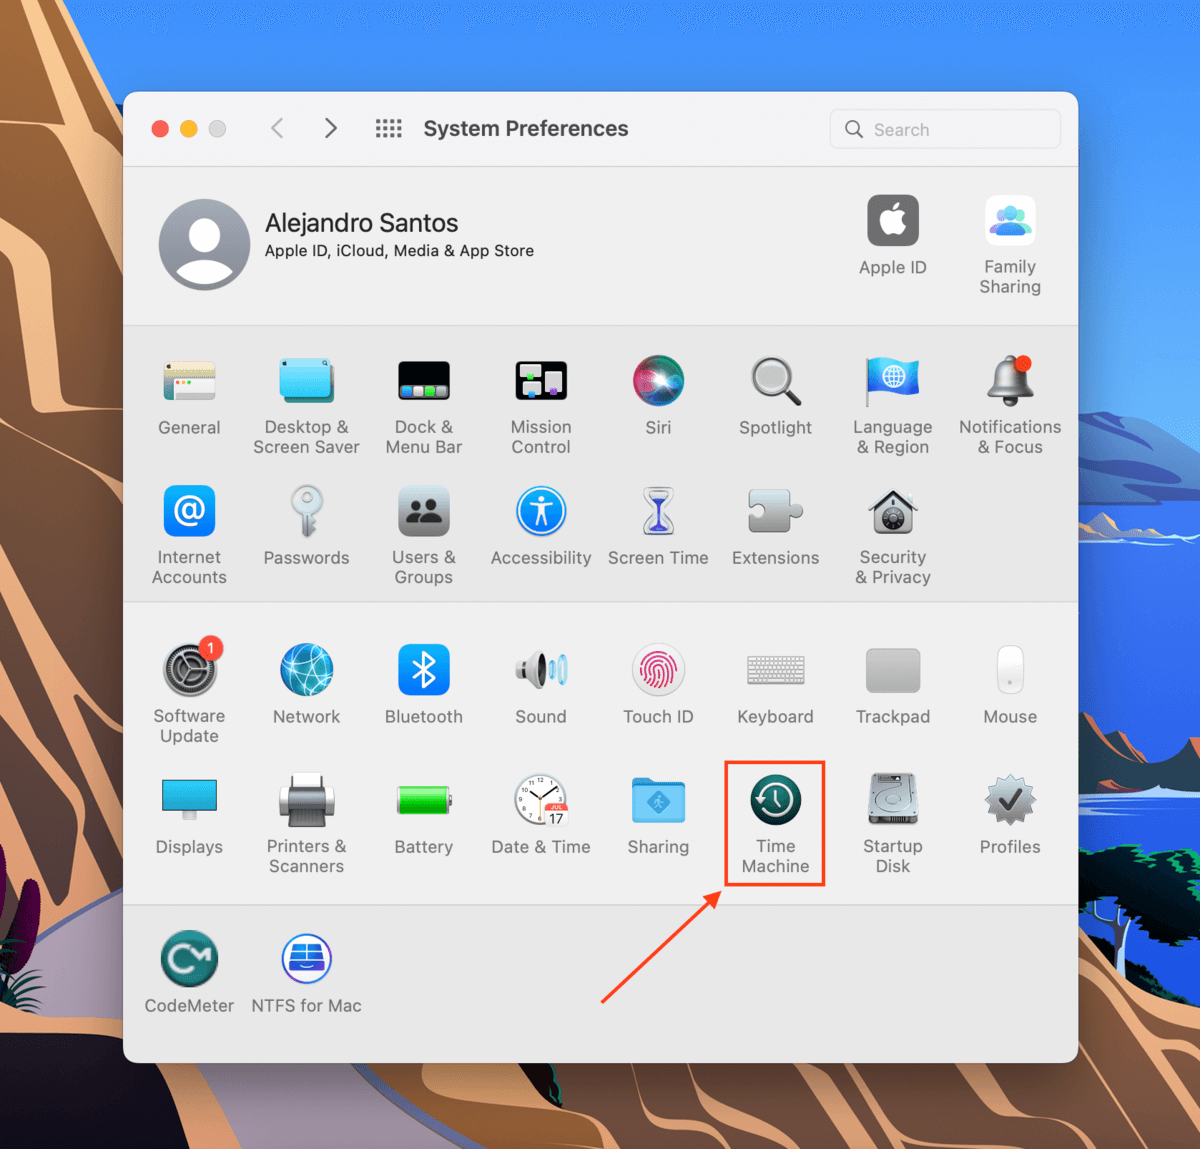
Then, untick the box beside the Back Up Automatically setting.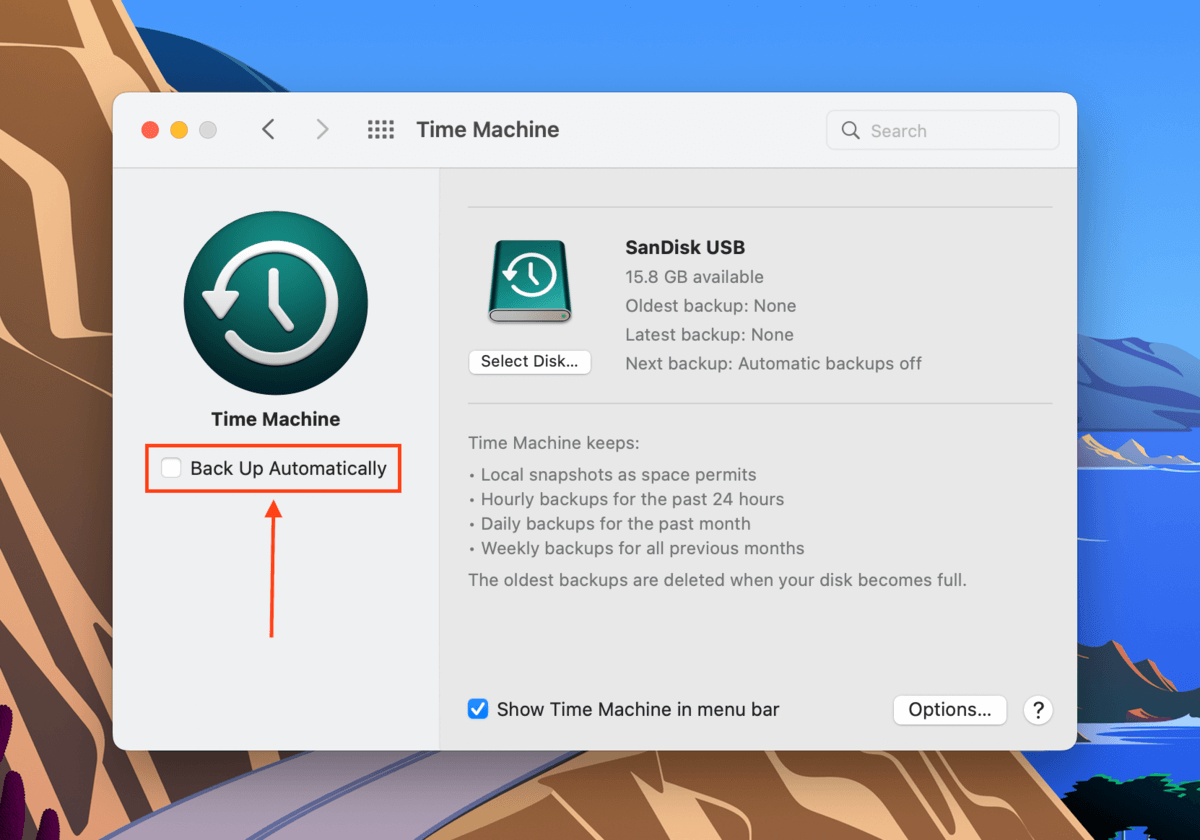
Method 5: Delete Time Machine snapshots using Terminal
Deleting Time Machine snapshots from your Mac may also resolve this disk utility error. Learn how to do it using the Terminal app by following the steps below:
Step 1.Launch Terminal (Finder > Applications > Utilities > Terminal).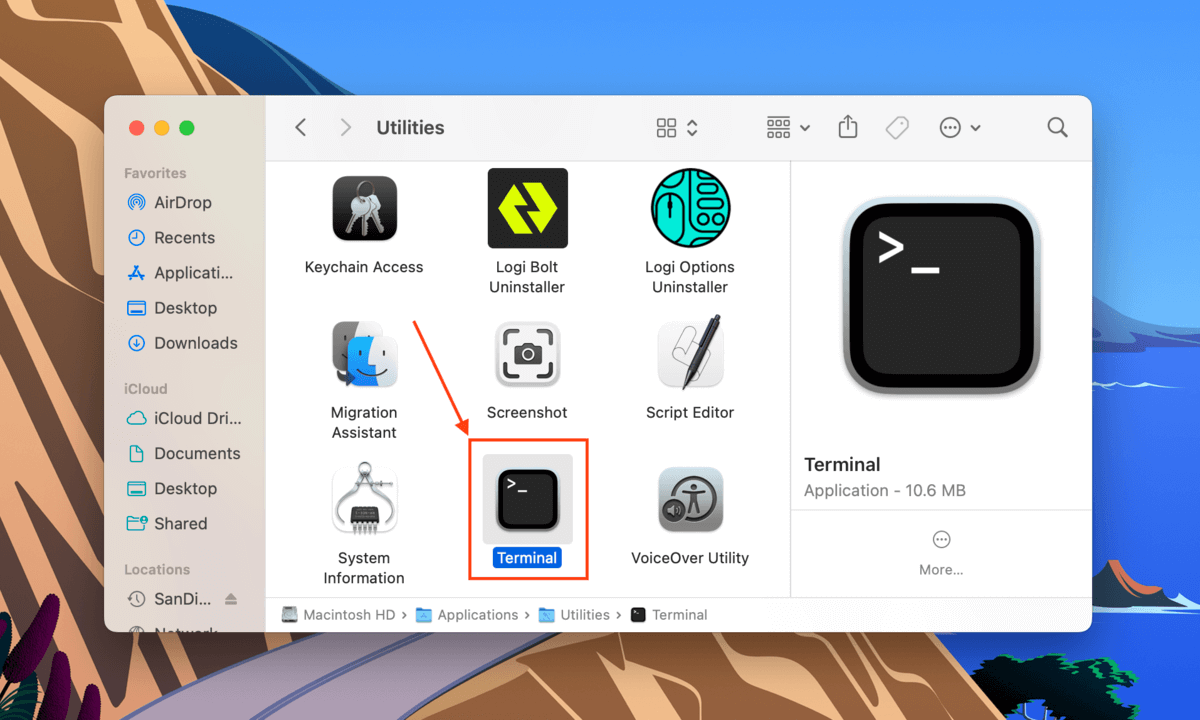
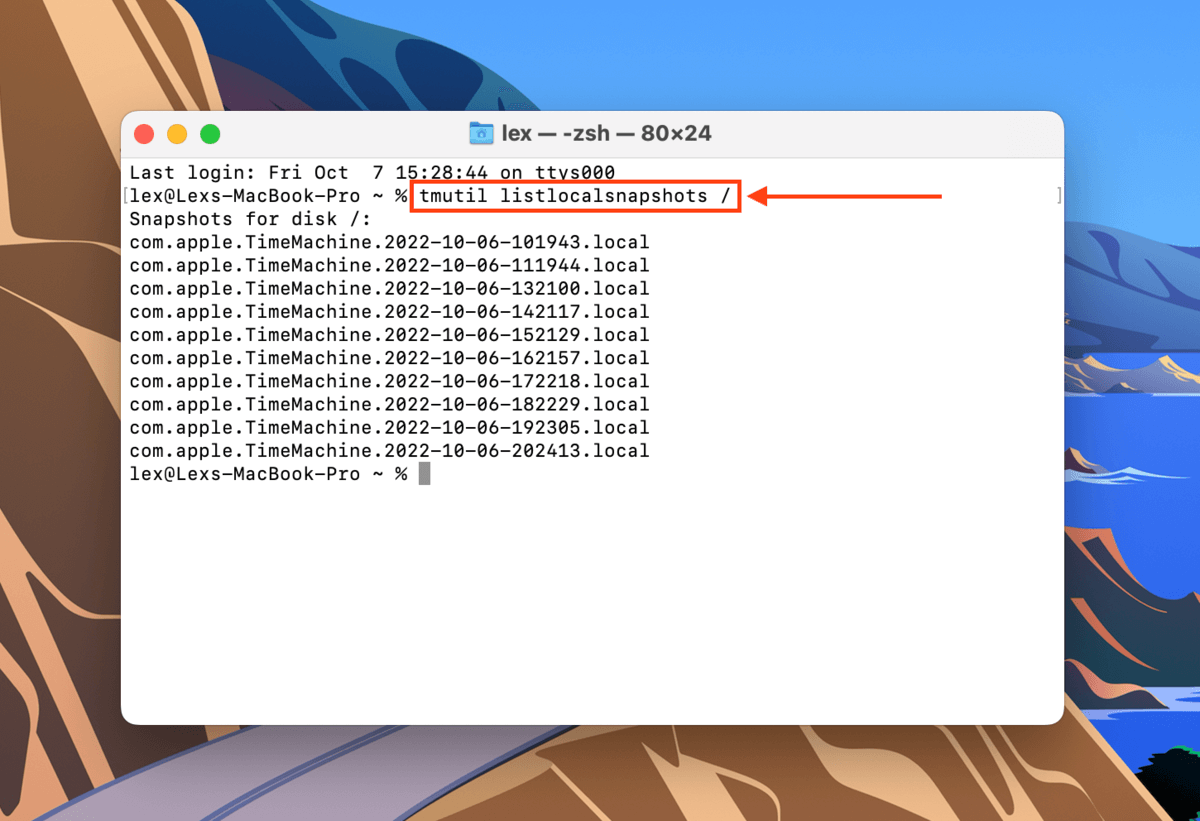
Step 2.The first command we’ll execute will list all locally stored Time Machine snapshots. Type the following command and hit Return:
Tmutil listlocalsnapshots /
Step 3.Type the following command and hit Return:
Tmutil thinlocalsnapshots /99999999999999
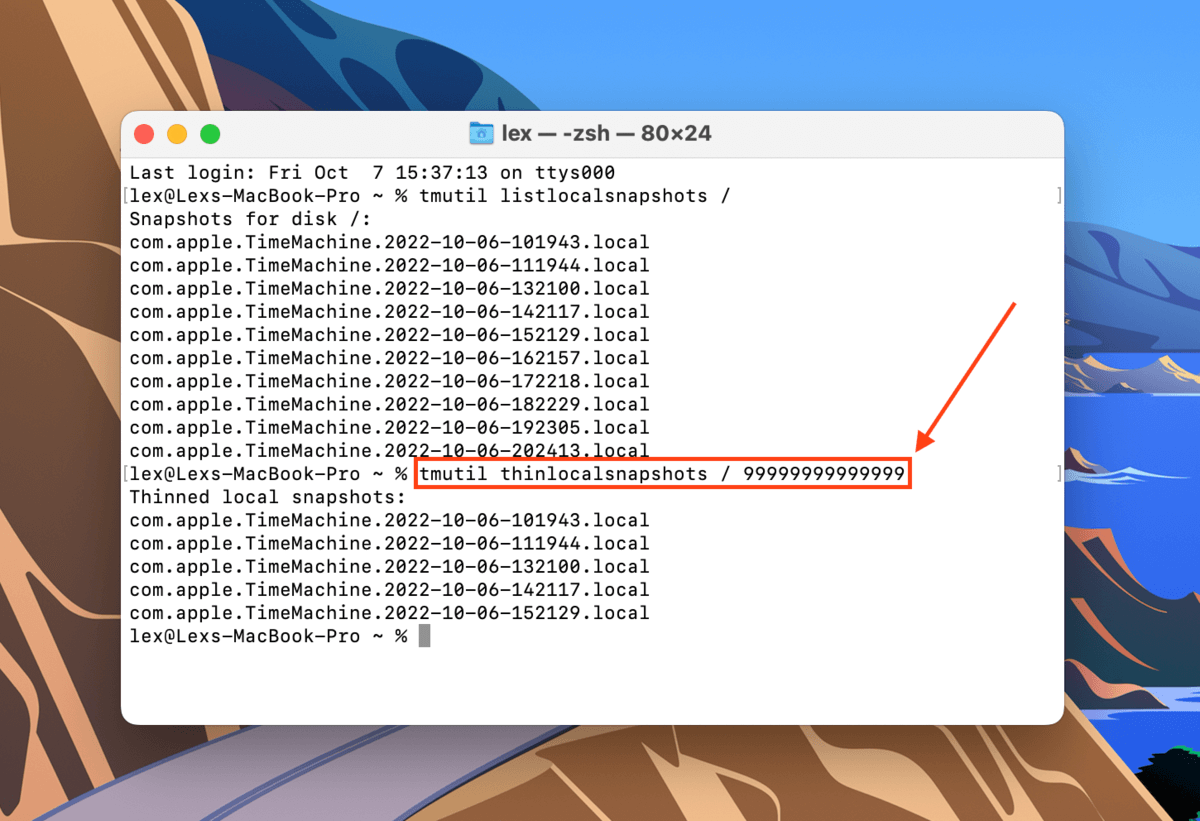
Step 4.Keep using the tmutil listlocalsnaphots and tmutil thinlocalsnapshots commands to make sure you delete all your snapshots.
Method 6: Format Your Drive
If all the above methods failed to get rid of the disk errors, your last resort is to format the drive. As we’ve already discussed earlier, formatting your drive will wipe the disk – including errors, viruses, corruption, and unfortunately, your data. We suggest copying your files to a secure location first.
Fortunately, formatting your drive on Mac is very easy thanks to the Disk Utility app. First, launch Disk Utility (Finder > Applications) and select your drive from the left sidebar. Then, click the Erase button on the top of the window.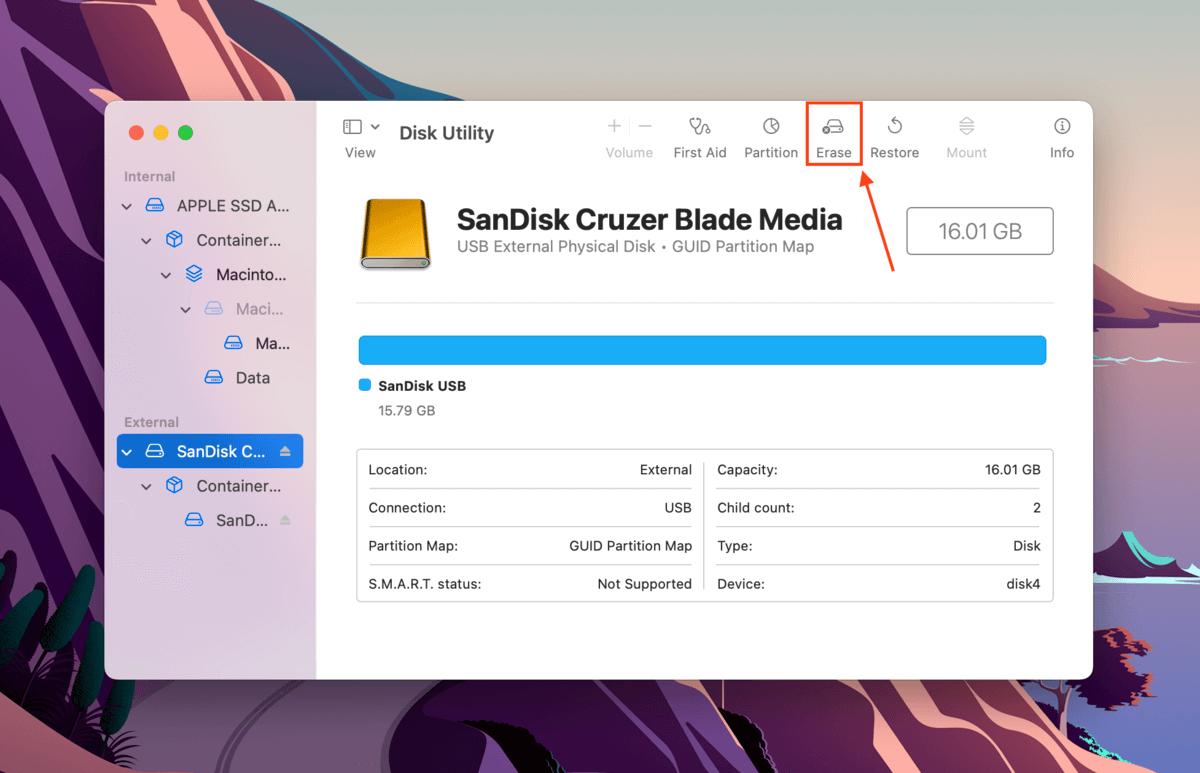
In the dialogue box that appears, name your drive and select a format. Due to the nature of this error yyou will have to choose either APFS or HFS+. If after that problem goes away you can reformat to any format you prefer. Select GUID Partition Map for its scheme, then click Erase to proceed with the format.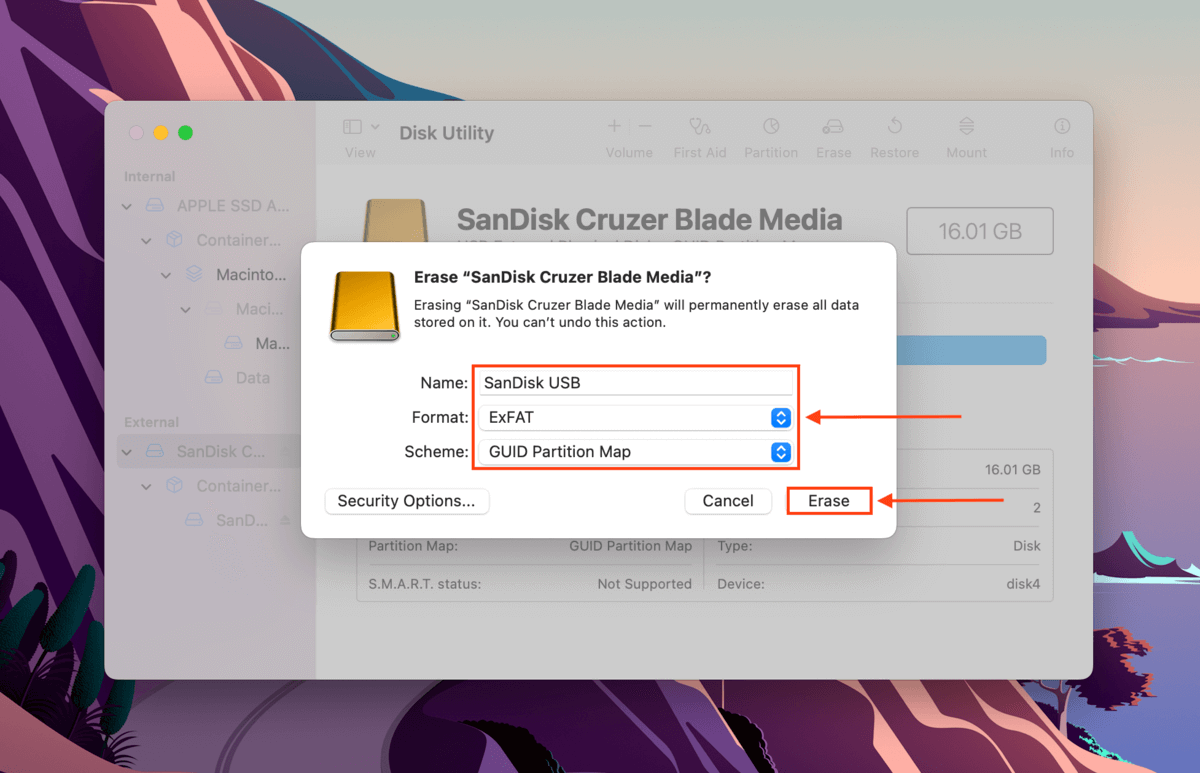
Other Types of DiskManagement Disenter Error
Aside from DiskManagement Disenter Error 49153, there are other DiskManagement Disenter errors that you may encounter that are represented by different codes. Below, we’ve listed the most common ones along with their solutions:
- DiskManagement Disenter Error 49223. An exFAT hard drive that’s been formatted using Windows can cause this error when connected to a Mac, as macOS doesn’t support all the storage block sizes available on Windows. This incompatibility makes MacOS unable to recognize and mount the drive.If you want to use this drive on both Mac and Windows, you need to format it using Mac (but first, back up your data!). If you intend to use it solely on Mac, we suggest formatting it to Apple-based APFS.
- DiskManagement Disenter Error 49221.This error is caused by a glitch in the security updates 2021-003 and 2022-003. After the update, you’ve probably tried to mount a NTFS hard drive in Disk Utility when you got this error. To fix this, reinstall macOS or use a third-party software to mount your NTFS drive.
- DiskManagement Disenter Error 49244. This error often appears when you try to mount your hard drive in Disk Utility while running macOS Catalina. You can use third-party software to mount your drive. If that doesn’t work, you need to format your drive to APFS (again, don’t forget to create a backup!).
- DiskManagement Disenter Error 49218. You might get this error when you remove a hard drive without proper ejection while using macOS Monterey. This error may also be caused by bugs from macOS Monterey itself.To fix it, (1) execute the sudo pkill -f command in the Terminal app, (2) execute the fsck /dev/disk_user_id/ command in single user mode, and finally (3) execute the mount -f /dev/disk_user_id/ command. Remember to replace “disk_user_id” with your disk’s identifier (diskutil list). To boot into single user mode, follow the first instruction in Method #4. If your drive still fails to work after this fix, you may need to format it.
- DiskManagement Disenter Error 49180. This error occurs when there’s a raw partition on the drive, which can happen if you connect an APFS drive to an old Mac or if something went wrong while you were shrinking your partition. You have two ways to address this error: (1) resize the external hard drive using Terminal or (2) format the hard drive altogether.
What to Do If You’d Lost Data After DiskManagement Disenter Error?
Disk Utility errors always have the potential to cause data loss and there’s no guarantee that your files will remain intact after fixing them. The safest and most efficient way to restore data caused by disk errors is to use data recovery software.
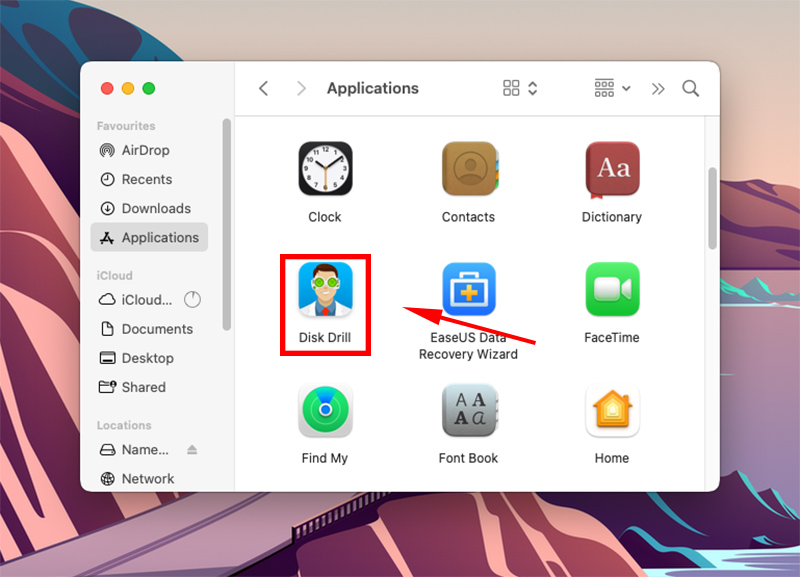
Data recovery software can restore files regardless of format – it will even work if you decided to format your drive due to the errors. For this article, we’ll be using a tool called Disk Drill. It’s easy to use and works with most disk formats, and it can restore data even from non-mounting drives. Here’s how to use it:
Step 1.Download and install Disk Drill for Mac.
Step 2.Launch Disk Drill (Finder > Applications > Disk Drill).
Step 3.Select your drive from the middle pane and click Search for lost data.
Step 4.Wait for the scan to finish, then click Review found items.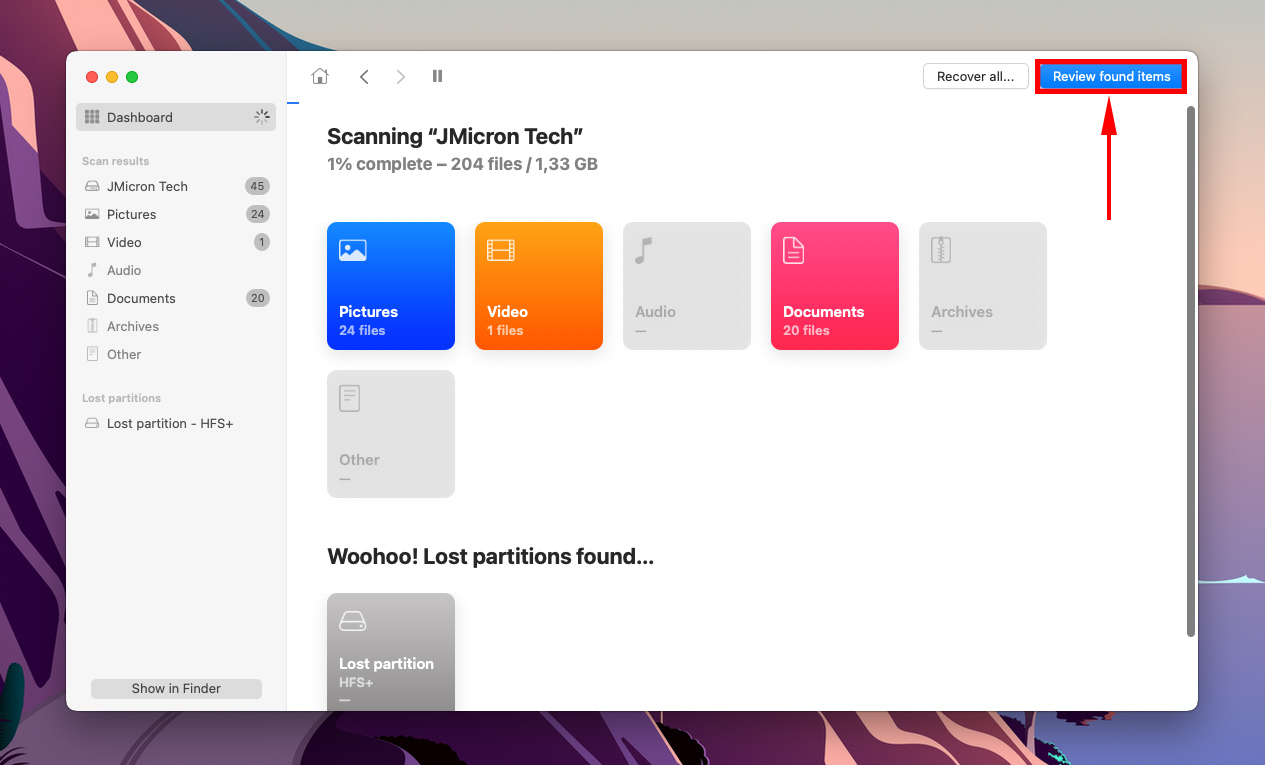
Step 5.Use the search bar to filter the results by name or by file extension, or use the left sidebar. You can also hover your mouse pointer beside any file to enable preview.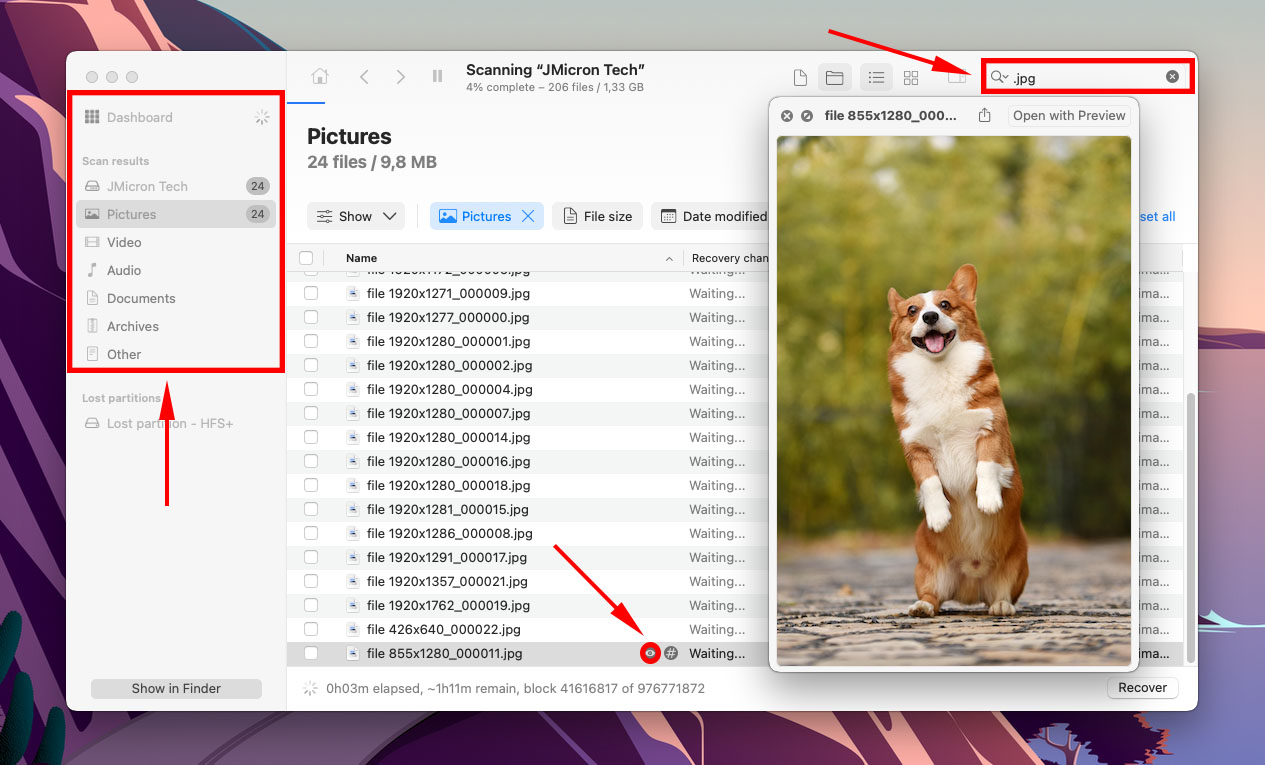
Step 6.Use the boxes in the left-most column to select the files you want to restore, then click Recover.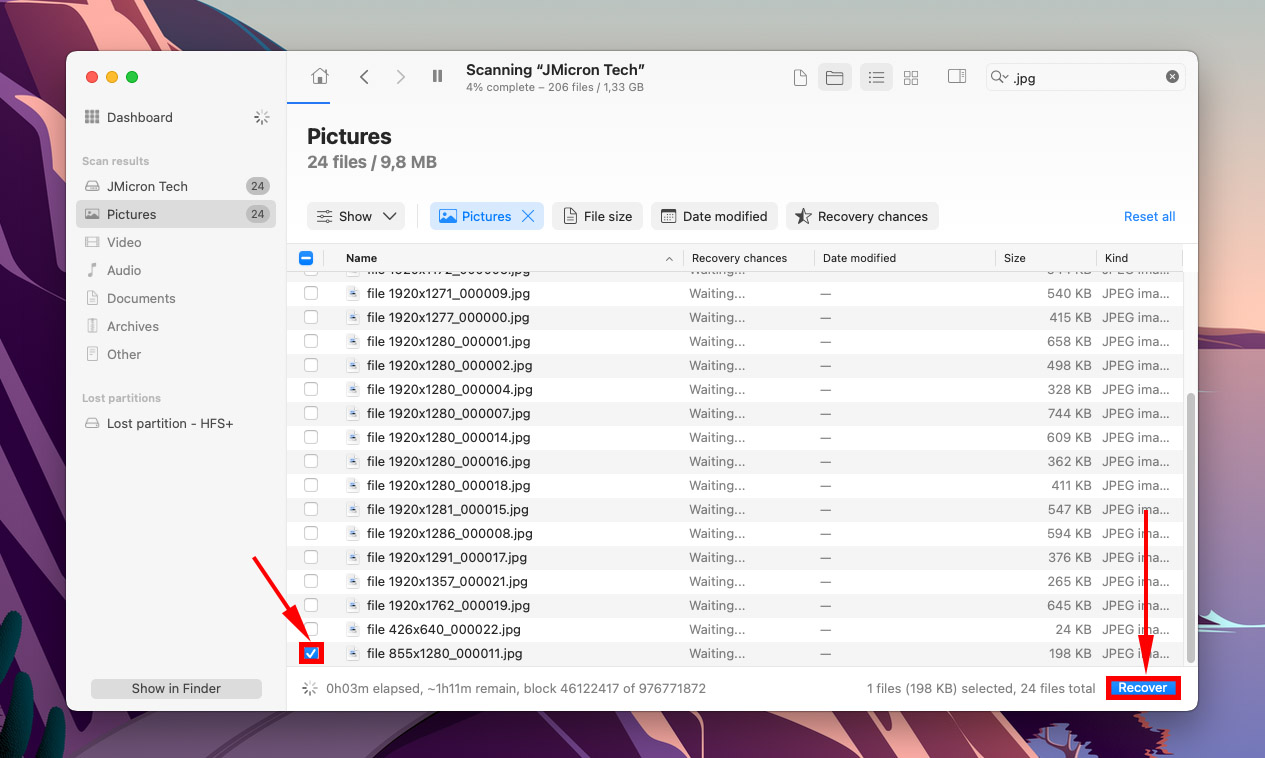
Step 7.Select a location on your non-malfunctioning drive to save the recovered files. Then, click Next.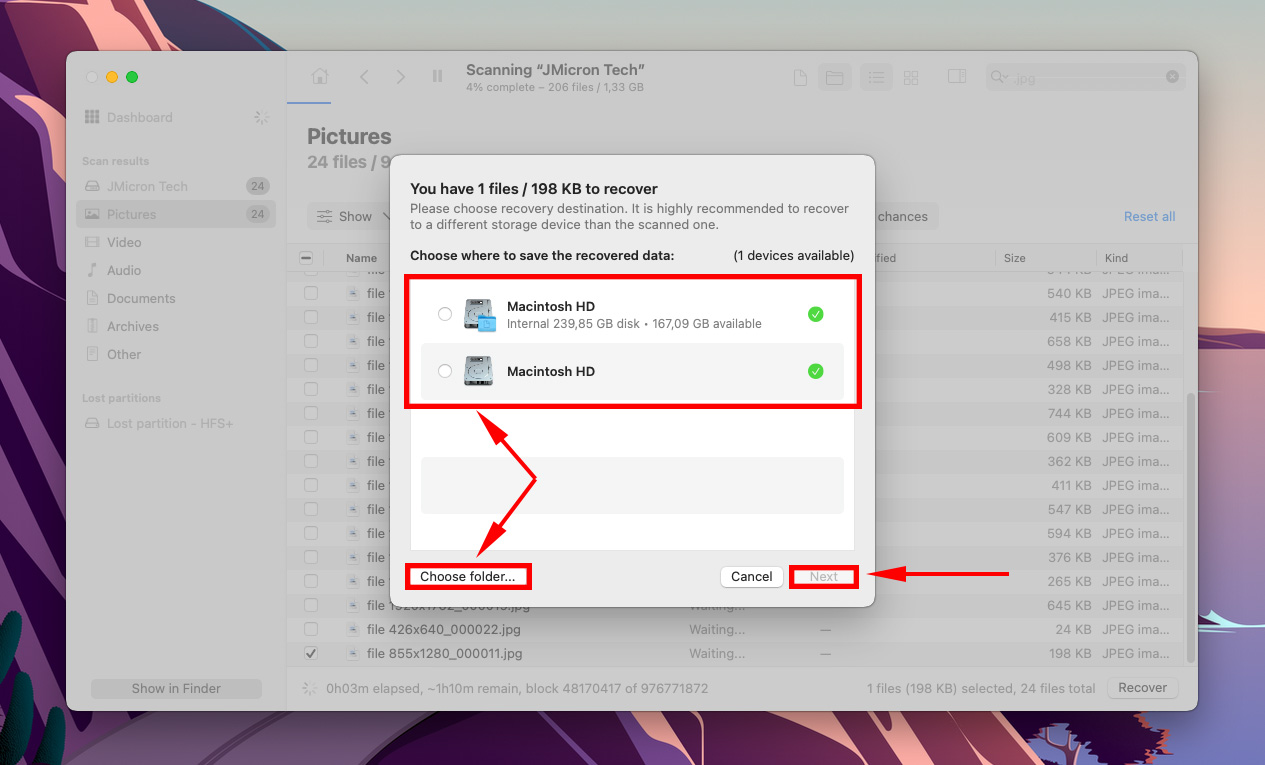
Conclusion
Bluntly, disk utility errors are inevitable. Buggy system updates, improper ejection, power surges, and other factors beyond the user’s control can cause one or multiple disk errors. Not only can these errors cause data loss by themselves, but the process of actually fixing them can also harm your files. The best you can do is to routinely back up your files to avoid the worst consequences of these errors.


