
iPhone photos are huge. A single image can be a few MB depending on your camera settings, the lighting conditions, and other parameters. That means that the resulting output is super high-quality, even if you expand it on a computer.
However, they quickly eat up your storage space. They can also be difficult to send or upload through mail, messengers, etc. due to their size. In this article, we’ll show you how to compress photos on your iPhone so they take up less space and are easier to manage.
Table of Contents
When You Need to Reduce the Size of the Photo
There are many good reasons to compress photos, especially since it usually doesn’t result in the loss of quality. Not only can photo compression improve your device experience, it can also help you work with images faster (e.g. sharing them with colleagues).
Below are common scenarios where photo compression is especially useful. Some of them aren’t that obvious, but they are actually relevant to many day-to-day tasks we use our devices for.
- Printing: If you need to print a lot of photos, raw iPhone camera photos can take a long time to transfer due to their file size. Compression will speed up this process while maintaining image quality.
- Sending emails: There are 3 reasons to compress photos for emails: (1) the email gets sent faster, (2) some mail clients only allow attachments until a certain file size, and (3) large attachments take up more of the limited storage space your mail client provides.
- Free up storage space: The average iPhone photo is just under 3 MB in size, even without using camera features like HDR Mode and Live Photos. If you use these features and/or you don’t have a habit of purging your library regularly, you’ll end up with full storage quickly
- Upload to a website: If you want to display photos on a website, compression is almost necessary. Large images take much longer to load online and can greatly decrease page load speed.
- Faster image transfer: Transferring images via all mediums (Airdrop, bluetooth, etc.) is way faster if they are compressed.
- Manage storage limits for iCloud and other apps: Cloud storage services like Google Drive and iCloud have limited space (unless you pay up). Compressing the photos you store will keep you from reaching the storage limit much longer.
- Saves mobile data: If you need to transfer or upload your photos using mobile data, compressed photos will consume much less of it.
Does the iPhone Compress Photos?
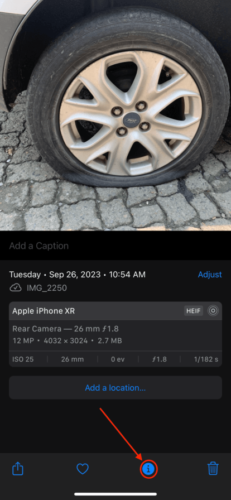
By default, the iPhone compresses photos taken by the camera. It does so by using the HEIF (High Efficiency Image File) format, which takes up 2 to 5 times less storage space than the JPEG format without a noticeable loss of quality.
You can check any photo’s format easily in the Photos app. Simply open any photo and tap the i button.
If you want to, you can modify these settings and save photos as JPEG instead (e.g. for cases of compatibility).
To check or modify your iPhone’s default format for photos:
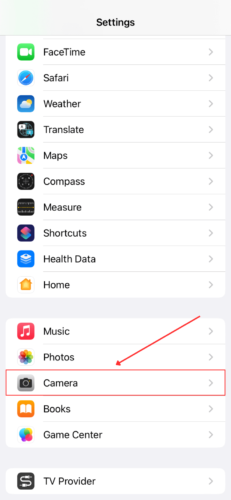
Step 1. Open the Settings app. Scroll down the page and tap Camera.
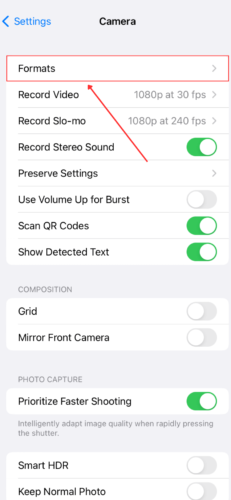
Step 2. Tap Formats.
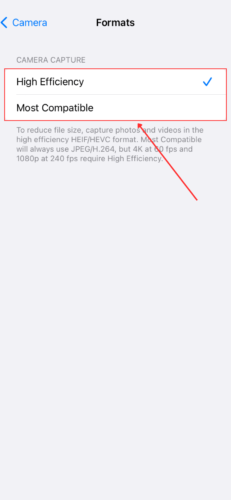
Step 3. Choose between High Efficiency (HEIF) or Most Compatible (JPEG).
How to Compress Photos on an iPhone
There are many ways to compress photos on the iPhone, depending on what you need them for and how much control you want over the reduction. The methods below cover all common scenarios where you’d need compression and they use all the tools and workarounds the iPhone has to offer.
Method 1: Optimize iPhone Storage Function
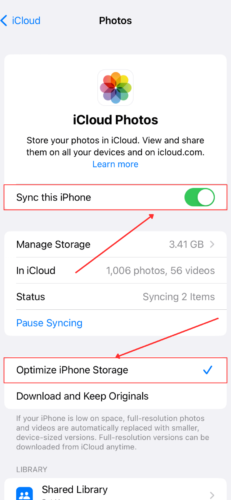
The Optimize iPhone Storage function is a game-changer for your storage space, without requiring you to modify any photos. With this setting enabled, your iPhone only keeps lower-quality copies of your photos on the device, which are much smaller in file size. The original, high-resolution photos are automatically uploaded to iCloud for safekeeping.
To use this function, you first have to enable iCloud Photos and iCloud synchronization. We’ll demonstrate how to set it up in the guide below.
To enable Optimize iPhone Storage on your iPhone:
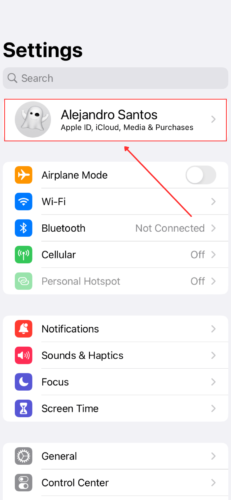
Step 1. Open the Settings app. Then, tap your Apple ID.
Step 2. Tap iCloud.
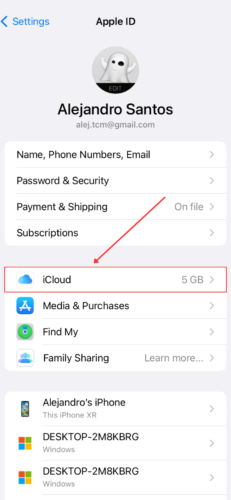
Step 3. Tap Photos.

Step 4. Enable Sync this iPhone and select Optimize iPhone Storage.
Method 2: Using Mail Client or Messengers
Mail clients and messenger apps (like WhatsApp, etc.) automatically compress and/or resize photos or at least offer such options when sending photos. By sending photos to yourself via mail and messenger apps, you can automatically compress multiple images quickly without much work.
For example, Apple’s Mail app allows you to resize photo attachments right before sending emails. We’ll demonstrate how it works:
To compress your photo for email attachment:
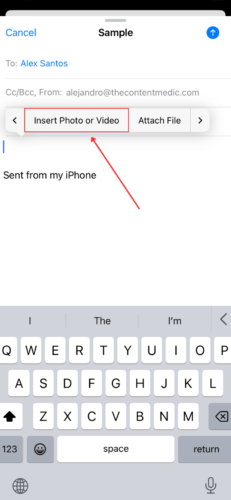
Step 1. Open the Mail app and create a new message. In the email body’s field, tap and hold on the blank space until a menu appears. Then, tap the right arrow twice and tap Insert Photo or Video.
Step 2. Choose the photo you want to email and tap it to insert it into the email.
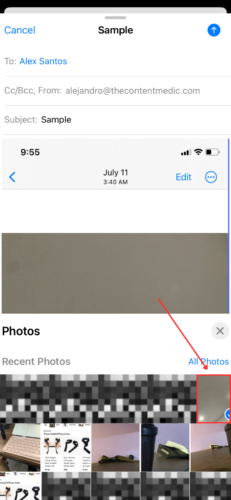
Step 3. Enter the recipient’s email address and a subject. Then, tap the send button.
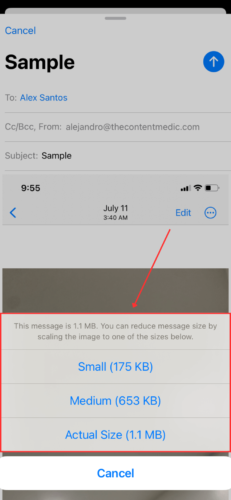
Step 4. Select the size of the photo you want to send.
Method 3: Take a Screenshot of the Photo
Taking a screenshot of the photo is another easy way to quickly compress images without manually modifying them. Screenshots are usually much smaller in size compared to camera photos on the iPhone because the camera uses loads of image processing technology to increase the quality of its output.
Camera photos are also higher in resolution and capture details that screenshots don’t, especially when you use features like HDR Mode.
To take a screenshot of your photo, use one of these button combinations (quickly press and release them at the same time):
- If your iPhone has a Home button Home button + Lock button
- If your iPhone has NO Home button Lock button + Volume Up button
Method 4: Online Compressors
If you’re willing to use browser apps to compress your iPhone photos, you have a lot of options. Below, we’ve compiled a list of 3 of our favorite online photo compressors to get you started. Using these tools, you can compress iPhone images online – usually for free (all of our recommendations are free apps).
- TinyPNG A straightforward web app that only offers a compression tool. All you have to do is drag and drop your photos into the browser and click 2 buttons to compress the pictures on your iPhone. We use this one a lot. Only supports WebP, PNG, and JPEG. However, uploading photos directly from your iPhone (using a mobile browser like Safari) automatically converts HEIF/HEIC photos to JPEG for compression and output.
- iLoveIMG An all-in-one suite of image tools where you can compress, resize, and perform other modifications to your photos. The interface is simple and easy to understand, even when modifying photos in bulk. Supports JPG, PNG, SVG, and GIF files. Similar to TinyPNG, direct upload from your iPhone automatically converts HEIF/HEIC photos to JPEG.
- XConvert Online HEIC Compressor An intelligent HEIC/HEIF compressor. Compress the images on your iPhone and set your own percentages for photo file size and quality reduction and/or specify your photos’ exact output size. Its web interface is simple but effective. It’s the only web app on this list that can compress raw photos on your computer.
Method 5: Photo Compressor Apps
The App Store has a wide selection of photo compressor apps for the iPhone. Many of them can not only compress photo sizes on your iPhone, but some of them allow you to modify image dimensions and even compress or resize videos. They can work directly on your device and usually have direct access to your Photos app and iCloud.
- Compress Photos & Pictures One of the best apps for photo compression on the iPhone and iPad. Compress individual images or multiple photos in bulk while seeing in real-time how much storage space is being freed up. It even compiles all compressed photos in an album for you. Super simple interface and you can bulk compress up to 3 photos at once for free.
- Photo Compress – Shrink Pics A popular photo compression app that allows you to compress individual or multiple photos with your own custom parameters. It only works with JPEG but you can conveniently convert HEIC/HEIF photos from within the app. You can pay to remove apps and access advanced features.
- Resize: Photo & Video Edit.or Expensive but high-quality app with a beautiful interface and lots of features. Compress and resize photos and videos without sacrificing quality; crop and convert images. You can even add custom canvases to your photos for social media.
Pro Tip: Crop Your Photos To Further Reduce File Size
The smaller a photo’s dimensions are, the smaller its size compared to the original. By cropping out unnecessary parts of your photos, you can reduce their file size further.
Using the Photos app, you can crop your photos freehand or by using one of the various pre-made sizing settings.
To crop your photos using the Photos app:
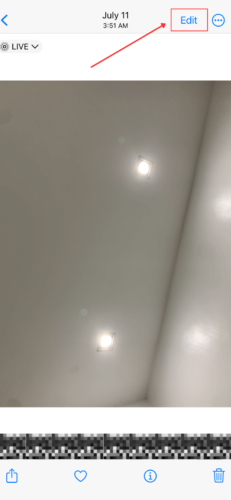
Step 1. Open the Photos app and open the photo you want to resize. Then, tap the Edit button in the top-right corner of the screen.
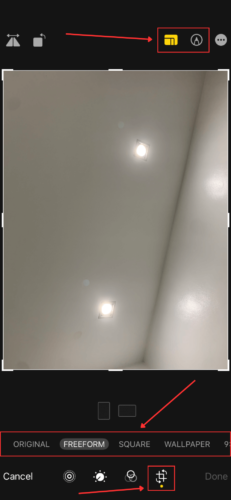
Step 2. Tap the crop button at the bottom of the screen and tap the dimensions button at the top-right corner of the screen (beside the pencil icon). You can now choose one of the preexisting dimensions at the bottom or manually drag the corners of the cropping tool inward until you’re satisfied with the output. Then, tap Done.
Conclusion
Understanding iPhone photo compression is useful knowledge. Not only can you free up a lot of storage space by reducing images that are normally huge in size, but you can also send emails and messages with attachments much faster. Even just using iCloud for your Photos (with the Optimize iPhone Storage setting enabled) can make a huge difference.
Just make sure to review your library for the original copies of the compressed photos and transfer or delete them.
FAQ
- Resize your photo by using the Print options (Photos app > your photo > Share > Print)
- Resize your photo by sending it in an email with the Mail app (create new email > Insert photo > tap send > select size)
- Send your photo to yourself using a messenger app, which automatically compresses attachments
- Take a screenshot of your photo – screenshots usually have much smaller file sizes
- Use an online compressor (web app), like TinyPNG
- Use a photo compressor App from the App Store, like Compress Photos & Pictures
- Send photos to yourself via email or messenger, which usually compresses attachments automatically (or lets you compress them on the fly)
- Take a screenshot of your photo for a smaller and lower-quality copy
- Use online compressors (browser apps)
- Use photo compressor apps (App Store)


