
Don’t have permission to delete photos from your iPhone? It’s an annoying but common issue that can, fortunately, be resolved quite easily. However, the exact solution to get rid of this error heavily depends on what caused it in the first place. If you use the wrong solution, you still won’t be able to delete your photos.
To help you, this article covers the common causes of the deletion error as well as the correct way to fix it depending on your diagnosis. Read on!
Table of Contents
Why Do I Not Have Permission to Delete Photos on iPhone?
As we previously mentioned, the correct solution depends on understanding what is causing the “You do not have permission to delete this item” error in the first place. To help you resolve the issue quickly, we created a simple navigation menu below with jump links to the appropriate sections.
| Scenario | Description | Solution |
|---|---|---|
| Your iPhone is experiencing temporary glitches or conflicts. | Software hiccups or unexpected errors may cause permission-related issues in your iPhone. If your iOS is updated and you’re deleting a local photo (not an iCloud photo from another device), this is likely your issue. | Method 1 |
| You’re using an older version of iOS. | If you’re using an older iOS version, it may still have bugs or glitches causing the error, or it may have security vulnerabilities that cause your iPhone to prevent unauthorized access to certain files. | Method 2 |
| iCloud Photo Library is enabled and you’re trying to delete a synced photo. | This is the most common cause of this error among users who enabled iCloud. If your iCloud Photo Library is enabled, you may be prevented from deleting photos that were originally stored on another device and backed up by iCloud. For example, (on your iPhone) you can’t delete an iCloud photo that was backed up from your iPad. This is a preventive measure against accidental deletion by the user. | Method 3 |
How to Delete a Photo that Says I Don’t Have Permission
Depending on what prompted the error on your iPhone specifically, there are 3 repair methods you can choose from. We’ll go through them one by one in the sections below.
Method 1: Reboot Your iPhone
Your iPhone is constantly running multiple processes at once to give you a seamless user experience. However, this leaves more room for conflicts and other temporary issues. Fortunately, you can easily clear all these processes by rebooting your iPhone. We’ll show you how to do it.
To reboot your iPhone:
Step 1. Open the Settings app. Then, scroll down and tap General.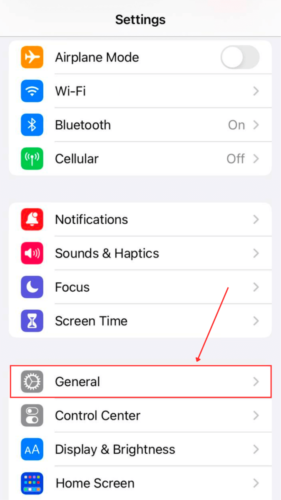
Step 2. Scroll down to the bottom of the menu and tap Shut Down.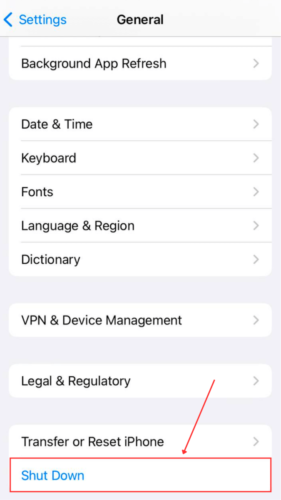
Step 3. Slide the onscreen power button to the right to confirm the shutdown.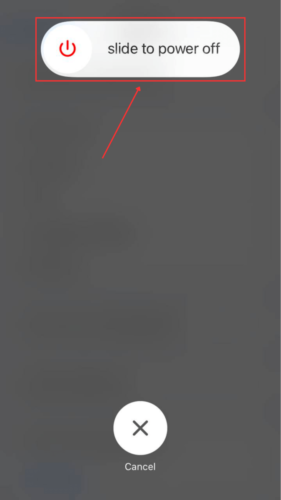
Once your iPhone has fully shut down, turn it back on and try deleting your photos again.
Method 2: Update iOS
Older versions of iOS are far more vulnerable to bugs, glitches, and security issues, which may all cause this error to appear for the user. Newer versions of iOS not only iron out the bugs from all of the previous versions but also improve how the system manages photos and other data. Updating your iOS may allow you to delete photos that couldn’t be removed earlier.
To update iOS on your iPhone:
Step 1. Ensure you have a stable internet connection and open the Settings app. Then, scroll down and Tap General.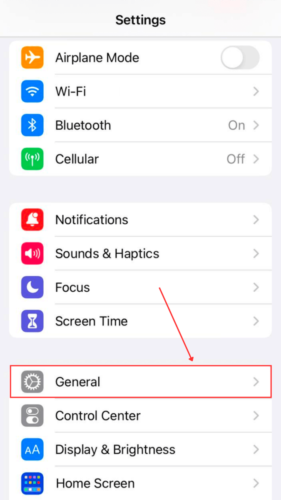
Step 2. Tap Software Update.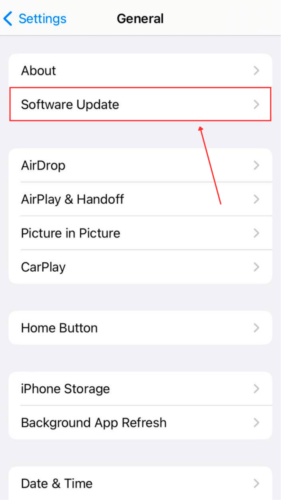
iOS will automatically check if there are any updates available. If it finds an update, tap Install and wait for your iPhone to finish updating (it may restart a few times).
Method 3: Disable iCloud Photo Library
As we mentioned earlier, enabling iCloud Photo Library means that you can’t delete a file on your iPhone that was synced to your device. This is to help users avoid permanently deleting a photo across all their devices (that have iCloud Photo Library enabled).
If you want to delete the photos that iCloud synced to your iPhone, you first have to disable iCloud for your photos. We’ll show you how to do it.
To disable iCloud Photos on your iPhone:
Step 1. Open the Settings app. Then, tap on your name at the top of the page.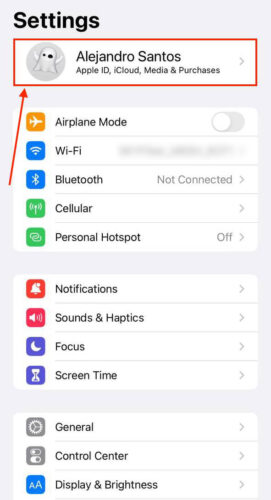
Step 2. Tap iCloud.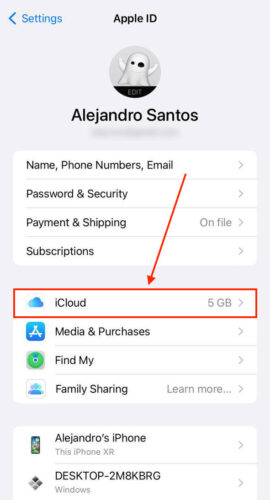
Step 3. Tap Photos.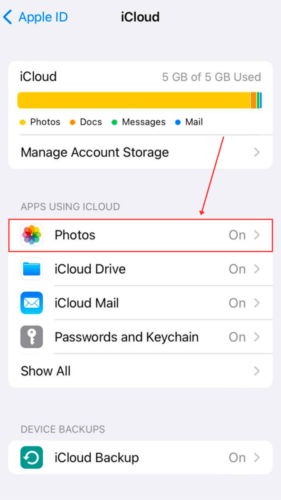
Step 4. Turn Sync this iPhone OFF (the toggle button should be grey).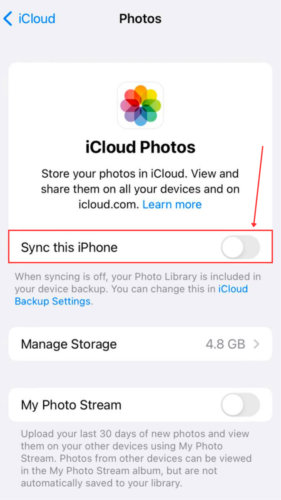
Step 5. Tap EITHER Remove from iPhone if you don’t want copies of your iCloud data on your device or Download Photos & Videos if you want to save them.
Conclusion
In summary, if you don’t have permission to delete a folder or file on your iPhone, it’s usually caused by glitches or bugs or iCloud synchronization. Fortunately, you can easily get rid of this error as long as you use the correct solution for your specific scenario.
Tip: If you’re deleting photos in an attempt to free up more storage space, we suggest using iPhone cleaner apps to bulk delete blurry or duplicate pictures quickly.
FAQ
If you get a permission error when trying to delete photos on your iPad, you can get rid of it and proceed with deletion by using one of these 3 methods:
- Reboot your iPhone
- Update iOS
- Disable iCloud Photo Library
If you don’t want to get permission to delete a file (and resolve the underlying issue), you can force wipe all the data on your iPad by restoring it to factory settings (Settings app > General > Transfer or Reset iPad).


