
Want to know how to delete photos from their iPhone but not iCloud? It’s a good way to clean up your local storage space and secure your iPhone (in case you want to sell it or give it away) without actually losing your data.
There are different methods to achieve this result along with a few non-iCloud solutions if you’re willing to compromise a bit. This article covers them all… And both iPhone users and iPad users can follow along. Read on!
Table of Contents
Does Deleting Photos from iPhone Also Delete Them from iCloud?
If I delete photos from my iPhone, is it deleted from iCloud? The answer is “It depends.” iCloud is a synchronization tool that helps users keep their data consistent across devices (and the cloud). Once you enable the iCloud sync feature, changes to your photo library will be mirrored to the cloud and to your other devices.
Here is what this setting means:
- Sync this iPhone is turned ON for Photos – Your photo library will be uploaded to iCloud and all changes will be reflected. If you delete a photo from your iPhone, it will also be deleted on iCloud.
- Sync this iPhone is turned OFF for Photos – Changes to your photo library do not affect iCloud or your other devices. In this scenario, deleting photos from your iPhone but not iCloud is possible.
How to Delete Photos from iPhone but Not iCloud
So we know that iCloud sync causes changes to your device to be mirrored to the cloud. Now, the goal is to either (1) prevent this synchronization from happening so you can remove photos from your iPhone but not iCloud or (2) store your data in another location so your photos remain secure regardless of your iCloud settings.
We’ll show you 6 different methods of applying these solutions in the sections below.
Method 1: Turn Off iCloud Sync for Photos
The most straightforward way to delete pictures from your iPhone but not iCloud is to disable iCloud sync for your Photos app. Once this setting is disabled, the connection is severed and changes on your iPhone will no longer be synchronized to the cloud.
To turn off iCloud sync on your iPhone and keep your photos in iCloud:
Step 1. Open the Settings app and tap on your Apple ID.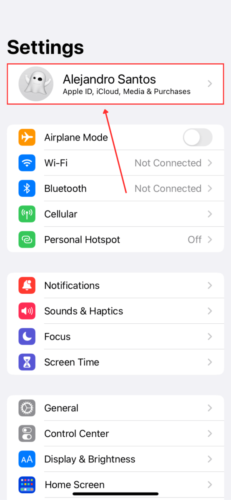
Step 2. Tap iCloud.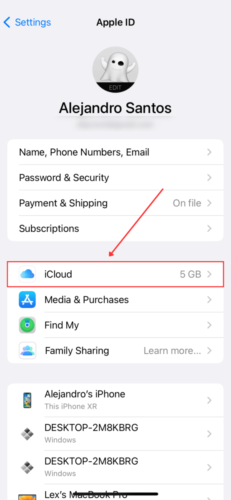
Step 3. Tap Photos.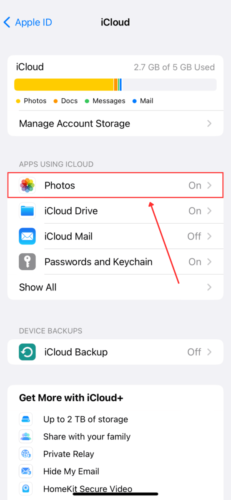
Step 4. Disable the Sync this iPhone setting.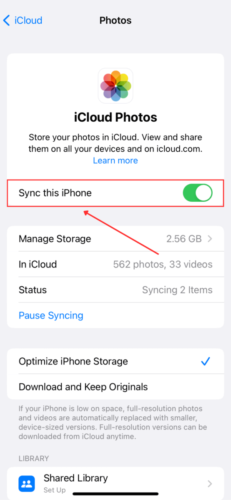
Once iCloud sync is disabled, you can freely delete photos from your library without worrying about affecting your iCloud data in any way.
Method 2: Sign In to Another iCloud Account
Another way to cut the link between your iPhone and your iCloud (thus preventing changes to your device from being reflected in the cloud) is by signing in to a different iCloud account.
When you sign in to a different iCloud account on your iPhone, changes on your device will no longer carry over to your iCloud. It won’t be reflected in the new account either, because the sync feature is tied to the iCloud account associated with your device.
In other words, sign in to a different iCloud account and delete without worry!
To sign in to another account on your iPhone:
Step 1. Open the Settings app and tap on your Apple ID.
Step 2. Scroll down to the bottom of the page and tap Sign Out.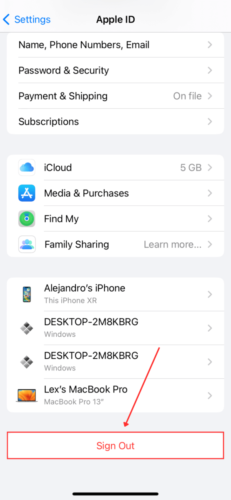
Step 3. Select the data you want to keep on your iPhone. Then, tap Sign Out in the top-right corner of the screen.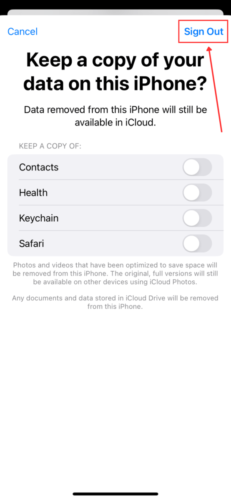
Once you’ve signed out of your iCloud account, you’ll be prompted to sign in again. You should now be able to delete photos from your iPhone without affecting your own iCloud data.
Method 3: Enable Optimize iPhone Storage
The Optimize iPhone Storage feature is a setting that can help you save a lot of storage space by only keeping low-resolution versions of your photos on your device. The original high-resolution copies are then stored in iCloud.
The bonus side effect of this setting is that you can freely delete the low-res images on your iPhone’s Photos app without affecting their original versions in iCloud.
To enable Optimize iPhone Storage on your device:
Step 1. Open the Settings app > Photos.
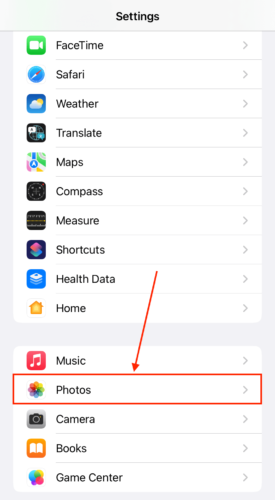
Step 2. Under the ICLOUD section and the iCloud Photos setting, tap Optimize iPhone Storage.
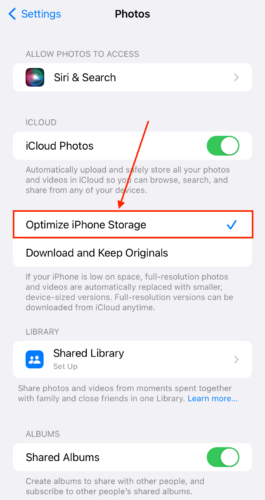
Give your device a few minutes to adjust to this new setting. Then, check if your photos have been uploaded to iCloud.
Method 4: Backup Your Photos to Google Photos
Are you open to using other cloud services? Because Google Photos provides a super useful tool that allows you to import a complete copy of your iCloud photos.
This method will allow you to purge your local photos without being overly cautious. Having a second backup copy of your data is also always a good idea in our book.
To copy your iCloud photos to Google Photos:
Step 1. Login to privacy.apple.com 
Step 2. Tap Request to transfer a copy of your data.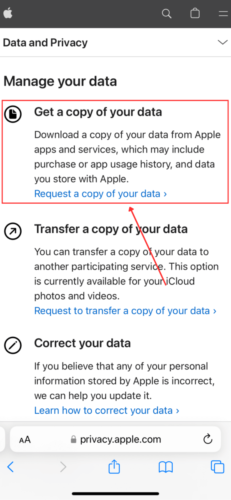
Step 3. Scroll down to the bottom of the page and tap on the Select Destination dropdown menu.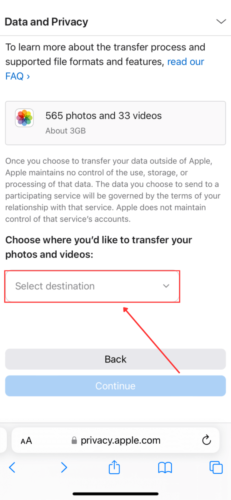
Step 4. Select Google Photos and choose the data you want to transfer. Then, tap Continue.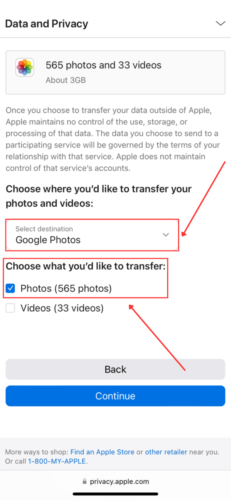
Step 5. Read the notice, then scroll down and tap Continue.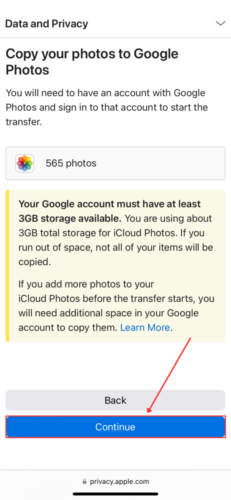
You will then be prompted to login to your Google account. Once you’ve signed in, your photos will appear in Google Photos in 3-7 days. After which, you can safely delete your photos from your iPhone without deleting them from iCloud.
Method 5: Copy Photos to an External Device Using Mac
If you don’t want to use another cloud service, why not copy your iCloud photos to an external drive? This way, you have an offline copy of your data you can access and/or modify anytime without worrying about network-related issues like login and synchronization.
Fortunately, it’s super easy to copy your iCloud photos to your Mac or to an external drive. You don’t even need to connect your iPhone to your computer with a cable. You just need the Mac Photos app and a stable network.
To copy iCloud photos to an external drive using Mac:
Step 1. On your Mac, open the Photos app (Finder > Applications).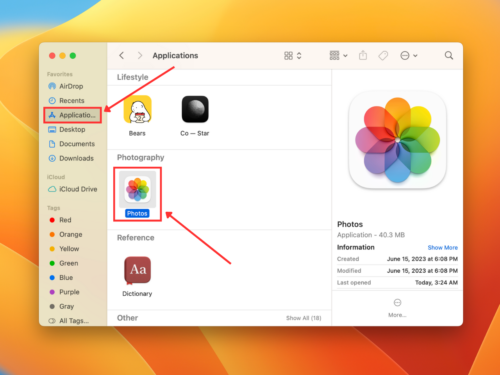
Step 2. Open your Library or any album. Then, click on any photo to select it. Alternatively, hit CMD + click to select multiple or CMD + A to select all. Then, drag your selection to any location on your Mac (you can either copy them directly to your external drive’s directory or copy them to your Mac’s local disk first).
Method 6: Use Third-Party Apps
Google Photos is not the only cloud-based backup/storage service. There are quite a few, in fact. To help you, we came up with 3 recommendations that satisfied the following simple criteria:
- You don’t have to manually upload your photos
- It offers at least limited free storage space so you can try it out without buying
Here are our app recommendations:
- Dropbox Provides 2 GB of free storage space. It’s not a lot but Dropbox is well-known and commonly used in professional spaces. Files saved in Dropbox can also be seamlessly accessed and used in Dropbox Paper.
- Microsoft OneDrive Provides 5 GB of free storage space. Like Dropbox, OneDrive is well-known and used by professionals. It’s a great option for users of Microsoft Office.
- Terabox: 1024GB Cloud Storage TeraBox is not as well-known as Dropbox and OneDrive. The free version also has a lot of ads… But you truly get 1,024 GB (1 TB) of free storage space.
How to Delete Photos from iPad but not iCloud
The concept of iCloud synchronization is the same on the iPad as with the iPhone. With that in mind, the methods to delete iPad photos without affecting iCloud data are:
- Prevent changes on your local device from being synced to your iCloud by (1) turning off iCloud Sync, (2) signing in to another iCloud account on your device, or (3) enabling Optimize iPad Storage.
- Back up your photos to a non-iCloud service or a local storage location. Consider backing up your photos to Google Photos (or a third-party backup app) or saving your pictures to an external drive.
Conclusion
iCloud synchronization can be tricky. It’s super useful for keeping your photos organized across all your devices and ensuring that you have a backup of your data. But this safety net can actually be the cause of data loss on your iCloud if you don’t disable it before deletion.
Just remember these 2 simple rules if you want to delete photos on your iPhone without deleting them from iCloud: (1) disable sync before deleting photos and/or (2) back up your photos elsewhere before deleting them on your iPhone (or iPad).
FAQ
- Turn off iCloud sync. Then, manually save photos to iCloud and delete them from your iPhone.
- Enable iCloud sync for your photos and enable the Optimize iPhone Storage setting (Settings app > Photos). You can then delete the low-res copies of your photos on your iPhone without affecting their original copies in iCloud.


