
Welcome to our macOS 14 Sonoma review. Named after the historic and charming city of Sonoma in northern California, known for its vibrant art galleries and winemaking tradition, macOS Sonoma promises to improve how you work and play on your Mac, but it certainly won’t overwhelm you with any major changes. Instead, it introduces many subtle but exciting updates that enhance your Mac experience in meaningful ways.
Table of Contents
macOS 14 Sonoma: Release Date and Compatibility
First introduced to the public at the WWDC 2023, macOS 14 Sonoma has transitioned from its public beta phase, first available on July 12th, 2023, to its official release on September 26th, 2023. While developers have had early access to the system since June 5th, the broader public can now experience all that Sonoma has to offer.
As has been Apple’s custom since 2011, the new macOS update is available as a free upgrade for anyone with a compatible Mac. Here’s a list of all macOS Sonoma-supported devices:
- iMac (2019 or later)
- iMac Pro
- MacBook Air (2018 or later)
- MacBook Pro (2018 or later)
- Mac Pro (2019 or later)
- Mac Studio
- Mac mini (2018 or later)
Those of you who closely follow Apple’s product releases might have already noticed that certain models that are supported by Sonoma’s predecessor, Ventura, are missing, namely:
- 2017 MacBook Pro
- 2017 iMac
- 2017 MacBook (12-Inch)
This list of unsupported models, all from 2017, shouldn’t come as a surprise. It’s a strategic move by Apple as part of their gradual transition from Intel processors and the x86 architecture to their in-house Apple Silicon processors and the ARM architecture and chips like the original M1 or the latest M2 Ultra.
This transition, announced in 2020, marks a monumental shift in Apple’s technological roadmap. By manufacturing their own processors, Apple aims for greater control over hardware and software integration, boosting performance and power efficiency.
How I Switched from Ventura to Sonoma
Making the switch to macOS 14 Sonoma from its predecessor, Ventura, is straightforward. But before you begin, you should always back up your system drive so that you can recover your data, applications, and settings if anything goes wrong.
Backing Up Existing macOS installation
Since my system drive wasn’t encrypted, I chose to use Disk Drill to create a byte-to-byte backup. My decision was heavily influenced by Disk Drill’s unique combination of user-friendly interface, robust capabilities, and efficient data recovery algorithms. Particularly relevant was Disk Drill’s ability to restore all “Existing” files for free, even those that would be very difficult to access otherwise due to various potential logical issues.
Here are the steps to create a byte-to-byte backup using Disk Drill::
- Download, install, and open Disk Drill.
- Select Byte-to-byte Backup from the Extra Tools menu on the left.
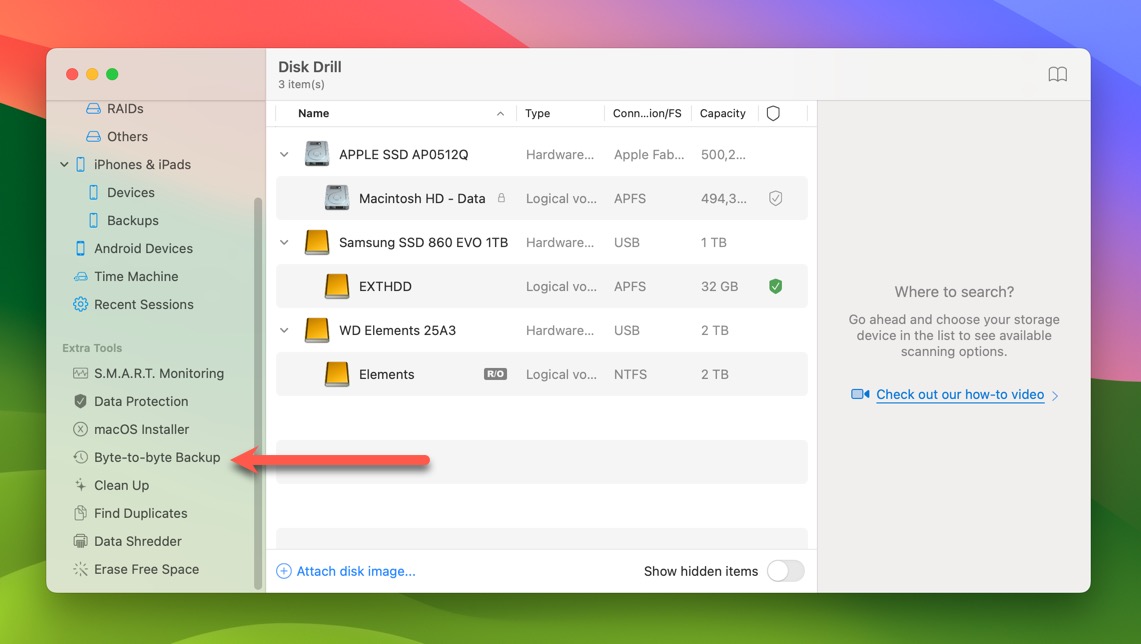
- Choose your main system disk (it will likely be called “Apple SSD”) and hit the Create backup button.
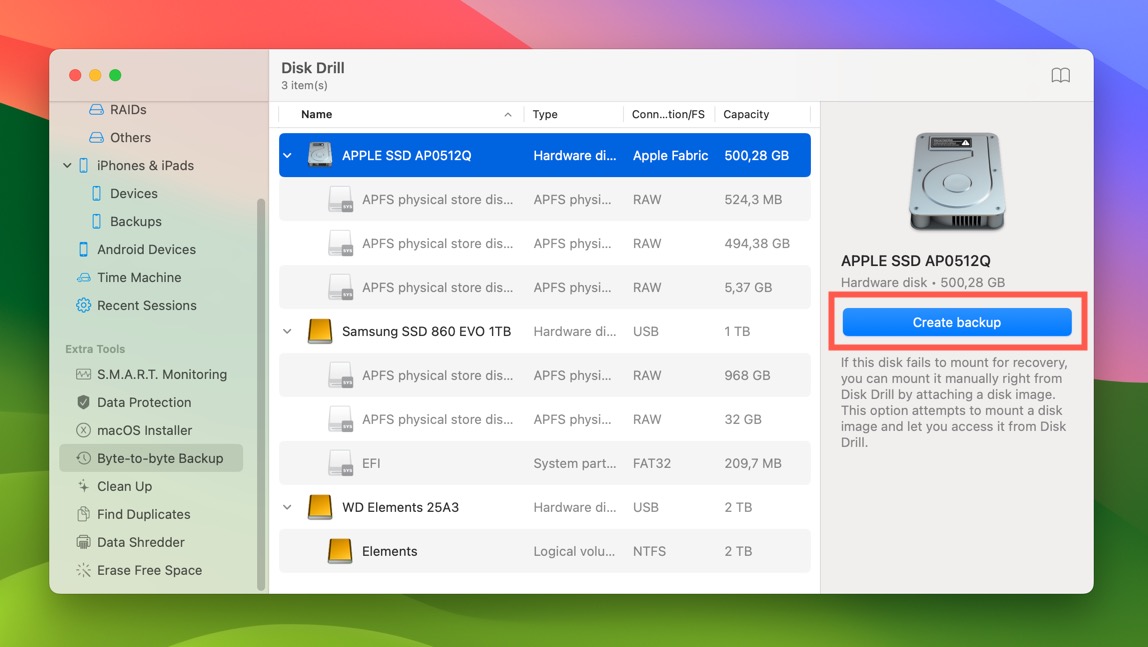
- Assign a name to your backup image and pick a location to store it. You need to store the backup image on an external drive.
- Hang tight until your backup image is created.
Those with an encrypted system drive can use Apple’s Time Machine instead:
- Connect an external backup drive.
- Launch the System Settings app.
- Navigate to General > Time Machine.
- Click on Add Backup Disk.
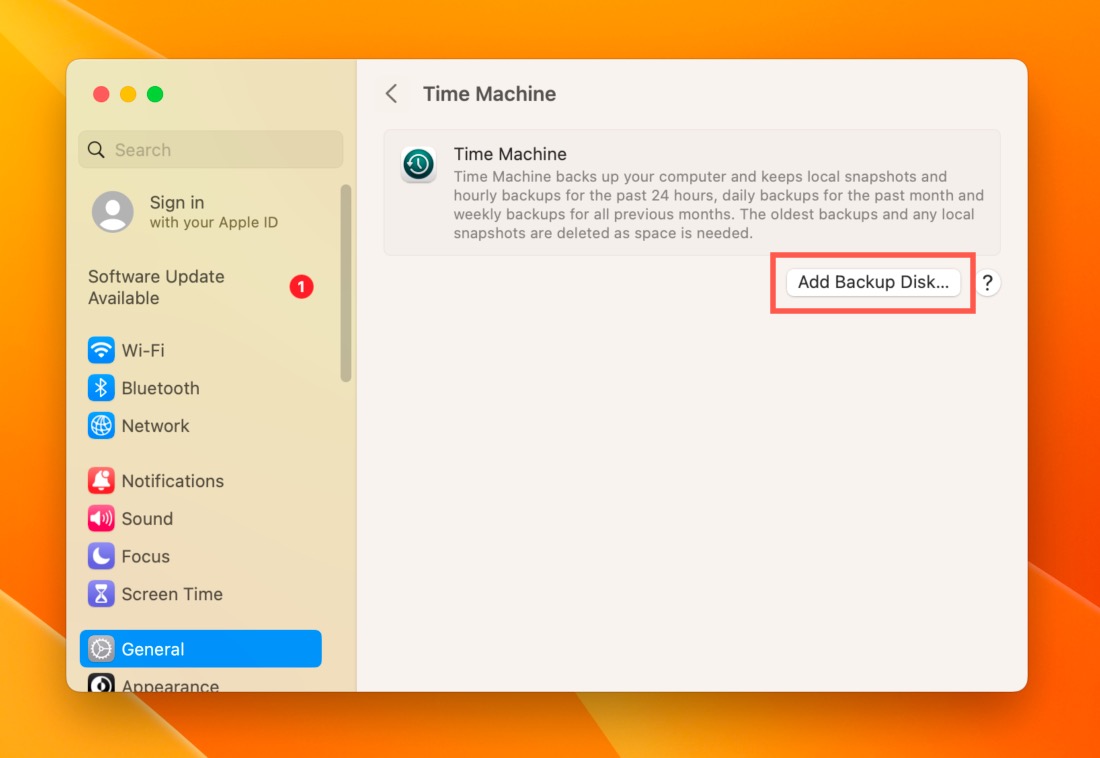
- Pick the disk you want to use for backups and wait until your Mac is fully backed up.
Downloading and Installing macOS Sonoma
Now it’s time to get your hands on macOS Sonoma. Since macOS 14 Sonoma has been officially released, you don’t need to enroll in Apple’s Beta Software Program to download and install it. Instead, you can simply install it from System Settings:
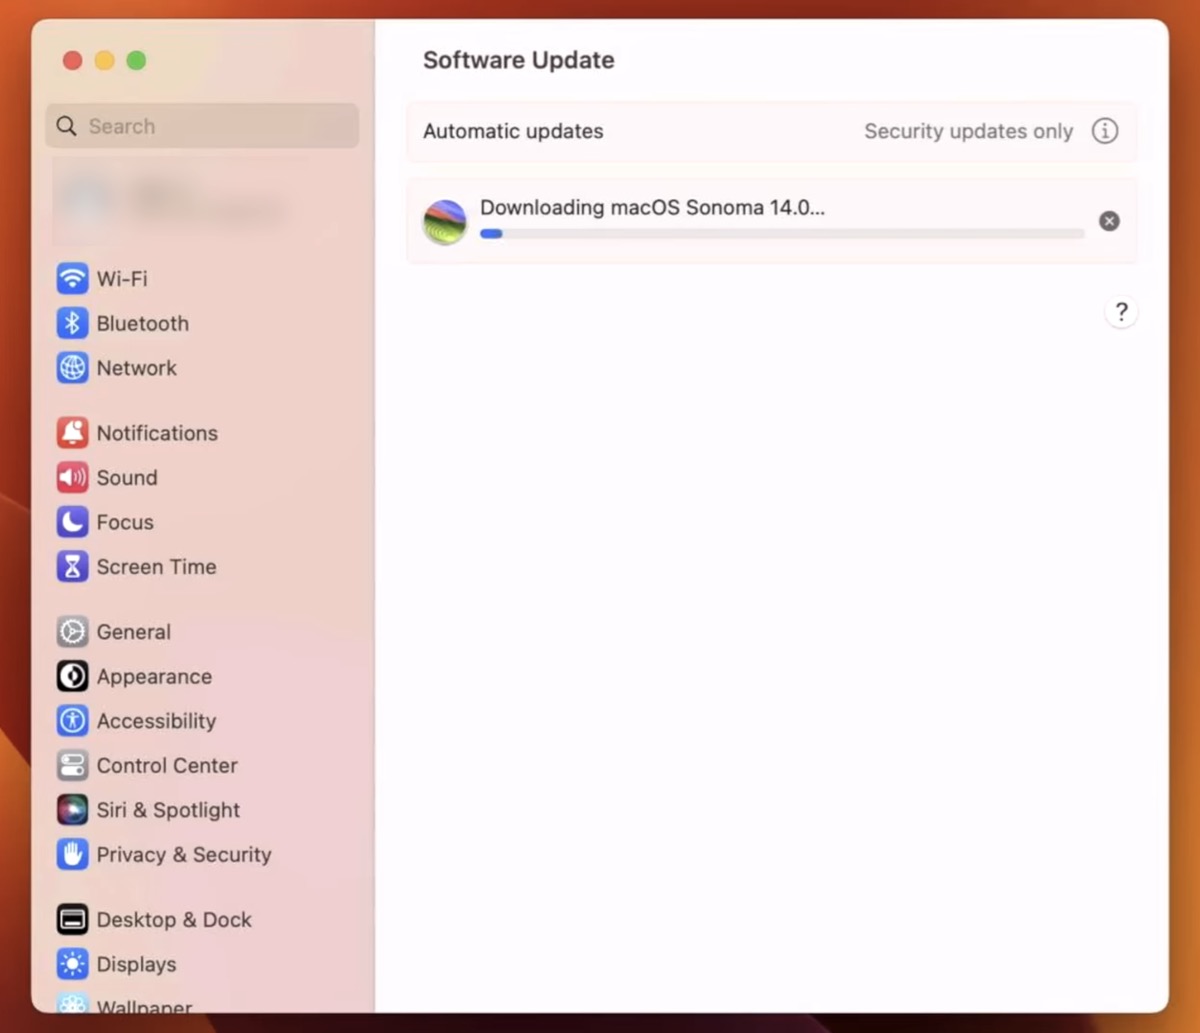
- Open System Settings and click the Software Update Available button at the top. If you don’t see the button, then you need to navigate to General > Software Updates.
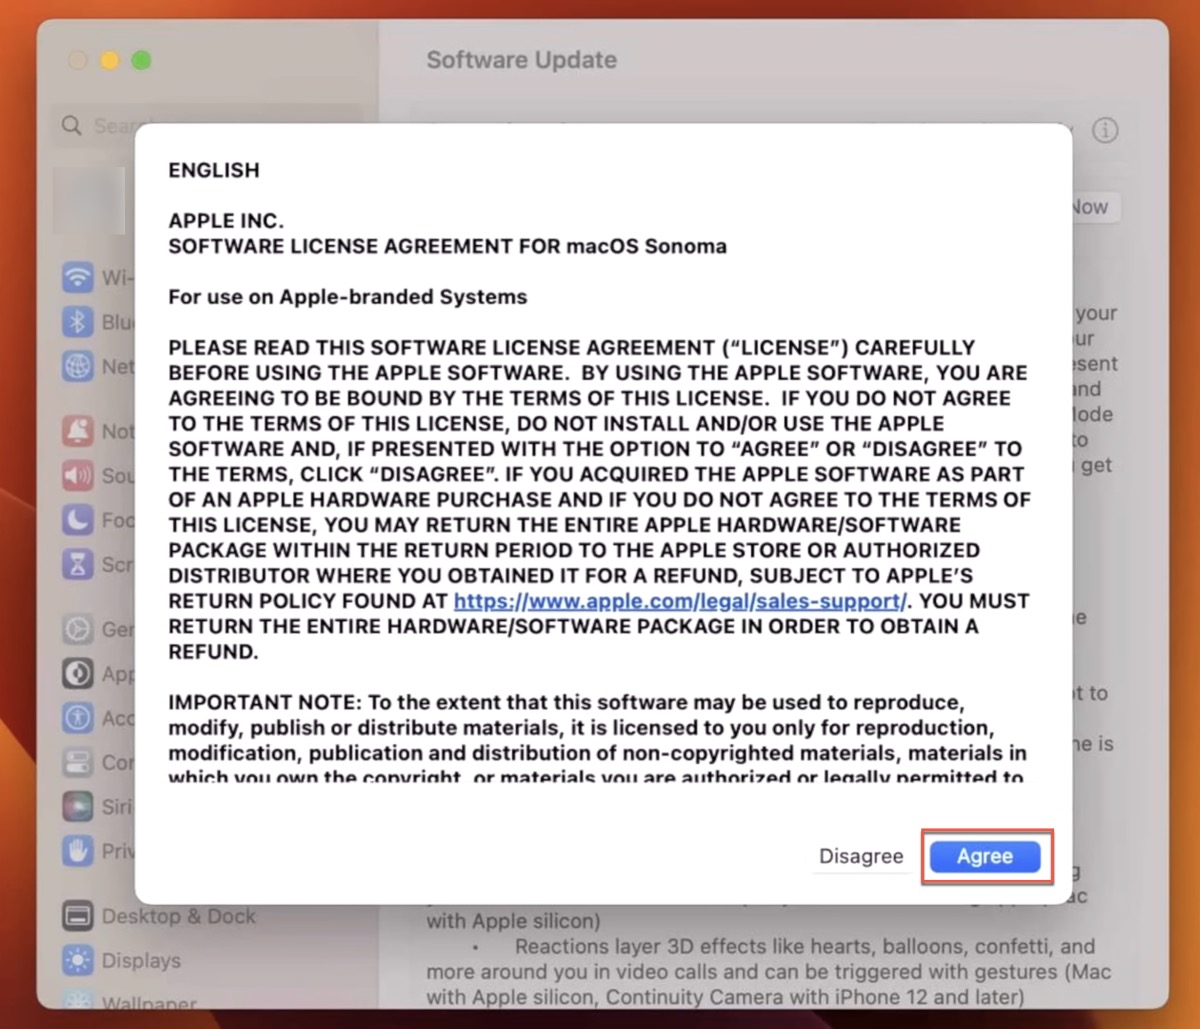
- Look for the macOS Sonoma 14.0 update and click the Upgrade Now button next to it.
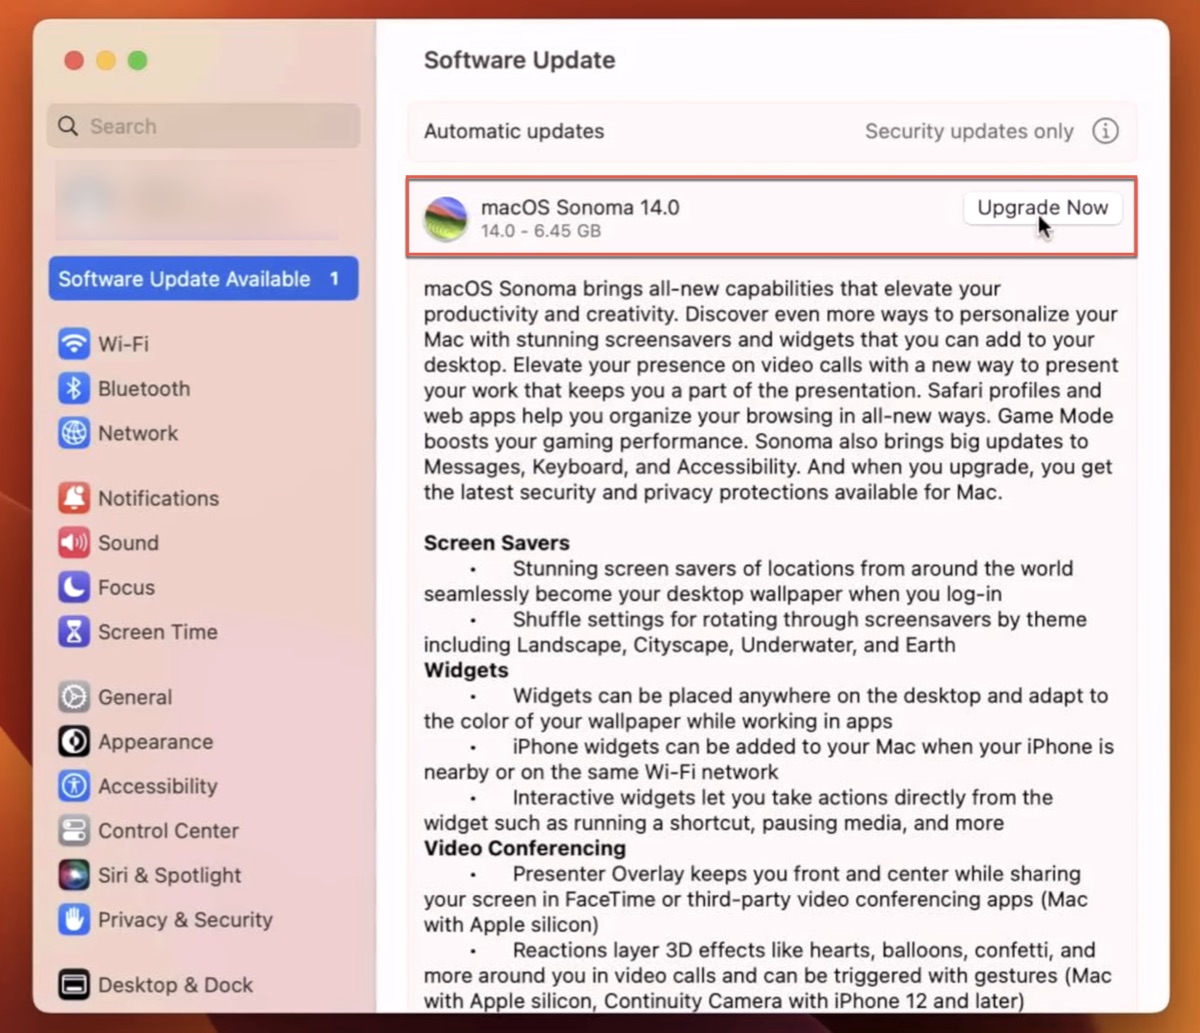
- Agree to Apple’s license agreement for macOS Sonoma.
- Enter your macOS admin password and click OK.
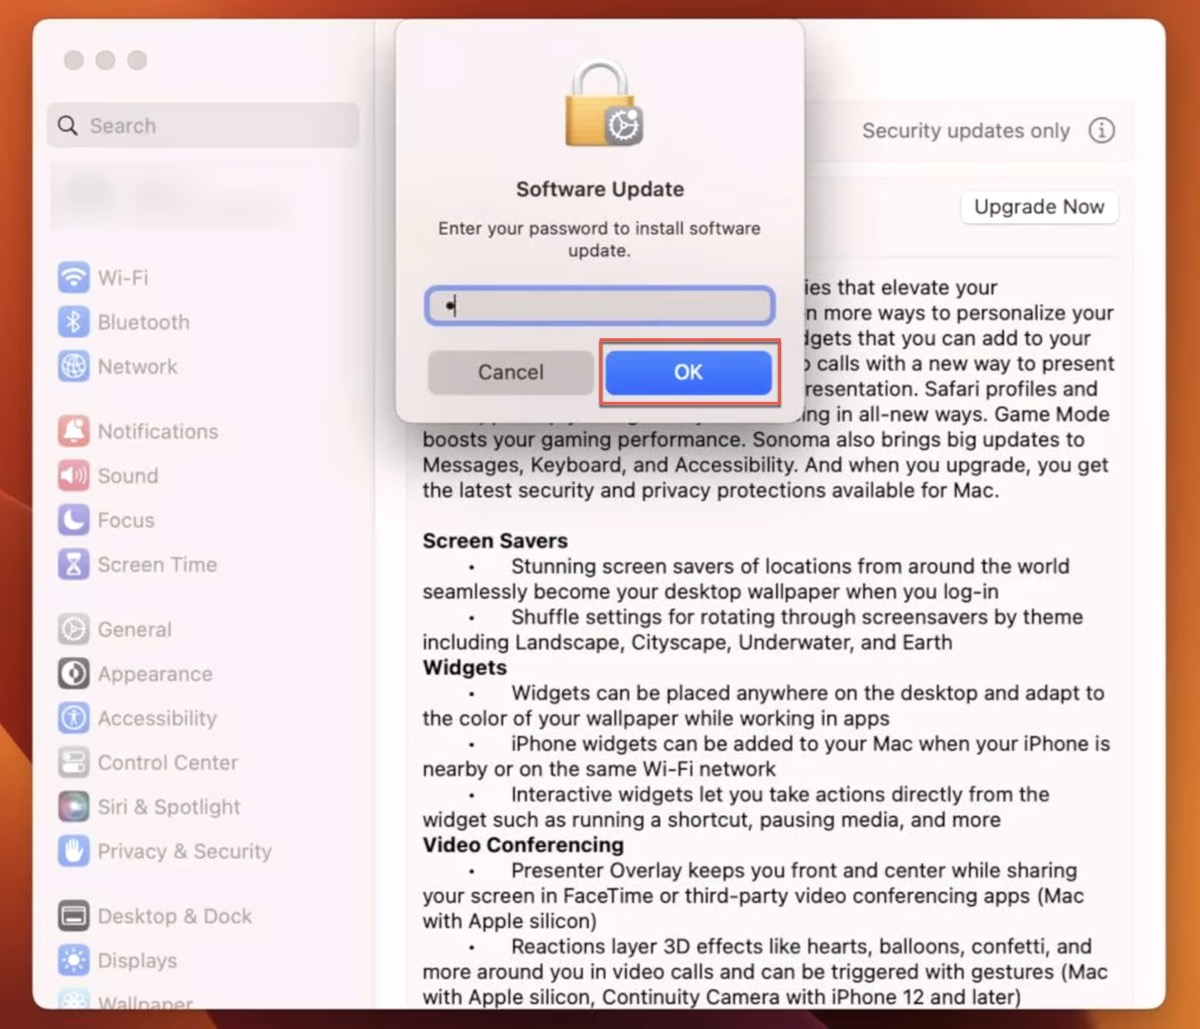
- Wait for the upgrade to install and be prepared to restart your Mac to finish its installation.
In the next section, I’ll dig deeper into these features and see what makes Sonoma subtly exciting. Stay tuned!
Overview of macOS Sonoma Features
In keeping with Apple’s tradition of refining the user experience, macOS 14 Sonoma adds a host of subtle yet impactful enhancements to your Mac. Many of these improvements are not immediately obvious (this release is certainly no major redesign like Big Sur), but they do enrich your day-to-day Mac experience quite significantly.
Major New Features and Improvements
Let’s start with the biggest changes introduced in macOS Sonoma, the first of which you’ll encounter right when you’re asked to log in.
New Lock Screen

The new lock screen greets you as soon as you boot up your Mac after the macOS Sonoma download. At first glance, it might seem familiar, but a closer look reveals several tweaks.
The password entry field has been repositioned to the bottom of the screen, and the space near the top is now occupied by a digital clock. Near the password entry field is a user carousel, whose purpose is to display the most recent user with a prominently placed avatar. Other users are indicated by smaller avatars.
If you don’t share your Mac with anyone else, you probably won’t appreciate the new lock screen as much as someone who does, but it’s still nice that Apple isn’t overlooking this important part of the user experience.
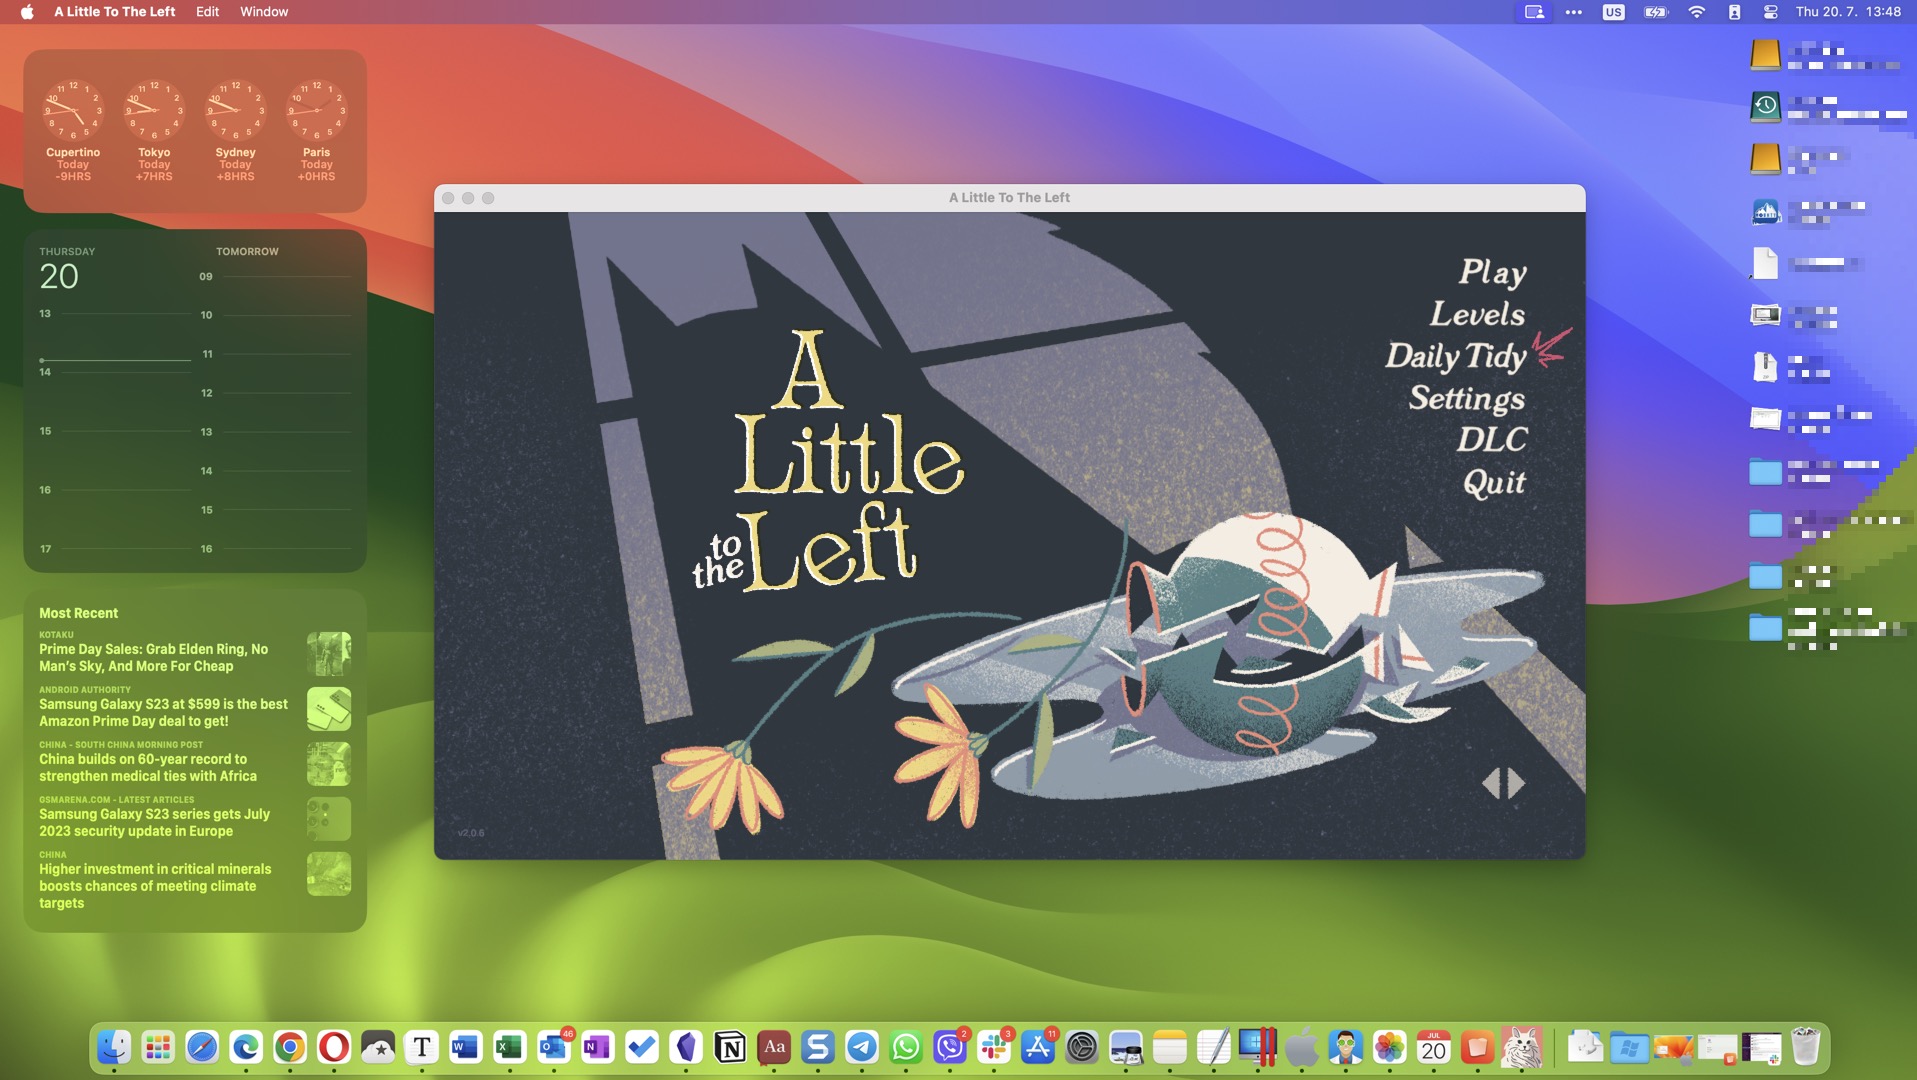
Desktop Widgets
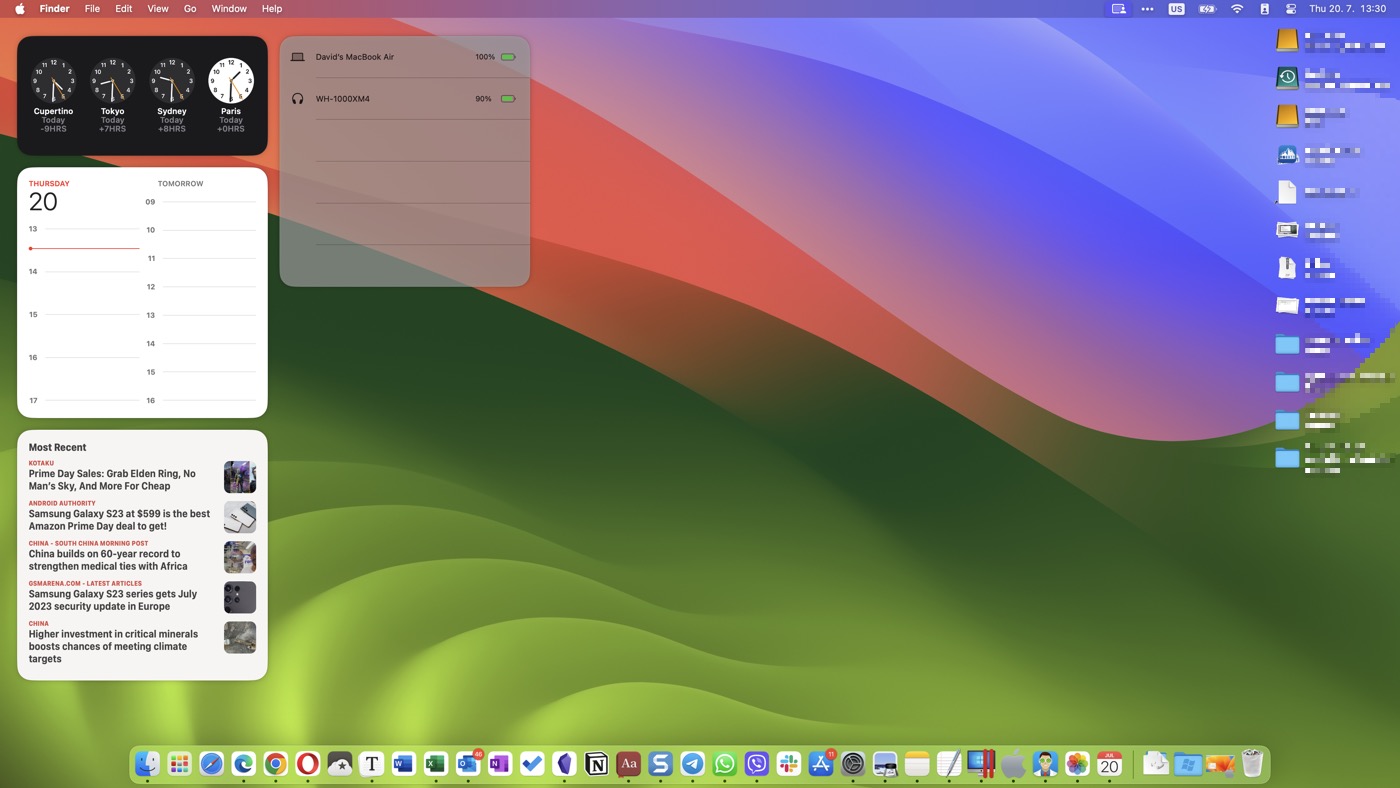
In macOS 14 Sonoma, you can finally place widgets on your desktop to create a more dynamic workspace. Even better, these widgets are now more than just information displays—they’re interactive.
For example, a Home app widget can be used to directly control your smart home features, like turning lights on or off, without the need to open the parent application. This effectively reduces the number of steps you have to take to perform certain actions, simplifying your user experience and streamlining your workflow.
To place widgets on your desktop, you need to:
- Right-click an empty desktop space.
- Select the Edit Widgets options.
- Pick an available widget and drag it to your desktop. Once placed on your desktop, you can click and drag the widget to position it anywhere you want.
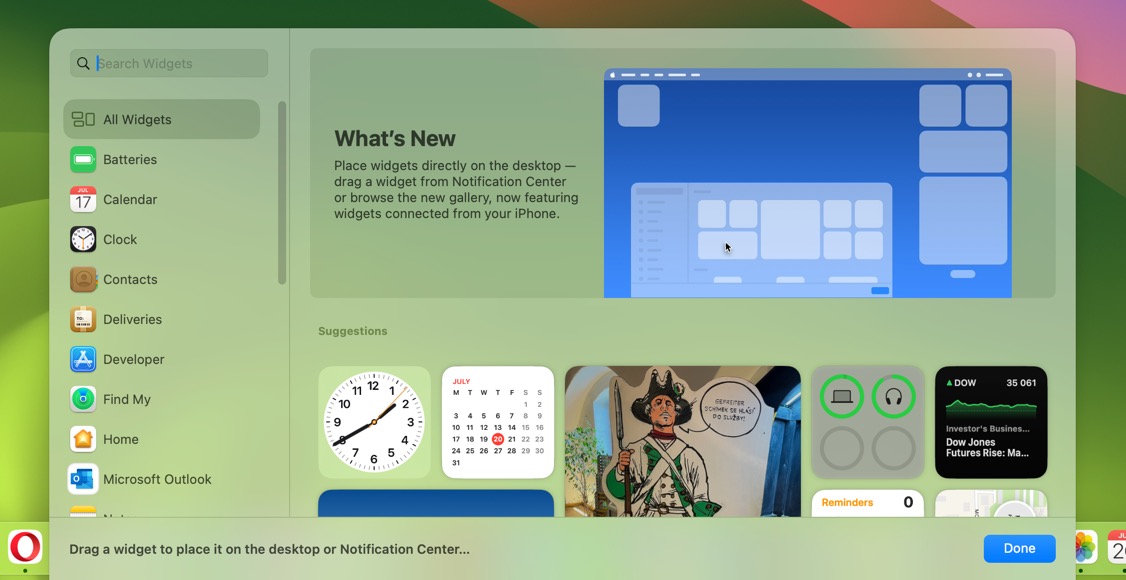
Besides macOS-specific widgets, you can also add your iOS widgets, and you can do so without installing the corresponding apps on your Mac. All widgets fade out when the desktop isn’t active, so they’re not overly distracting when the entire screen isn’t filled with apps.
Screen Savers
macOS 14 Sonoma takes a substantial leap in the aesthetics department with its revamped screen savers. Taking a cue from Apple TV’s widely admired aesthetics, the new screen savers for Mac feature stunning slow-motion captures from scenic locations worldwide.
The available screen savers are divided into the following categories: Landscape, Cityscape, Underwater, Earth, Shuffle Aerials, and Other (where you can find familiar screen savers from older versions of macOS).
Here’s how you can set up your screen saver in macOS Sonoma:
- Click on the Apple icon in the top-left corner of your screen.
- Select System Preferences from the dropdown menu.
- Navigate to the Screen Saver section.
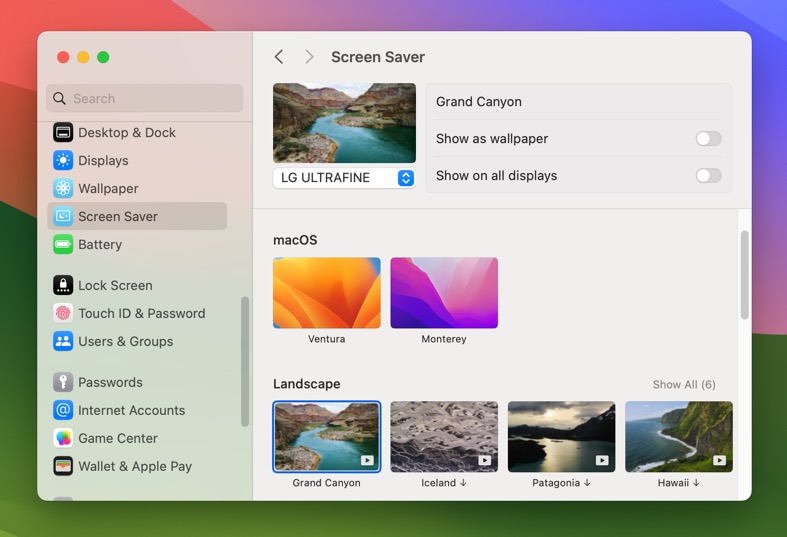
- Click on your preferred screen saver. If the screen saver isn’t already downloaded on your Mac, you may need to wait a short while for it to download.
Unfortunately, it’s currently not possible to preview them before downloading, so finding the one you like best may take some time and some bandwidth because their sizes can be pretty substantial.
Video Conferencing
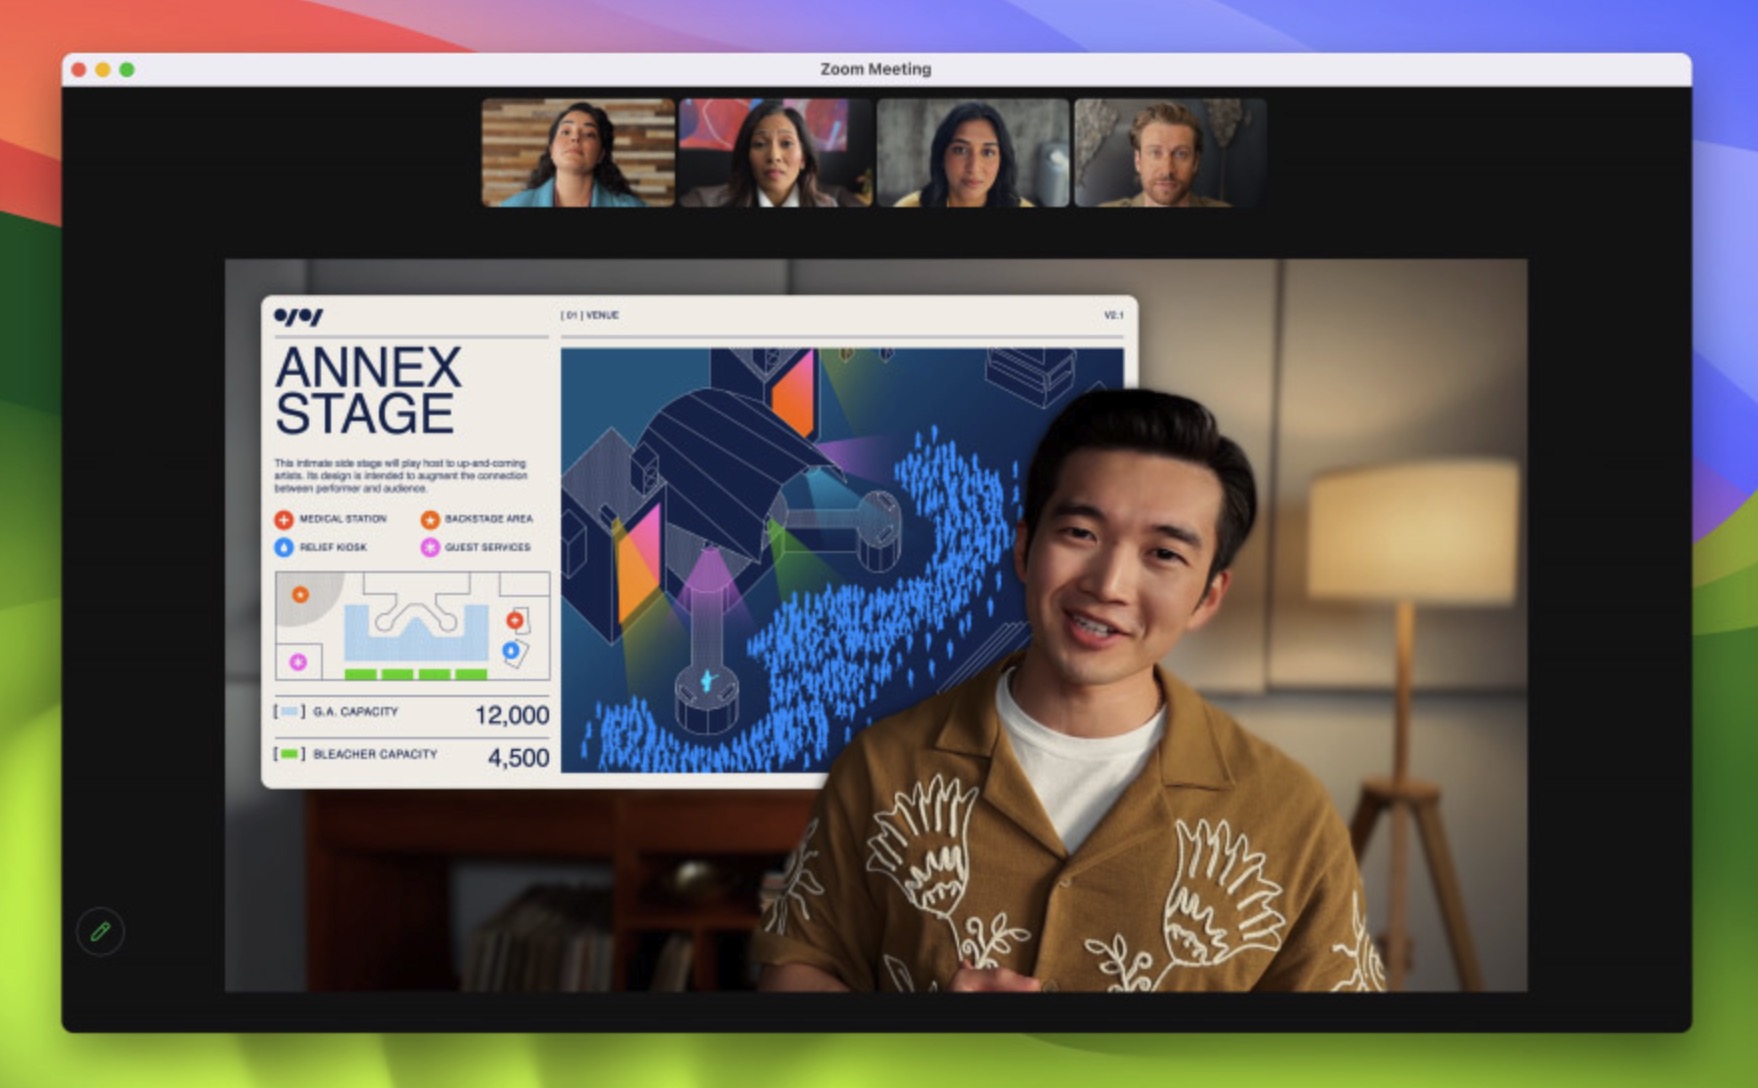
There’s no denying the increasing importance of video conferencing in our daily lives, and macOS 14 Sonoma takes it to the next level with a suite of innovative new features. The most compelling one for me is the Presenter Overlay, which allows you to put yourself in the frame alongside your shared screen. You can even move the overlay around to point out important details.
In addition to the Presenter Overlay, video conferencing in macOS 14 Sonoma is literally more hands-on thanks to the ability to physically react with hand gestures and watch as your screen fills up with 3D augmented reality effects, such as fireworks or confetti. Yes, it feels a bit silly at first, but after you get used to it, you’re left with a feature that’s sure to inject some much-needed energy into your video conferences.
Also worth mentioning is the new Screen Sharing picker. It provides a seamless way to share one or multiple apps directly from the window you’re working in, keeping you focused and efficient. To take advantage of it, screen sharing must be enabled on your Mac.
Gaming
As a part of Apple’s commitment to make Mac a more gamer-friendly platform, macOS Sonoma introduces a Game Mode. This mode ensures that your games get the highest priority on your Mac’s CPU and GPU, while the background tasks take a back seat. This dramatic shift in resource allocation leads to a smoother, lag-free gaming experience. Plus, it promises a noticeable reduction in latency with wireless accessories, such as AirPods and game controllers.
But the real game-changer (pun intended) is the Game Porting Toolkit. Inspired by Valve’s Proton and the Steam Deck, this feature in macOS Sonoma is based on Wine, and it allows you to run Windows games on macOS by translating Intel-based x86 instructions and Windows APIs to Apple silicon and macOS APIs.
Already, there are third-party tools like Whisky that make it very easy for regular Mac users to take advantage of the Game Porting Toolkit and play popular Windows games on macOS Sonoma with impressive results.
To get started with it, you need to do the following:
- Download Whisky: Navigate to the Whisky GitHub page and download the latest release.
- Download Apple’s Game Porting Toolkit DMG: Visit the Apple Developer downloads page. You can sign in with your regular Apple ID, you don’t need to pay the $100 fee. Download the Game Porting Toolkit DMG file.

- Move Whisky to your Applications folder: Once you’ve downloaded Whisky, move the app to your Applications folder. This allows you to easily access and launch it from your Mac’s Applications list.
- Open Whisky: Navigate to your Applications folder and open the Whisky app.
- Install Game Porting Toolkit: With Whisky open, drag and drop the Game Porting Toolkit DMG file you downloaded earlier into the Whisky window. Whisky will handle the installation process for you.
- Create your first bottle. Click the + icon in the top-right corner to create a bottle, a virtual Windows environment for your games.
- Launch a Windows game. Select the newly create button and click Run. Point Whisky to your game’s installer or executable file.
With the Game Mode, Game Porting Toolkit, and Whisky, your gaming experience on macOS Sonoma is ready for takeoff!
Privacy and Security
One of the main selling points of the macOS in general has always been its strong stance on privacy and security. It’s apparent that Apple has continued to prioritize these aspects in the Sonoma update, and users like myself can certainly appreciate this.
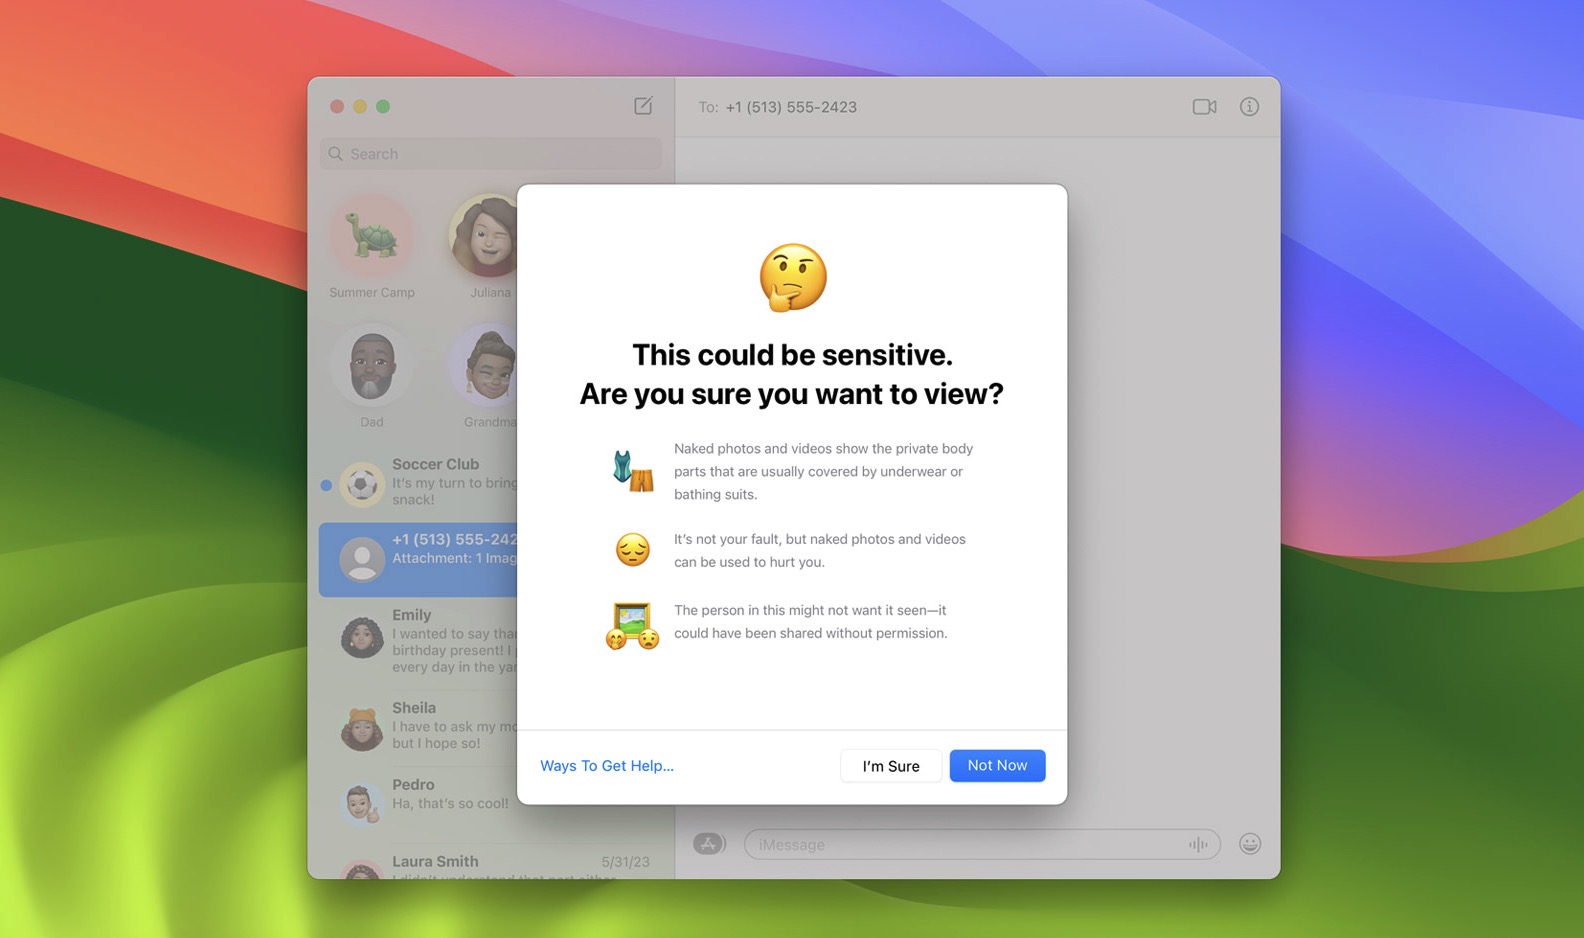
The Communication Safety feature, which can detect nude photos before they’re sent or viewed on a child’s device, has been extended to work beyond Messages. Adults will appreciate the additional Sensitive Content Warning feature, which provides the option to blur out potentially sensitive photos and videos before you decide to view them. I suspect that this feature will save many Mac users from unwanted surprises, like the accidental unveiling of those artistic “nudes” you took for your significant other.
Another upgrade in Sonoma is the introduction of the Lockdown Mode. This security feature is aimed at individuals who are likely to be targeted by advanced threat actors, and it significantly elevates protection against sophisticated cyber attacks by disabling certain features to reduce the attack surface.
Other Notable New Features and Improvements
Besides the above-listed major changes, macOS Sonoma introduces a variety of additional refinements across its suite of applications and services, including:
- 🧭 Safari: You can now create different profiles for distinct purposes like work and personal to keep your history, extensions, cookies, and favorites separate. Additionally, Safari now lets you add any website to the Dock as a web app. To bolster your privacy, Safari has also enhanced its Private Browsing mode, which now blocks known trackers, removes tracking added to URLs, and locks your private browsing windows when not in use.
- 💬 Messages: Apple’s instant messaging app received a lot of attention in macOS Sonoma. The new search filters help you locate messages faster, and a new catch-up arrow lets you jump to the first unread message in a conversation. There’s also a new stickers drawer, which lets you sync your Live Stickers and Memoji across your Apple devices, making them readily available whenever you need them.
- 📜Notes: When it comes to Notes, the enhancements are aimed at boosting your productivity to another level. The AutoFill feature uses your saved information from Contacts to fill out PDFs or scanned documents faster. You can also link related notes for a more organized way of working, and the new sharing button lets you send work started in Notes to Pages for further customization.
Being these three popular apps, macOS Sonoma also introduces subtle but meaningful upgrades to a host of other applications. The Reminders app has been upgraded with new Grocery Lists and Column View, making task management more streamlined, the Music app lets you co-create playlists with friends, and Mail can display travel-related emails at the top of your search results when a scheduled trip date approaches.
There are also some accessibility enhancements that are guaranteed to make some Mac users extremely happy. These include the Personal Voice feature, which allows users with speech loss to recreate their voice for use during FaceTime calls and in-person conversations, or an easier way to adjust text size for reading comfort.
Should I Update to macOS 14 Sonoma?
The all-important question on your mind might be: Should I update to macOS 14 Sonoma? The answer largely depends on your appetite for experiencing the latest enhancements, your tolerance for potential bugs, and, most importantly, your current use of your Mac.
As I’ve noted earlier in this macOS Sonoma review, the new update isn’t a major overhaul of the operating system. Instead, it’s a thoughtful refinement of macOS 13 Ventura. This implies that there’s less room for significant issues or bugs that could hamper your everyday tasks. In fact, during my testing of the beta version, I’ve had a fairly smooth ride, with the only hiccup being compatibility warnings thrown up by a few apps, like Homebrew.
While it’s generally smart to be cautious with system updates, this advice mostly applies to beta versions. With Sonoma now officially released, Apple has likely addressed most of the major bugs. If your Mac is essential for work or sensitive tasks, there’s a bit less to worry about in terms of potential glitches.
For those who love being on the cutting edge, experiencing new features, and don’t mind dealing with a potential bug or two, I’d say go ahead and explore the offerings of macOS Sonoma. But, and it’s a crucial but, always remember to back up your system before updating. Even a seamless update can sometimes lead to unexpected data loss, and having a backup is your best defense.
macOS 14 Sonoma: Review Verdict
macOS 14 Sonoma isn’t a game-changer or a massive overhaul of your Mac’s ecosystem. It stands as a more subtle, polished iteration following its predecessors, macOS Ventura and macOS Monterey. But that’s not to say Sonoma should be overlooked. Sonoma breathes in a fresh breath of optimization and fine-tuning, infusing your workflow with new features and refined capabilities. The improvements might seem minor at first glance, but they serve an essential purpose: streamlining your day-to-day tasks, keeping you organized, and shedding off the mundane aspects of your work.


