
You’ve connected an external hard drive to your Mac computer. Instead of seeing it show up in Finder, macOS says that you don’t have anything there.
When your Mac doesn’t recognize your external drive, accessing the files kept there is no longer possible. If you know how to restore this functionality, you can help your Mac see the external drive once again.
Table of Contents
How to Find an External Hard Drive on Mac
As you go about the business to repair external hard drive on Mac issues, it is essential to review how macOS locates this resource.
When you plug an external drive into your Mac’s port, it mounts (appears) on the desktop. You’ll also see an access point appear in Finder windows with the latest versions of macOS.
If you’re still using an older operating system, you might see the external drive appear under Devices or Locations.
Reasons Why External Hard Drives Aren’t Showing Up on Mac
When your Mac plays hard to get with your external hard drive, various reasons could be behind this seemingly unpredictable behavior. So let’s pull back the curtain and shine a light on what’s really going on:
| Reason | Description |
| 🔌 Connection problems | The most common issues involve cord health and system settings. |
| 🔝 Permissions settings | You could have a permissions issue interfering with your external hard drive. This problem sometimes develops right after you’ve installed a new app or upgraded to the latest macOS version. |
| 📱 Active applications | Some apps can cause conflict with how Mac computers read your external drive. Although macOS does an excellent job of finding drivers, interference issues can cause recognition problems. |
| 💿 Bad sectors | If your external hard drive has bad sectors or file corruption issues, the problem could be enough to cause macOS to be unable to see it. |
8 Ways to Solve External Hard Drive Detection Issues
If your external hard drive doesn’t mount on Mac operating systems, several potential fixes can get you up and running once again.
This guide takes you through the most common problems users face to the rarest issues that cause Mac not to read external hard drive connections.
Method 1:Check the Connection
If you plugged the external hard drive into your computer’s port and it isn’t showing, it could be the cable or the connection. You’ll want to review these steps to determine if these issues are present when Mac isn’t reading an external hard drive.
- Check to see if you have a secure connection.
- Review the connector for damage.
- Inspect the cable to see if it has wires exposed or fraying components.
- Check to see if you have power going to the cable.
- Try a different cable to see if the problem continues.
- If you have another Mac, try plugging the external drive into that one to see if it works.
- Check the formatting of your external drive.
- Determine if you’re using the right USB connection.
If you have a Windows® PC at home, try plugging your external hard drive into it to see if it works. Should that result be successful, you know that a formatting issue requires correction.
You can allow macOS to correct this situation for you if the external hard drive is new. If you have files on it, send the information to a different location since reformatting the drive usually causes data loss.
Method 2:Edit Your Finder Preferences
If Mac can’t find an external hard drive, it could be due to your preferences. That means it is mounting to your computer, but you are unable to see this step happen.
When you think this issue could be preventing you from seeing the external storage, follow these steps to resolve the issue.
- Open a Finder window.
- Click on Finder at the menu bar at your screen’s top.
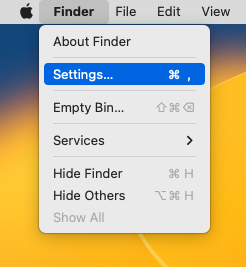
- Select “Settings”, and then choose “General” from the window that appears.
- Review the items that have permission to show on your desktop.
- If “External Disks” isn’t checked, click on the open box to reverse it.
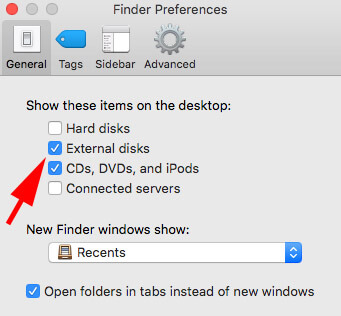
If you had to check the box, this should resolve the issue so that you don’t need to repair an external hard drive on Mac to get it recognized.
Method 3:Clear Your Cache, Cookies, and Temp Files
When your cache gets too full, system performance can often suffer. You might notice that some cookies and temporary files impact this issue even further. The problem can get to the point where your Mac refuses to recognize an external hard drive.
If your hard drive won’t mount on Mac, try restarting your computer. This process wipes away the problematic files and cache issues that can disrupt the mounting process. This step often works when you were using the external drive fine earlier in your session, but it is now failing to register.
Should the restart process not clean out the files and cache enough to restore functionality, you can follow these steps to complete a manual process.
- Open your Safari browser.
- Look to see if the Develop window is available. If it is not, go to Settings, choose the Advanced tab, and click the empty box next to “Show Develop menu in menu bar“.
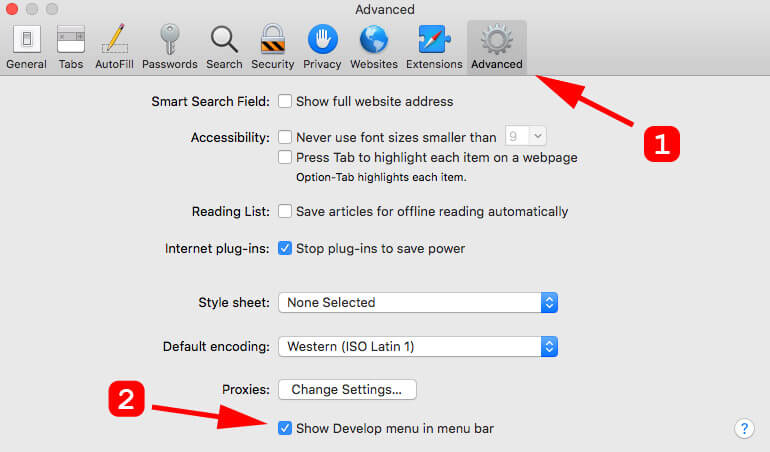
- Click on the Develop menu.
- You’ll see “Empty Caches” as an option about halfway down the list.
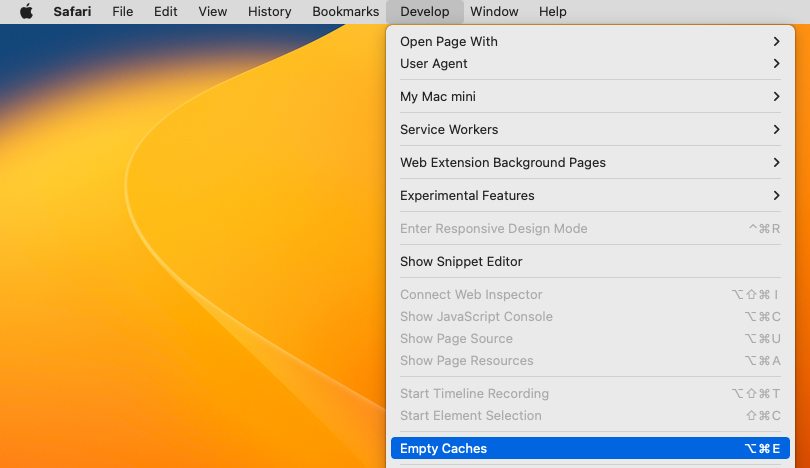
- You can also use the
COMMAND + OPTION + Ekeyboard shortcut to take care of this issue.
You might get asked for your password to complete the task. If you’re unsure of what information is in these files, you might want to create a system backup with Time Machine or a similar service to ensure your Mac remains accessible.
Method 4:Force the Connection to Your Mac
When Mac won’t recognize external hard drive connections, you can try to force your computer’s issue. These steps will help you see if a cyclical reading issue is a problem or if the HDD or SSD isn’t mountable for another reason.
- Navigate to your System Preferences through the Apple menu screen.
- Choose the Disk Utility option.
- Review along the left sidebar to see if your external drive appears.
- If you see it as an available choice, click on it to highlight the storage device.
- Select Mount.
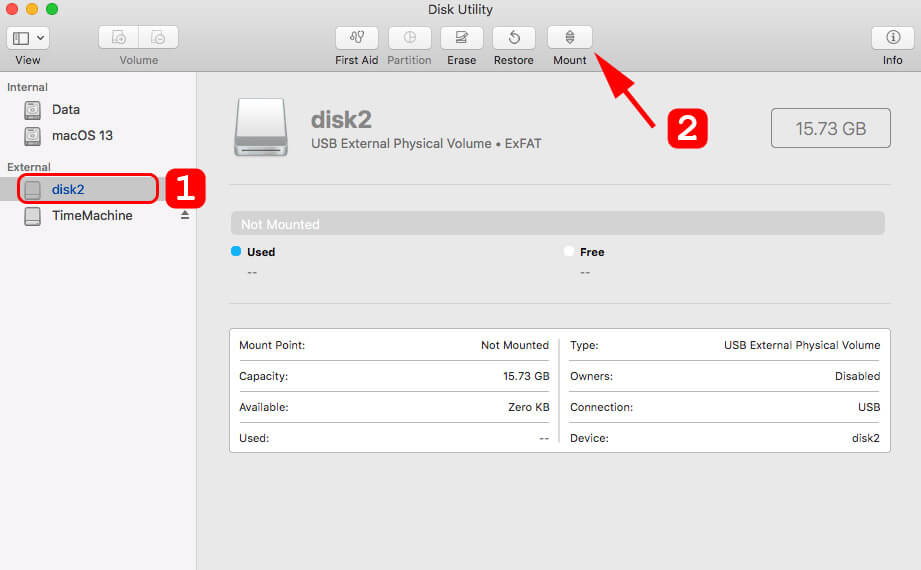
After taking these steps, you should see the external hard drive appear in Finder. You can now use it as expected.
If it isn’t in the left sidebar or doesn’t appear in Finder, you’ll need to use another solution to solve your external hard drive detection issues on Mac.
Method 5:Use First Aid on the External Hard Drive
The First Aid tool helps more than your computer’s internal drive. It can also see the hard drive on Mac connections from external sources.
If you aren’t getting a proper mount with your external HDD or SSD storage, activate First Aid to see if it can help.
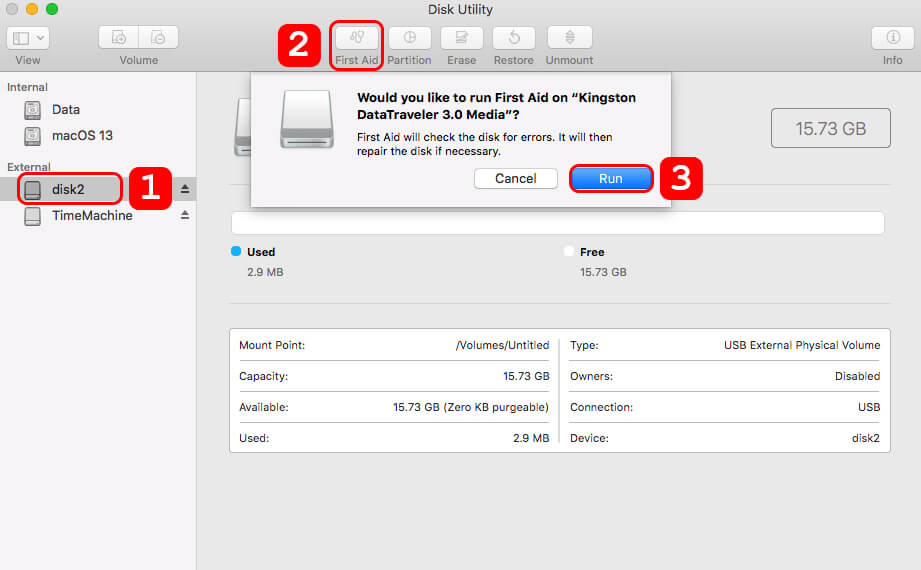
- Navigate to your System Preferences through the Apple menu screen.
- Select the Disk Utility option.
- Highlight the external hard drive and choose “First Aid“.
- You’ll get asked if you want to run it on the media. Click the Run button.
This sequence enables macOS to automatically fix potential problems when you want to know how to open an external drive on Mac when it doesn’t mount.
You’ll get notified if any faults get repaired. If no issues get detected, another method must get used.
Method 6:Delete Conflicting Apps
If you haven’t had an external hard drive mounting for a while, it could be an app-related problem. You’ll need to uninstall them sequentially, starting from the most recent software added until you reach the oldest installations.
Test after each uninstall effort to see if your access to the external hard drive got restored. If it doesn’t function as expected, remove the next app in your order.
You can manually uninstall apps on Mac by following this sequence.
- Click on Launchpad.
- Long-click the app you want to delete.
- Wait until you see an “X” appear on it. The other icons will start to wiggle.
- Click on the X to delete the file.
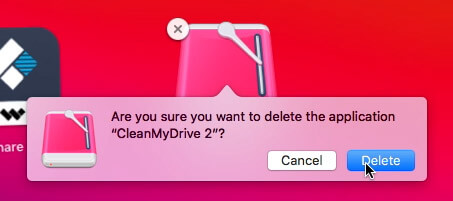
Some macOS versions require you to drag the icon to the Trash can to uninstall the program. You might need to run an uninstall program to get rid of the associated files.
Please remember that if the icon is in your Dock, moving it to the Trash only takes it away from that location. It is still accessible through Launchpad.
Method 7:Disable System Integrity Protection
System Integrity Protection (SIP) is a security feature embedded in your macOS designed to shield your device against harmful software. It keeps your system files safe, maintains the integrity of your operating system, and prevents potentially dangerous actions, even when you’re logged in with an admin account.
While it does a stellar job of protecting your system, SIP can sometimes overstep and block access to legitimate hardware like your external hard drive. Temporarily disabling it can, therefore, help you bypass any unnecessary barriers it may have placed on your drive.
Here’s how you go about disabling System Integrity Protection:
- Restart your Apple silicon or Intel-based Mac in Recovery mode.
- Select “Terminal” from the “Utilities” menu.
- Type in the following command and press Enter: csrutil disable
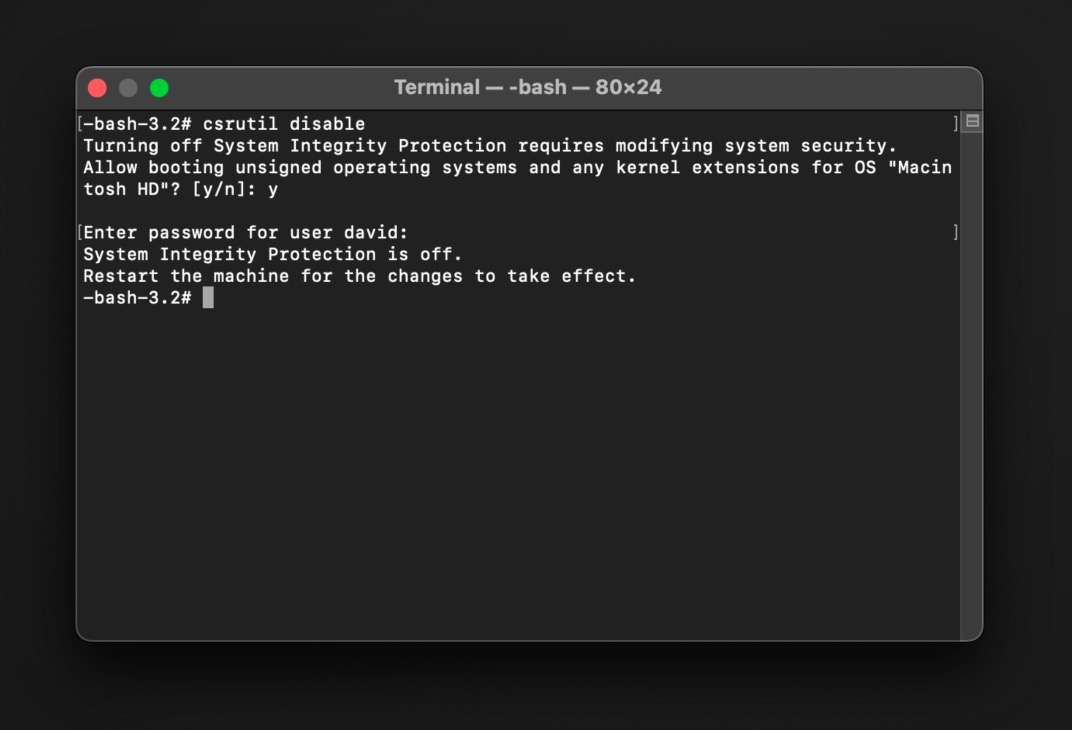
- Restart your computer. Now your Mac is running with SIP disabled.
After checking if your hard drive appears with SIP turned off, don’t forget to turn it back on. Disabling SIP, even momentarily, can leave your system vulnerable. Here’s how:
- Restart your computer in Recovery mode like before.
- Open the “Terminal” from the “Utilities” menu.
- This time, type “csrutil enable” into the Terminal and hit Enter.
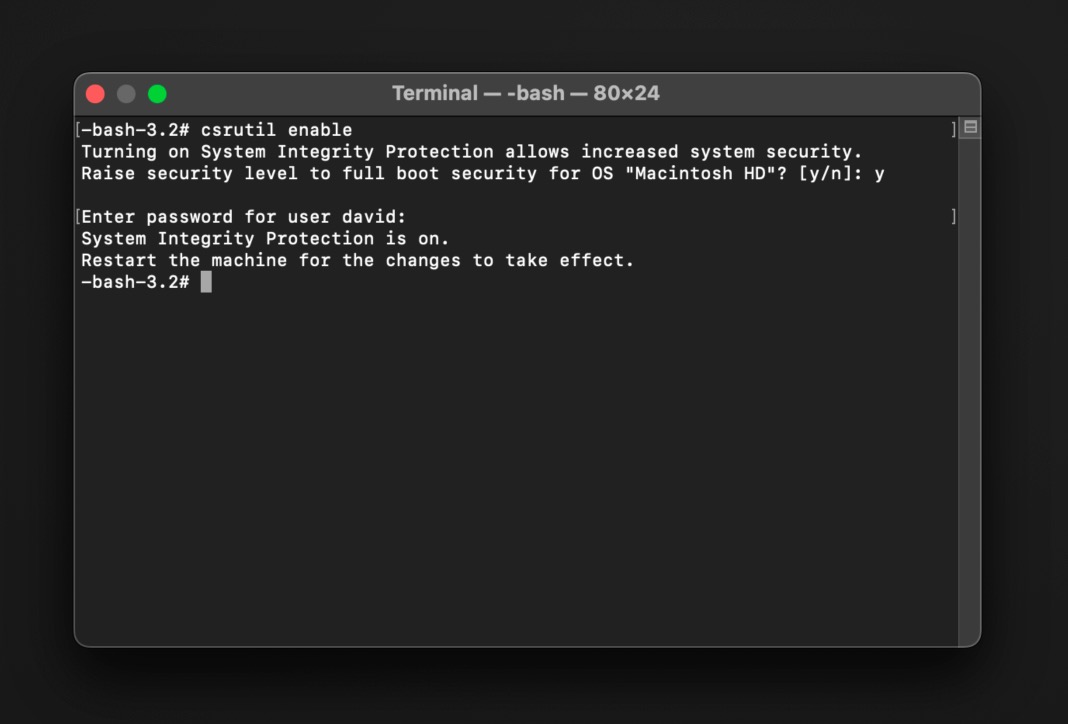
- Restart your computer once more. SIP is now back in action.
Always remember: your Mac’s security is crucial. Only disable SIP when necessary and always turn it back on. Your Mac will thank you for it!
Method 8:Reformat Your Drive
There comes a time when your Mac simply can’t fix what’s wrong with your external hard drive. Whether the file system is logically damaged or alien to macOS, sometimes, the only way forward is to start from scratch. That’s where reformatting your drive comes in.
Essentially, reformatting is like hitting a reset button on your hard drive. All data gets wiped, and the drive’s file system is rebuilt from the ground up. The result is a fresh, clean drive that your Mac can understand and interact with.
Alright, you’ve been warned. Now, let’s get to reformatting your drive using Disk Utility:
- Launch Disk Utility. You can find it in the Utilities folder within Applications.
- Once Disk Utility is open, you’ll see a list of drives on the left. Find your external hard drive in this list and select it.
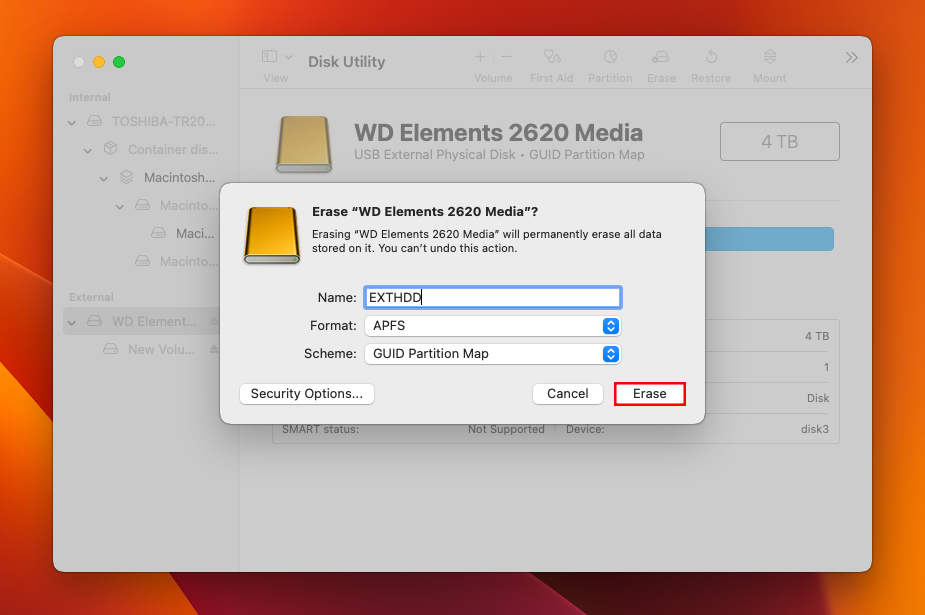
- With the drive selected, click the “Erase” button at the top of the Disk Utility window.\

- Now, you’ll see some options for formatting your drive. For the “Format” option, choose APFS (Apple File System) if your drive will only be used with Macs running macOS High Sierra or later. If you need it to work with Windows PCs, choose ExFAT instead.
- You can also rename your drive in the “Name” field. This is optional but can help you identify the drive later.
- Once you’re ready, click on “Erase” at the bottom. Disk Utility will now reformat your drive, making it fresh and readable by your Mac.
What to Do If You Lost Data from Your Hard Drive
If you lost information on your external hard drive because of connection errors, the first step to take is to stop using the device. When lost data gets overwritten, it becomes much more difficult to recover.
With the external hard drive now recognized, you can use a file recovery tool to find the missing information. One of the best options in the industry today is Disk Drill for Mac. It recovers hundreds of different file formats, offers a deep scanning tool, and provides an entire suite of features that helps macOS meet your needs.
After installing the software package, Disk Drill’s data recovery tool is relatively easy to use. It lets you scan any partition or disk to detect deleted or damaged files.
- Open the Disk Drill software package.
- You must choose what disk you’d like the tool to analyze.
- Select the “Search for lost data” button to initiate the process.
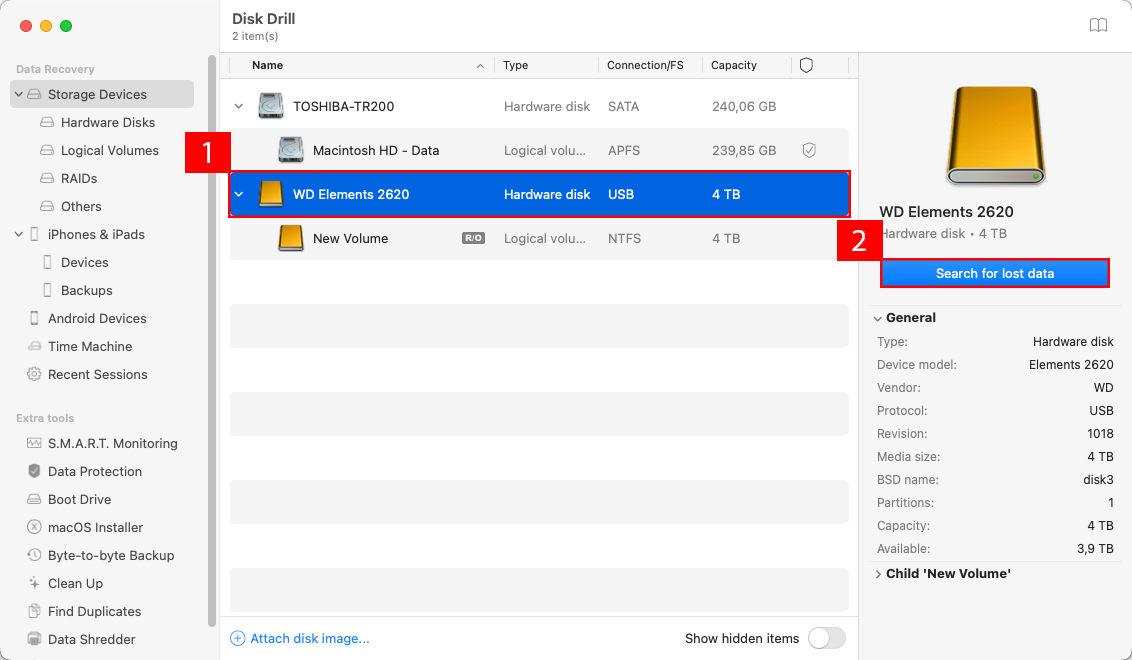
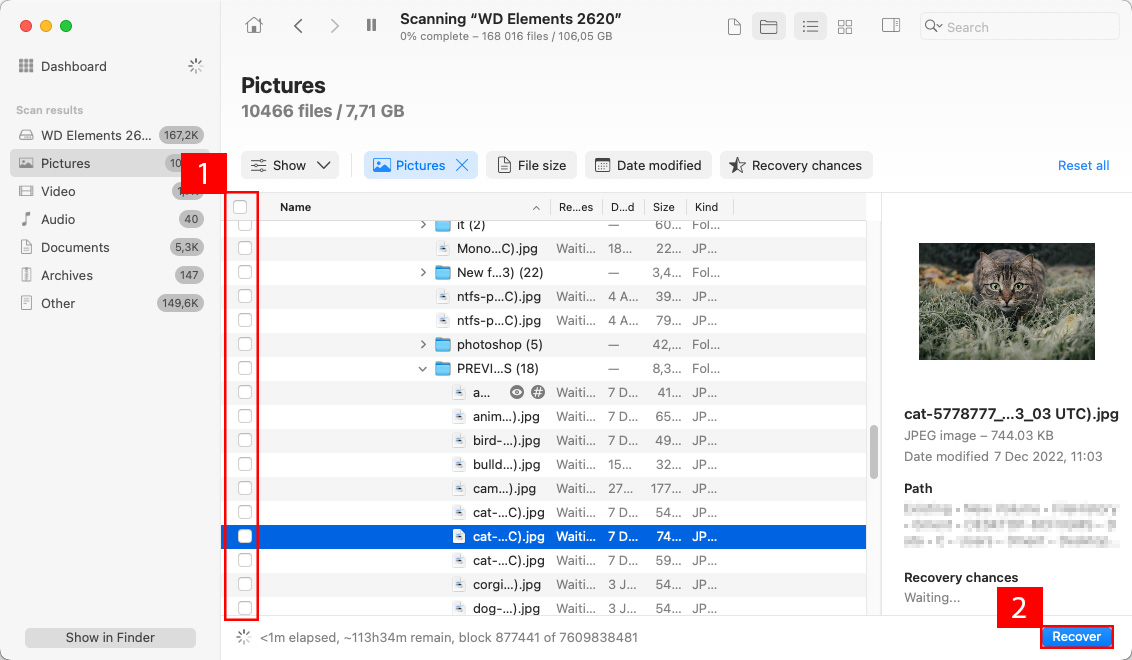
- The software scans for deleted or corrupted files, with several filters available from the left sidebar to customize the search.
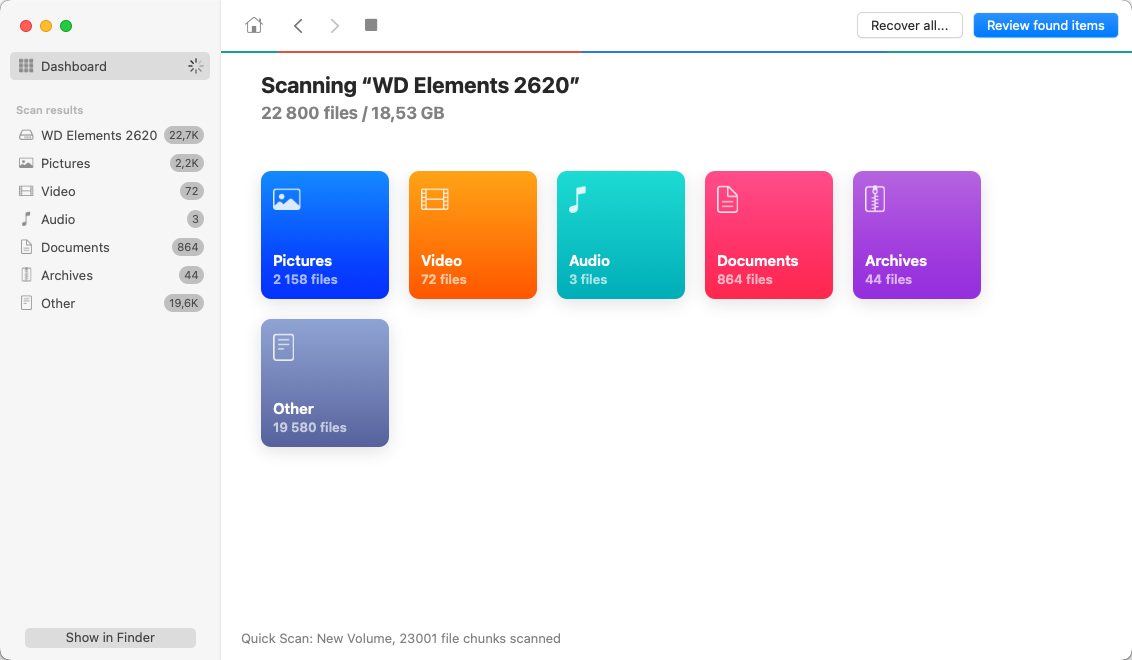
- You’ll see a list of the available files to recover.
- Select Files you Wish to Recover and click “Recover“.
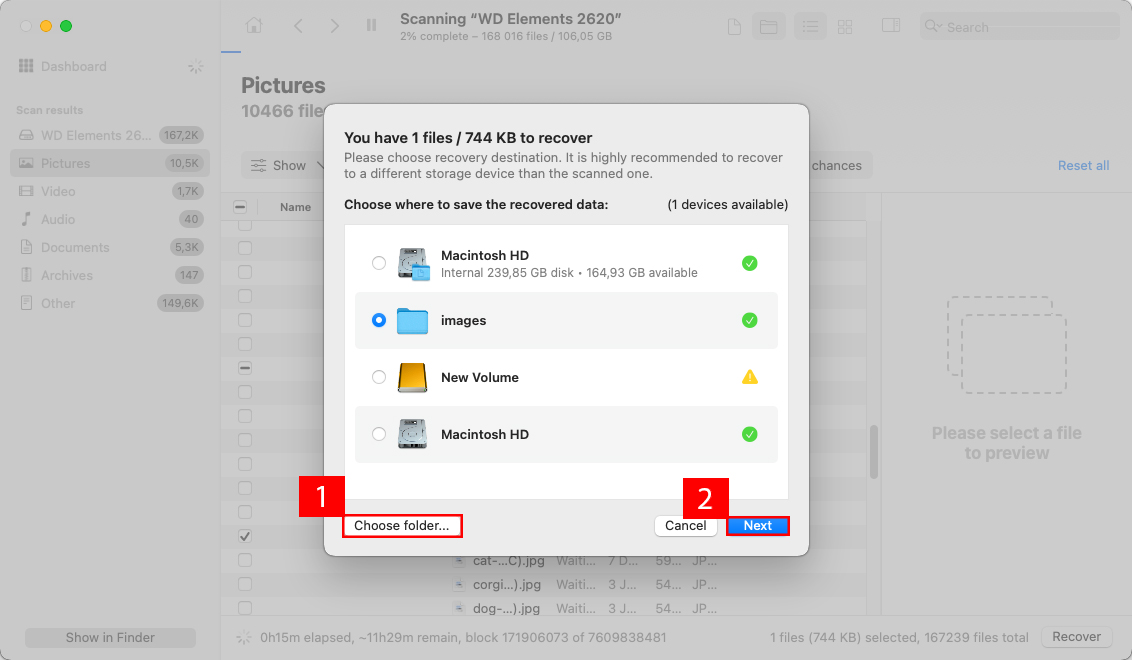
- Specify a new location (you cannot save recovered files to the same external drive safely) to keep your data safe and click “Next“.
You can also use Disk Drill to back up your Mac drives, clean up unneeded files, and enable data protection. It is a comprehensive solution that helps you manage file storage in numerous ways.
How to Use an External Hard Drive on a Mac Properly
It helps to connect and disconnect your external hard drive properly to maintain its health. When you unplug it from the port without using the ejection process, the risk of bad sector development rises with each incident.
This problem isn’t always a user-related issue. If you operate an iMac with external storage and the power goes out, the instant shutdown could cause this problem.
That’s why knowing how to connect your external hard drive correctly can resolve many of these issues.
- Use the cable that came with your external hard drive to connect it to your Mac. That includes the manufacturer’s FireWire or Thunderbolt cable.
- Check for the drive to appear on your desktop. If you don’t see it, open a Finder window to review the list shown in the left frame.
- Open the disk utility if you need to format the drive. This step is usually only necessary during the first connection to your Mac.
- If you still can’t show hard drive on Mac support, it may not have enough power. Some products require a separate connection. That means a dual-cable switch might be necessary.
- Restart your computer with the connection remaining if your external hard drive isn’t working on Mac. This action clears the cache and temporary files that could be preventing your access.
- Once you see it and know how to open an external hard drive on Mac, you can transfer files from your internal storage to this media.
When you purchase a Mac external hard drive, it’s likely formatted with the FAT32 file system. It comes that way because it has the most support across all operating systems.
This support is primarily for temporary storage, such as a USB flash drive. If you can’t mount an external hard drive on Mac, you likely need to take the reformatting step.
Before saving data to the drive, swap its format to Apple’s HFS+ instead to ensure optimal performance.
Conclusion
Troubleshooting a missing external hard drive on your Mac can be a headache, but it’s usually fixable. The fixes range from simple connection checks to total reformatting. If you’ve ruled out all other possibilities and the drive is still not cooperating, it’s likely that the hardware itself is faulty. This could be due to wear and tear, accidental drops, or manufacturing defects. At this point, consider professional repair or throwing the hard drive away. But remember: never ditch a hard drive without first ensuring any sensitive data is destroyed.
FAQ
NTFS, or New Technology File System, is a file system used by Windows. While Mac Ventura can read NTFS-formatted drives, it cannot write to them out of the box. This can create problems when you’re trying to save or modify files on an NTFS drive from a Mac. If you need to write to an NTFS drive, there are third-party software options available, such as Microsoft NTFS for Mac by Paragon Software.
If your external hard drive isn’t showing up on your Mac desktop, you can adjust your Finder preferences. Here’s how:
- Open Finder.
- Click on “Finder” in the menu bar and then select “Settings.”
- Navigate to the “General” tab.
- Click the checkbox next to the “External disks”option in the “Show these items on the desktop” area.
- Close the Settings window.
If your external hard drive isn’t showing up in Mac Disk Utility, there could be several reasons, including connection problems, file system incompatibility, and hardware damage, just to give some examples.


