
Many Mac users feel their souls leave their bodies the first time they find that their files and folders disappeared from their Mac desktop. Fortunately, this is a common problem and there are multiple ways to restore those files.
In this article, we cover all possible methods including advanced search, undeleting, and even data recovery software. We condensed everything into easy-to-understand mini-guides so you don’t get lost along the way. Read on.
Table of Contents
Where Did the Desktop Files Go?
The location of your desktop files depends on what caused them to disappear in the first place. These are the most probable locations of your missing files and folders:
💭 iCloud Drive – iCloud can make your desktop files disappear in two ways (applies only if you have iCloud enabled for desktop files). First, if your Mac’s storage is full, the files you save to your local desktop will be moved to iCloud. Second, in the case of macOS updates, you may have used certain settings related to iCloud and your desktop files. They may still be in your iCloud drive.
📁 “Relocated” Folders – Whenever you upgrade your OS, it relocates your files into their proper folders on the new installation. However, some files fall through the cracks. These are housed in “Relocated” and “Previously Relocated” folders on your Mac.
🗑️ Trash Folder – You may have accidentally deleted your desktop files, which will have sent them to your Mac’s Trash Folder. We show you how to restore deleted desktop files from the Trash folder in Method #2.
📚 Stacks – Stacks is a macOS feature for your desktop that allows you to group files and folders together on a single “stack.” The files and folders you’re looking for may be stacked underneath the other items. We cover Stacks in Method #4.
💻 Anywhere on Your Mac – Sometimes, files and folders simply get misplaced. The methods listed below include advanced search instructions that should find them, no matter where they are on your Mac.
How to Recover Files that Disappeared from Desktop
For this article, we’ve listed 7 different methods on how to recover desktop files on Mac. We start with the most specific and most common problem and solution, then we go down the list to more general data recovery methods – basically, we have you covered. With that out of the way, let’s start.
Method #1 Look for Your Desktop Files on iCloud
By far, this is the most common reason for Mac users finding everything disappeared from their desktop. Apple has been experimenting with iCloud to optimize their growing installation files and limited storage upgrade options. To restore desktop from iCloud, follow these steps:
Check Your local iCloud Folder
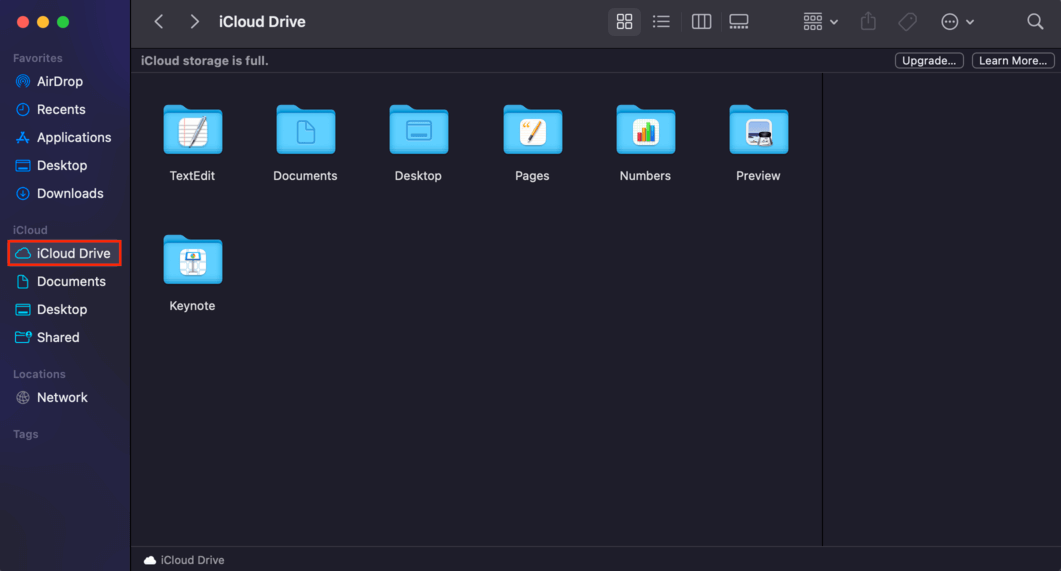
Step 1:First, double-check your iCloud folder for your files. On the Apple menu bar, click Finder > Preferences…, and check the box beside “iCloud Drive.”
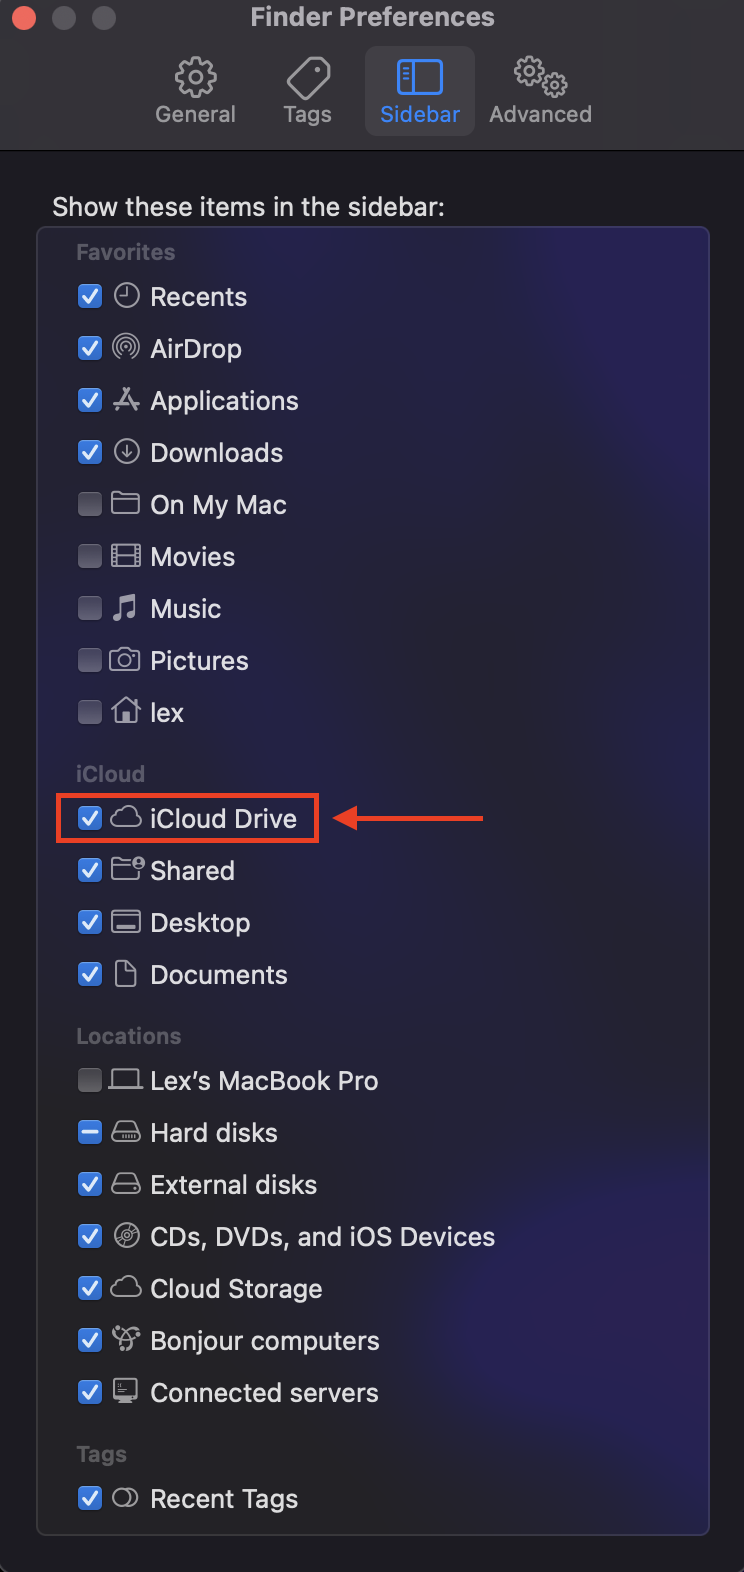
Step 2:Open Finder > iCloud Drive, then check if your files missing from desktop are there. You can copy-paste them to a local destination or to an external drive if you want to be extra cautious. Proceed to the next section.
Restore Your Files From the iCloud Website
Step 1:Open your browser, go to iCloud.com, and log into your account.
Step 2:Open Finder > iCloud Drive, then check if your files missing from desktop are there. You can copy-paste them to a local destination or to an external drive if you want to be extra cautious. If you can’t find them, move on to step 3.
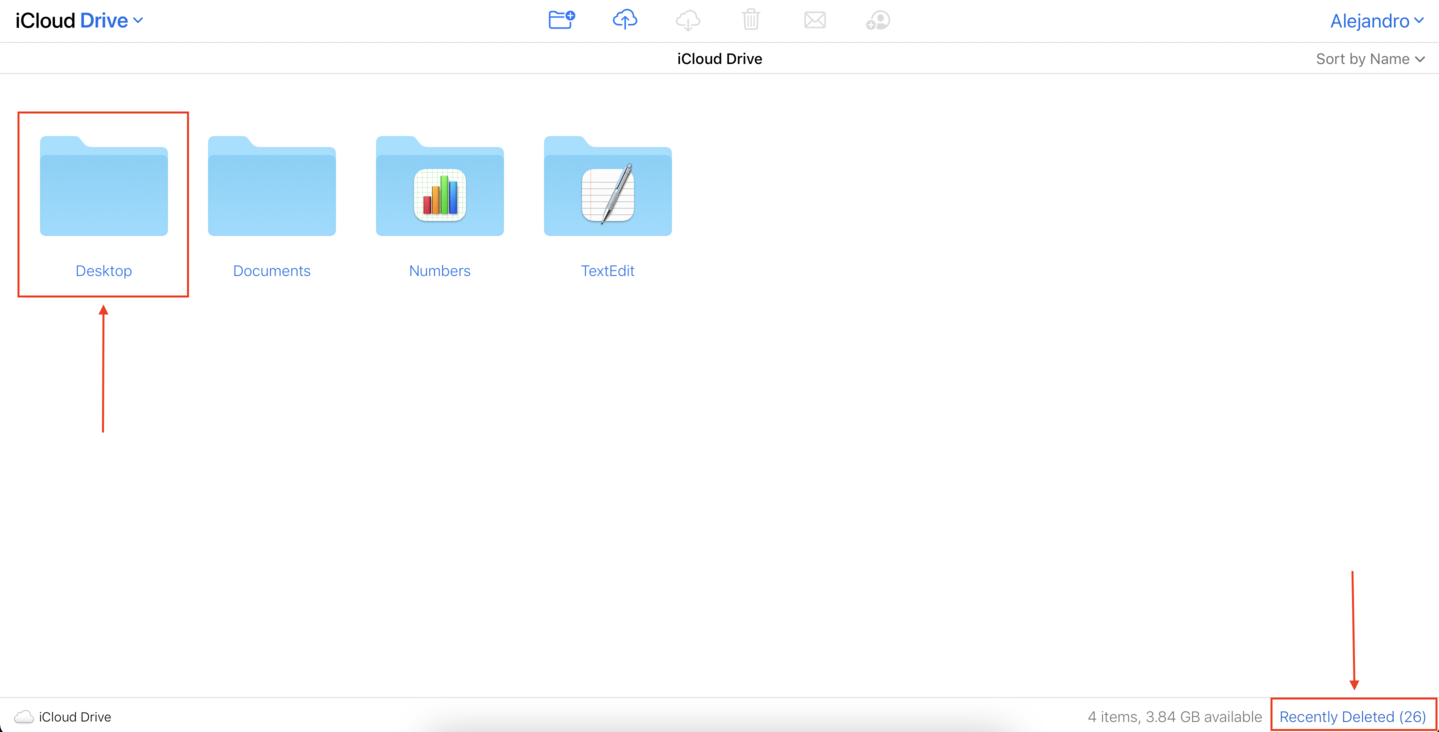
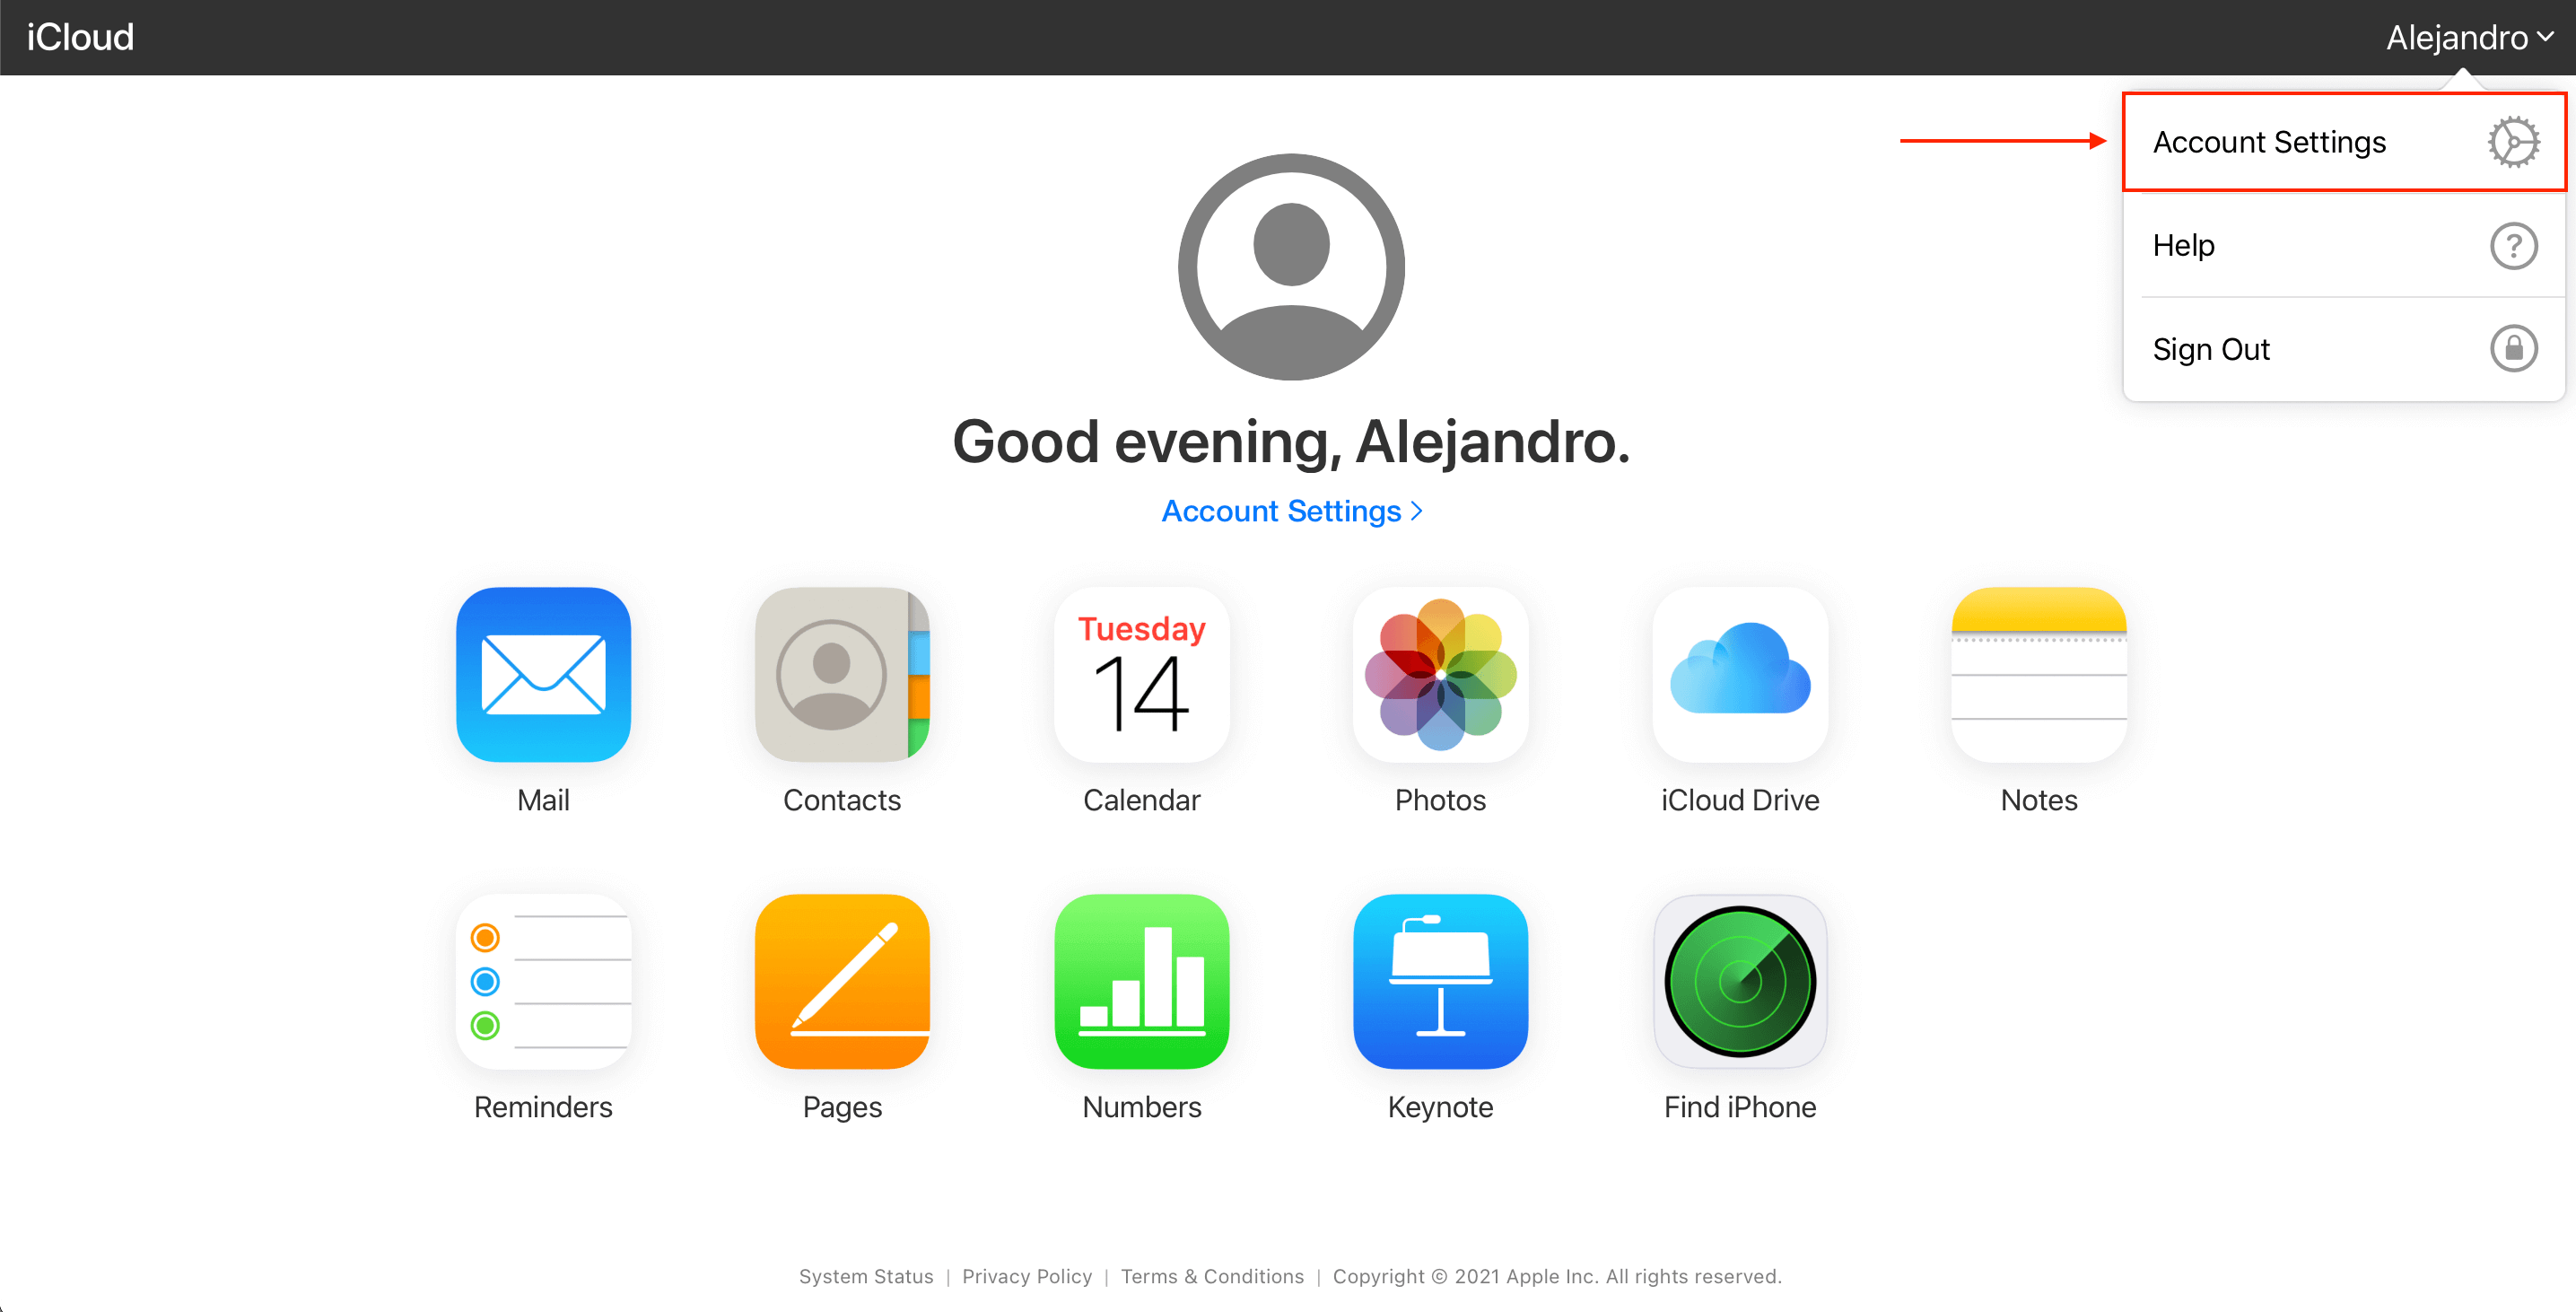
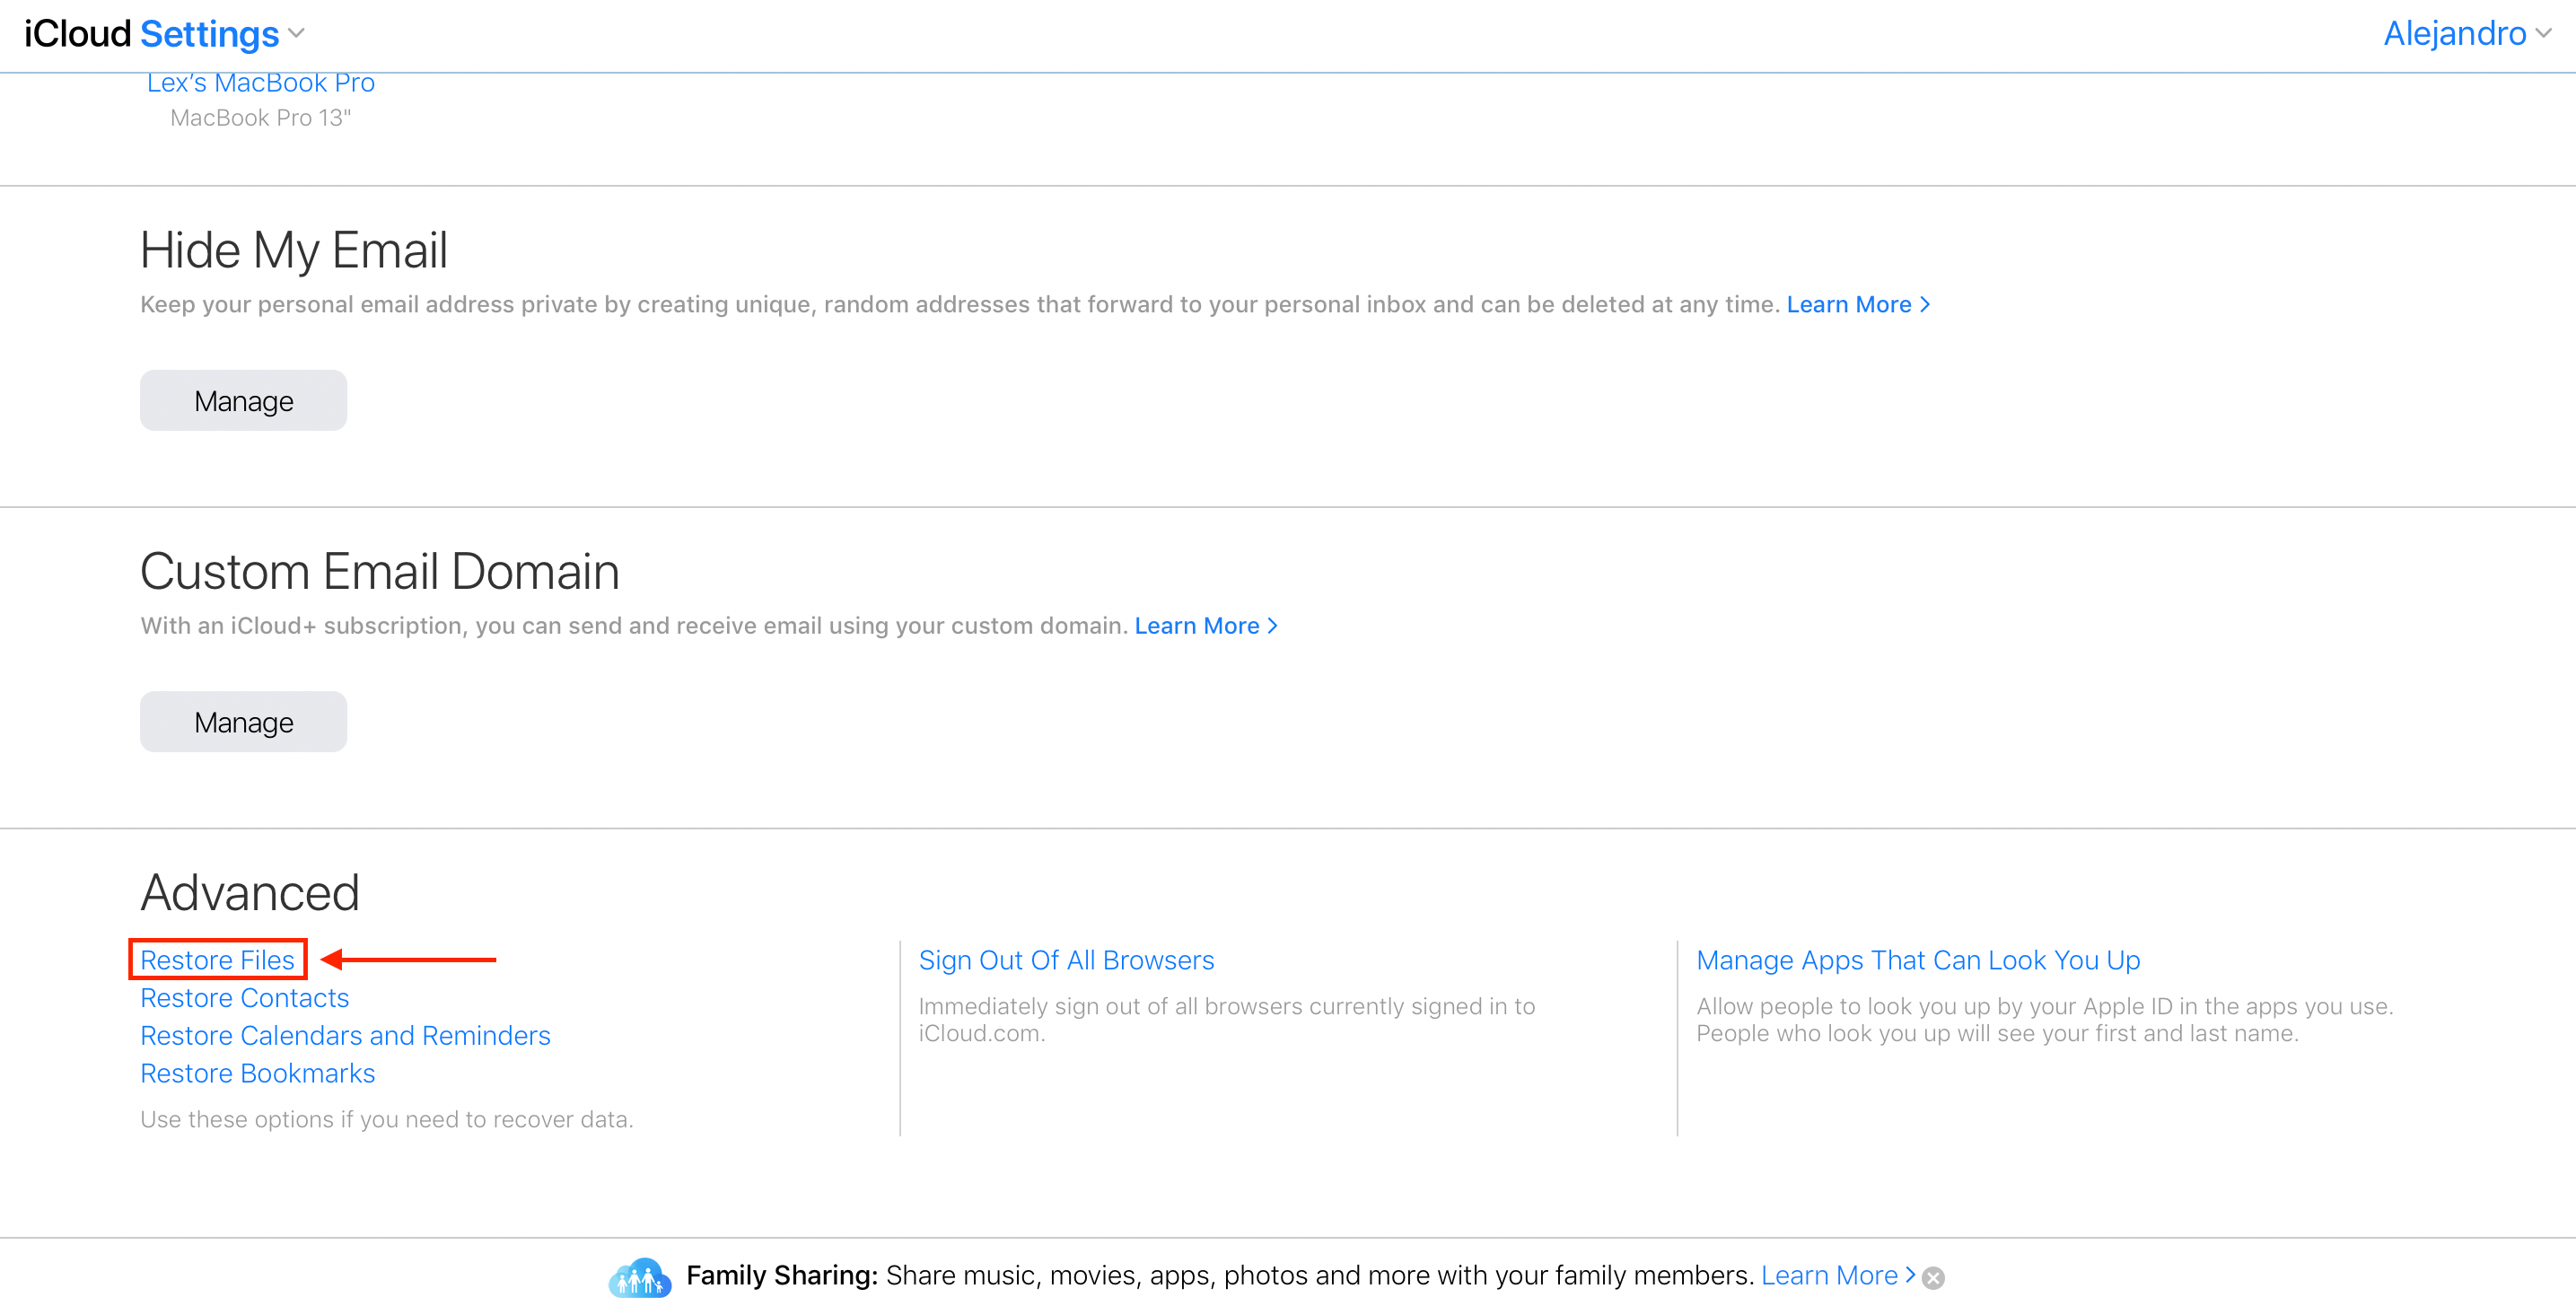
Step 3:Return to your iCloud homepage (iCloud.com).
Step 4:On the top right corner of your screen, click your account name, then click “Account Settings.”
Step 5:Scroll down the page and click “Restore Files” on the bottom left corner under “Advanced.”
Step 6:On the popup that appears, use the checkboxes to select which files you want to restore. You can also use the “Select All” option on the lower left corner of the file list. Use the sorting button on the top right corner of the file list to narrow down your search if needed. Once you’re satisfied with your selection, click “Restore.”
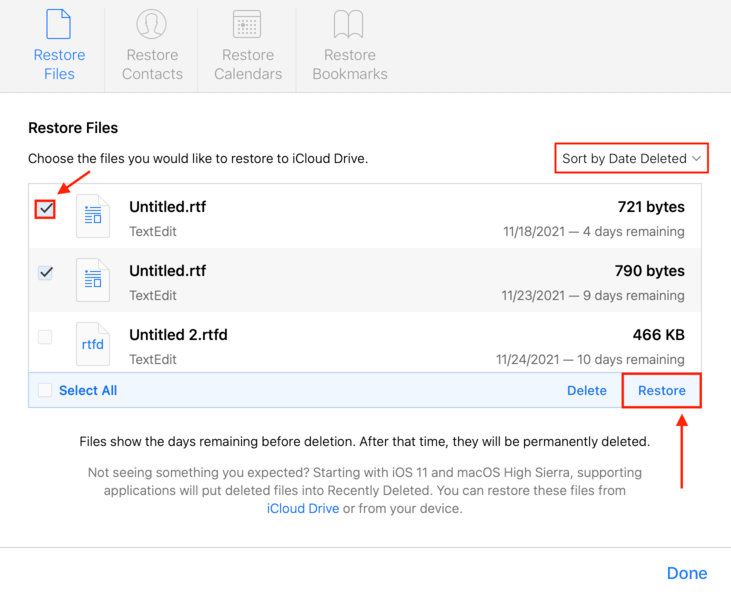
Step 7:Wait for the confirmation then click “Done.” You can then check your desktop files and folders if you were able to successfully restore your Mac desktop.
Method #2 Check the Trash Folder
After confirming that iCloud isn’t the problem, we start considering human error. The first place to look is the Trash Folder, as you may have accidentally deleted your files.
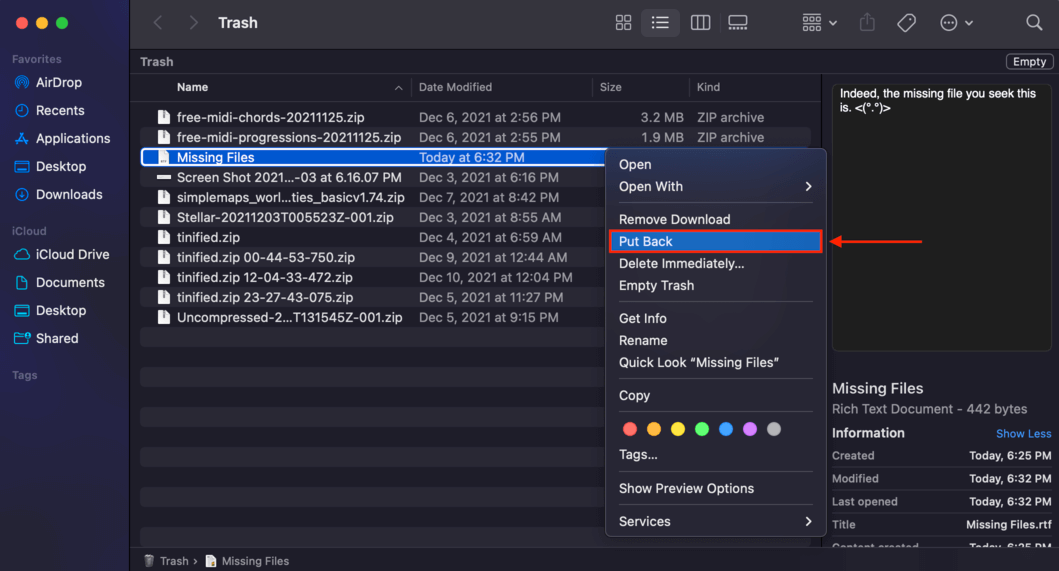
Step 1:Open Trash Bin by clicking the Trash icon on your dock (usually the right-most app) or by opening Finder > Press (CMD + Shift + G). In the empty field, type “Trash.”

Step 2:To restore desktop files on a Mac from the Trash folder, right-click the item and click “Put Back.”
Method #3 Try to Find the Missing Files on Your Mac
Sometimes, our files might not actually be missing or corrupted – they might have just been misplaced. There are 3 ways you can look for your files:
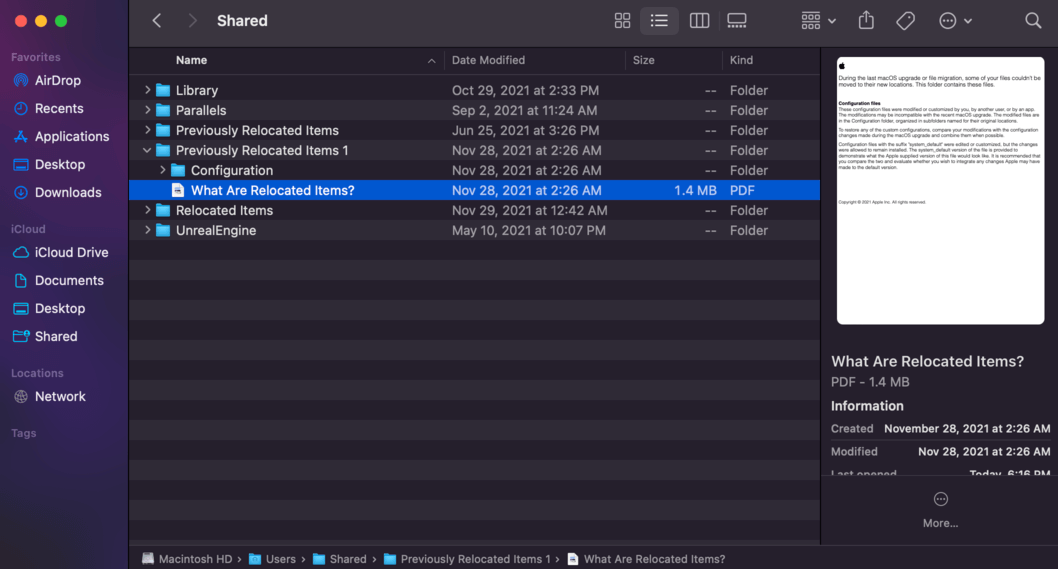
Relocated Items
Whenever you upgrade your macOS, some files might not be moved to their new locations – this is where you’ll find them.
Step 1:Go to Finder > Press (CMD + Shift + G). In the field that appears, type /Users/Shared/ and press enter.

Step 2:Look for the “Relocated Items” and “Previously Located Items” folders and browse through their contents to find your files. Apple even leaves a useful guide in some of the folders, as highlighted in the screenshot below.
Spotlight Search
If you remember the names of your missing files, you can try searching for them using Spotlight Search (CMD + Space).
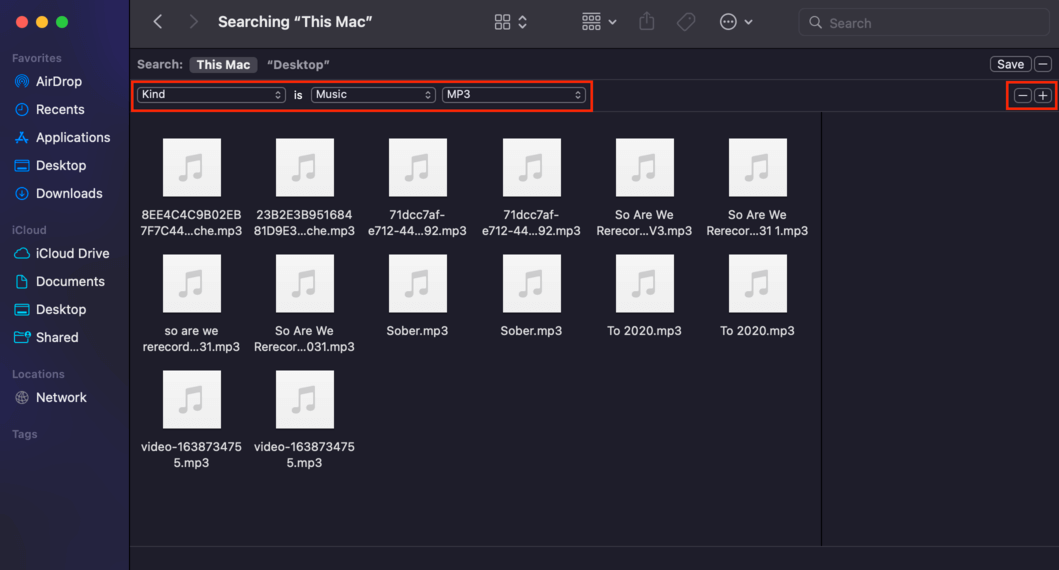
Finder Advanced Search
If you don’t exactly remember the file name but you know the file type (or any other details), you can try using Finder’s advanced search.
Step 1:Open Finder > Press (CMD + F)
Step 2:On the first dropdown bar, choose the parameters to base the search on. On the second dropdown bar, define those parameters. For example, in the first bar you could select “Kind”, then on the second bar, select “Music.”It will open a third bar, where you can narrow down your search even further. You can also click the + button at the far right side of the advanced search bar to add as many details as you can remember.
Method #4 Toggle Mac’s Stacks Feature
If your files weren’t misplaced, they instead could be hidden – inside “stacks”, a file organization feature by Mac. To check if this is the case, follow these steps:
Step 1:First, make sure you’re on your desktop. On the menu bar at the top of the screen, click “View.” If you’re not using the stacks feature, you should see no checkmark beside the “Use Stacks” option. Move on to Method #5.
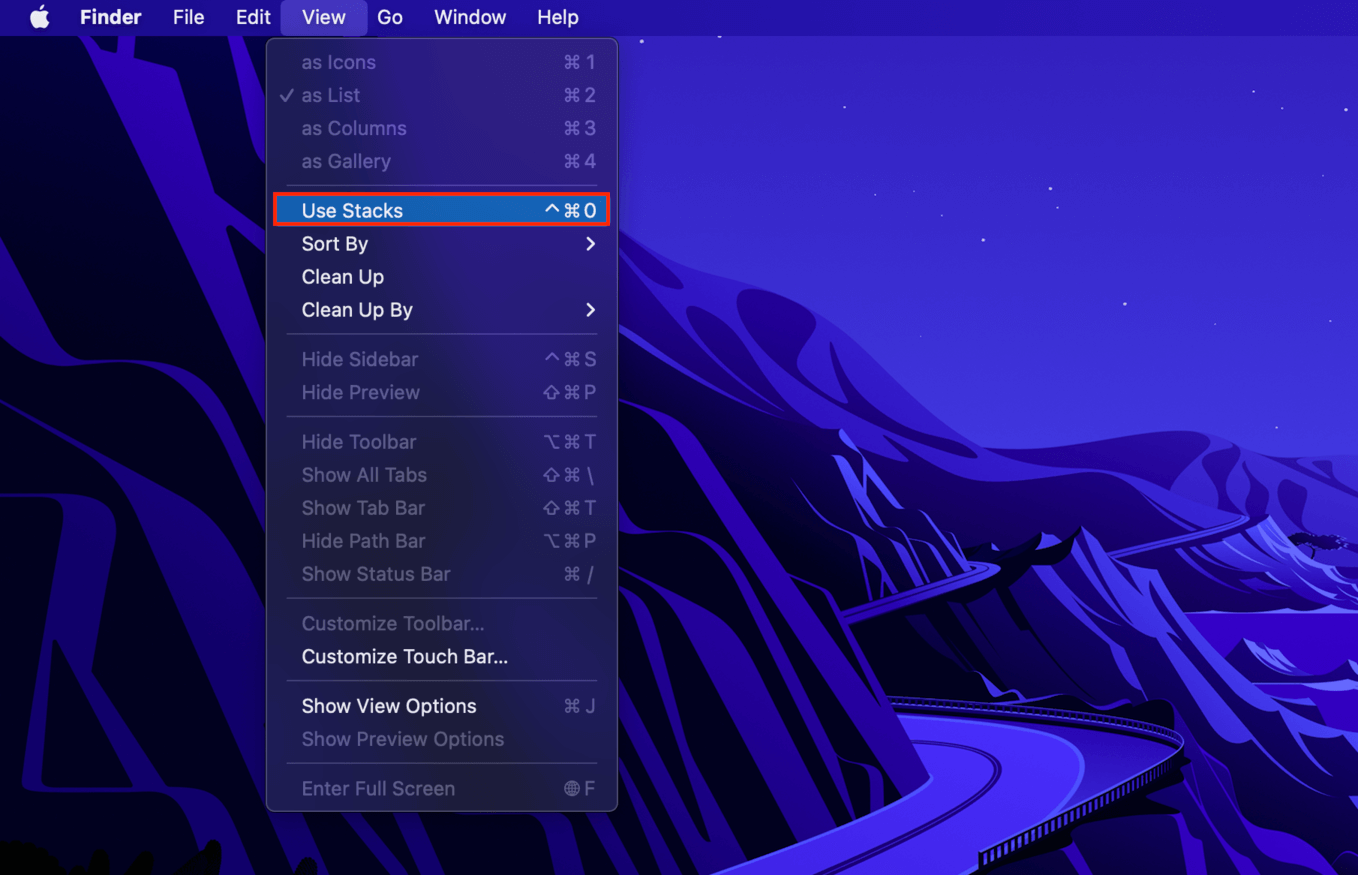
Step 2:If there is a checkmark beside the “Use Stacks” option, then you have the feature activated. You can either uncheck it, or check your desktop stacks to see if you can find your files.

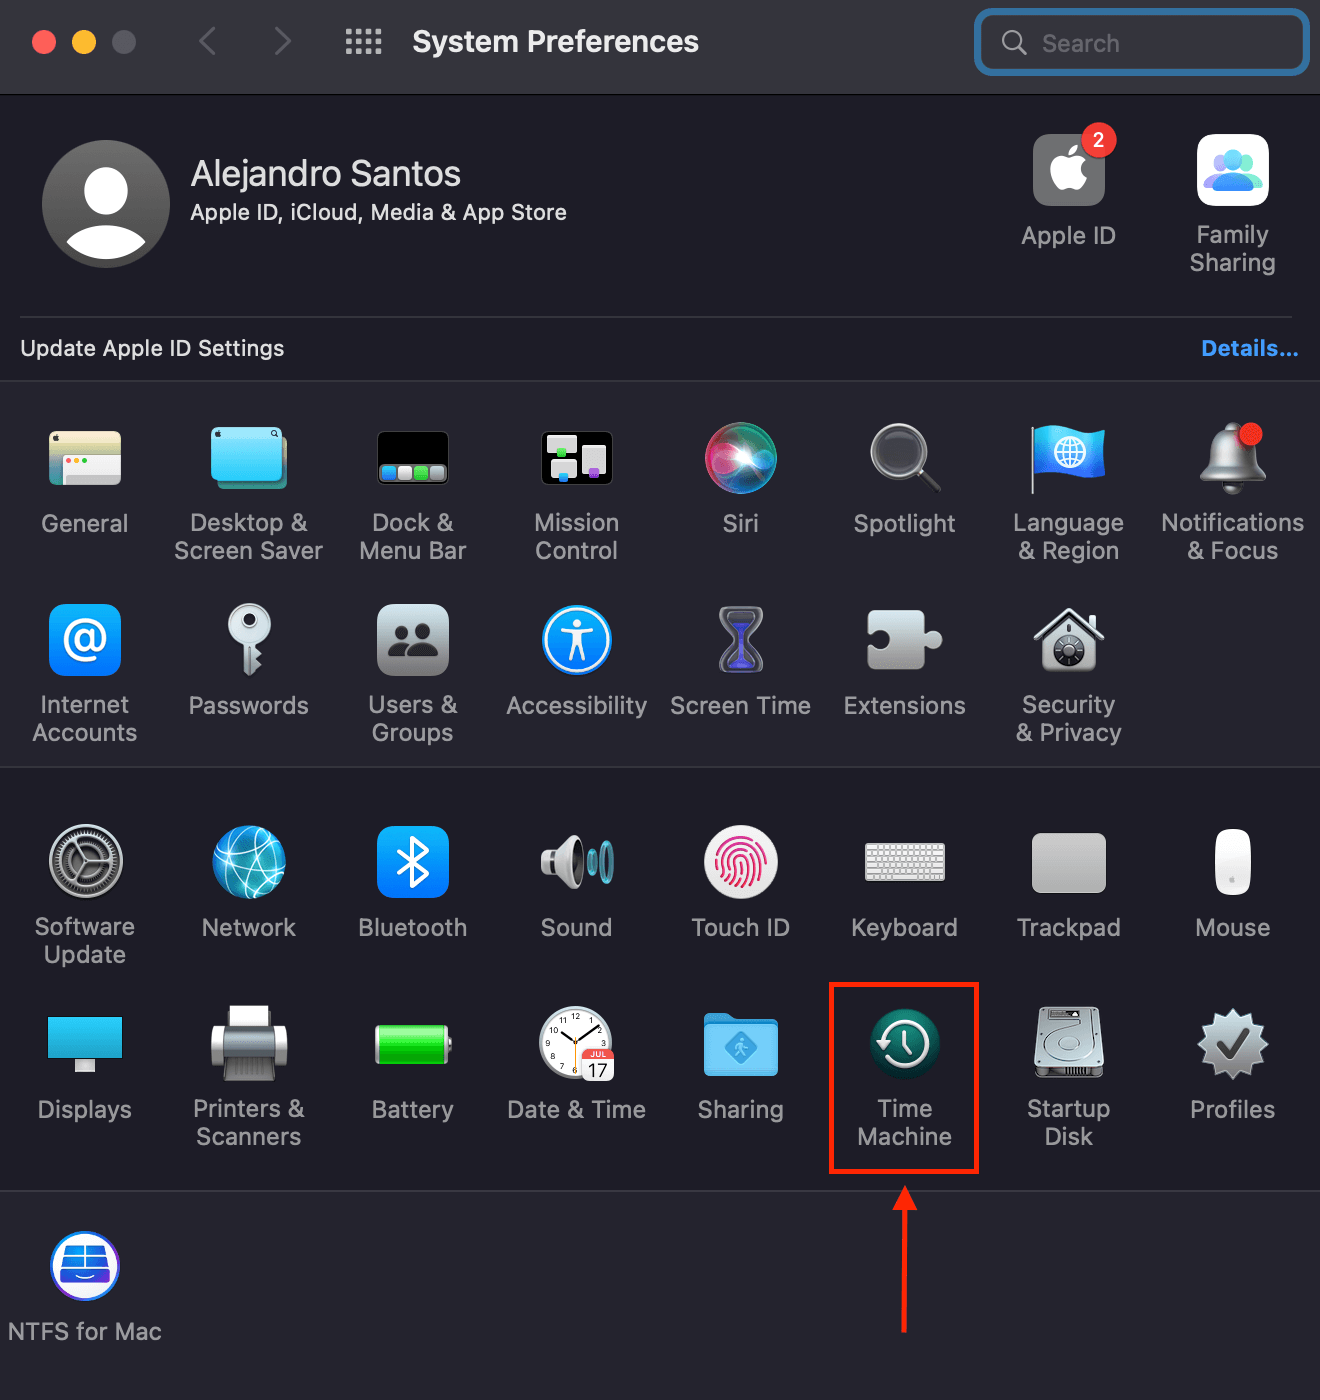
Method #5 Restore Previous File Versions Using Time Machine
Time Machine is a useful backup and restore utility that can copy entire volumes and take local “snapshots” of your device’s usage timeline. In other words, it can access the state of your laptop at an earlier point in time.
Step 1:Open the System Preferences app by clicking its icon on your dock or using Spotlight Search (CMD + Space > Type “System Preferences”), then click Time Machine.
Step 2:At the bottom of the window, check the box beside “Show Time Machine in menu bar.”
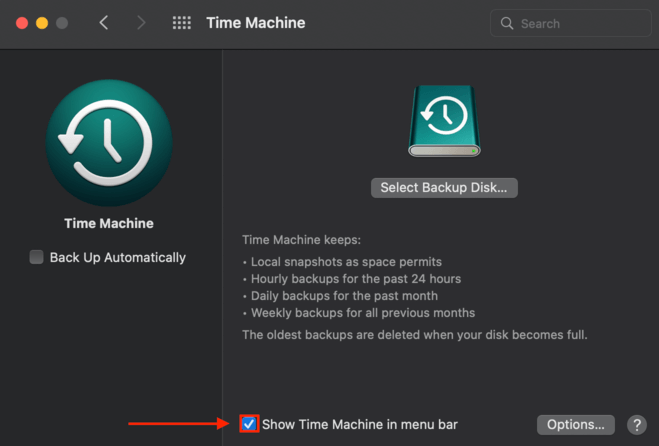
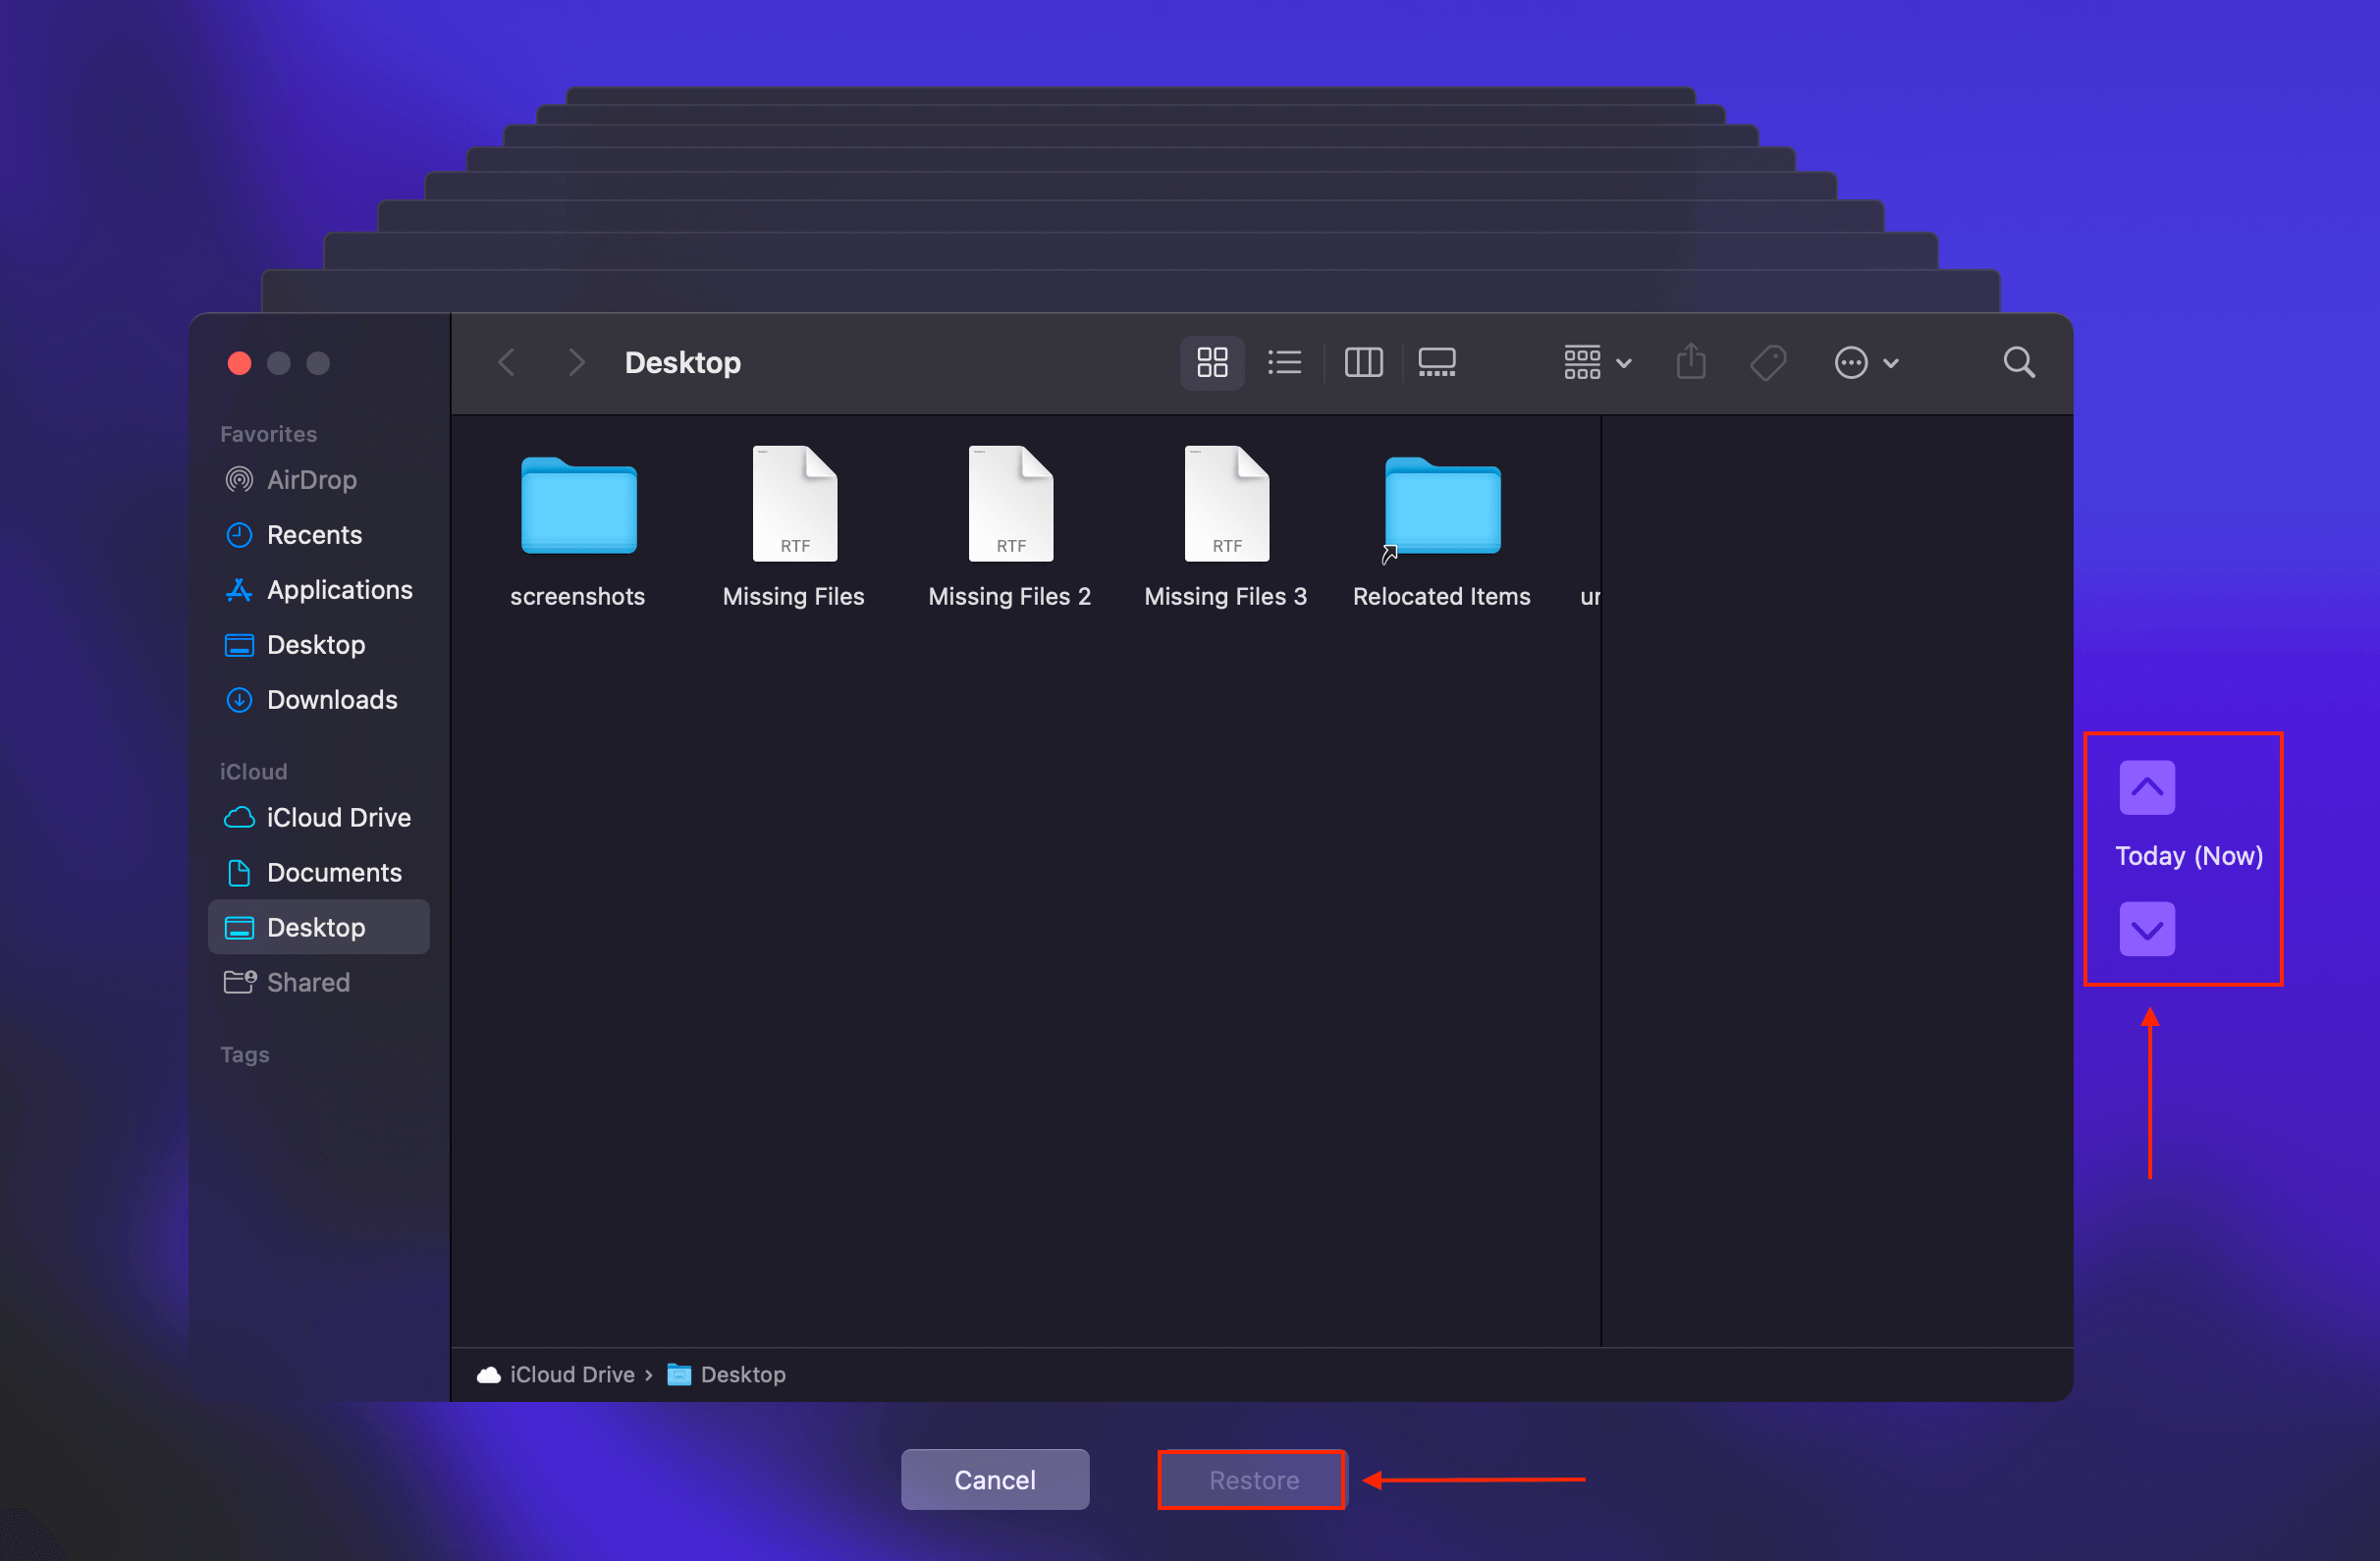
Step 3:On the Mac menu bar at the top of your screen, click the Time Machine icon and click “Enter Time Machine.”

Step 4:Use the arrows on the right of the screen to browse through snapshots and see if you can locate your files.
Method #6 Use Data Recovery Software
If you still can’t find your data, they might have been accidentally deleted. Data recovery tools make it super easy to recover deleted files and folders, even if they’ve been removed from the Trash folder. We’re specifically using Disk Drill for this article because it’s one of the few premium tools that offer a lifetime license instead of monthly or annual subscriptions. It’s a great option for civilian users at home.
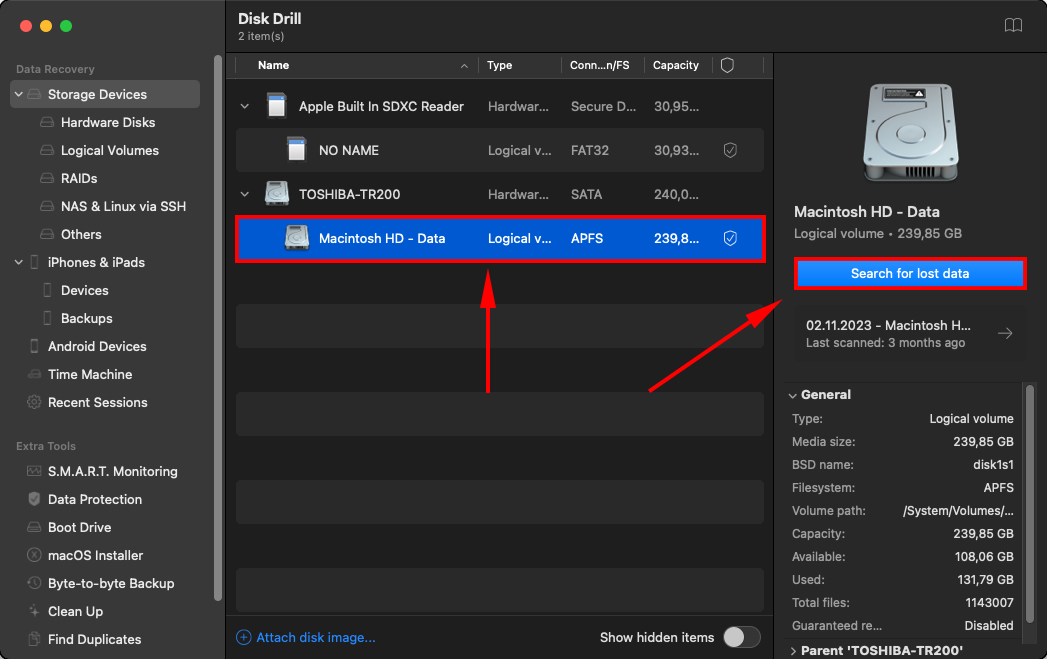
Step 1:Download and install the Disk Drill Mac app from Cleverfiles’ official website.
Step 2:Select the drive where your desktop files and folders are located (on a default Mac system, it’s on the same disk as your OS installation). Then, click “Search for lost files.”
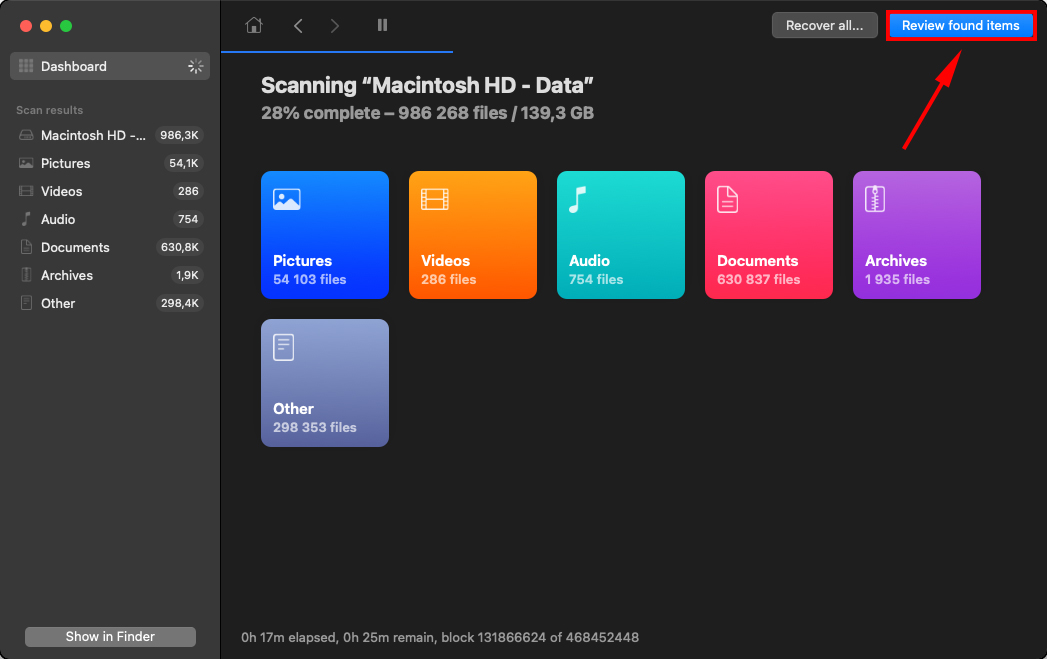
Step 3:Allow Disk Drill to finish the scanning process or go ahead and browse the files it already found by clicking one of the file type categories. To view all the data Disk Drill found, click “Review found items.”
Step 4:While browsing your data, you can easily preview any file by hovering your mouse beside the file name and clicking the eye icon that appears.
![]()
Step 5:Sort through results by using the file type folders in the sidebar and the search bar at the top right corner of the window. Check the box to the left of the files you want to recover, then click “Recover.”
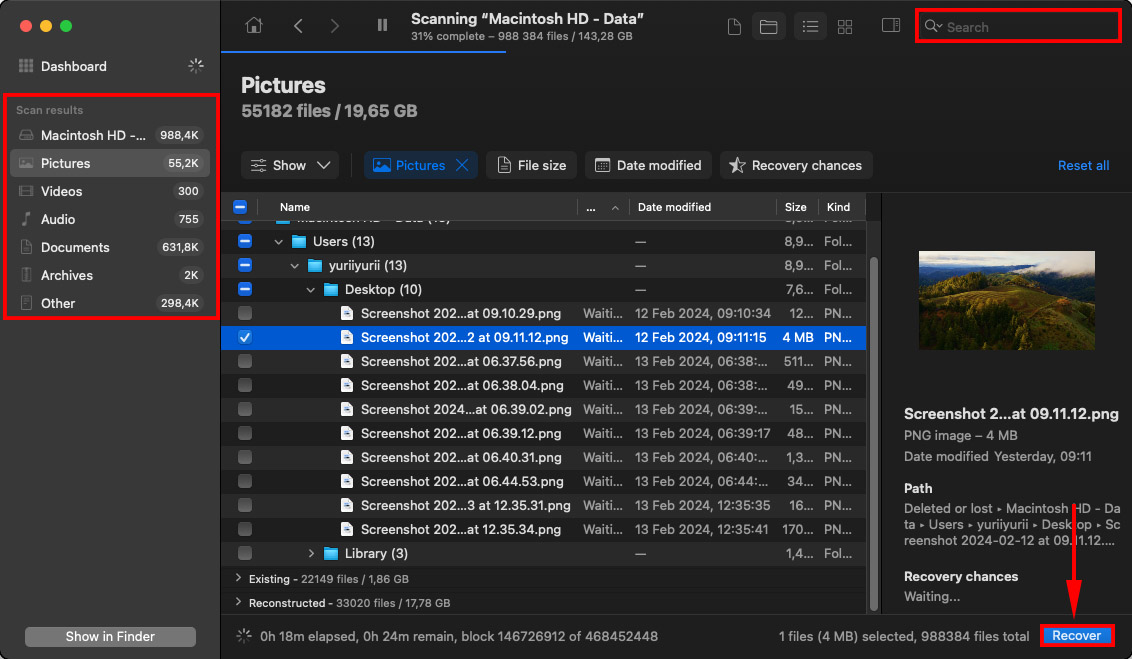
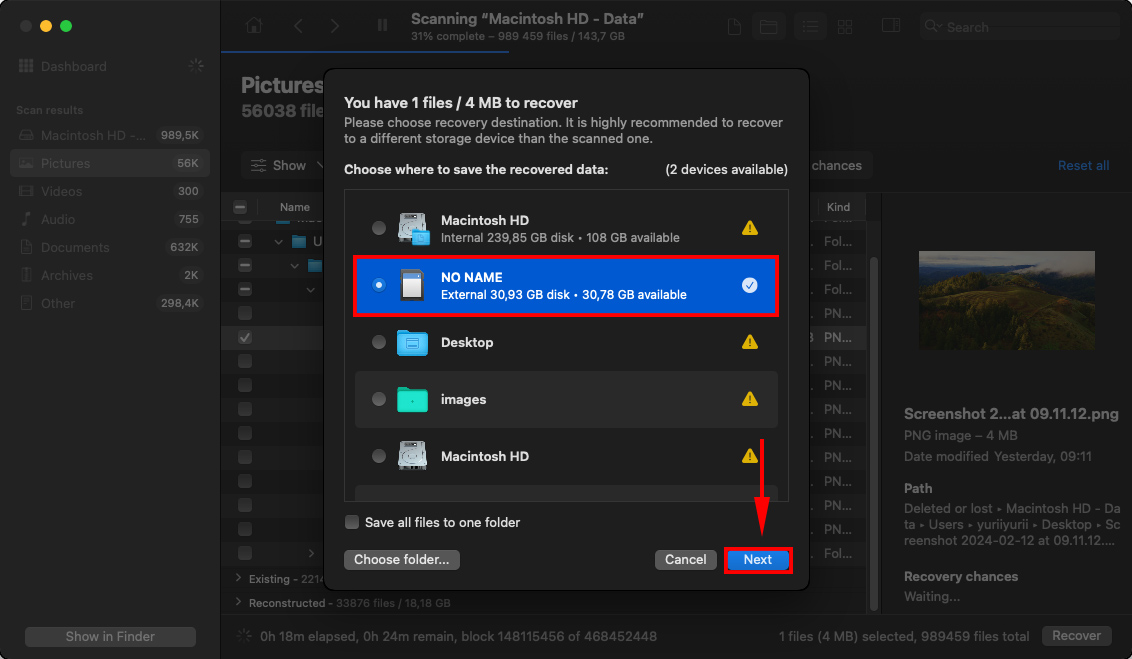
Step 6:You’ll be greeted by a popup where you can choose where your files will be recovered. Disk Drill will usually give you a warning if you’re attempting to recover your files to the same drive, so plug in a USB stick just in case.
Method #7 Unhide Files and Folders
It’s possible that your desktop files and folders haven’t disappeared at all – they’re just invisible. The Finder tool on macOS has a feature that lets users hide their files and folders. When you enable “hide” on one or multiple files and folders, their thumbnails are temporarily removed from their current location (in this case, your desktop).
However, when you can simply “unhide” them from the same location; their thumbnails will be returned to their original positions and will once again be clickable and usable.
To unhide your desktop files and folders:
- Open Finder and click Desktop in the left sidebar (under Favorites).
- Press the following keys at the same time: Command + Shift + >.
Conclusion
Thanks to its special properties as a core folder of macOS, losing files and folders from the Desktop location can be mildly frustrating. Fortunately, most of the root causes of your data’s disappearance from your desktop specifically are harmless; you’ll likely get your data back unscathed.
In case your files and folders were actually deleted, Time Machine and using data recovery software are reliable ways to get them back as long as you act quickly. Note while macOS is relatively secure and well-designed, it’s not infallible to malware and accidents can still happen. Recovery is also never a 100% guarantee. So we recommend using iCloud and Time Machine to secure your files and folders as often as you can.
FAQ:
First, try force quitting Finder to refresh all desktop app icons and files. On the Apple menu bar, click the Apple icon > Force Quit… Click the Finder on the Applications list then click “Relaunch.” Click “Relaunch” again on the confirmation popup.
If your icons still don’t reappear, open the Terminal app by going to Finder > Utilities > Terminal app. Then, type this command and press enter:
com.apple.finder CreateDesktop false
Finally, restart Finder by typing the following command and pressing enter:
killall Finder
The #1 reason for why folders disappeared from desktop on a Mac is due to iCloud relocating files to save storage space. It’s likely that the Mac desktop files disappeared after updating your OS.
Other possible reasons include hardware and software issues as well as human error causing general data loss.
You may have Desktop and Documents selected for saving on your iCloud Drive. To undo this setting, on the Apple menu bar, click the Apple icon > System Preferences > Internet Accounts. On the left sidebar, click iCloud.
On the list that appears, click the “Options…” button beside “iCloud Drive”, and deselect “Desktop & Documents Folders” on the window that pops up.


