
Missing photos on your iPhone? Ironically, the iPhone’s many advanced features may be the reason why this issue is so common. Fortunately, there are also many ways to recover deleted photos from an iPhone, depending on how your device is set up.
This article covers them all. The process varies depending on your specific scenario, so we provided 5thods to Recover Delet reliable methods (along with detailed instructions) that solves the most common data loss problems on an iPhone. Read on!
| Scenario | Solution |
| When you don’t have any backups of your photos (iTunes, iCloud, Google Photos, etc.) | Method 1: Recover Photos Using iPhone Data Recovery Software |
| When you created a backup using iTunes on your Mac, which is usually only available for users with macOS Mojave and below (unless iTunes is installed via the Retroactive app or similar). | Method 2: Retrieve Photos from a Finder/iTunes App Backup |
| When you created an iCloud backup of your iPhone and you’re connected to a reliable wireless network. | Method 3: Recover Deleted Photos from an iCloud Backup |
| When you have an iTunes or iCloud backup or you only want to view local data. | Method 4: Recover Photos Using Free iPhone Data Recovery Software |
| When you backed up your pictures to Google Photos and you’re connected to a stable network | Method 5: Restore Images From Google Photos Backup |
Table of Contents
Make Sure Your Photos Are Really Gone
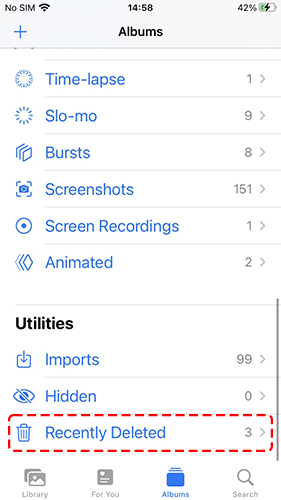
Before trying the recovery methods we cover in this article, make sure that they aren’t in the Recently Deleted album! Whenever you delete photos from your iPhone, the Photos app sends them to the Recently Deleted album (Photos > Albums > Utilities).
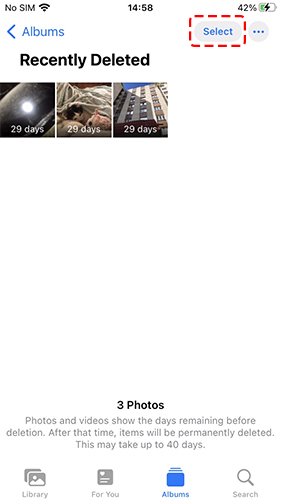
Deleted photos are stored here for 30 days – within that time frame, you can go into the Recently Deleted album and choose to restore them or delete them permanently. After 30 days, the photos are permanently deleted (which is when the other methods in this article will come in handy).
Step 1. Open the Photos app on your iPhone.
Step 2. Tap on Albums and then scroll down until you see Recently Deleted, it should be right at the bottom of the list.
Step 3. From here, click on Select which will be in the upper right-hand corner of your screen, and tap on the recently deleted photos that you would like to recover. If you want to recover all of them, you can click on Recover All. You also have the option to delete all from within this screen.
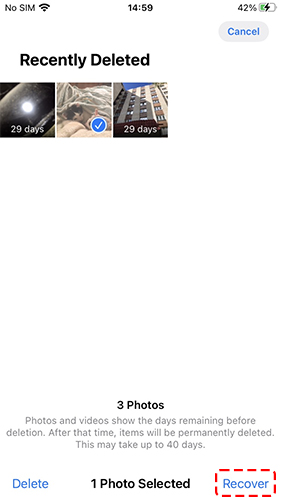
Step 4. Click on Recover to retrieve deleted photos and then they will be put back into the All Photos view.
5 Methods to Recover Deleted Photos on iPhone
Aside from the Recently Deleted album, there are other useful tools that can help you recover deleted photos. Your primary safety net is a myriad of backup types that guarantee 100% recovery, as long as they were created before the photos went missing. We’ll demonstrate how to access and restore each of them in the next section.
Even if you don’t have a backup, we provide alternative methods to restore your deleted photos directly from your iPhone’s disk. However, we can’t guarantee 100% recovery success (some files may not be recovered) but the right tools will give you the best chance. We’ll also cover them in the guides below.
Method 1: Recover Photos Using iPhone Data Recovery Software
If your photos are no longer in the Recently Deleted album and you don’t have any backups available, you can use data recovery software to restore them.
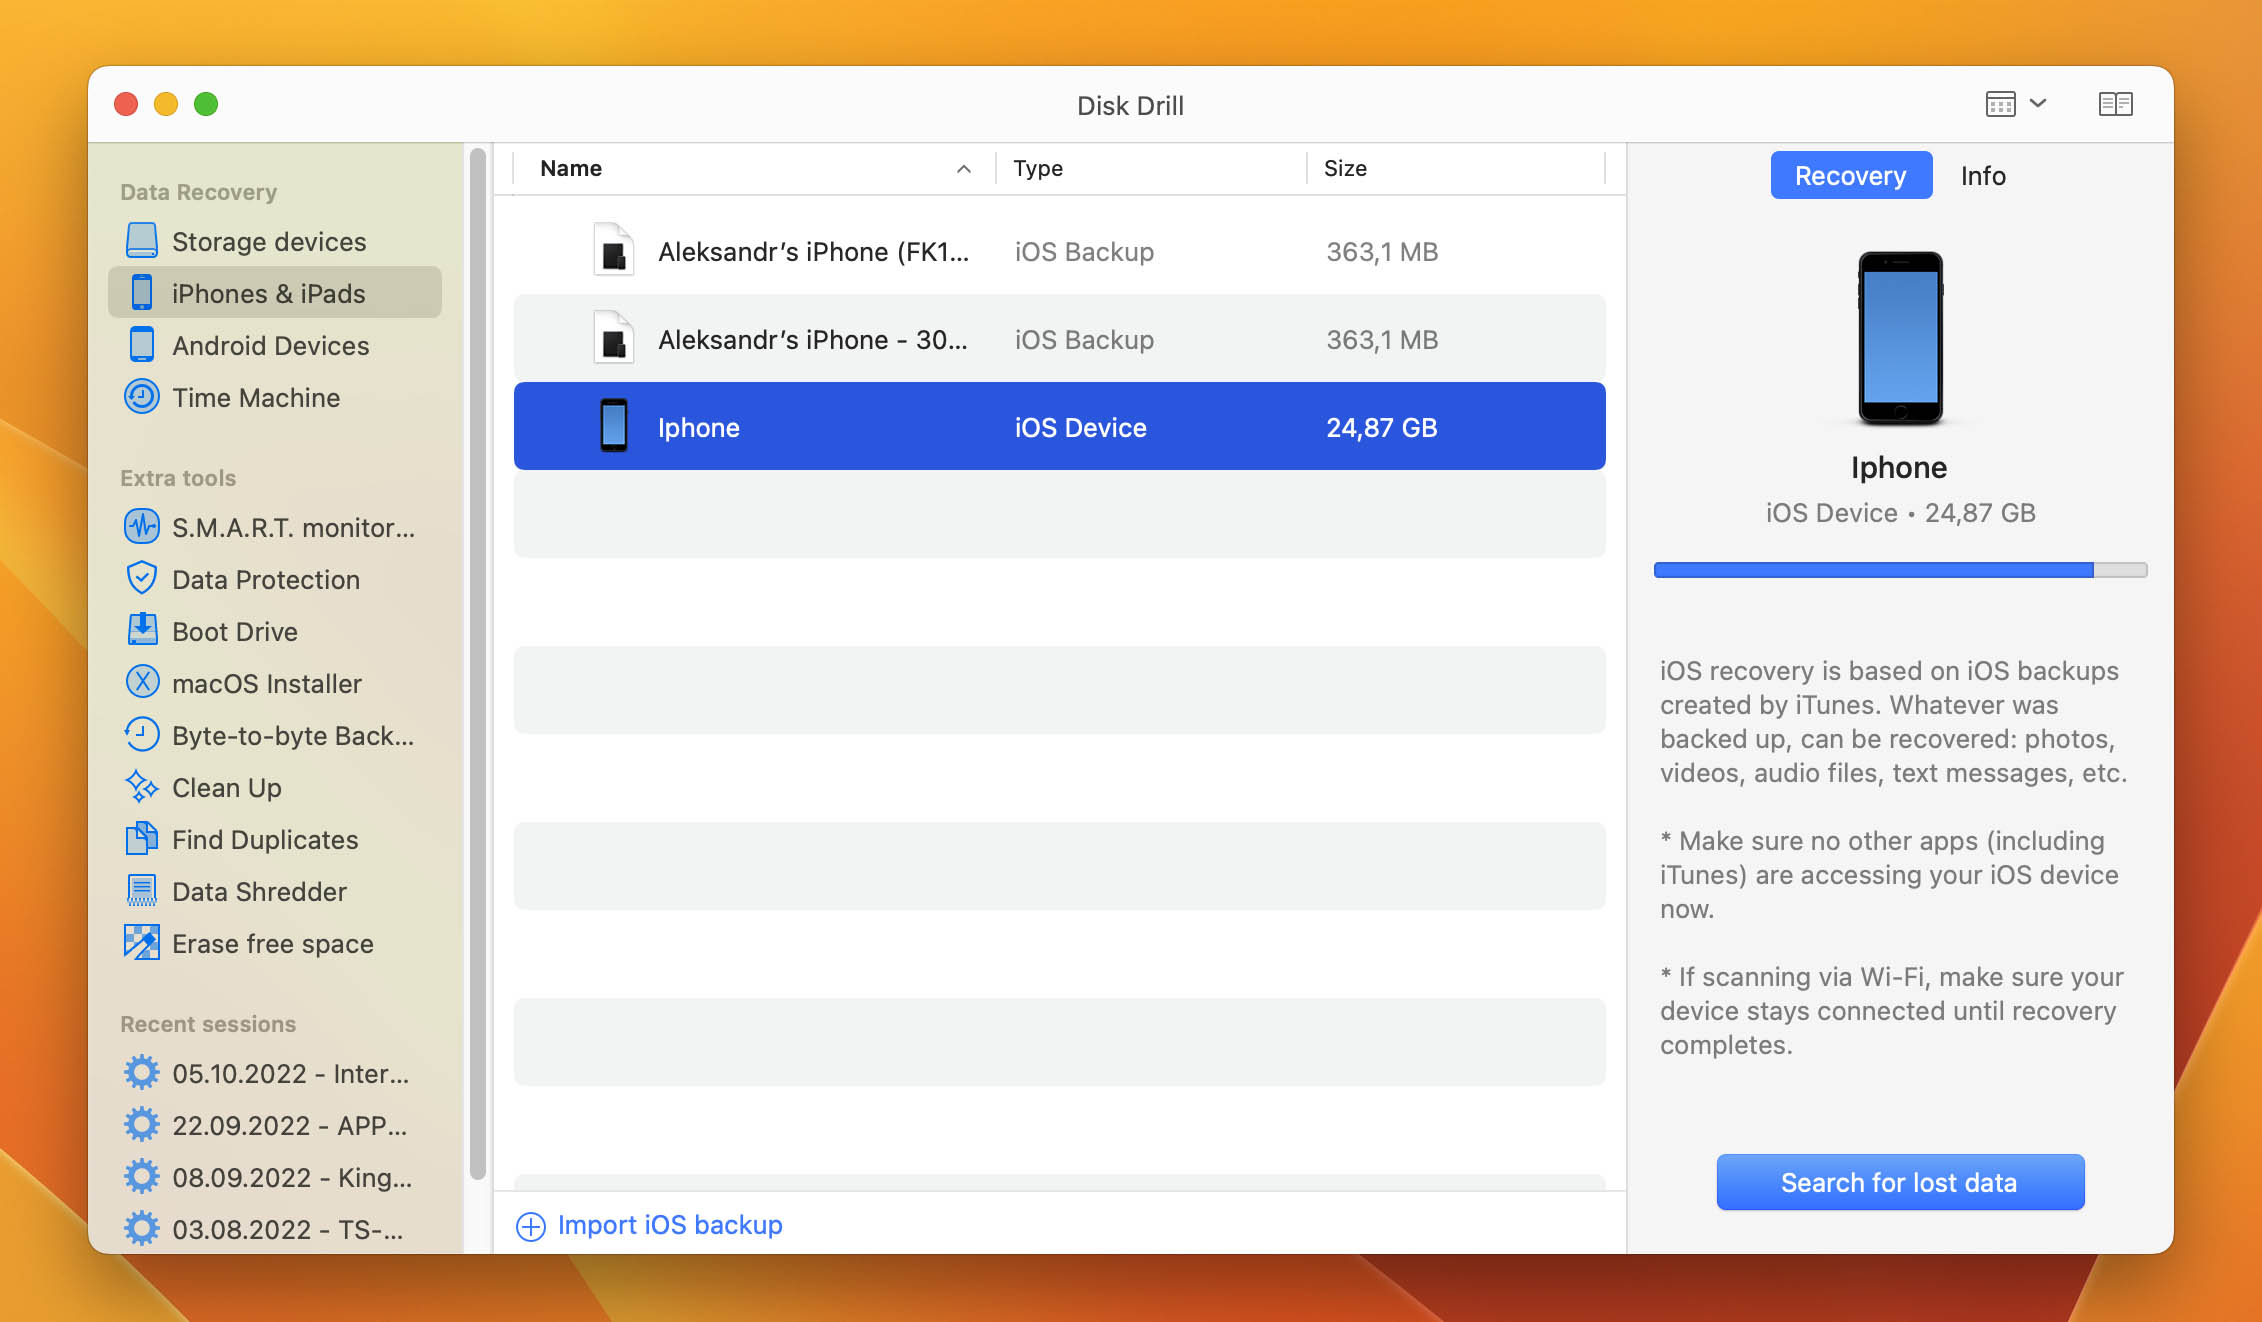
For this article, we’ll be using a tool called Disk Drill. It’s natively built for macOS and has been designed to work around Apple’s no direct data access policy for the iPhone. It also performed very well during our tests where we tried to recover JPG and HEIC images, which are common iPhone photo types. We’ll demonstrate how to use Disk Drill to recover your iPhone photos in the guide below.
🎁 Apply a coupon “DDIPHONE” during the checkout process, and you’ll get Disk Drill PRO (Mac edition) with a 35% discount.
Step 1. Download and install Disk Drill for your computer.
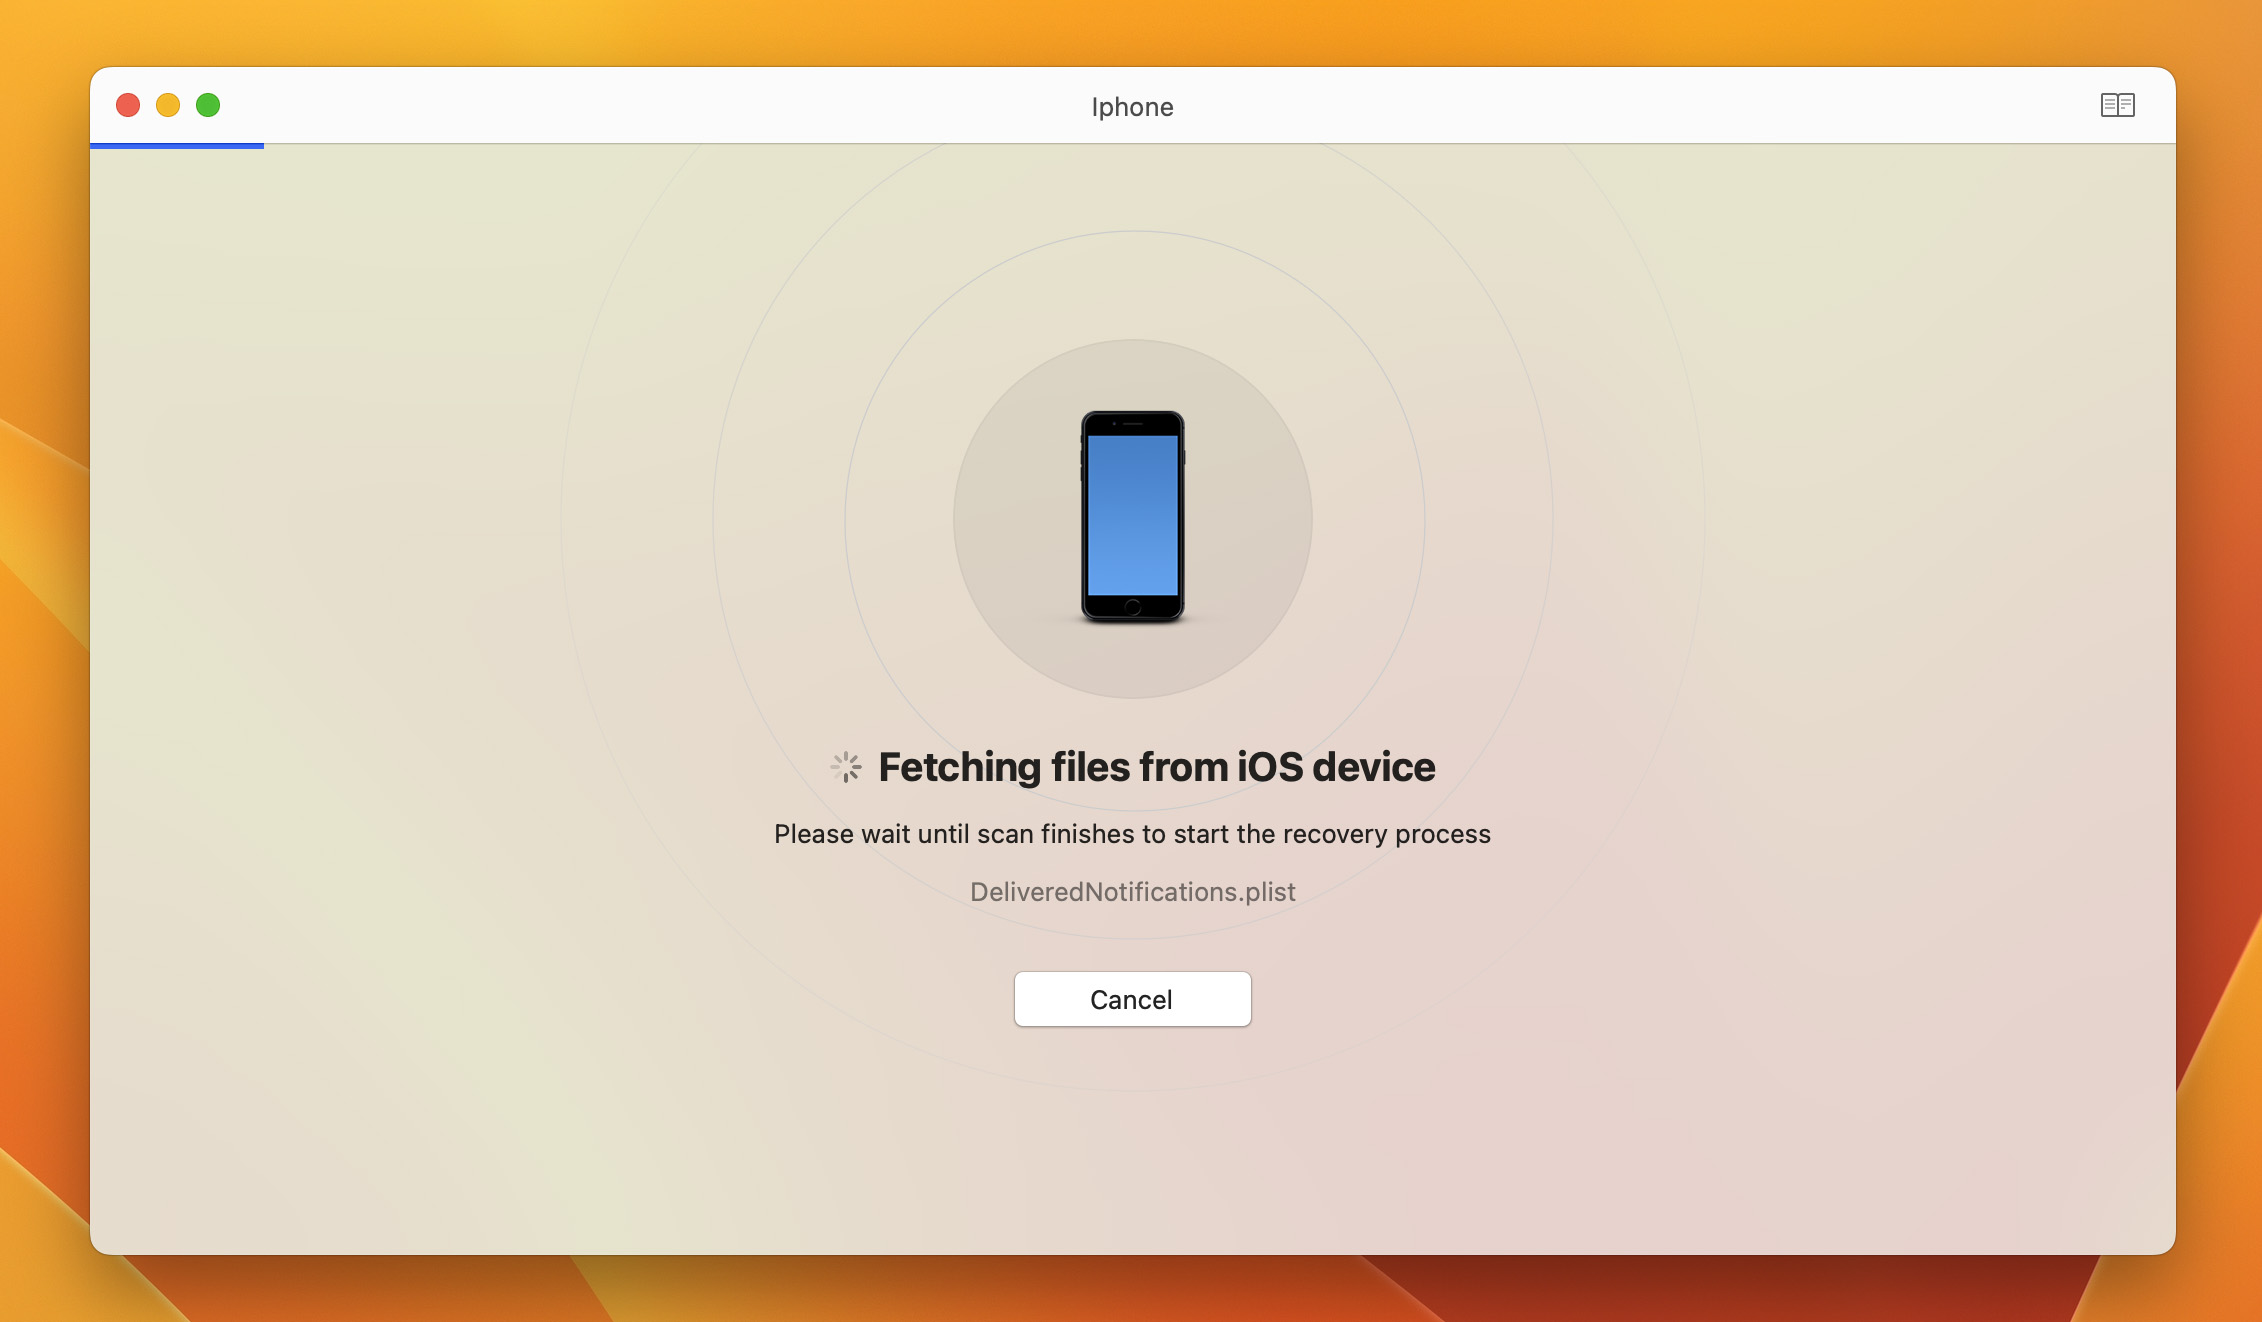
Step 2. Initiate a scan by plugging your iPhone into your computer and selecting it as the device to search through.
Step 3. Wait for the scanning process to complete. This shouldn’t take long but will vary depending on how much data you have on your iPhone. For my phone, it took around 20 minutes to complete and I have a lot of things stored on my device.
Step 4. After the scan has completed, you will be greeted by all of the found files on your iPhone. Click on the Photos icon to view the deleted photos that Disk Drill was able to recover.
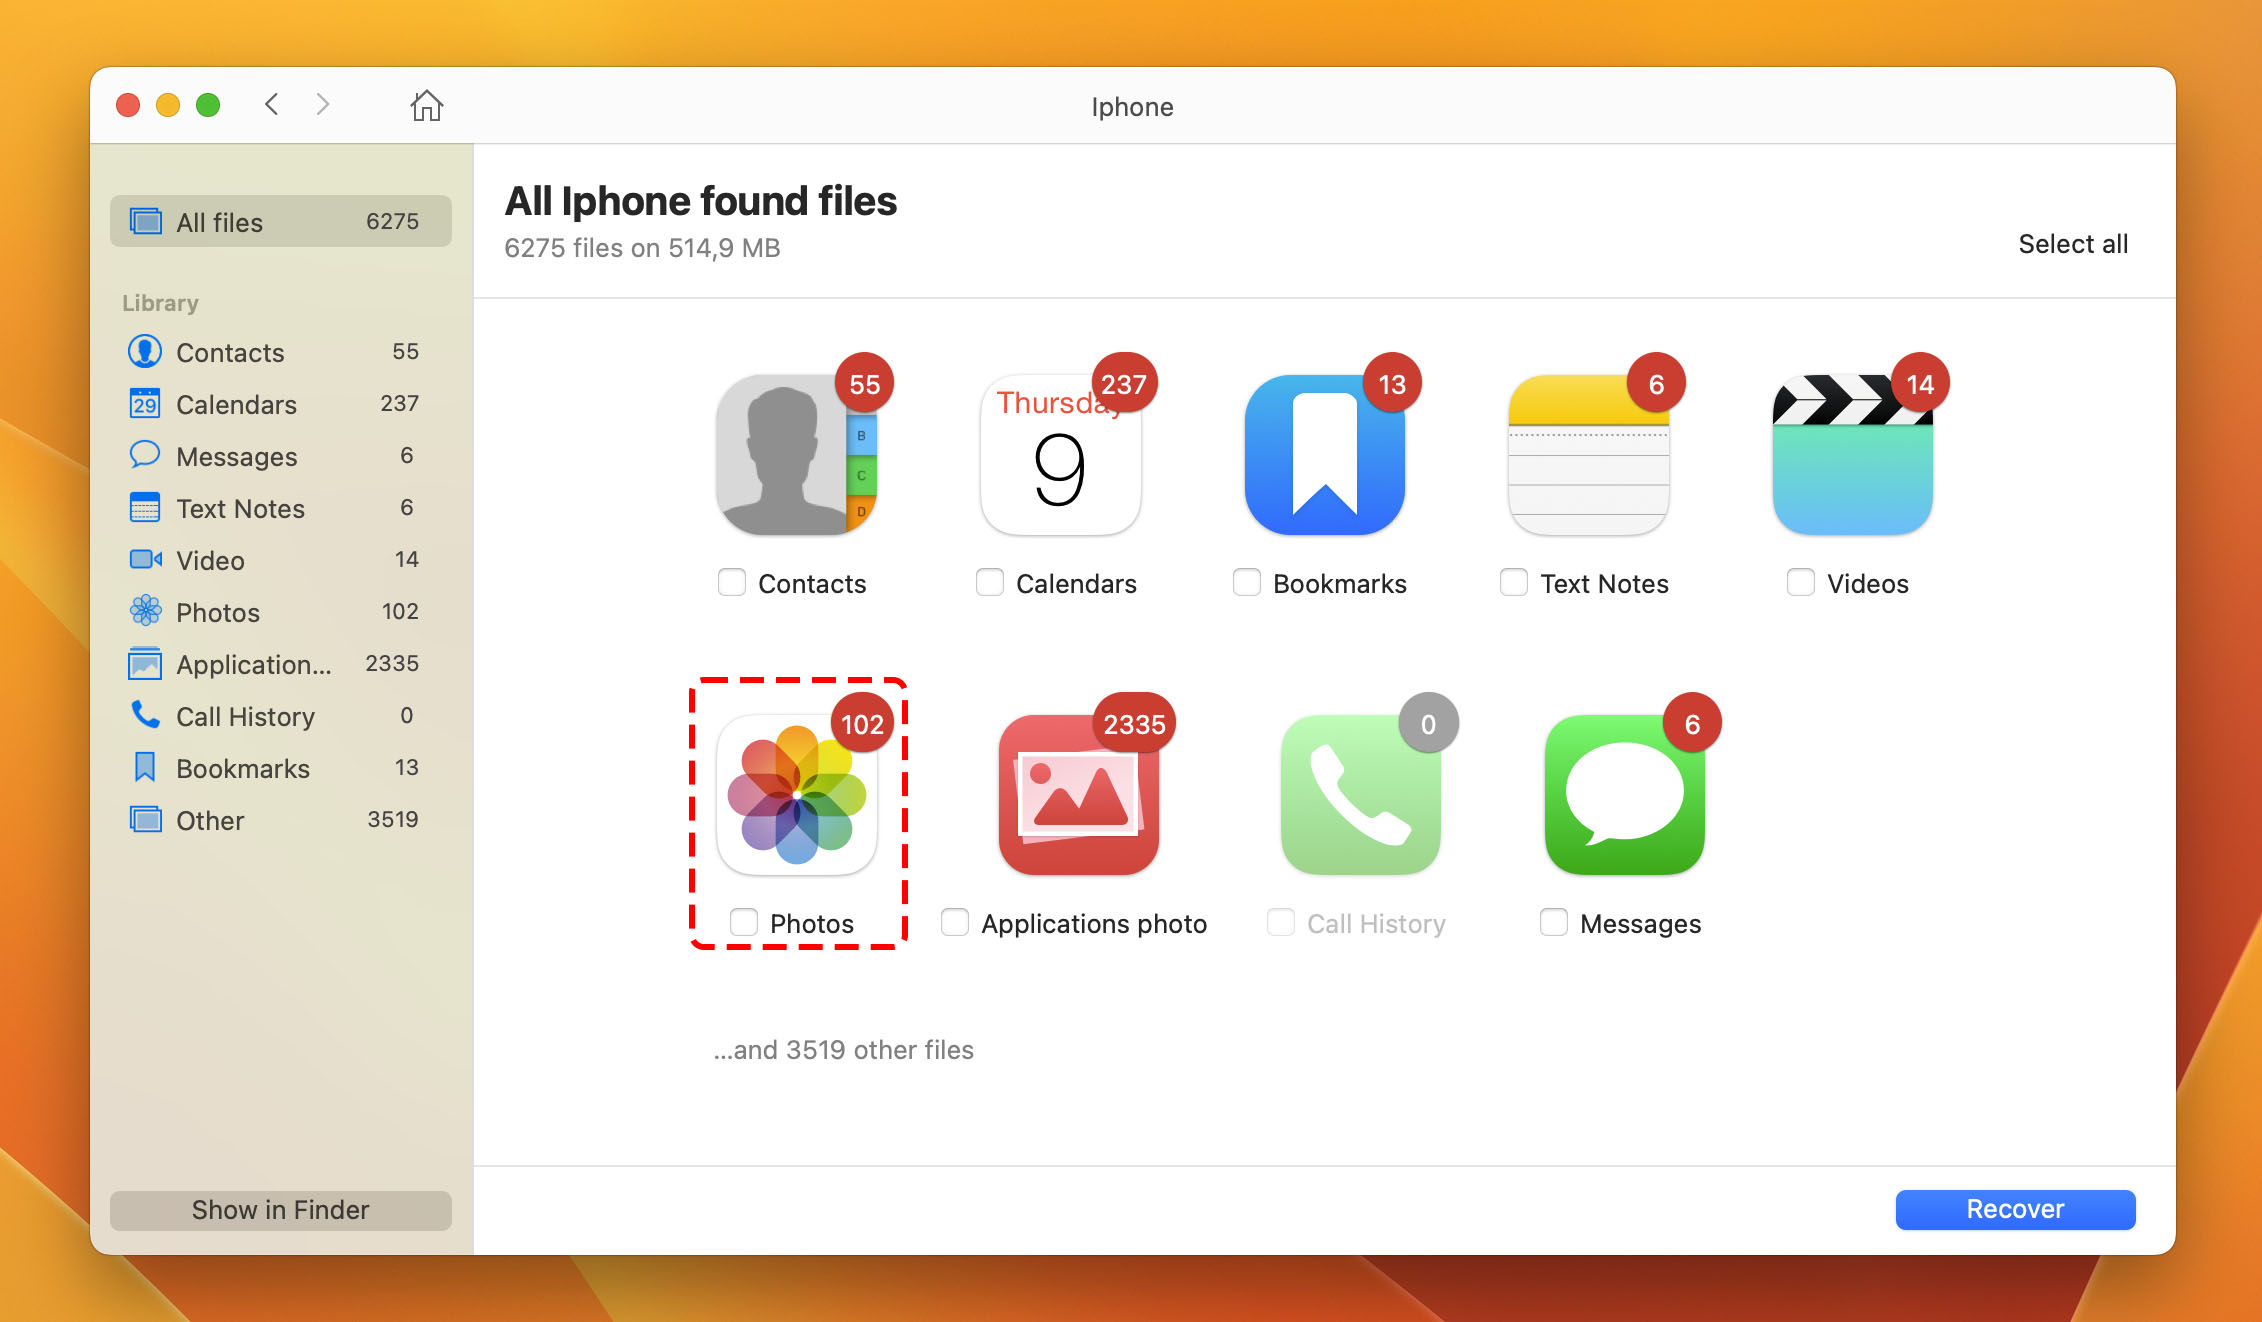
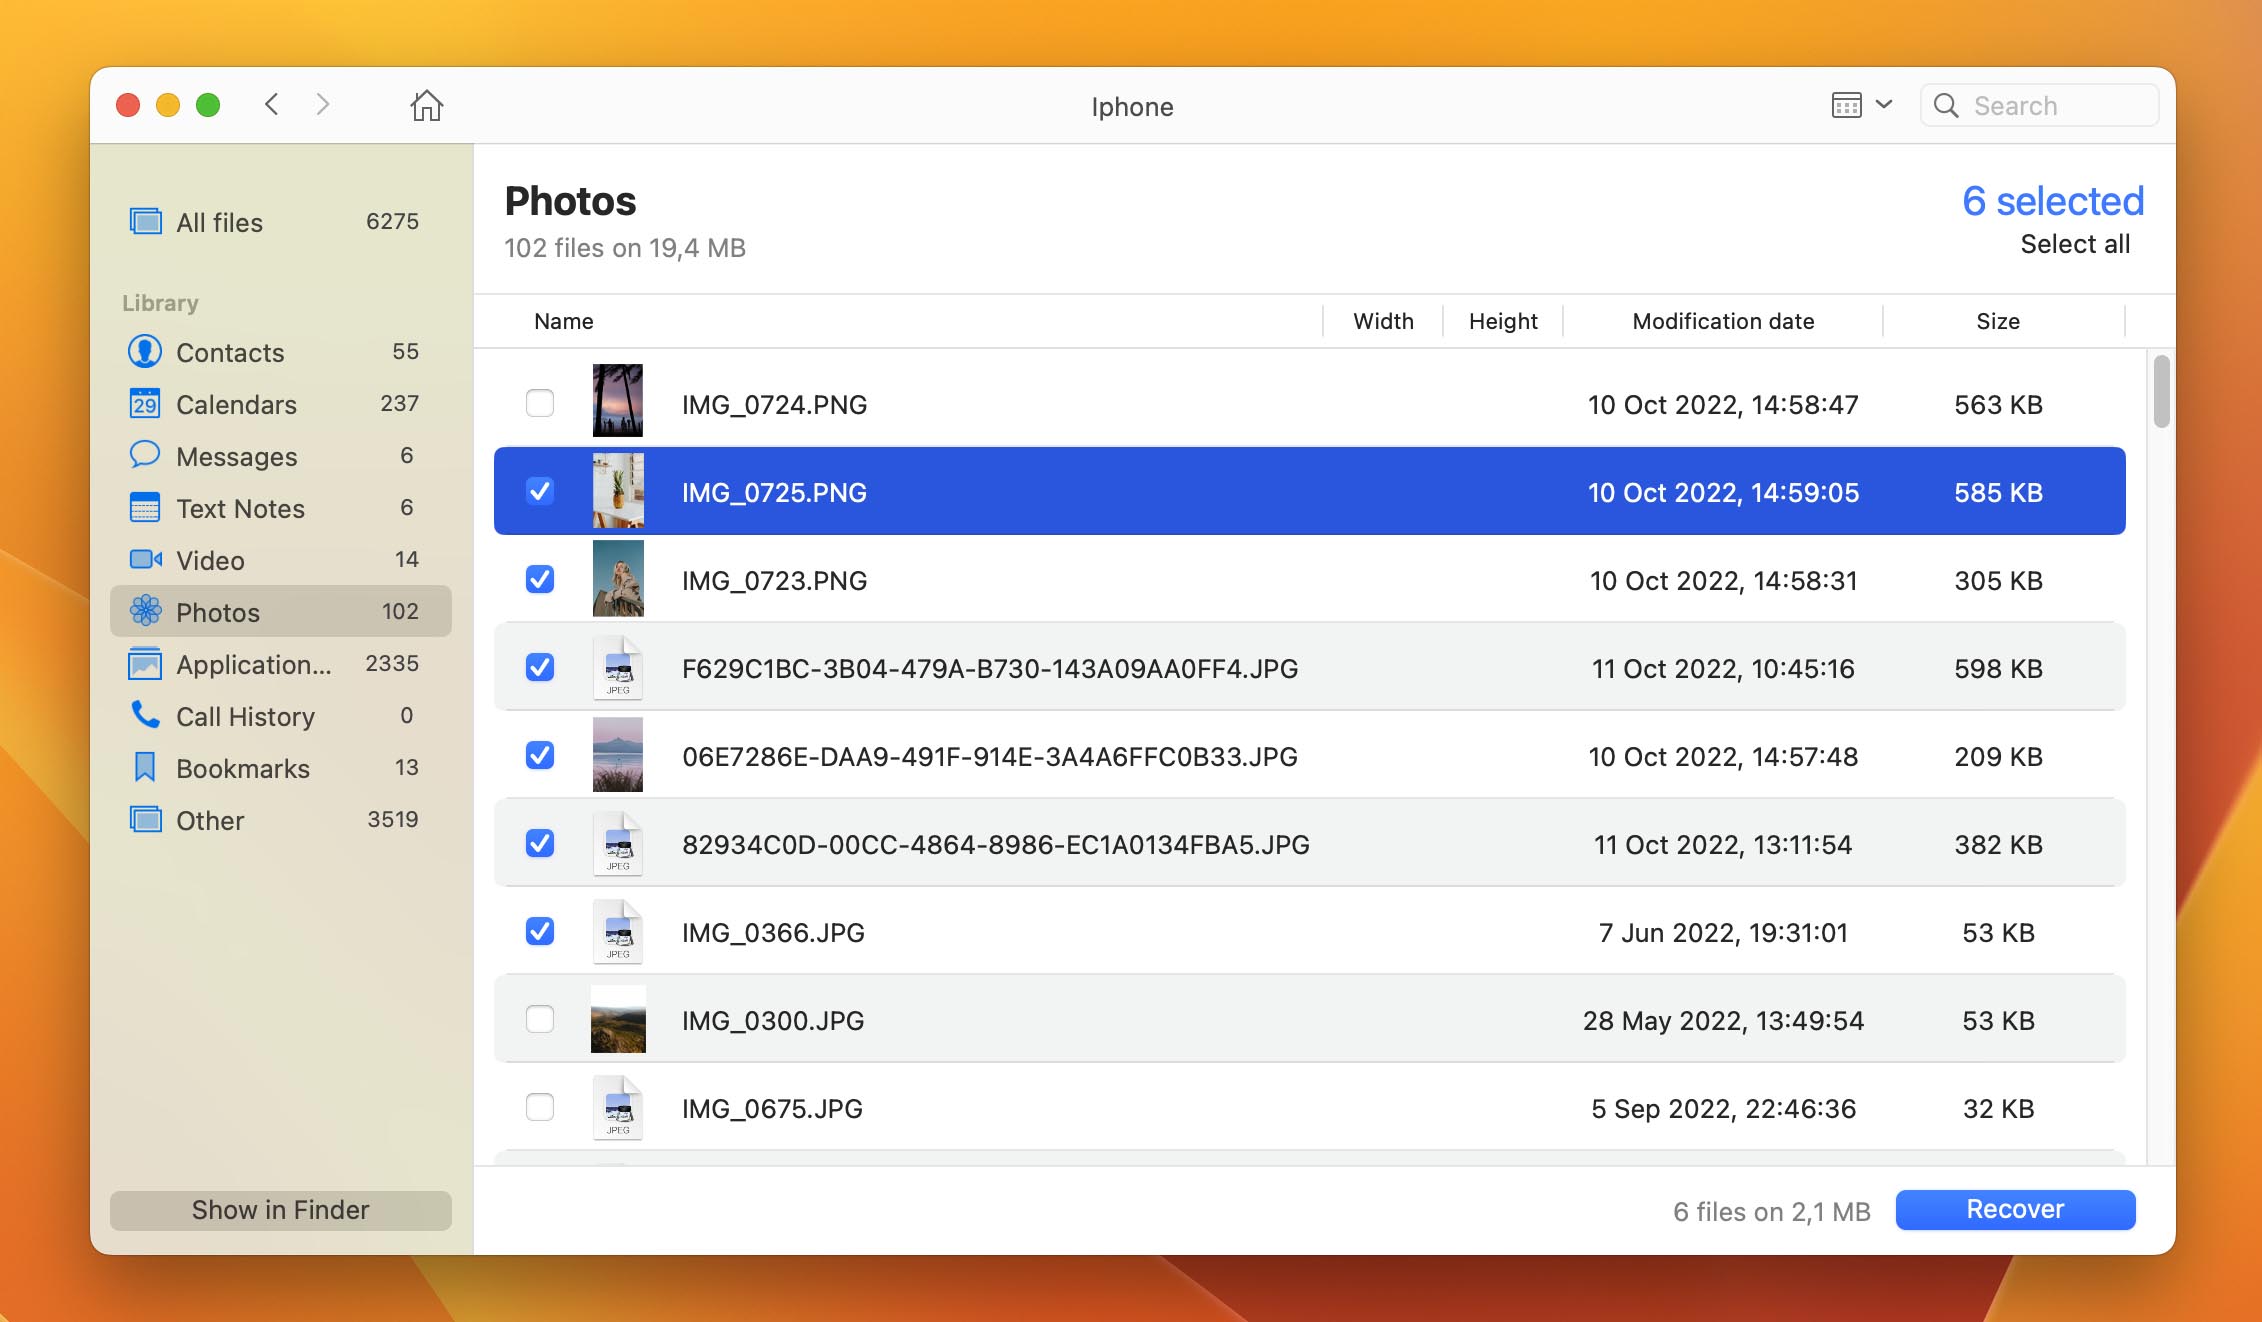
Step 5. Once on the recovered photos screen, we can find the deleted photos on iPhone. You can sort by name and date. Since all of my photos haven’t been named and have the default file name, I am going to sort by the date that I want to recover my deleted photos from. You can search by photo name on your iPhone here if you do know the name of it.
Step 6. Select the photos that you would like to recover and then click the blue Recover button in the lower right-hand corner of the screen.
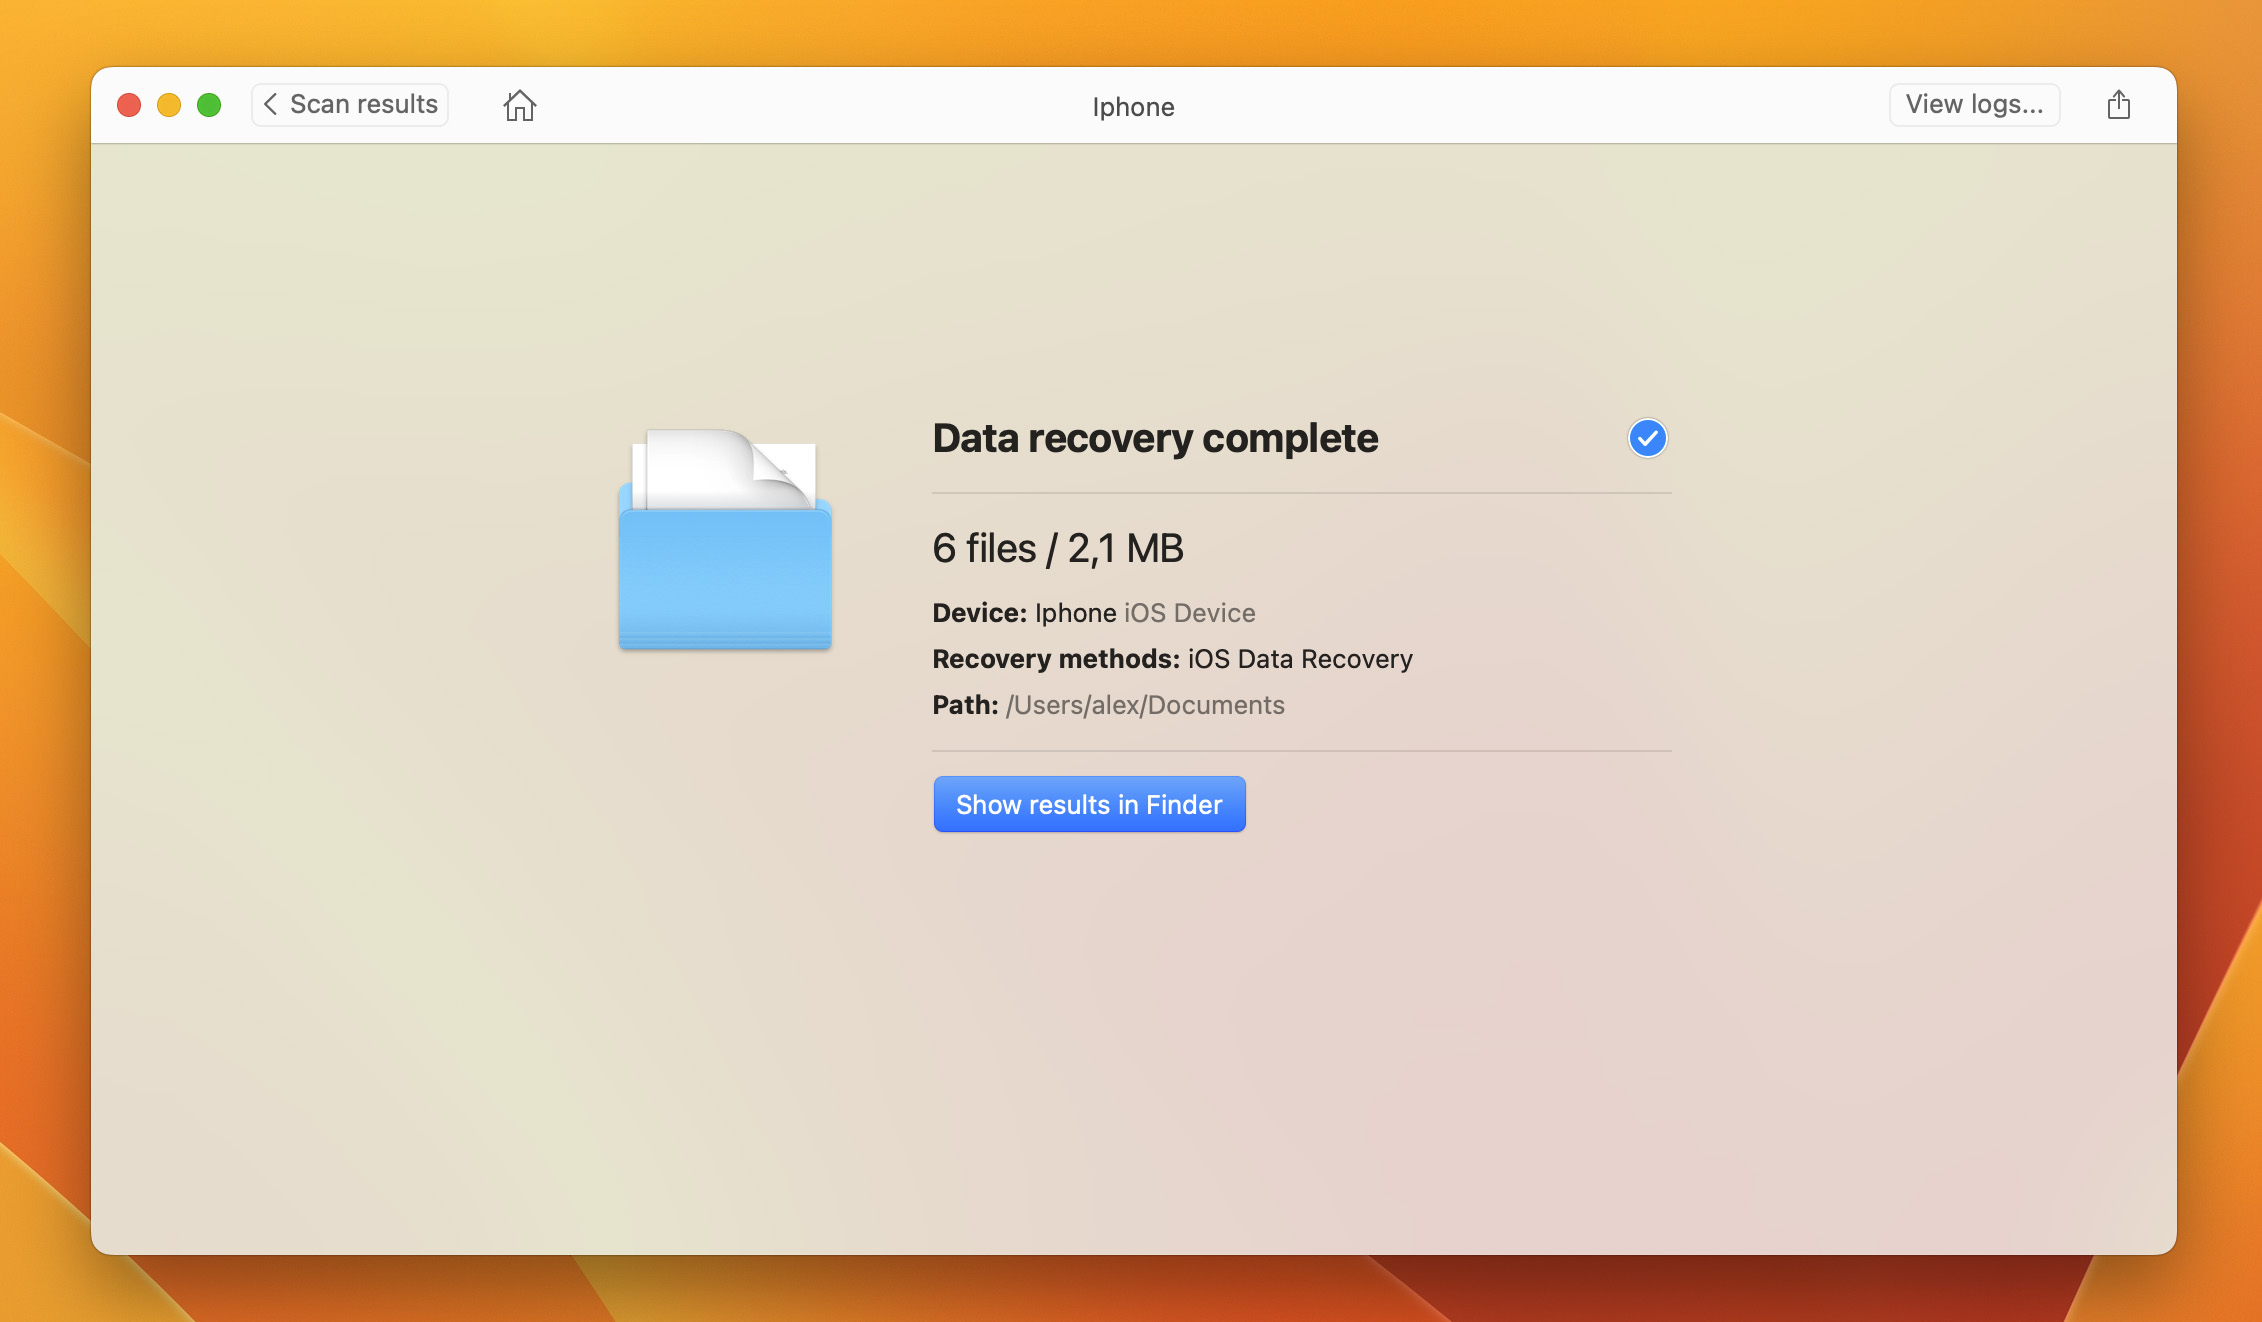
Step 7. Choose a path for Disk Drill to restore the deleted photos to and click Next.
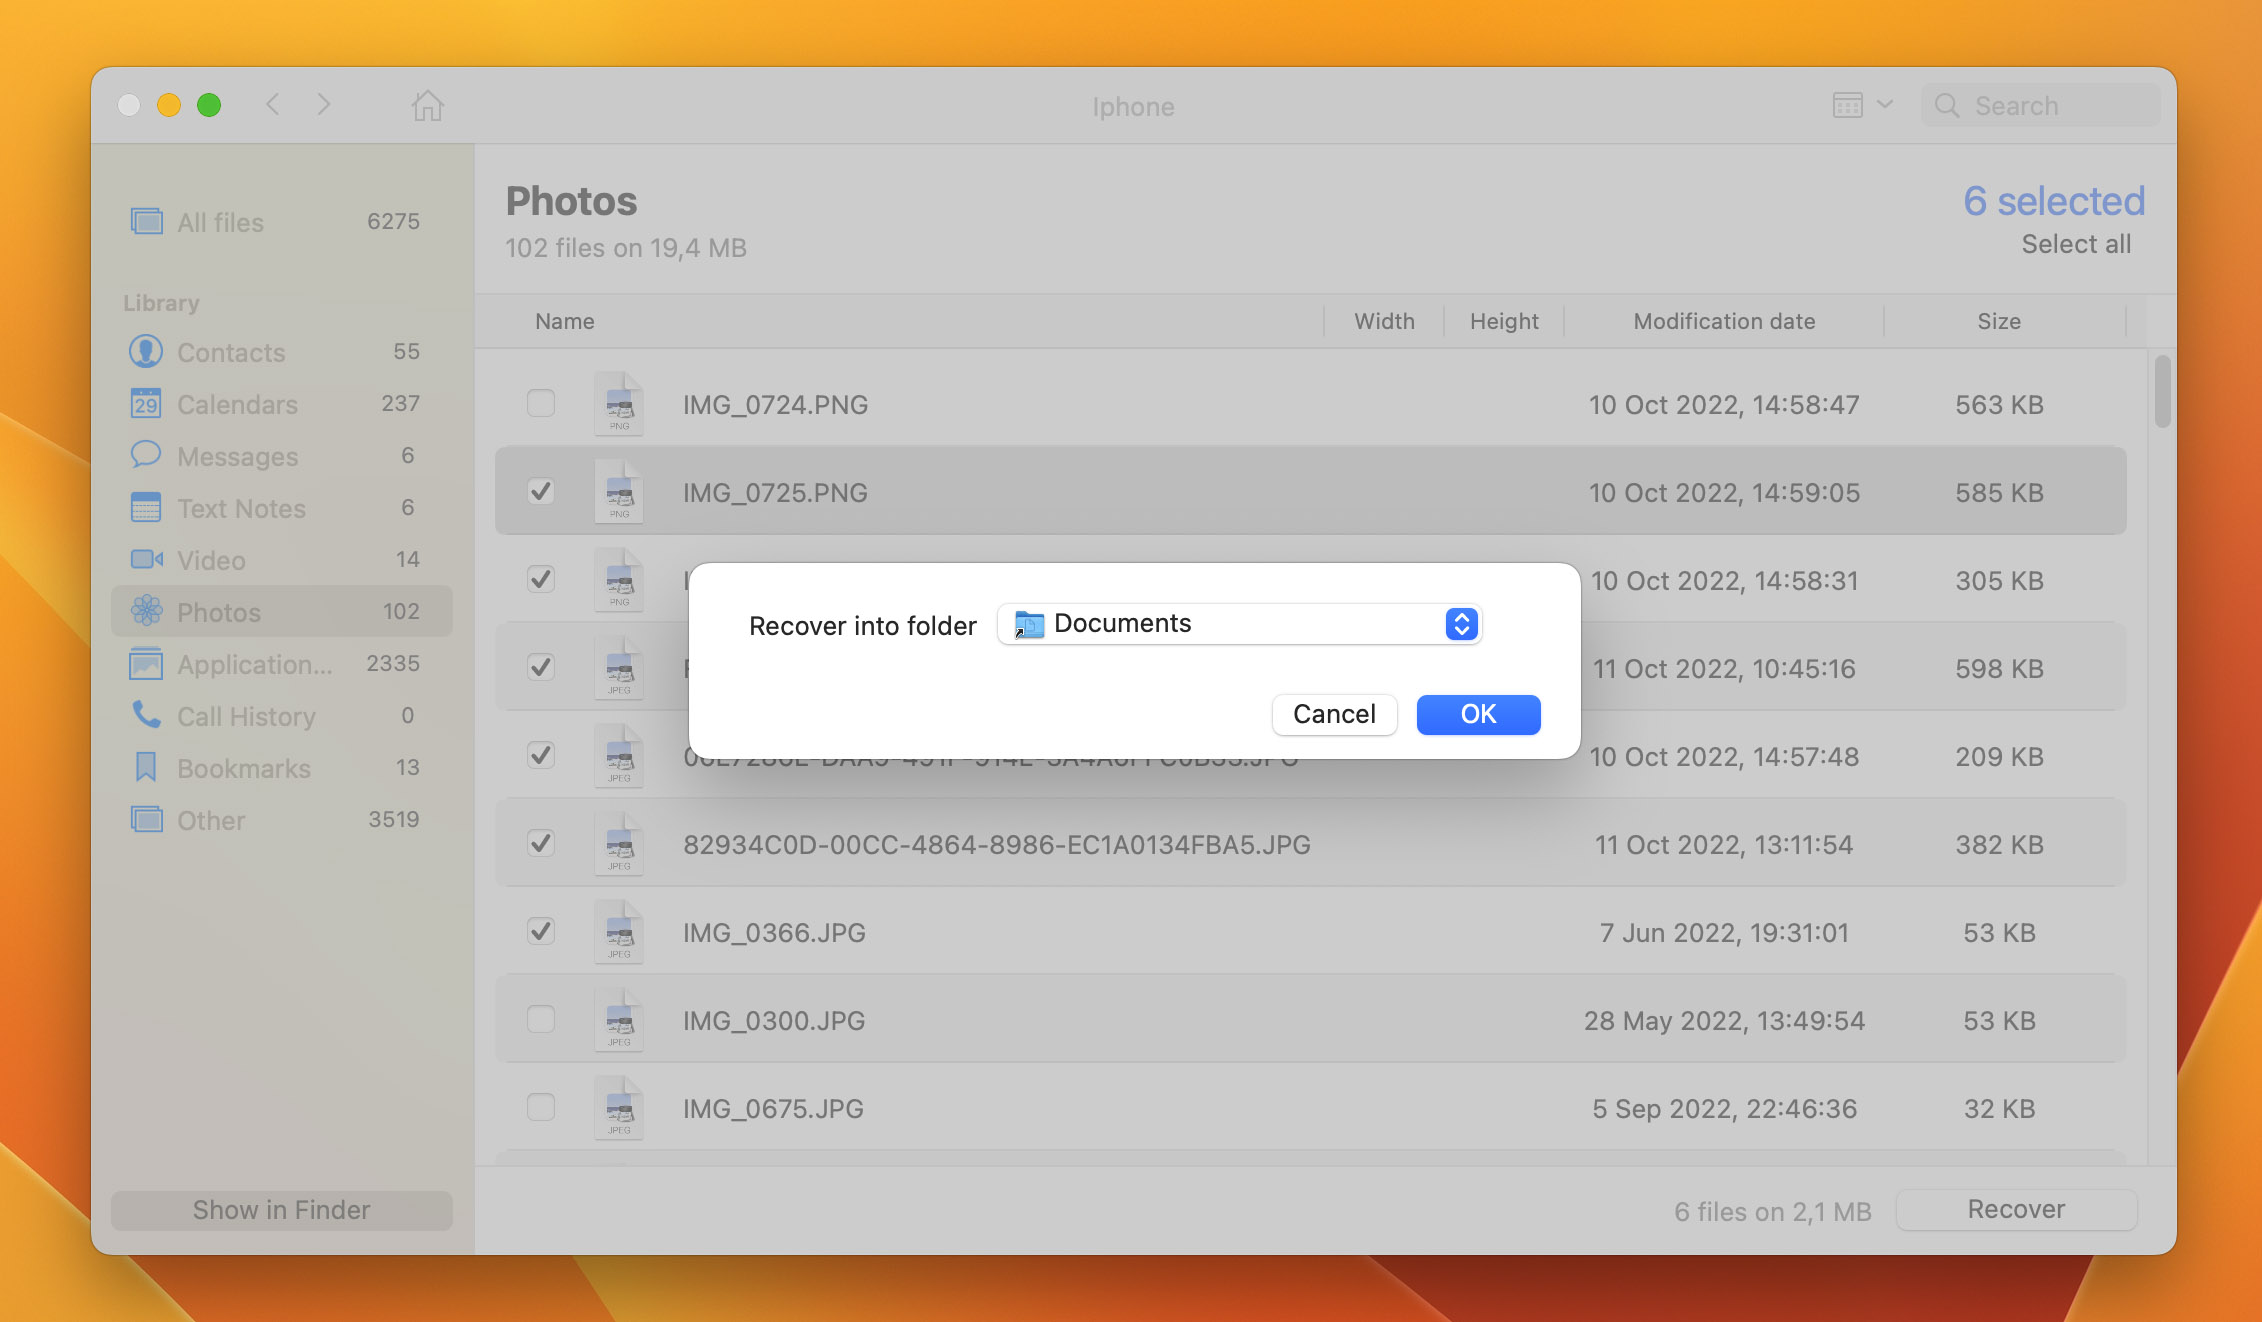
Step 8. After you have successfully recovered the deleted photos, you will receive a confirmation message that the recovery is complete and the deleted photos will be restored to the location you choose on your computer.
Method 2: Retrieve Photos from a Finder/iTunes App Backup
If you recently created a backup of your iPhone using your computer, restoring it will revert your device to the state it was in when the backup was created. If your missing photos were still in the Photos app during the backup, they should reappear.
Depending on your system, you either used iTunes or Finder, which you’ll need again for the restoration process. It’s iTunes for Windows and macOS Mojave (or earlier) users and Finder for macOS Catalina (or later) users. The process is very similar though, so the guide below is applicable to all users.
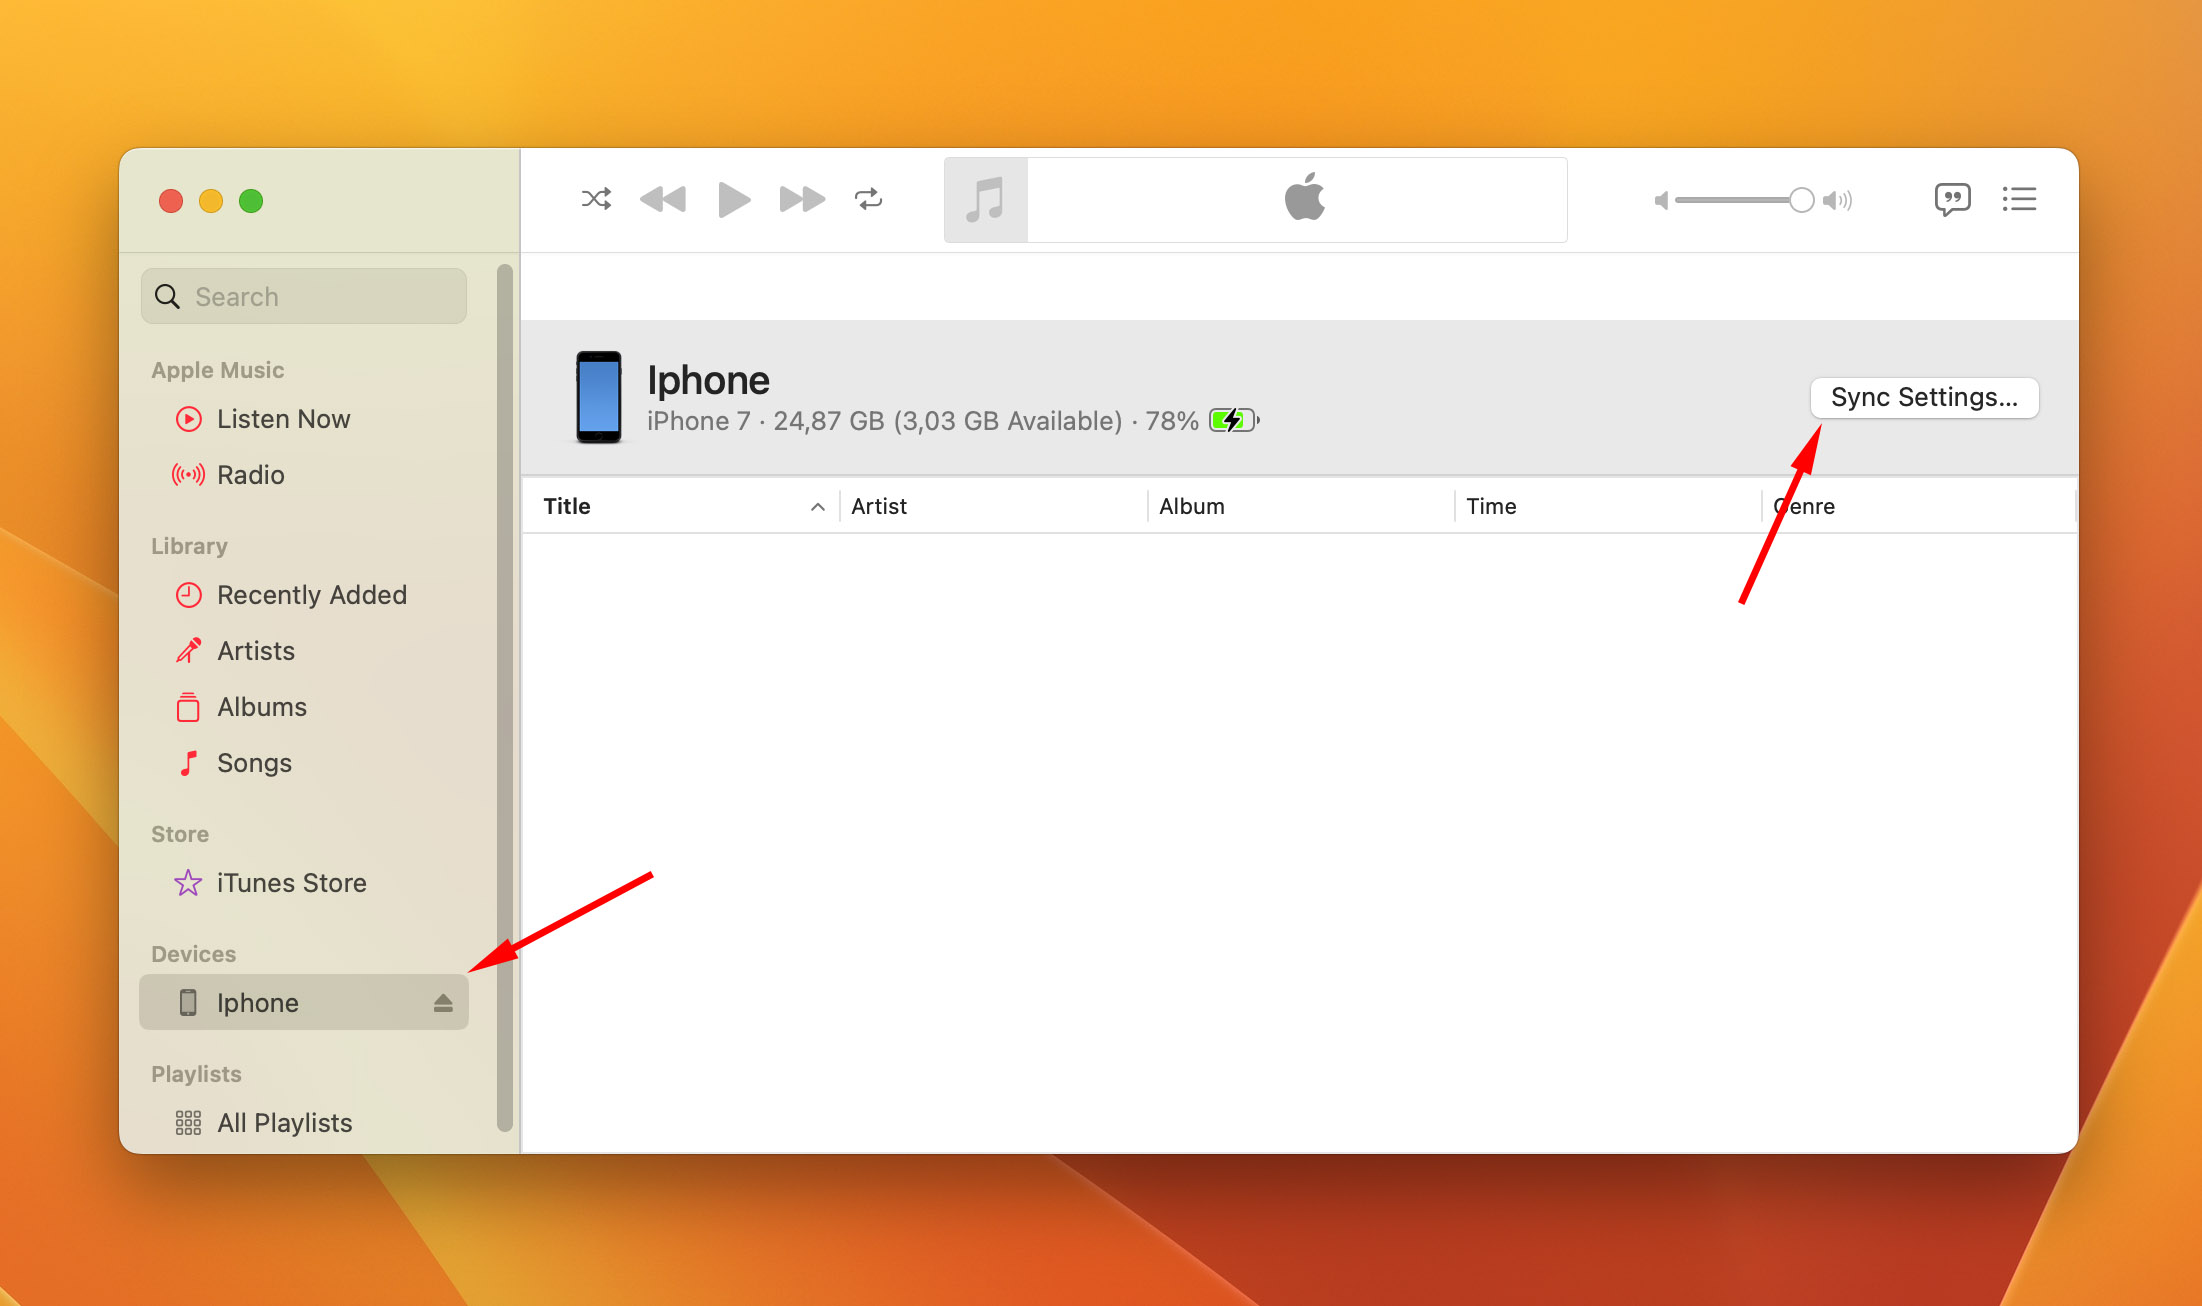
Step 1. Plug your iPhone into your Mac or Windows computer.
Step 2. Select your iPhone from the drop-down menu on the left-hand side and then click on Sync Settings….
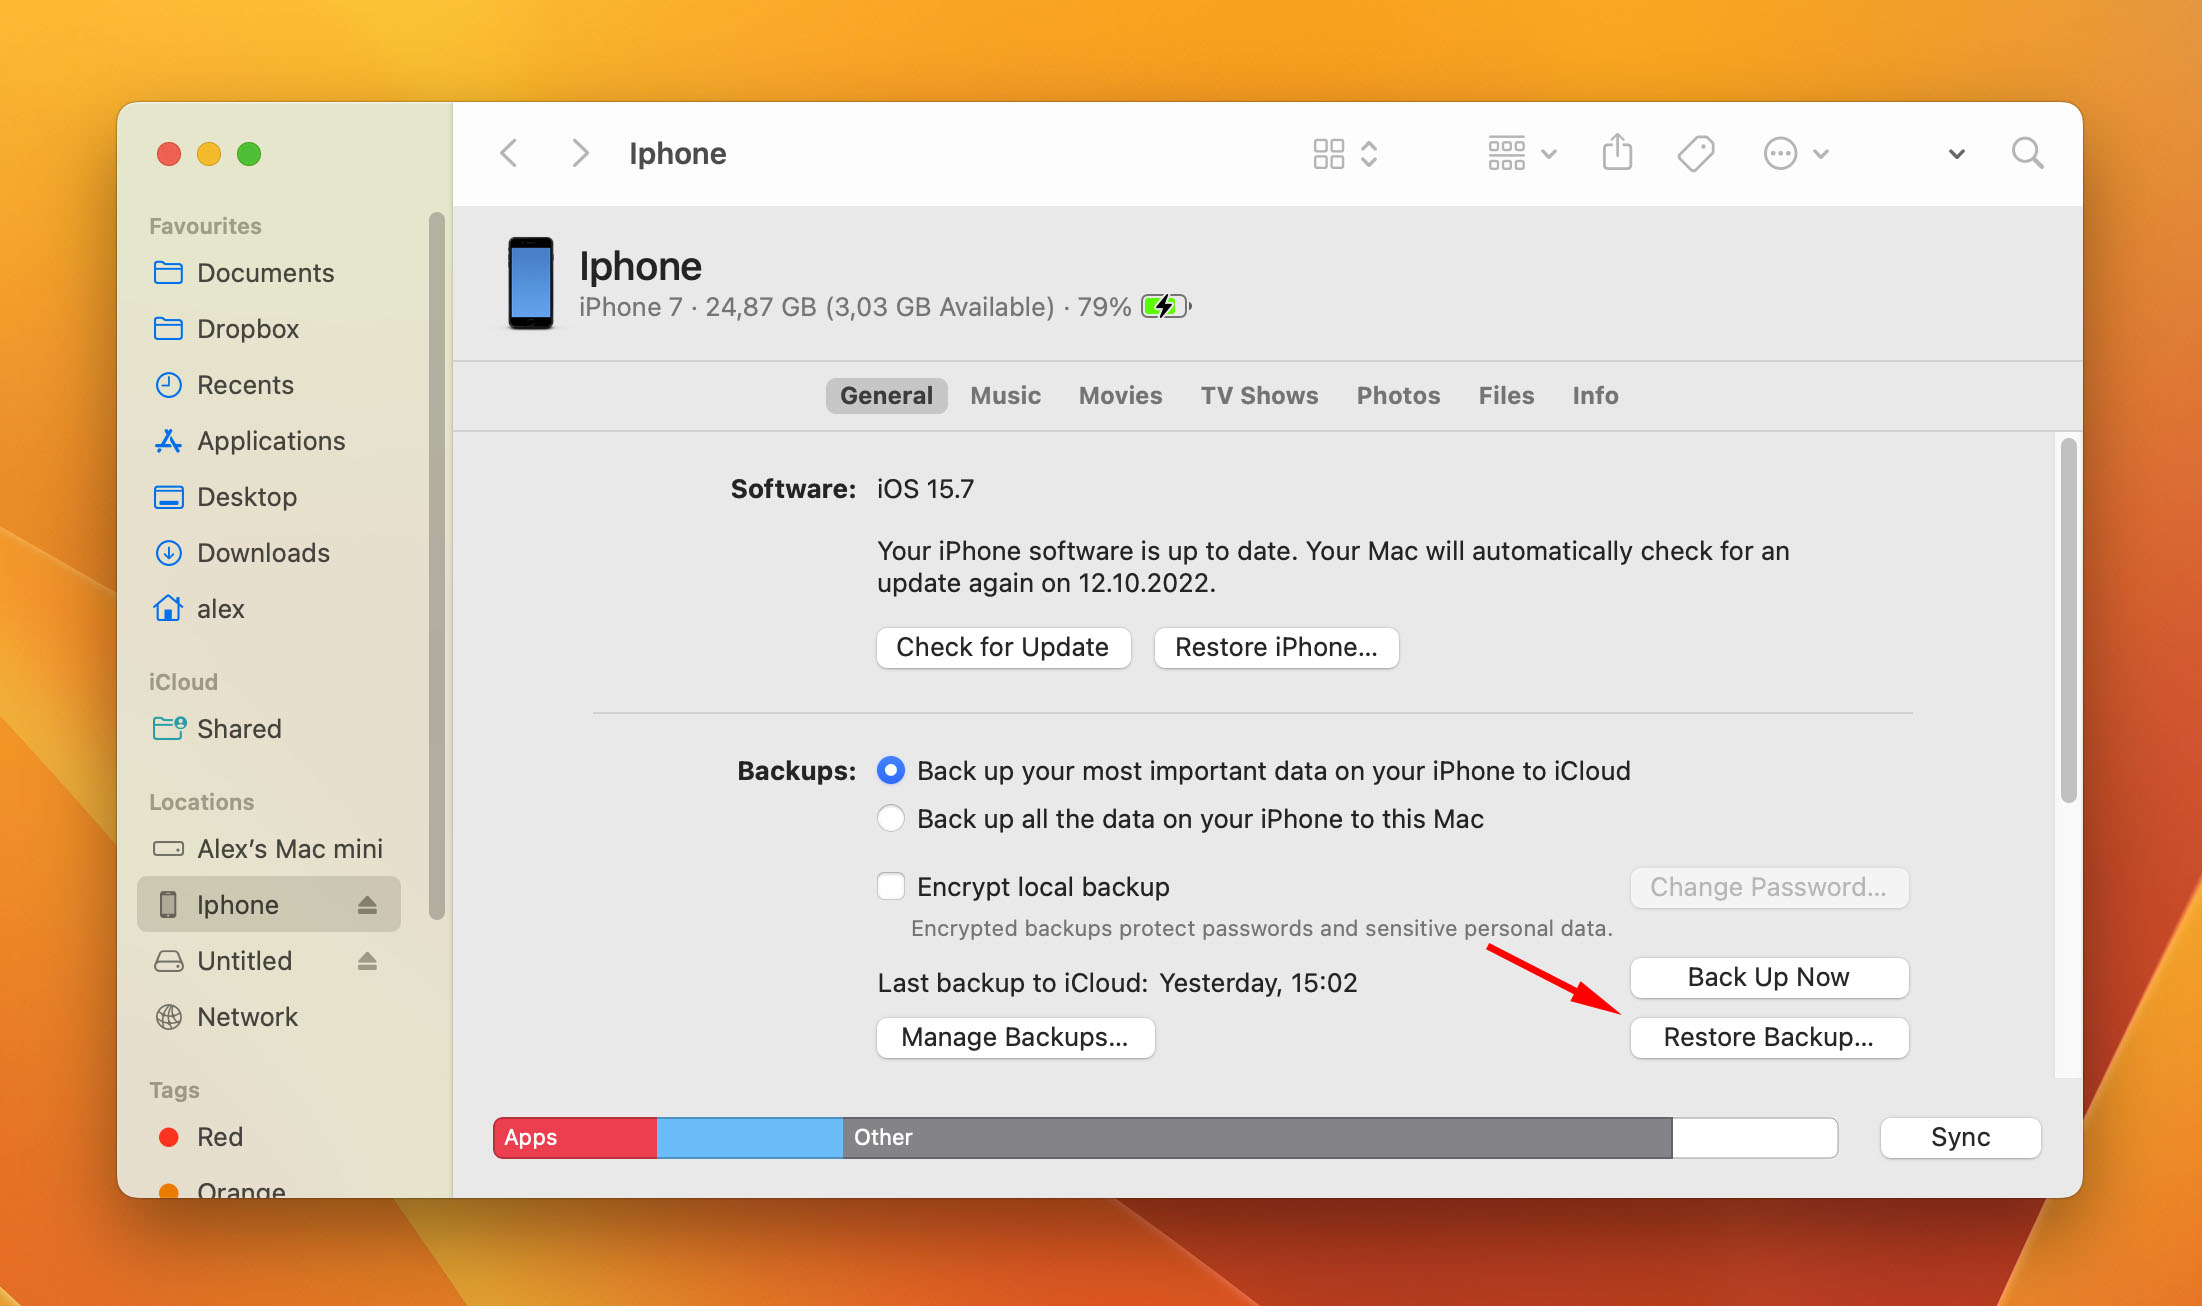
Step 3. Once on the Summary page, select Restore Backup…. This can be found from within the General tab. You can also manage backups and backup your iPhone from within this window as well.
Step 4. After clicking the Restore Backup… option, your iPhone will restore back to the backup that you selected and your recently deleted photos will go back onto your iPhone. This will take some time depending on the size of the backup. Make sure your iPhone is plugged into your computer during this whole process as it can’t be interrupted!
Method 3: Recover Deleted Photos from an iCloud Backup
When you purchase an iPhone, it asks you to set up iCloud during the initial set up so the chances are you may have enabled this without even knowing what it was as iCloud is one of the most used cloud services in the world.
iCloud will sync your data between devices but it also will make a backup of your iPhone overnight when you plug it in to charge and it’s on Wi-Fi. This is a backup of everything from text messages to contacts, and all of your pictures.
You can restore accidentally deleted photos from iCloud using one of the backups that have been created and put the data right back onto your phone.
Step 1. First, we want to back up our device should anything happen to it during the restoration process. To do that, plug your iPhone into a computer and back it up to the Music app if you’re on a Mac or iTunes if you’re on Windows.
Step 2. Once in the Music app or iTunes, choose Sync Settings….
Step 3. Choose Back Up Now… to start backing up your iPhone to your computer. This may take some time and the phone will need to be plugged for the entire process.

Step 4. Next, we need to perform a factory reset on our iPhone so that we can go through the setup process which allows us to recover photos from an iPhone backup. To initiate the reset, go to Settings > General > Reset > Erase All Content and Settings.
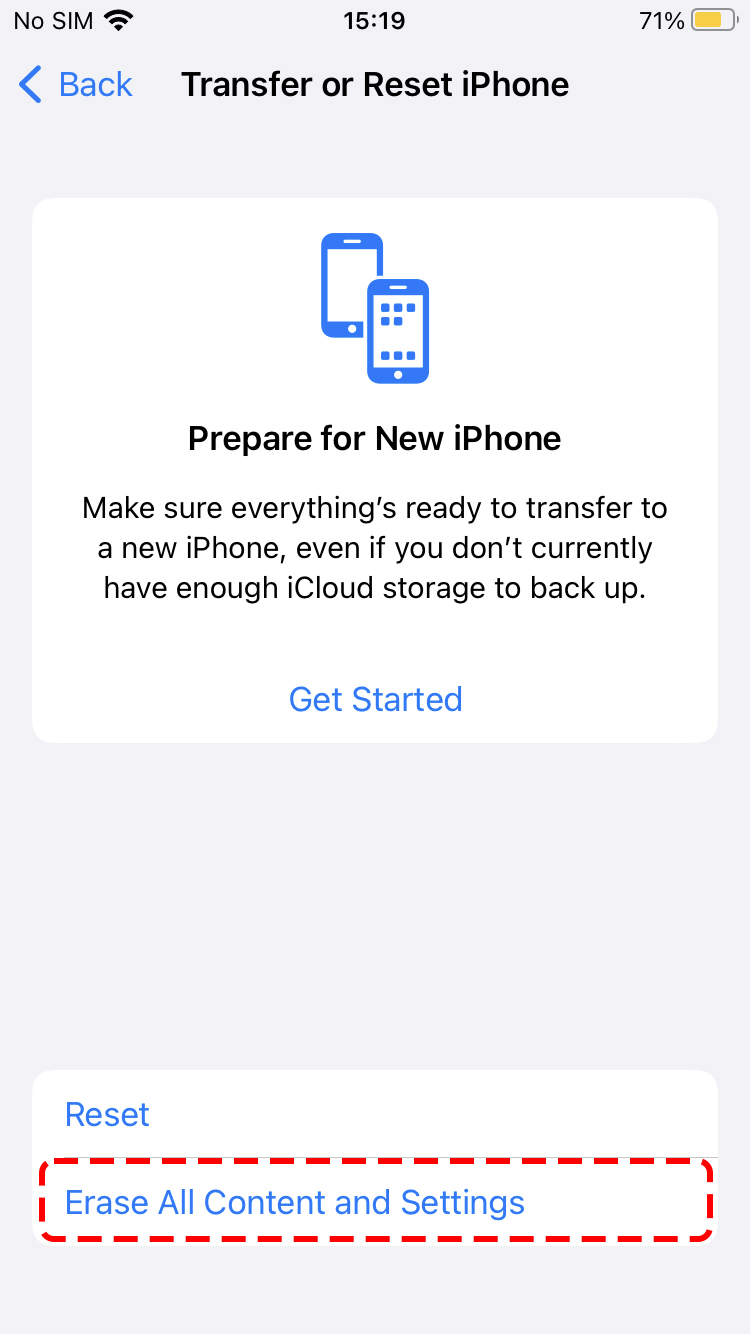
Step 5. When your iPhone restarts, go through the iPhone setup process and choose Restore from an iCloud backup and choose an older date from when you can last remember having the old photos on your iPhone. This will start the process of restoring photos from an iPhone backup.
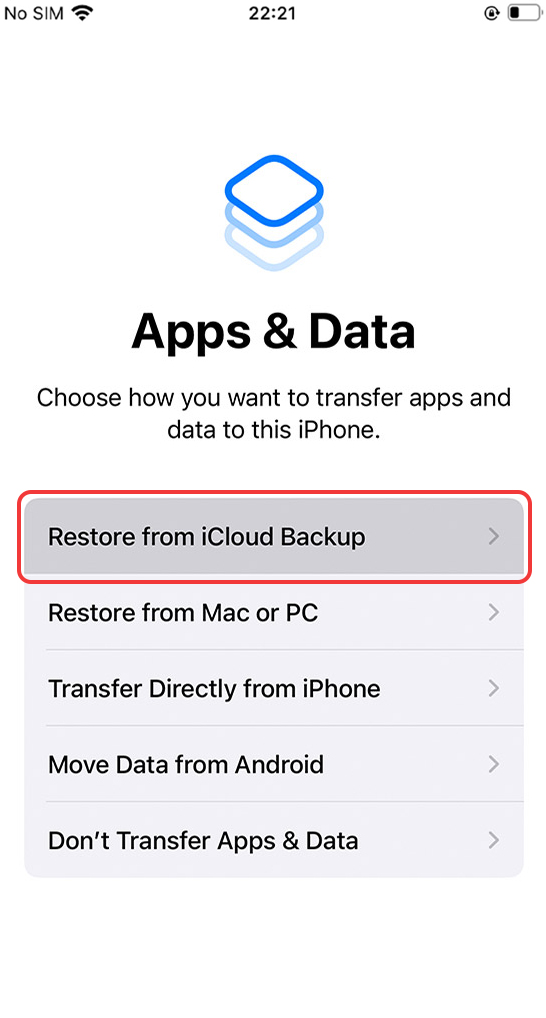
Step 6. Wait for the restore to finish and then check your Photos app to see if the deleted photos have been recovered.
Method 4: Recover Photos Using Free iPhone Data Recovery Software
Gihosoft iPhone Data Recovery is a freemium macOS app that can restore photos (and other data) from your iPhone. Unlike Disk Drill, Gihosoft’s app is focused only on the iPhone and has additional seamless iOS-only features like extracting data from iTunes and iCloud backups.
Unfortunately, that’s all Gihosoft’s free version can do, aside from scanning your device and showing you the local data it found. You’ll have to buy the Pro version to actually recover photos directly from your device. In other words, you’ll still need an iTunes or iCloud backup to use the free version – which is why we bumped it down to #5.
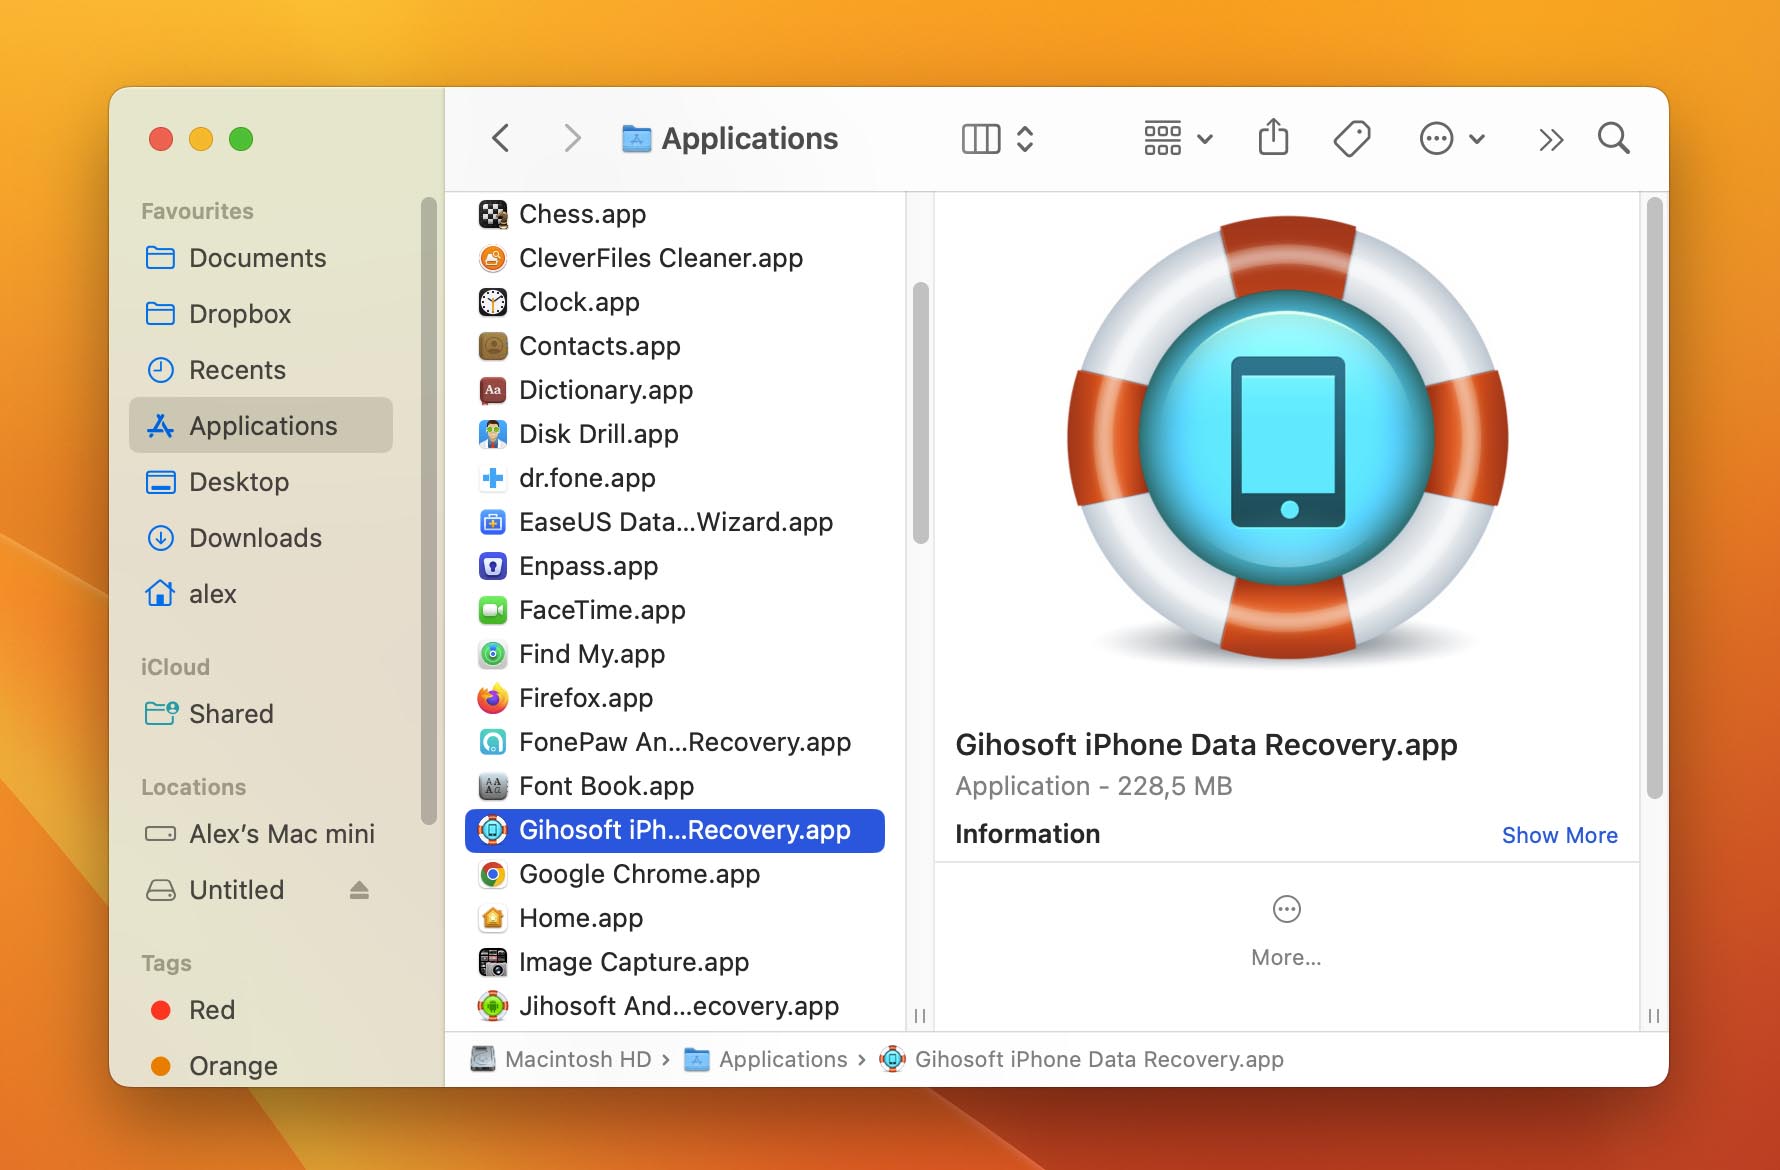
Step 1. Download and install Gihosoft iPhone Data Recovery.
Step 2. Make sure your iPhone is securely connected to your Mac, then launch Gihosoft iPhone Data Recovery (Finder > Applications).
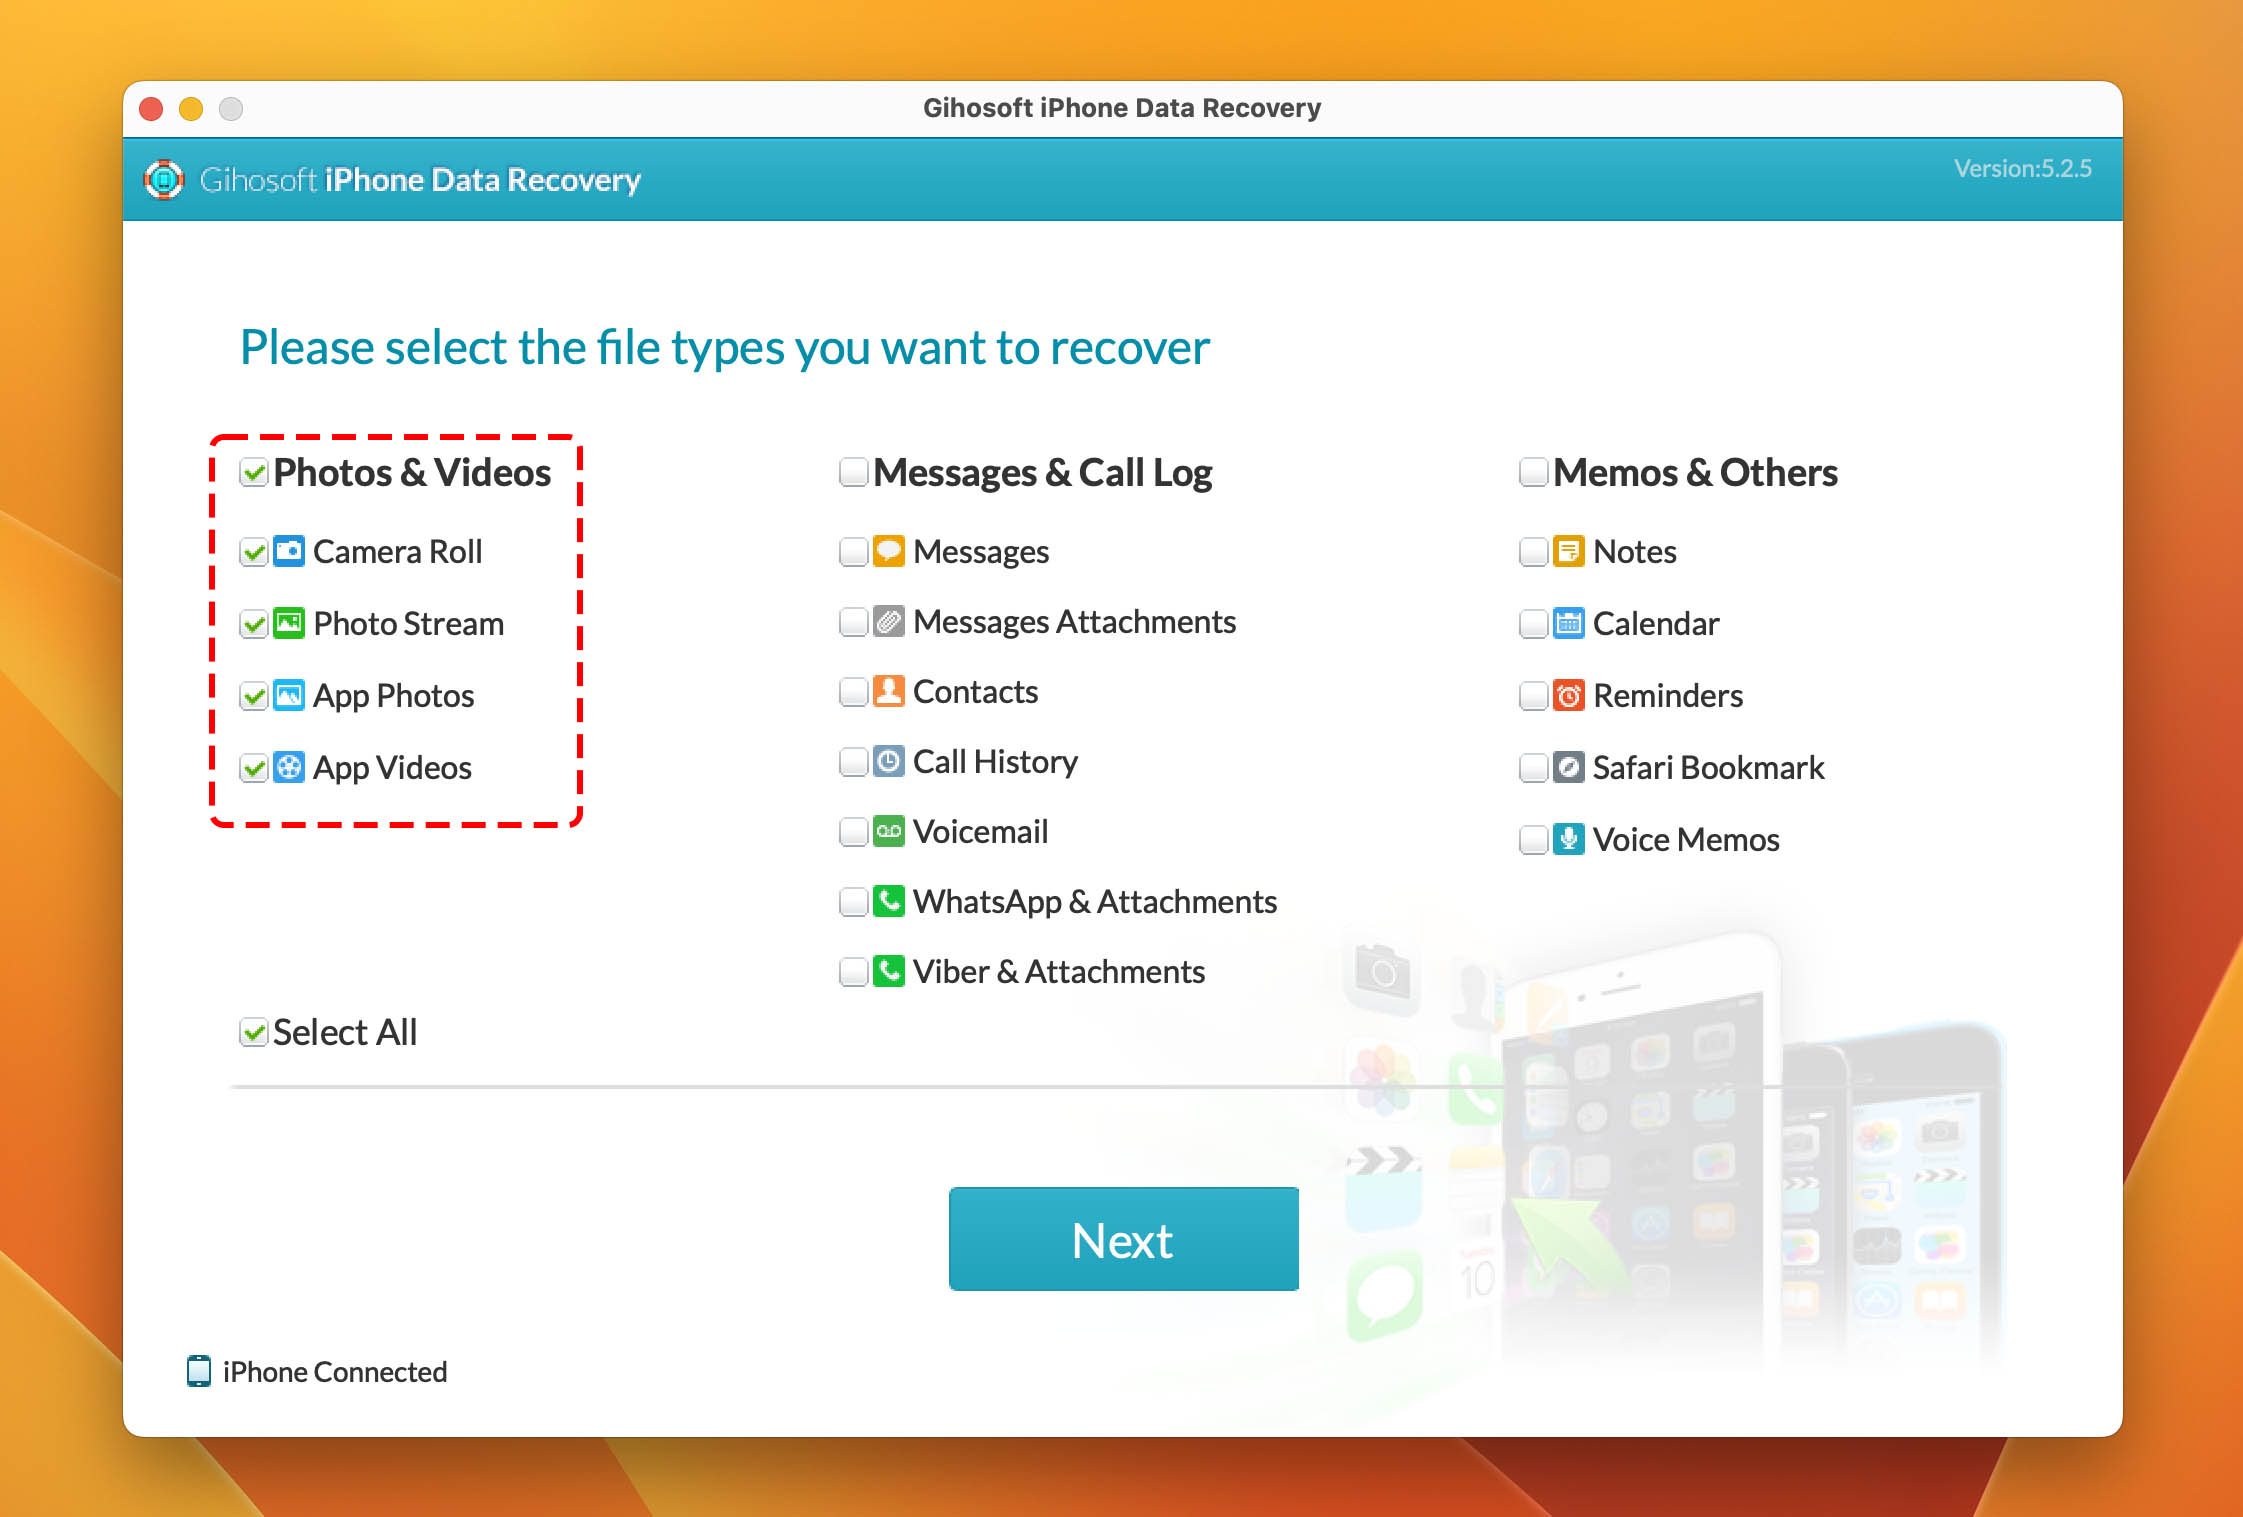
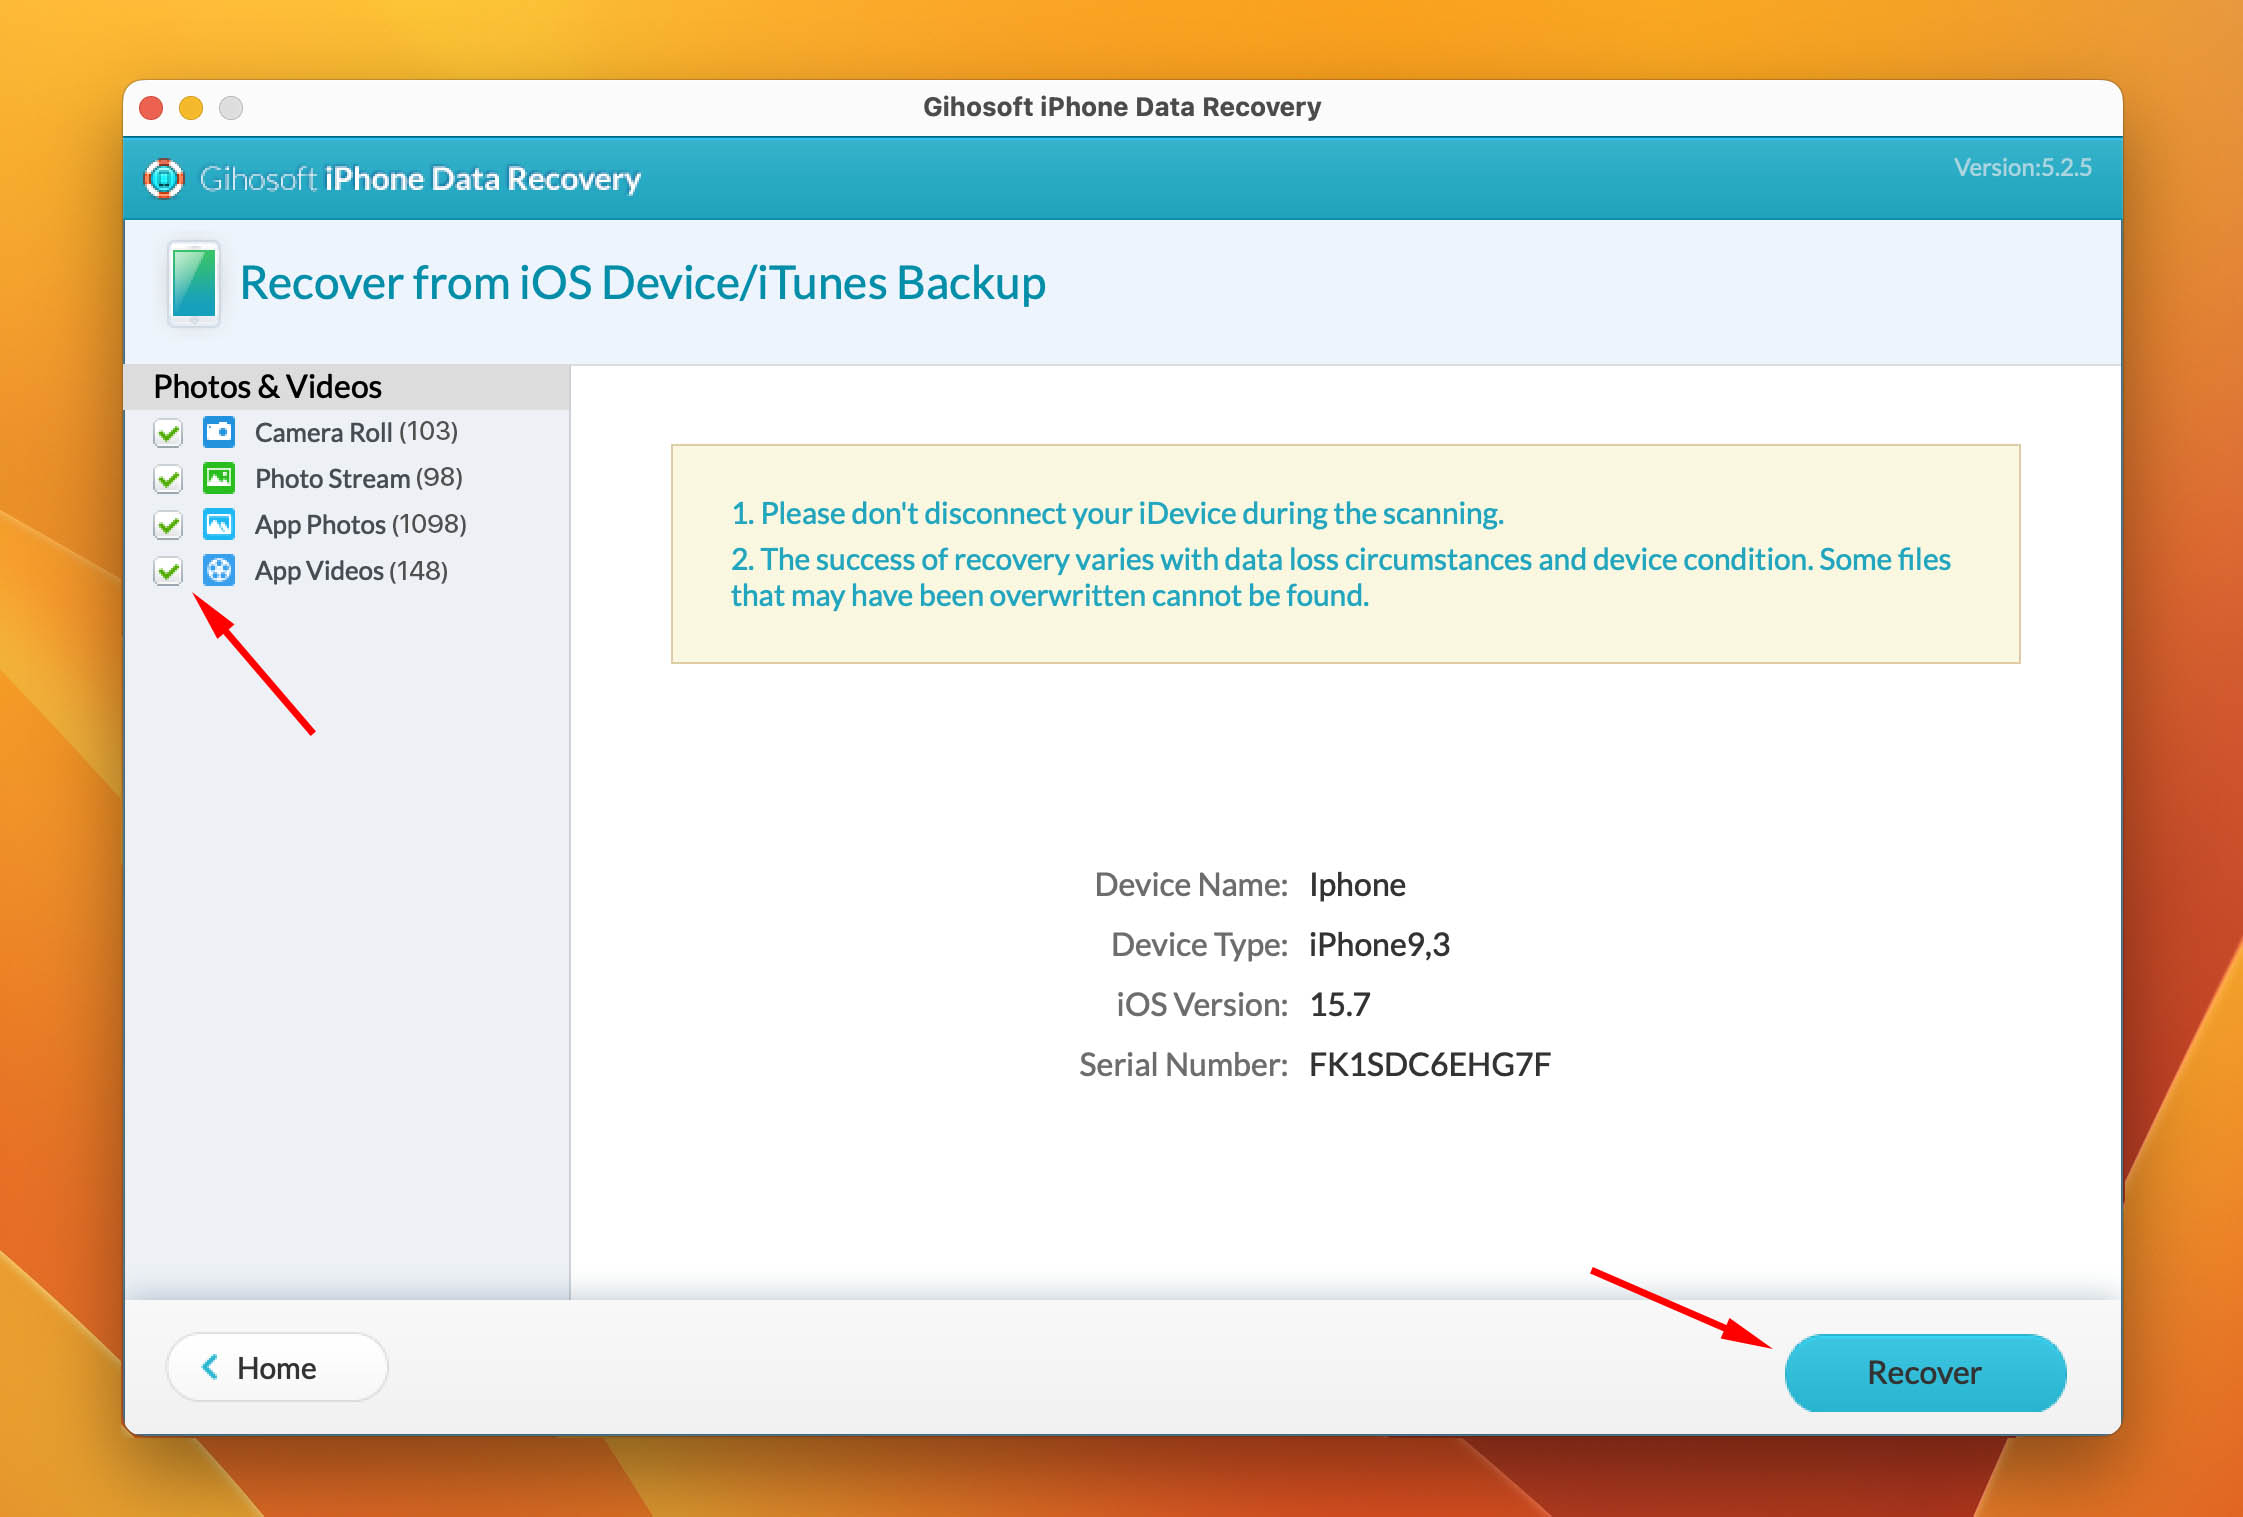
Step 3. Select “Photos & Videos” and all the subtypes underneath it, then click “Next.”
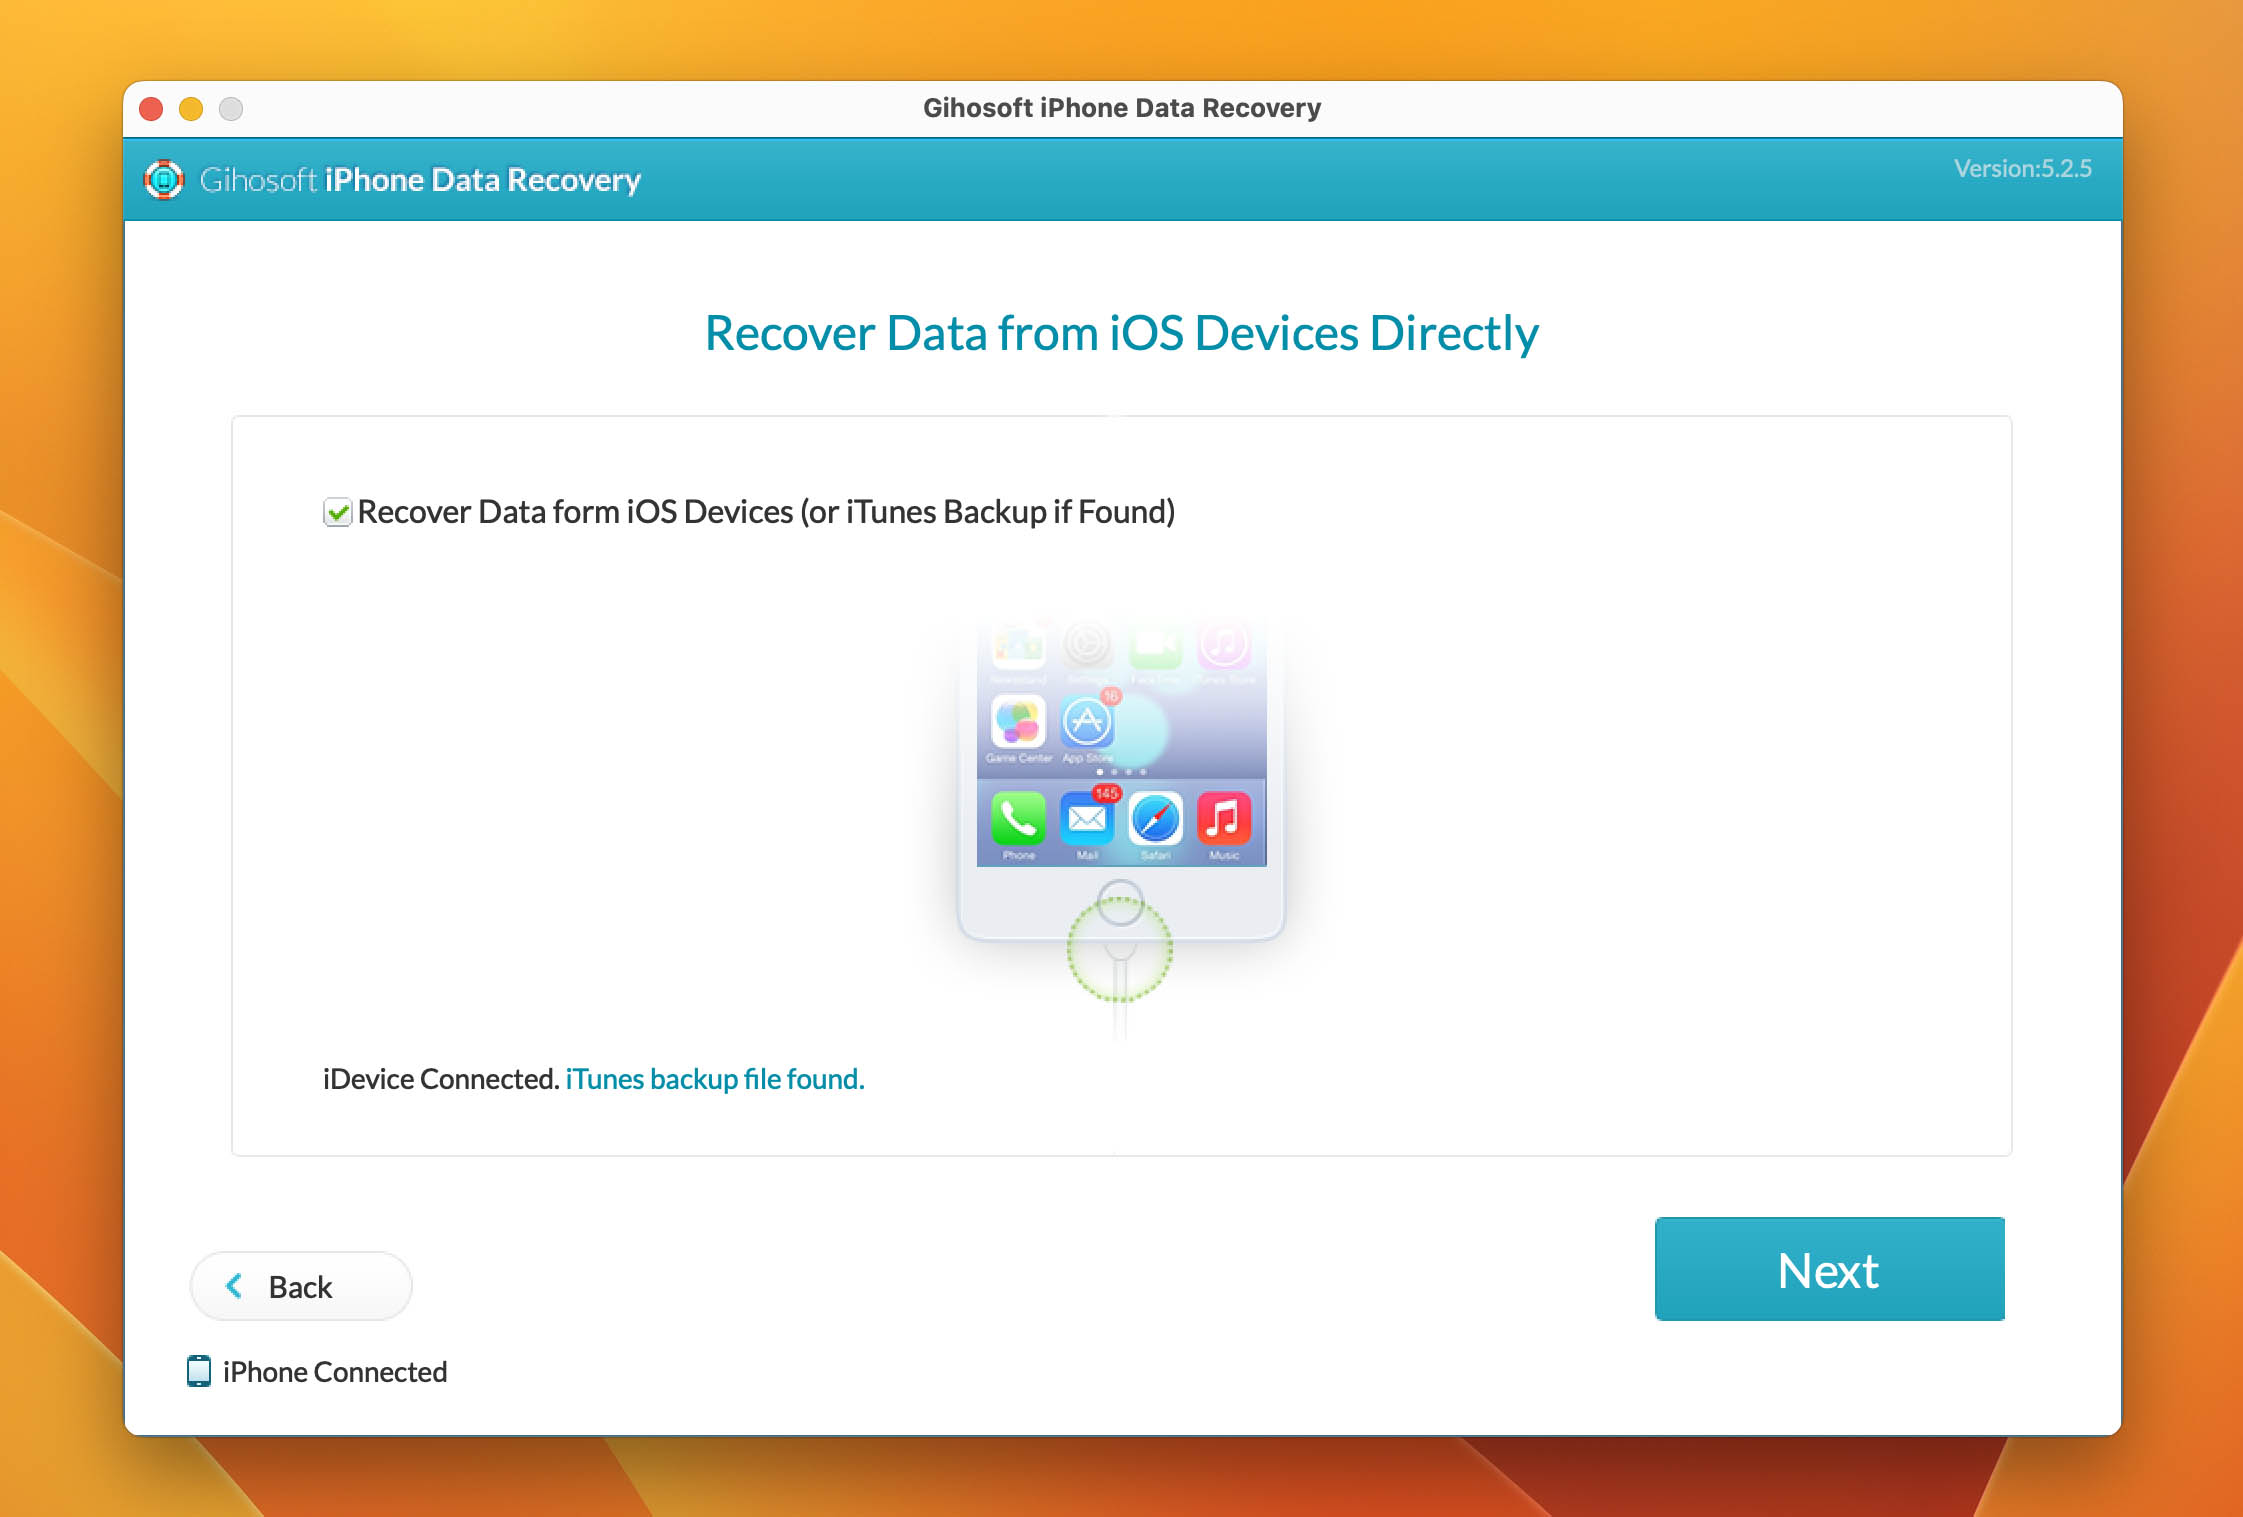
Step 4. Click “Next” again to begin the scanning process.
Step 5. Once the scan is complete, you can go ahead and click “Recover”, or you can view your photos organized by location using the left sidebar and select them individually.
Method 5: Restore Images From Google Photos Backup
For those who backed up their data using Google Photos (for ex. users who are switching from Android to iPhone), there is unfortunately no way to restore it directly to your iPhone the way we did with an iCloud/iTunes backup. Instead, you’ll have to download them to your device. There are 2 ways to do this:
To download photos from Google Photos on a Mac:
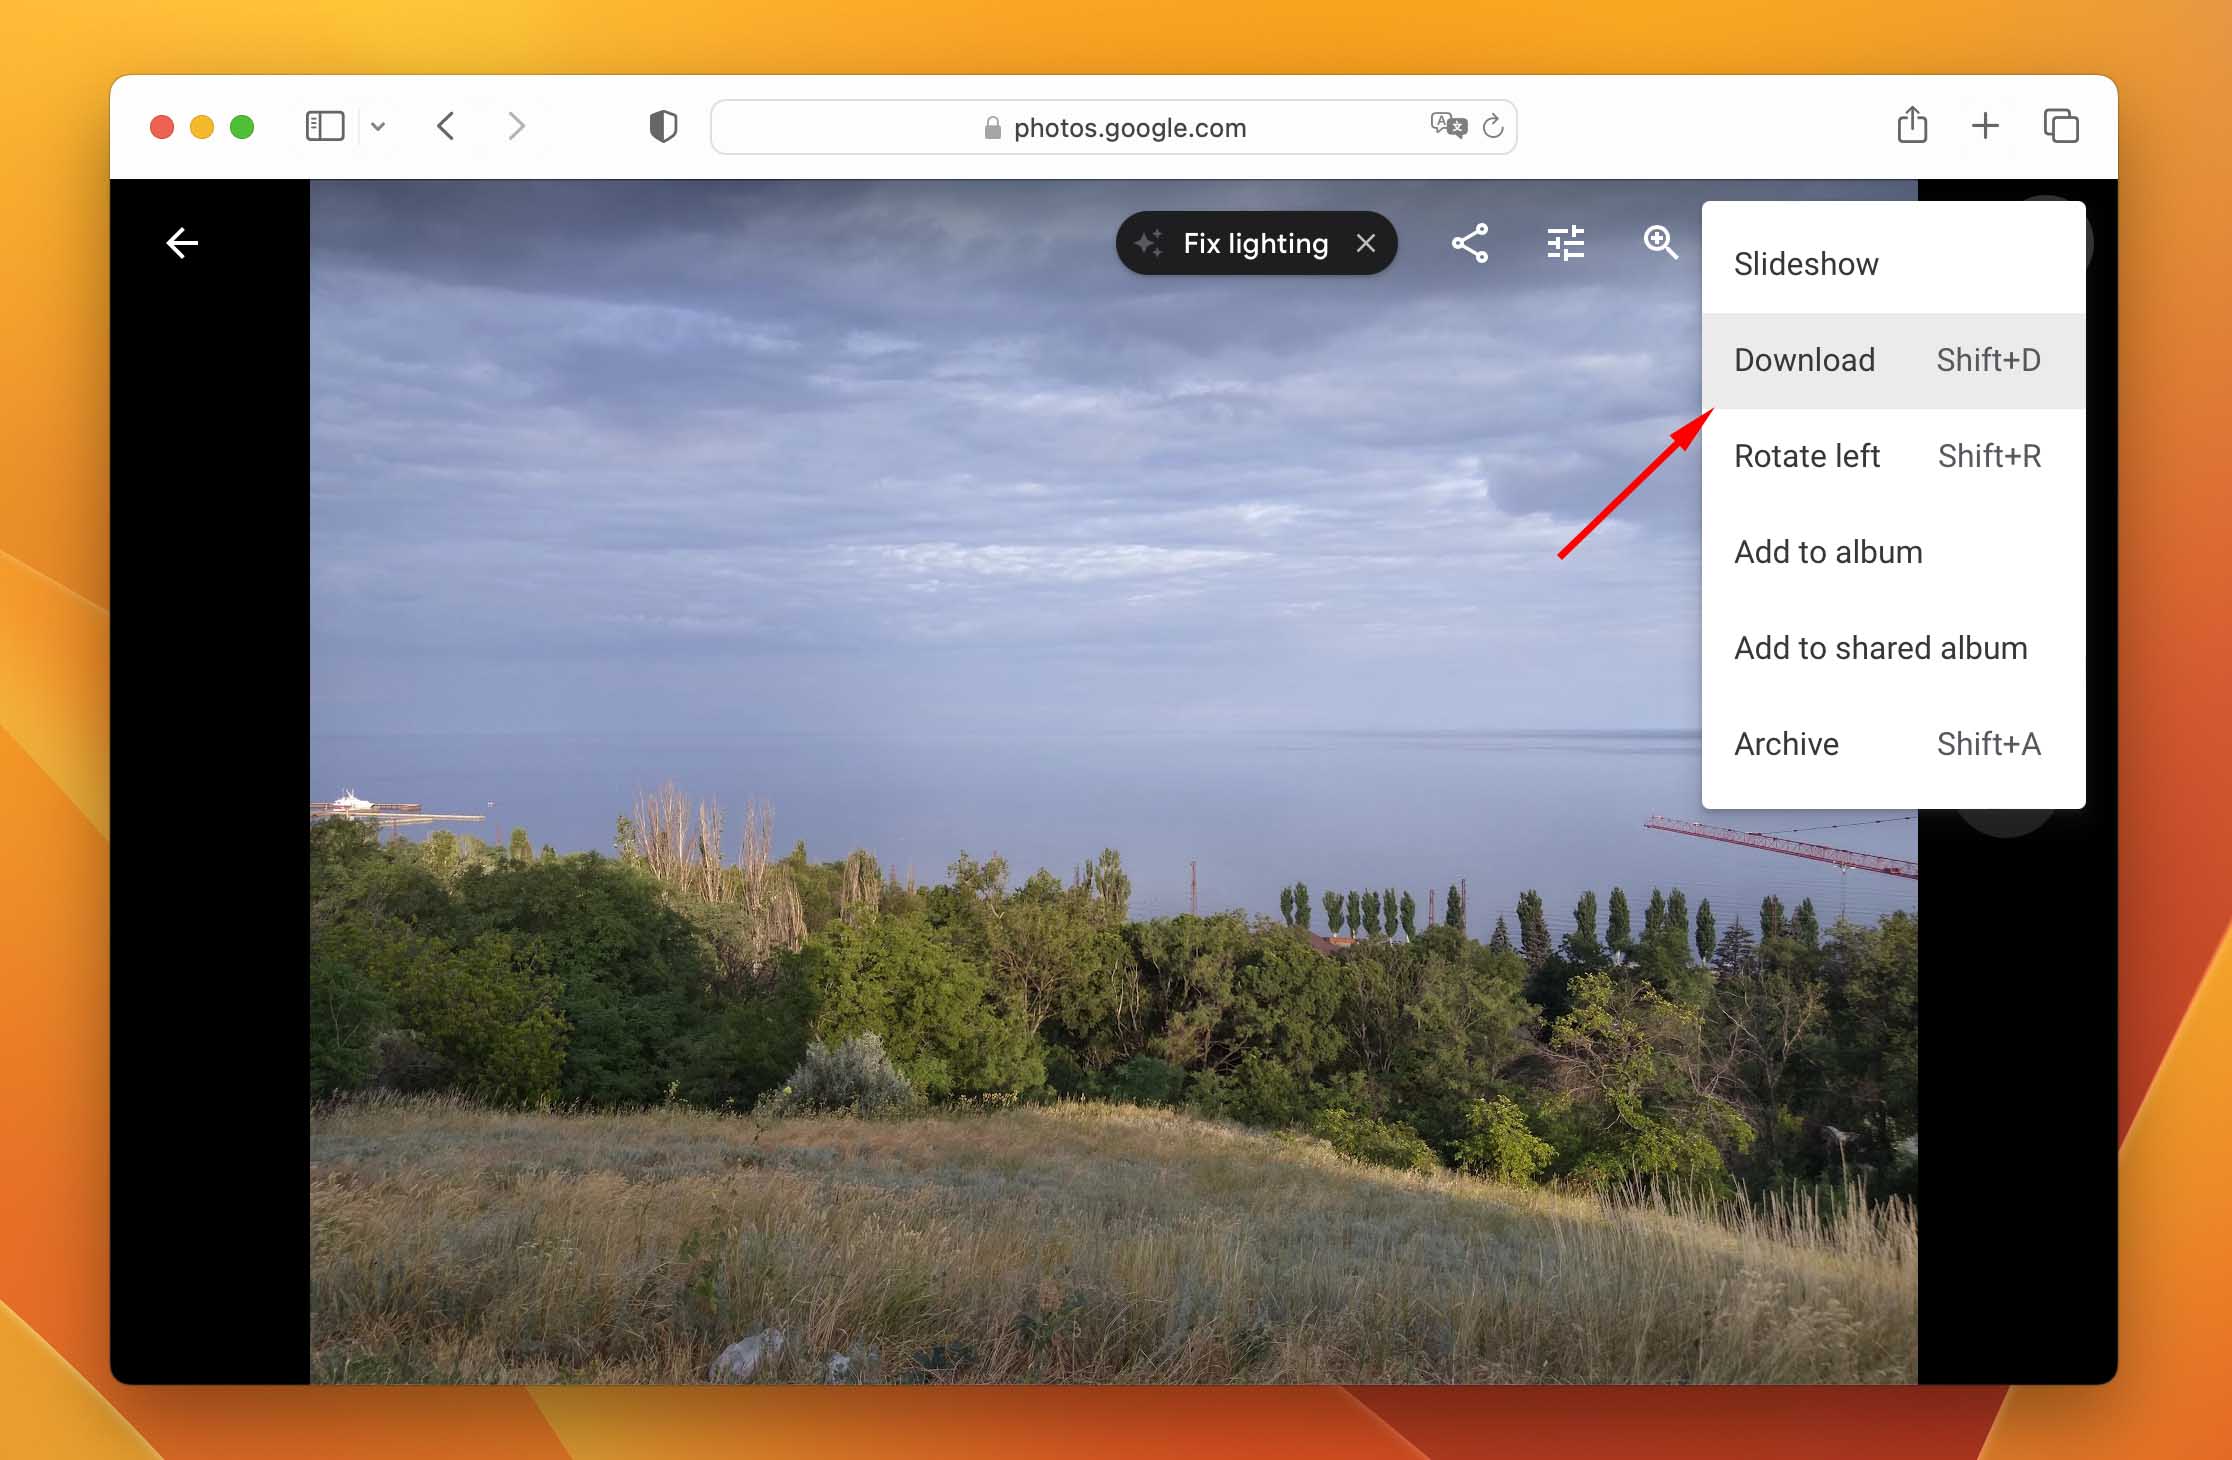
Step 1. Log into photos.google.com and open the image you want to download.
Step 2. Click on the 3 dots on the top-right corner of the window (beside the delete button), then click “Download.”
To download photos From Google Photos directly on your iPhone:
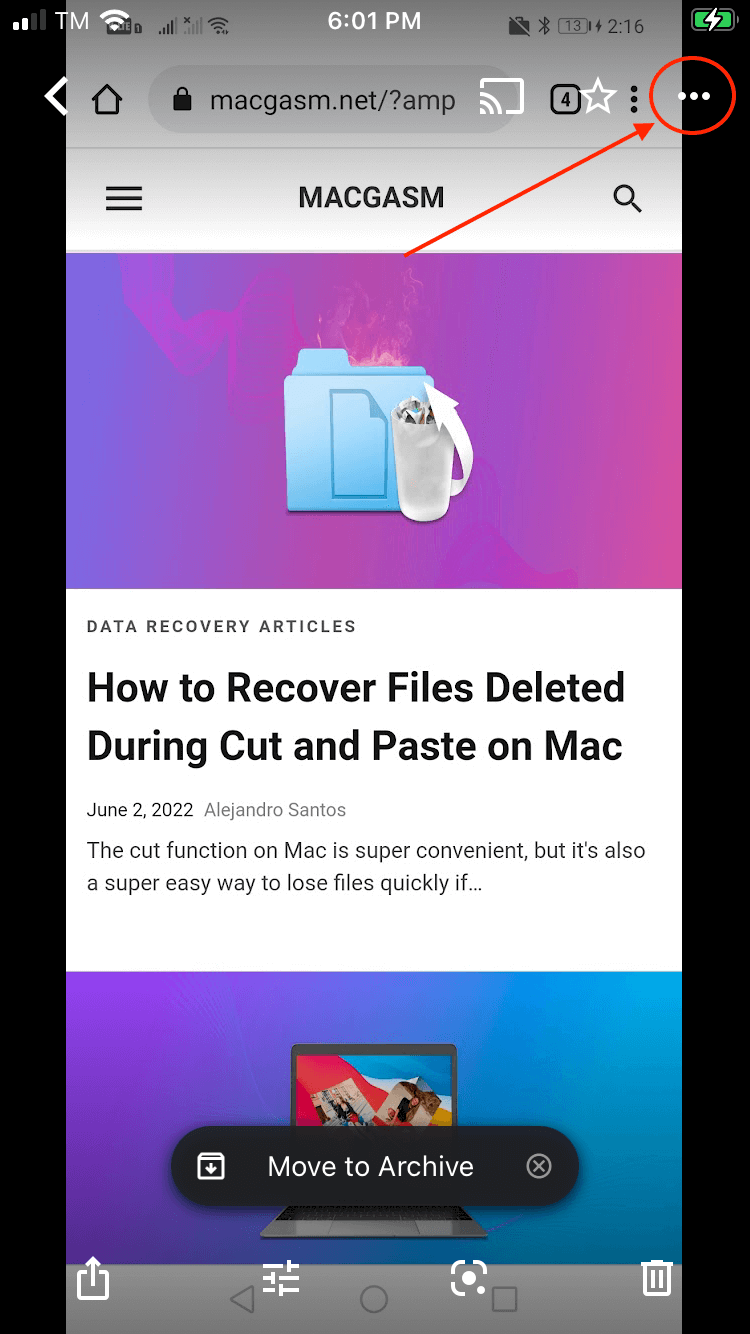
Step 1. Download Google Photos from the App Store.
Step 2. Launch the Google Photos app and open the photo you want to download.
Step 3. Tap the 3 dots on the top-right corner of the screen to bring up a menu.
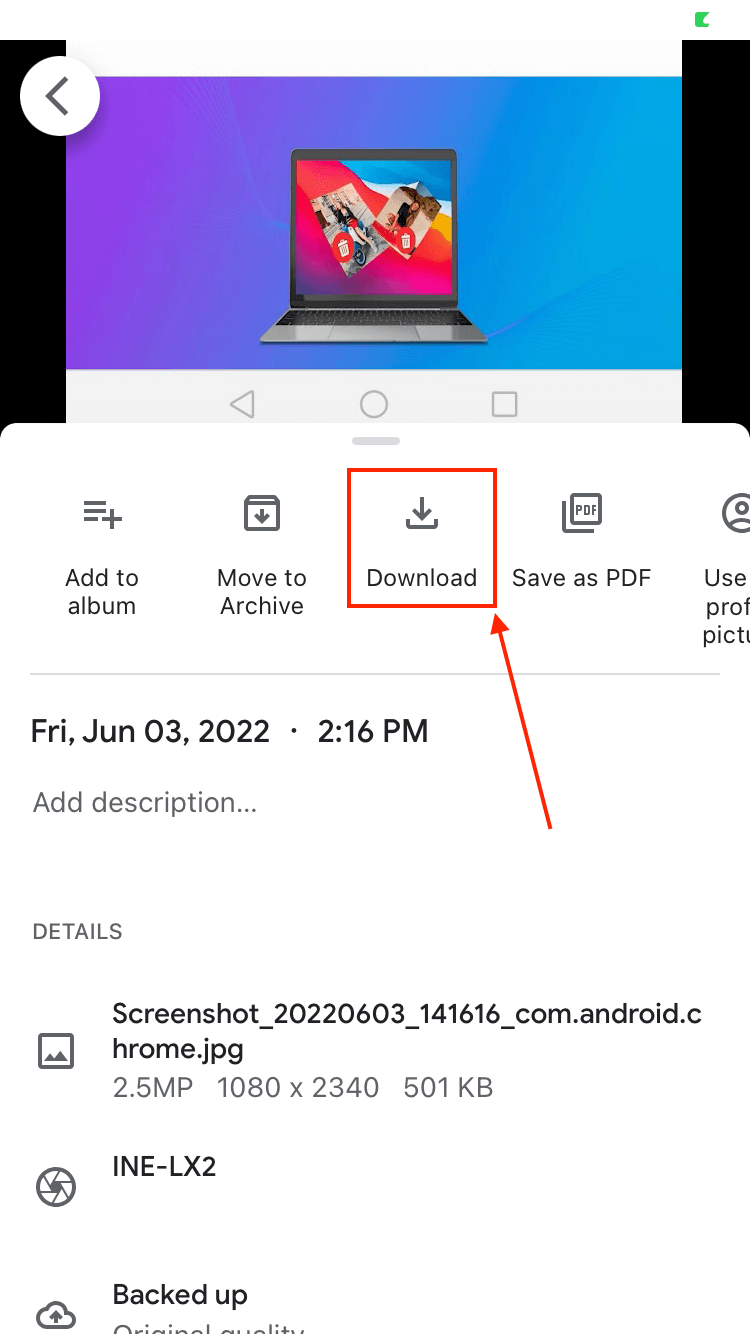
Step 4. Tap the “Download” button.
Conclusion
In summary, losing photos on your iPhone is a common problem… But there are just as many ways to restore them, even if you have never created a backup of your device. However, let this scenario be the push you need to create a habit of backing up your data – it makes data recovery so much easier!
FAQ
You can recover permanently deleted photos on iPhone 11 using data recovery software:
- Install data recovery software on your Mac.
- Connect your iPhone to your Mac.
- Scan the device and recover your photos.
There are multiple ways to retrieve pictures deleted from iPhone:
- The Recently Deleted album inside the Photos app.
- Third-party data recovery software.
- Local and cloud backups.
To restore iPhone photos from the gallery:
- Launch the Photos app.
- Go to Albums > Recently Deleted.
- Select the photos you want to recover and tap the Recover button to restore gallery photos.
We came up with 15 of our favorite apps to recover deleted photos on an iPhone. Here’s 5 of them:
- Dr.Fone iPhone Data Recovery
- Stellar Data Recovery for iPhone
- iMyfone D-Back
- Disk Drill iPhone Data Recovery
- iBeesoft iPhone Data Recovery for Mac
For a more in-depth look at each of these tools and what they have to offer, read the full article.


