
All Mac owners should know how to check drive health in OS X using Terminal. While it may seem intimidating if you’re not used to the command line, it’s super easy to do once you actually try it – we’ll help you!
Most importantly, there are significant benefits to performing these simple “checkups” once every couple of weeks. The small learning curve is worth it.
In this article, we’ll go through these benefits in more detail and we’ll show you 2 easy ways to check your Mac’s drive health using the Terminal app. Read on!
Table of Contents
Why It is Vital to Check Drive Health in MacOS
As we previously mentioned, there are significant benefits to periodically checking your Mac’s drive health. They can save you time, money, and a lot of frustration. Specifically:
- Prevent data loss: Keep your data safe by knowing your drive’s health status so you can avoid getting blindsided by errors and sudden failures, which may directly or indirectly lead to data loss.
- Optimize performance: Maintain your drive’s performance by addressing issues like bad sectors and file system errors, which can cause slowdowns and errors.
- Prevent unexpected failures: Avoid sudden drive failures (which can further damage said drive) by identifying issues before they get worse.
- Maximize warranty: For new drives, quickly identify issues that resulted in DOA (“Dead on Arrival”) and qualify for refund or replacement.
- Plan backups: Determine when drive failure is imminent so you can create an updated backup of your data in advance or transfer it to a new drive.
- Proactively maintain drive: Prolong your drive’s health and identify potential problems before they happen or get worse.
How to Check Mac Hard Drive Health Using Terminal
In this section, we’ll demonstrate 2 simple methods to check your Mac’s hard drive health using Terminal. The first method uses the native Mac tool Disk Utility to check for file system issues and other disk-related errors.
The second method uses a third-party tool that provides a much more comprehensive analysis of your drive. It not only identifies issues but also provides error codes that can tell you what caused the malfunction.
Method 1: Using Diskutil
The first tool we’ll cover is Disk Utility, which already comes with macOS so you won’t have to install anything. There are 2 commands you can use:
- verifyDisk Scans your entire disk. Use this command to get a comprehensive report of your entire drive’s overall health.
- verifyVolume Scans a specific volume. Use this command to focus on a single volume, isolate issues, and save time.
There are scenarios where one or the other is preferable. But if it’s your first time doing it, we suggest using verifyDisk to get a thorough analysis.
To check your hard drive’s health with Diskutil:
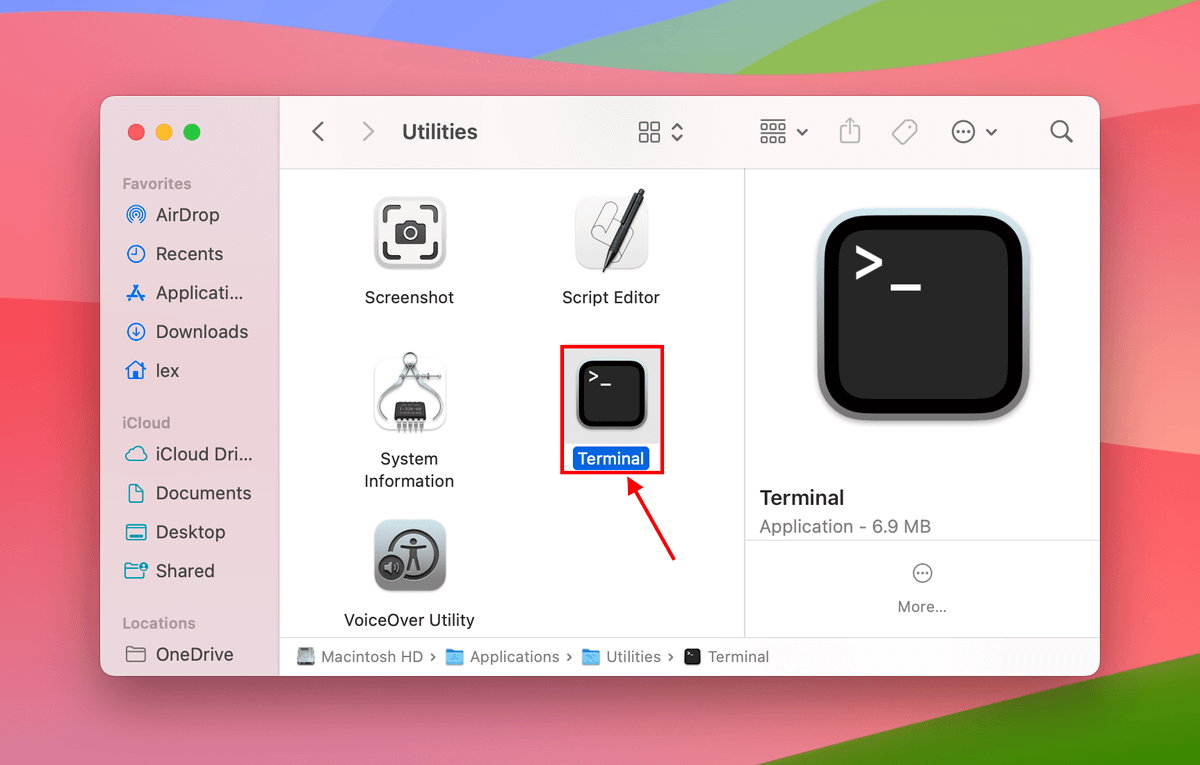
Step 1: Open the Terminal app (Finder > Applications > Utilities).
Step 2: Type the following command and hit Return:
diskutil list
Identify your disk’s IDENTIFIER

Step 3: Then, type the following command and hit Return:
diskutil verifyDisk /dev/disk0
Replace “disk0” with your own disk’s identifier.
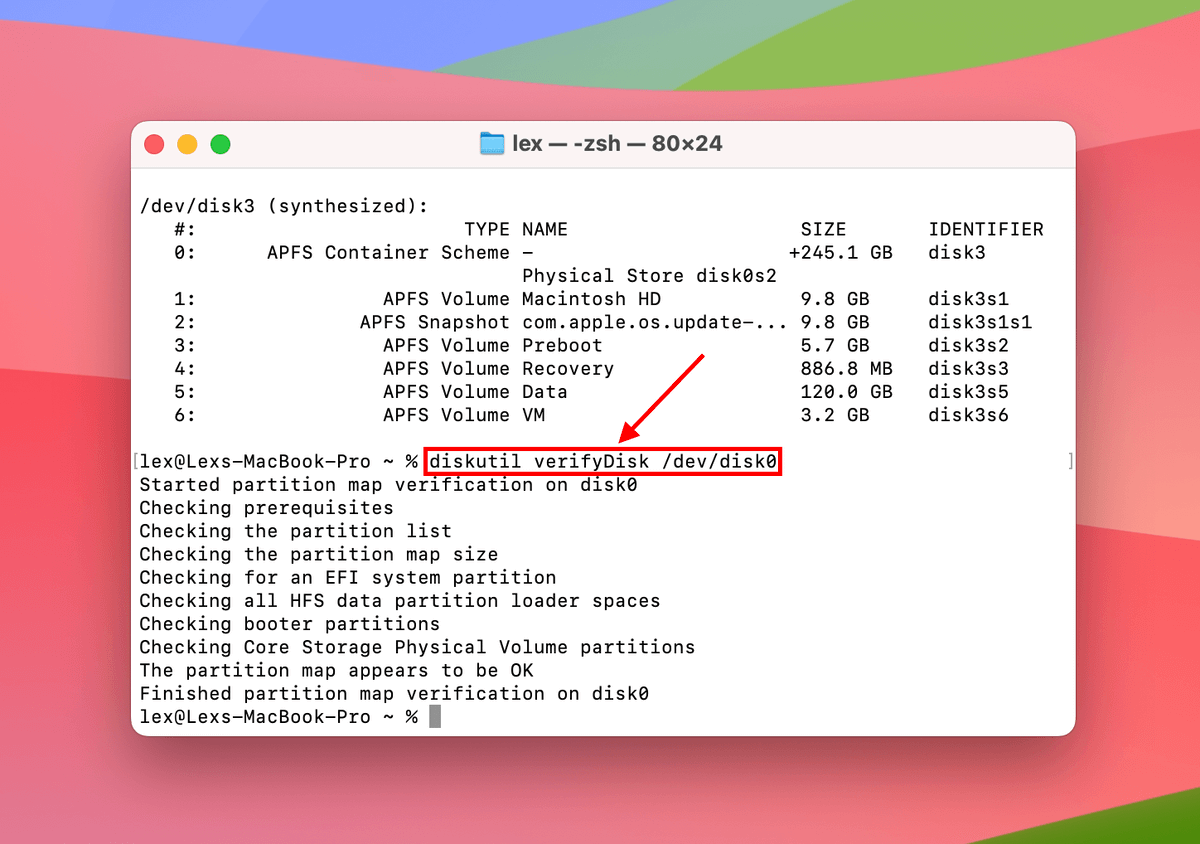
Once you execute the verifyDisk command in step 3, the Terminal app will generate a succinct report that will notify you if it encountered any problems or not.
Method 2: Using Smartmontools
The next tool we’ll demonstrate is called Smartmontools. It’s another command line-based utility that can perform a comprehensive scan of your drive – both on the hardware and software level. It will then generate a report with a number of helpful parameters.
These parameters will give you a good idea of what may be wrong with your drive and whether you need to secure your data ASAP. We’ll briefly discuss the most important parameters after the guide.
To check your Mac drive’s health using Smartmontools:
Step 1: Open the Terminal app (Finder > Applications Utilities).
Step 2: If you already installed Homebrew, skip to step 3. If not, type the following command and hit Return:
/bin/bash -c “$(curl -fsSL https://raw.githubusercontent.com/Homebrew/install/HEAD/install.sh)”
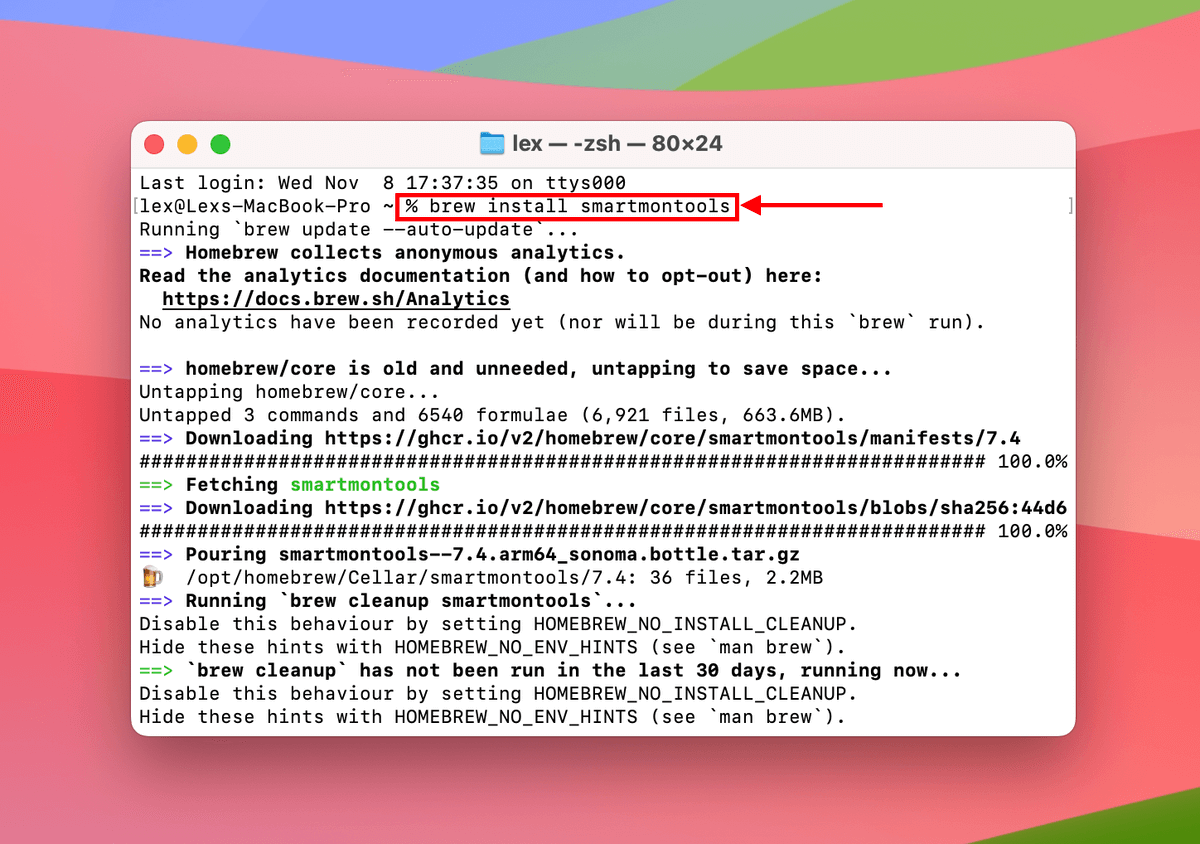
Step 3: Once Homebrew is installed, type the following command and hit Return:
brew install smartmontools
Step 4: Type the following command and hit Return:
diskutil list
Note your disk’s IDENTIFIER.
Step 5: Type the following command and hit Return:
smartctl -a /dev/disk0
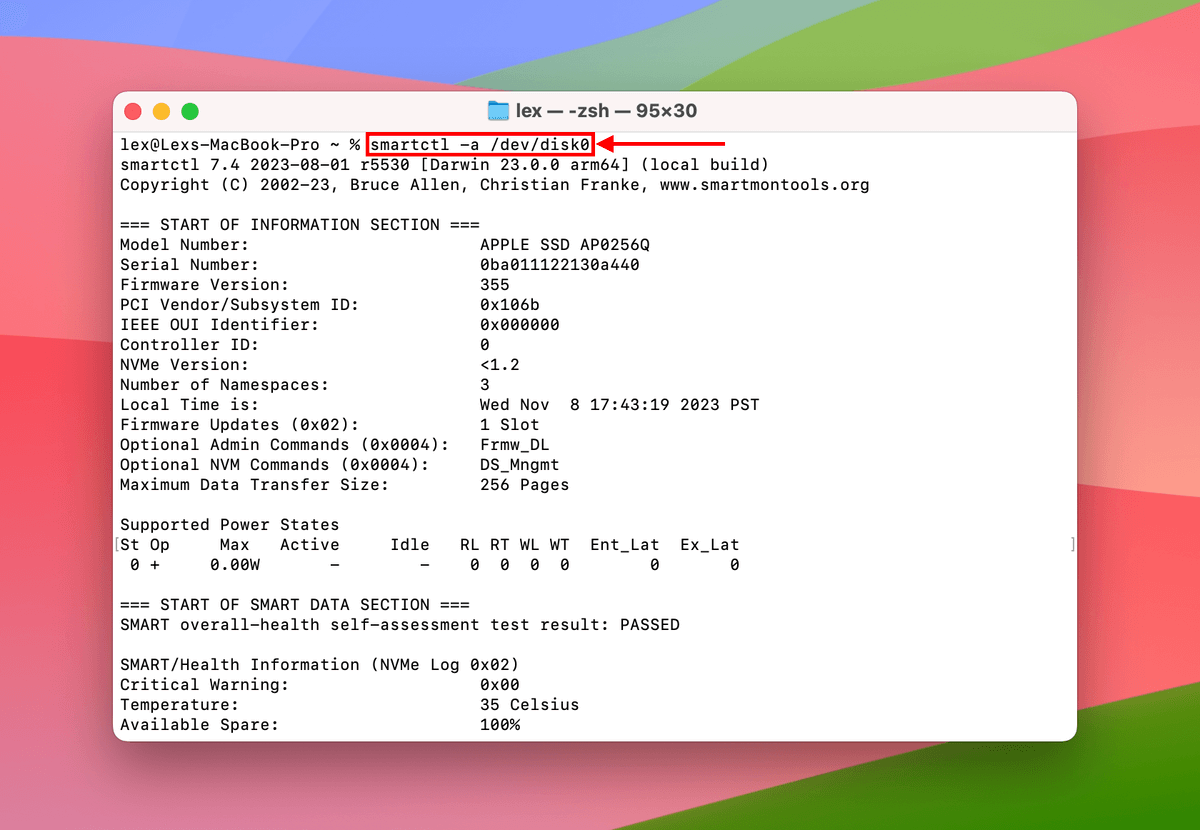
Once you execute the command in step 5, Smartmontools will scan your drive and generate a health report. Here are some parameters to watch out for:
SMART overall-health self-assessment test result– PASSED and FAILED attributes that indicate your drive’s current health status.
Critical Warning– Pending critical issues that need attention. 0x00 indicates no critical problems.
Temperature, Warning Comp. Temperature, Critical Comp. Temperature– Current drive temperature and instances of potential overheating.
Unsafe Shutdowns– The number of times your Mac had shut down unexpectedly.
Media and Data Integrity Errors– Number of instances where data was lost due to errors (including Unsafe Shutdowns).
Error Information Log Entries, Error Information– Number of error reports (log entries) and error indicators.
If any of these parameters look odd or alarming, see Smartmontools’ Help Page for more information on what to do and who you can ask for technical support.
How to Recover Data From Failing Drive
If your drive is on the brink of death but you can still access it, copy or back up your data to another location ASAP. But if it’s already in a state where you can’t perform read-and-write operations anymore, we recommend using data recovery software to extract your data directly from the drive, bypassing Finder.
For this article, we recommend Disk Drill specifically. Not only does it have a nice GUI and powerful recovery capabilities, but it also has 2 useful tools for this scenario that are missing from many other apps:
(1) Byte-to-byte backup, which allows you to create an image backup (essentially an exact copy of your entire drive compressed into an image file), which you can scan with its recovery tool. This gives you a much better chance of successful recovery. And (2) S.M.A.R.T. (Self-Monitoring, Analysis, and Reporting Technology), which gives you real-time reports on your drive health.
To recover data from a failing drive using data recovery software:
Step 1: Connect a reliable external drive to your Mac, ensuring it has enough space for your drive’s backup image and the recovered data.
Step 2: Download and install Disk Drill (we recommend installing it to the external drive you connected in step 1 by dragging its icon to the drive’s icon instead of to your Applications folder when prompted).
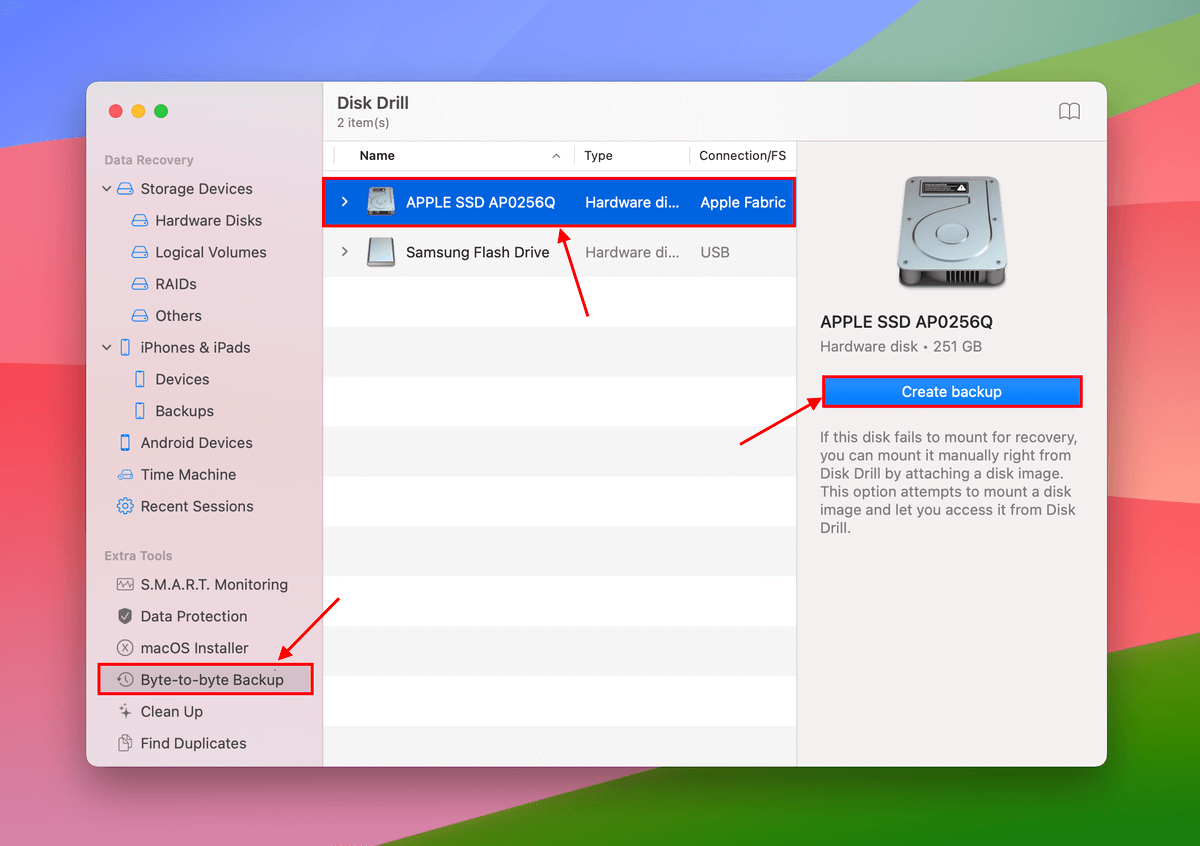
Step 3: Launch Disk Drill and click Byte-to-byte backup in the left sidebar. Then, select your Mac drive and click Create backup.
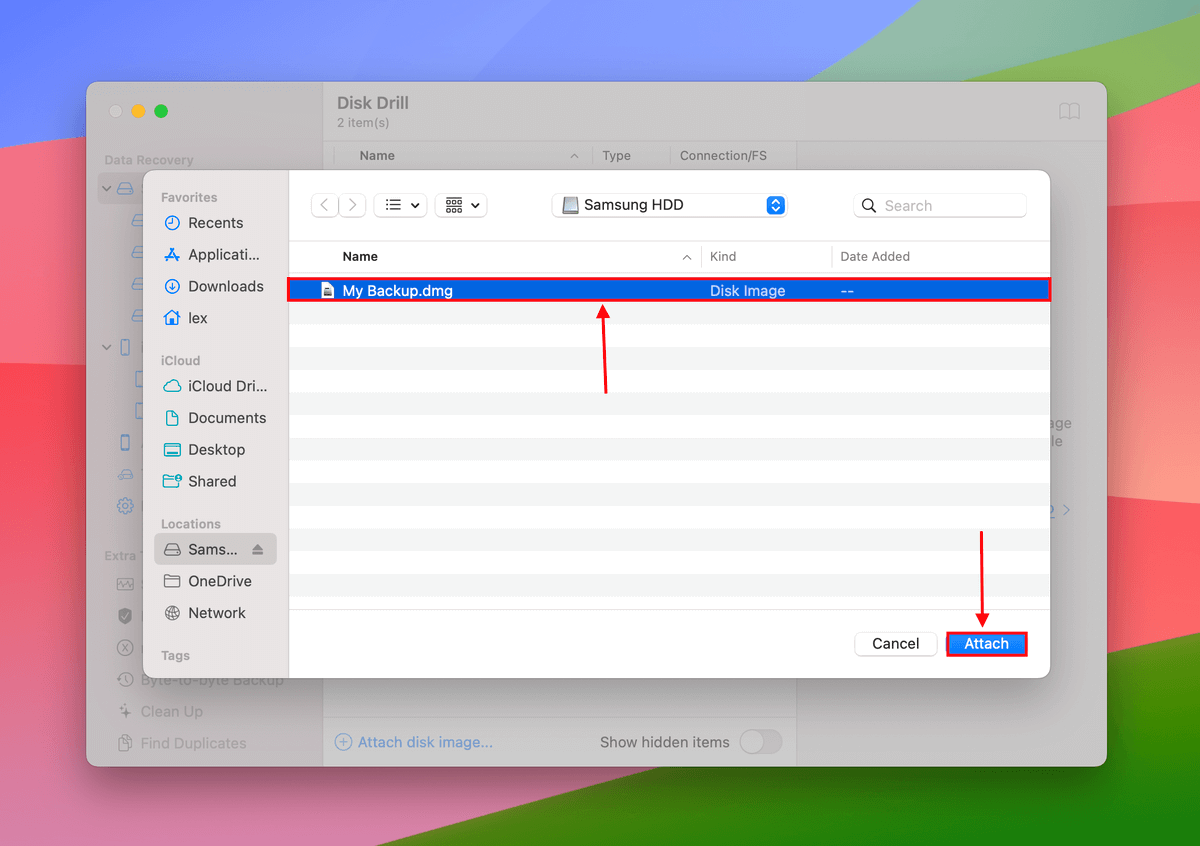
Step 4: Name your image backup and choose a location on your external drive where Disk Drill will save the image. Then, click Save.
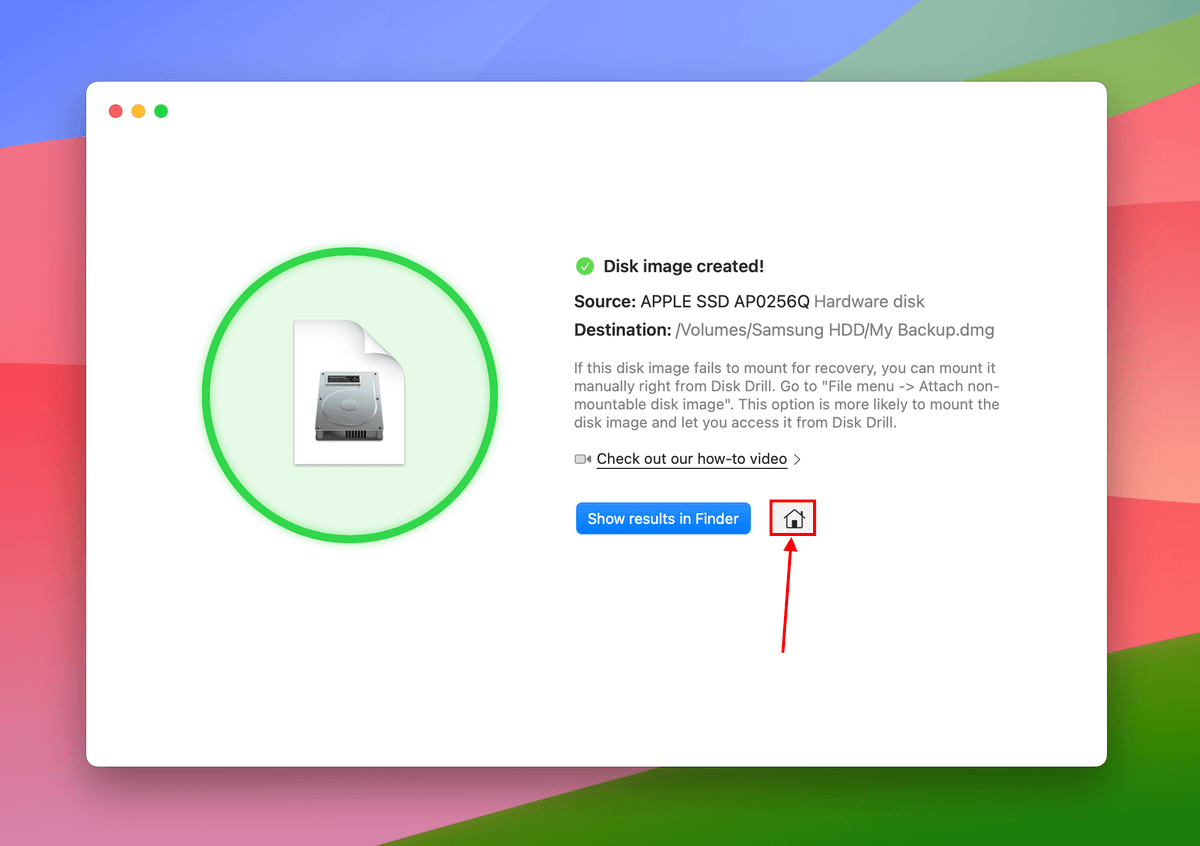
Step 5: Once Disk Drill has created the image, click the Home button.
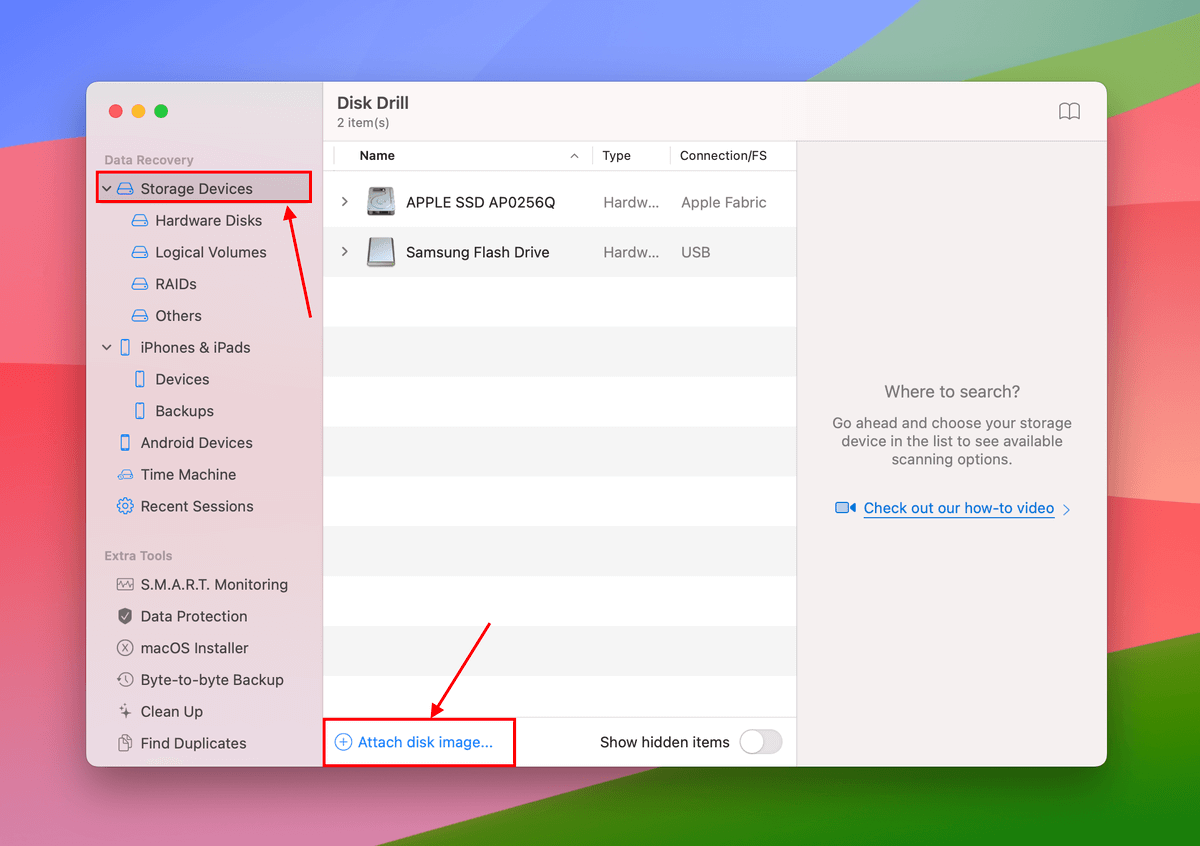
Step 6: Click Storage Devices in the left sidebar. Then, click Attach disk image… in the bottom of the window.
Step 7: Select the image you created in steps 3-4 and click Attach.
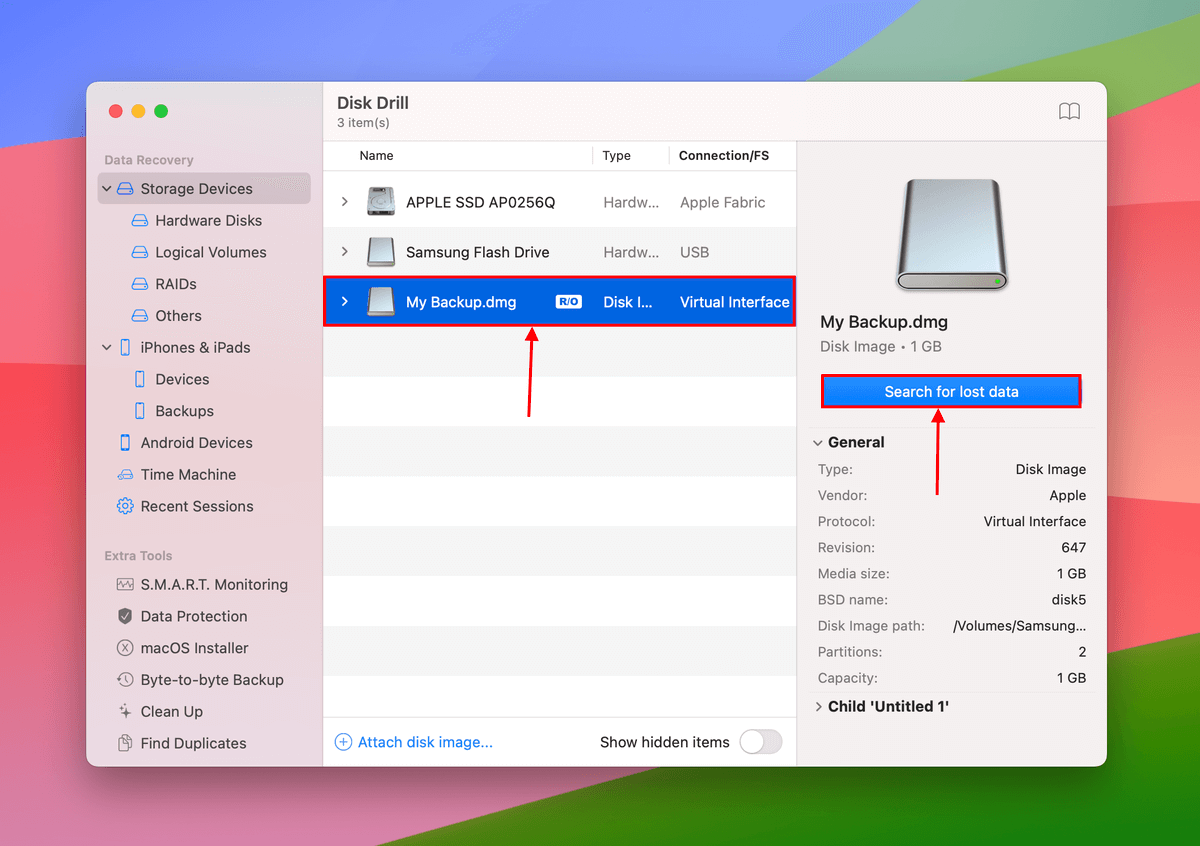
Step 8: Select the image backup you attached in step 6 and click Search for lost data. Once the scan is done, click Review found items.
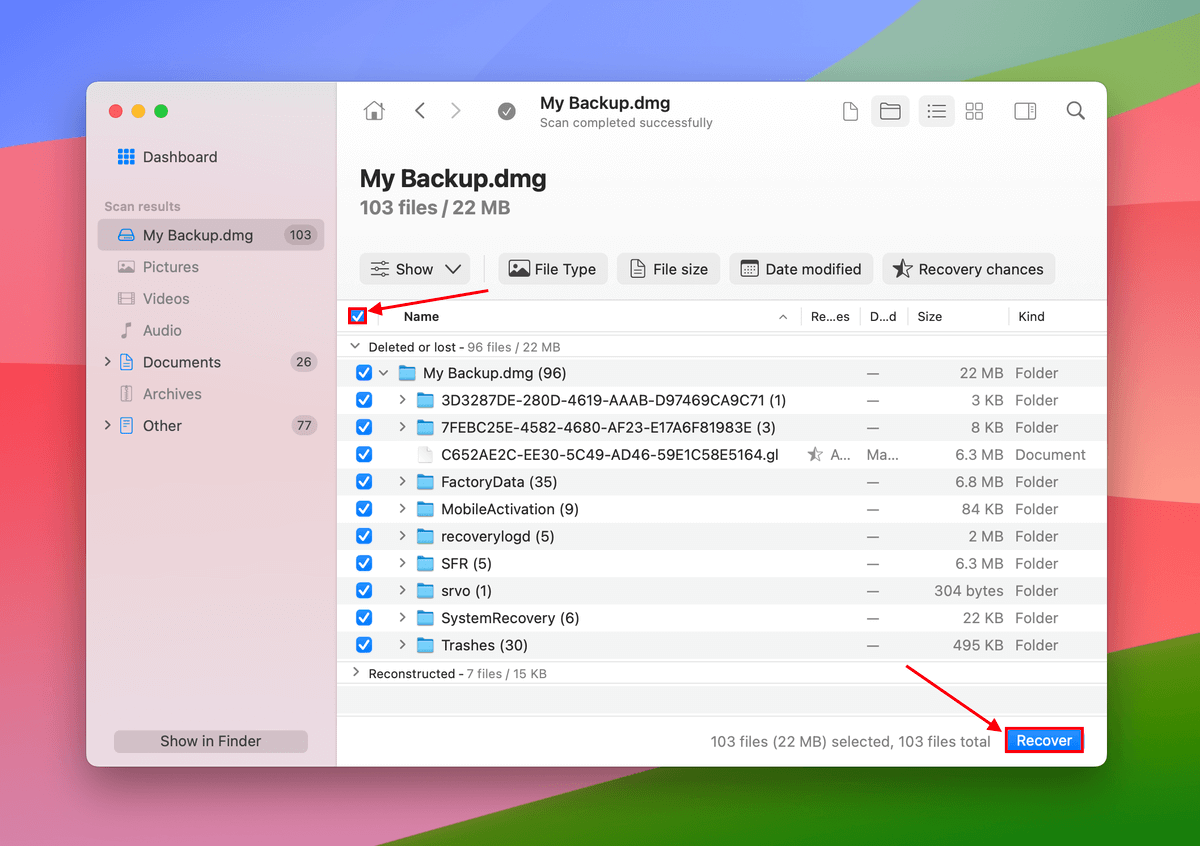
Step 9: From this window, you can browse, search, and preview your files. But you should secure your data ASAP so mark the box at the top of the leftmost column to select everything. Then, click Recover.
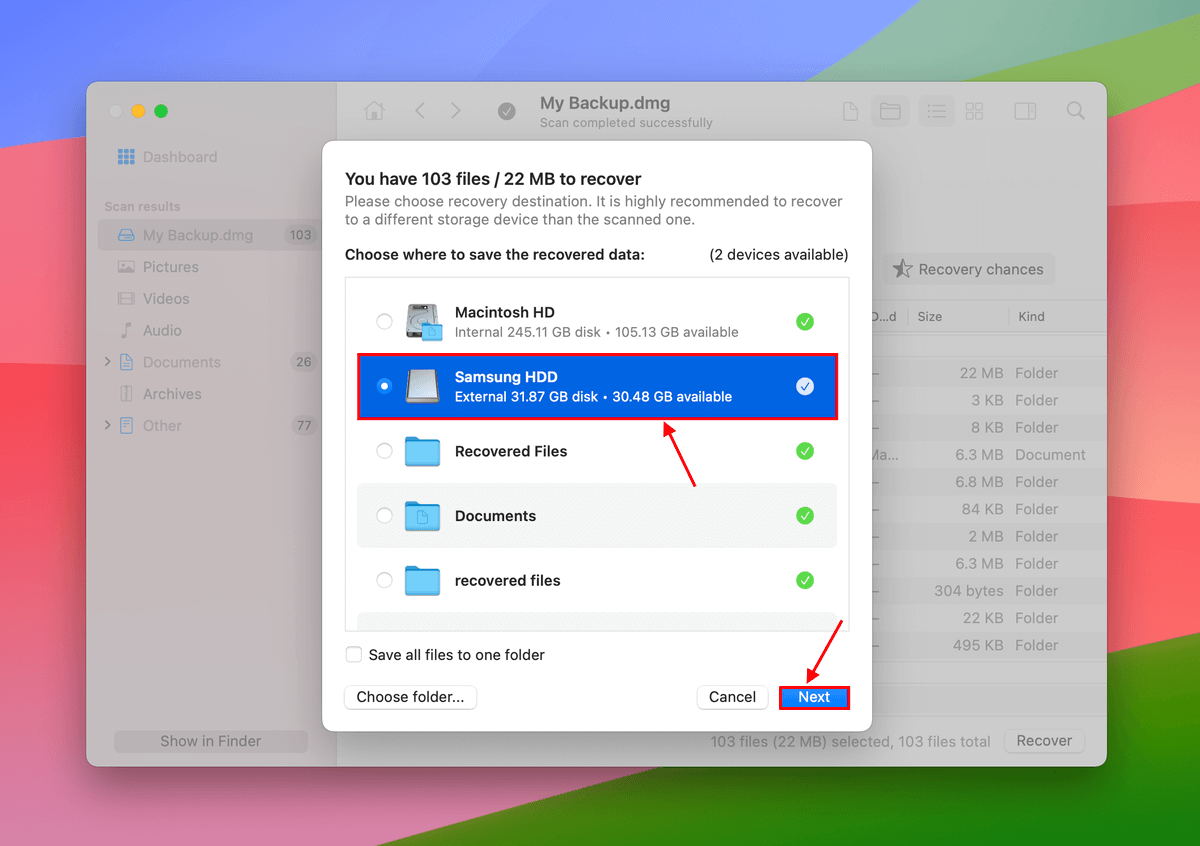
Step 10: Choose a location on the external drive you connected in step 1 as the save destination. Then, click OK to proceed with recovery.
Conclusion
Knowing how to check your Mac’s drive health in Terminal is an important skill that can help you prolong your device’s lifespan, keep your Mac running optimally, and keep your data safe!
Just keep in mind that all storage devices have a finite lifespan, no matter how careful you are. The best you can do is maximize it. When you know it’s on the way out, create a backup (we recommend using Time Machine) ASAP or move your data to a new device.


