Table of Contents
A confession
So, even as a wholly dedicated Mac weenie / freak / guru (I prefer the third option, but have often been saddled with the other two) I sometimes need windows.
Well, to be more precise, because the intended audience for most of my work as a web developer tends not to have the taste in computers I have, I sometimes need windows.
As our fearless leader, Josh, put it this morning in a gtalk message:
I generally don’t mind [CSS coding] except when it comes to IE
The discussion about IE CSS coding is a subject for another, much longer, exceedingly vitriolic post — and many hours with a therapist — but the idea of being a web developer who uses a Mac means that without question you’re going to need some method of testing your code on windows (at least until the revolution, when windows will be the first against the wall.. followed closely by HP-UX).
A crisis
Until a few weeks ago, my reliable method for testing web code on windows had been very simple: RDP to a windows box on my home network reserved for just such a task, and run IE. Simple. Effective. Non-intrusive, and non-ram-intensive for my low end MacBook. Nice. Unfortunately, being the nice guy I am, I gave away my little low-profile Pentium 4 Compaq to a good cause, and have since had to rely on a little Mini-ATX box I’ve had for years. Definitely not as grunty, but as I don’t use it very often I didn’t mind.
Then, of course, it died.
My thoughts turned quickly to virtualization. I have in the past used Parallels and VMWare Fusion on my MacBook and never been truly happy with either of them. I tend to run one of the several versions of “slimmed down” Windows XP, but even then the performance has never been anything more than “tolerable”. Plus, they cost, and I’m broke, so I never used them for any longer than their respective trial periods (I promise, no, really..). Still, they were all I knew, so I figured that in this case I’d probably go with one or the other.
A cry for help
So, as has become my habit lately, I turned to twitter for advice. I sent out the tweet, requesting preference between the two choices, and wasn’t exactly overwhelmed with replies. The consensus, though, seemed to be that Fusion was the way forward (I admit, I’m not a patient person, so I only gave it a few minutes or so). Thus, I started the download, and went searching for my windows install iso. Just then, however, I got a reply from the wise and benevolent @stilgherrian who suggested that I check out the stream of one @brendanb who had replied to Stil when he kindly re- tweeted my question. The tweet got my blood flowing:
“try Sun’s recently aquired VirtualBox – works quite well under OS X and is helluva lot less resource hungry”
Short and to the point (thanks to the twitter format) but a lot of goodness there, for sure. From Sun, which means another competitor in the ring, and “less resource hungry” had to be a good thing. I followed the link, and found, well.. virtual nirvana:
Sweet, sweet freedom
That’s right. It’s free.
I’ve never clicked the download button faster, I’m sure of it. Think of it. All the pleasures of virtualization, brought to you by a reputable — well, mostly, you can’t blame Sun entirely for what Java has become — vendor, for zip, nada, zilch, 2/3 of SFA (that’s for you, my Aussie readers).
All thoughts of the original two choices went immediately out the window. I had to try this thing out. Then, to pile ridiculous ecstasy on top of ridiculous ecstasy, the whole thing is less than 20M to download? Whatever Sun are smoking, they should be passing to the left.
Down to business
I was going to include exciting screenshots here of the ever-so-interesting install procedure.. But, alas, there wasn’t much to see. It was very, very simple.
A couple of the installer screens caught my eye, though. Here’s the license screen:
This outlines the “VirtualBox Personal Use and Evaluation License (PUEL)”. I gathered from the name that I would not be able to use the product for free in perpetuity, and sure enough, in the text you’ll find:
Sun grants you a personal right to install and execute the Product on a Host Computer for Personal Use or Educational Use or for Evaluation .. “Evaluation” means testing the product for a reasonable period (that is, normally for a few weeks); after expiry of that term, you are no longer permitted to evaluate the Product.”
Ah, well. No free lunch after all. I’ll come back to the licensing a bit later.
Carrying on with the ridiculously easy install procedure, the only thing that really caught my eye was this:
I always click customize in installers. I like knowing exactly what’s going to be installed — or at least having some vague idea — and I like being able to turn off the chaff whenever possible. In this case, though, there was only one option to turn on / off, the “Sun xVM VirtualBox Command Line Utilities”. The description, “Installs the Sun xVM VirtualBox command line utilities into /usr/bin”, definitely sounds interesting. I’m still a unix geek at heart, so anything command line always gets me excited (sad, but true). I’ll come back to this later, if I figure out what the hell it does, exactly.
Running it up.
Upon starting the software for the first time I was presented with startup screens fitting the profile of most virtualization products. I was prompted to create my first VM, with questions regarding the intended OS, the name of the VM-to-be, the amount of RAM, and, of course, the creation of the virtual hard disk.
That list of supported OS’s is crazy long!
Yeah, very little RAM. I only have 1G total!
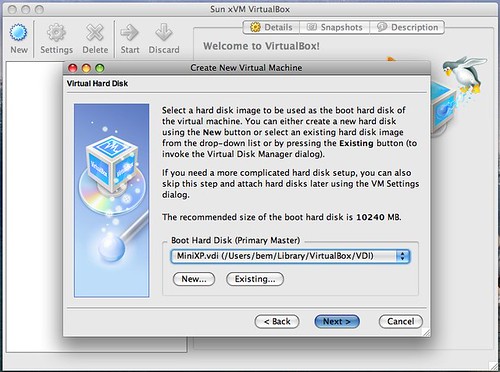
Time to set up the virtual hard disk.
I chose a “fixed size” disk image, as I have a general belief that a dynamically sized disk will be more resource intensive for the host machine as the disk is re sized on the fly. Also, I prefer to set aside the full amount of space from the start rather than getting a nasty surprise later on if the disk suddenly grows to full size and takes over my host hard disk.
The disk image creation was swift, to say the least, although admittedly I created a very small disk image, as my only intended use for the VM is as a web testing machine.
Once the disk image (or images, if you prefer multiple disks from the start) has been created, you can move forward with the install of the OS on the VM.
Before I dove in, though, I wanted to have a look around at the VM config. I like to know what I can screw around with before I get started, plus I want to know what I can expect from devices (whether the ethernet will be configured, in particular).
The VM browser screen (see “Welcome!” above) shows three tabs. The default tab “Details” and two others, “Snapshots”, and “Description”. A quick look at the “Description” shows us we can add a fulltext description for the VM. I don’t know if this will be particularly helpful, being that I’ll probably only be running the one VM, and therefore won’t be very likely to forget what it’s for, but I rather like the idea.
The “Snapshots” tab is reminiscent of functionality from competing products, whereby you can easily rollback a VM to a certain period in time. Think of it as Time Machine for VM’s. We’ll definitely come back to this, post-install.
That brings us back to the meat of this screen, the “Details” tab. A quick looks shows me all the things I already know: My VM is named “MiniXP”, has 192M of RAM, and a 2G disk image. I can also see a lot of PC BIOS style information like the boot order. I can also see that there is indeed a virtual ethernet card already “installed”. This gives me hope that I’ll be able to easily share my MacBook’s Airport Express to give the little beast network. Fingers crossed.
Pre-install Tweakery
Clicking on any of the headings on the Details screen brings up the “Settings” dialog. Cool. Very “Parallels like”, one might say. Let’s dig in here a little bit, to make sure things are configured properly pre-install:
There is, for better or worse, a HELL of a lot here, as it turns out, so I’ll stick to highlighting the bits I’ll be changing, and leave the rest to your imagination for now.
Firstly, I want to make sure my install media gets mounted on first boot, so I can actually install windows. Selecting “CD/DVD-ROM” from the left hand menu gives me exactly what I’m looking for:
I select “Mount CD/DVD Drive” and click the “ISO Image File” radio button then browse for my windows ISO (I’m using an ISO, your mileage may vary depending on your chosen install method, but a normal windows install CD/DVD should certainly work).
I wasn’t game to change any of the network settings, but I LOVE that it’s seemingly easy to add up to four adapters. Very nice idea.
I went ahead and set up my Mac desktop as a “Shared Folder”, as I like the idea of having an easy way to share files with the VM (assuming there’s no “drag n drop” support.. That would just be too good to be true).
That’s it for my pre-install tweaks. Let’s get an OS running!
Installing the guest OS (Windows XP)
Back at the summary screen, I made sure my new VM was highlighted and jumped in, finally, by hitting the “Start” button.
After a moment or two, I was presented with the expected little black box of a VM, along with a warning message.
This helpful little screen let me know that my keyboard would be automagically directed to the VM once it was running, and that I could break free by pressing the “host key” The default host key in my case, is “Left Command”. Handy to know, thanks.
Next, came a very brief, and not-entirely-unattractive, splash screen:
Followed by the blue-install-screen of death. Oh man, I’m glad this is a virtual machine.. Shudder. I was gonna screenshot it, but I just couldn’t bear it. You know what it looks like. I won’t bore you with the ugly details of a Windows XP install, but I will say that it went by as fast as I’ve come to expect from other virtualization products. Suffice to say that after about 20 minutes and the odd mouse click — selecting languages, timezones, etc — I was presented with another exceedingly depressing screen (for any self-respecting Mac user, anyway):
The next screen got me interested, as I was really hoping that network wouldn’t require any voodoo to get working:
To my utter delight and surprise, my windows activation quickly went through, which meant my network connection was working. Fantastic.
Now what?
Other than installing MultipleIE, so I can effectively web test (don’t tell me you expect one version of IE to behave like any other.. What fun would that be?) I really wasn’t looking for very much more.
For the sake of testing, however, I decided to put the software through a few of its paces.
Time Machine for VM’s
I mentioned the “Snapshot” feature earlier, and I think it’s worth coming back to. If you’ve used any virtualization before, you’ll be well aware of the value of this feature. If not, you’re in for a treat. Earlier, I referred to snap-shotting as “Time Machine for VM’s”, and that’s a pretty good description. The basic idea is that once you’ve got your install just right, you can snapshot the entire VM — not just the settings, not just the disk contents, but the whole momma lovin’ thing — to a file. Then, as if that wasn’t enough, the software allows you to roll back to that time. Thus, if you’ve installed some very silly software, you can roll your VM back to a time before the install and all the ill-effects it caused will magically be gone (this is all probably very novel to windows users who have never used Leopard, I’m sure). For the sake of brevity, let me say that this worked, and worked well beyond my expectations. Creating the snapshot took less than a minute, which was no doubt due in some part to the fact that I have a very small hard disk. Still, I’ve built a LOT of low-fi VM’s — particularly on various VMWare products — and snapshotting them was NEVER this quick. Once my snapshot was created — by choosing “Take Snapshot” from the “Machine” menu — I went ahead and polluted my beautiful image with some software. In this case, Safari for windows (seemed apropos).
Next, the rollback. I wasn’t really sure how to do it, I must admit. I actually stumbled across it by mistake. I thought it might be prudent to stop the VM before rolling it back, and decided to just try clicking the handy old red button. Upon doing so, I was presented with the “Close virtual machine” dialog.
I chose the “Power off machine” option and its sub-option “Revert to the current snapshot”, said a little prayer, and clicked “OK”. I got a new dialog, very reminiscent of the snapshot dialog, which advised me that I was not only “Discarding current machine..” but “Restoring the execution state”. I was lucky to get in a screenshot, by the way, as this went away very, very quickly as my machine shut down.
I guess that means success. Again, most impressed by the speed with which this occurred. Impressed is not the word, actually. I believe “Schwing!” is the word.
Still, schwing or not, before I could call the snapshot/rollback procedure a success, I needed to make sure the machine was still functioning and that the evil software install was gone (“a backup routine is only as good as its restore”, don’t ya know). VirtualBox closed down when I stopped the VM (this is probably configurable) so I restarted it. Once the VM browser came up, I clicked start again and, this time too quickly for me, a dialog reading “Restoring machine”, or something to that effect, came and went and I was presented with my beautiful VM, restored to it’s pre-Safari state. Running and ready to go.
Schwing. Yes, again. I’m only 33.
But wait, there’s more.. Seriously.
One feature people always want to know about is “Unity”, the feature in VMWare (which is, of course, matched by Parallels) which allows you to run guest OS programs in an “integrated” fashion with the rest of your desktop, with the guest OS desktop hidden. To be honest, I wasn’t overly concerned with this feature, but I was reminded by my good twitter buddy @lewellyn that it’s not JUST about me, as it was pretty much the first feature he asked me about once I had things running. This one’s for you, @lewellyn!
In case you hadn’t noticed, I tend NOT to read documentation. It’s more fun this way. Really. So, I decided to poke around and try to find the feature, which I found out was called “Seamless Mode”. Makes more sense than “Unity” if you ask me. Unity has that icky “marketing-speak” ring to it. A quick look in my old friend the “Machine” menu revealed it to me very quickly. It also revealed that the option was greyed out. D’oh.
From past experiences with desktop VM software, I had an inkling that I might need to install the “Guest” software on the windows VM before this would work. So, I looked for that option. I very quickly found it under the “Devices” menu (not entirely sure why it lives there, other than the fact that I presume, like other desktop VM software, it needs to mount a disk image first). I clicked on “Install Guest Additions”, and waited.
…
Oh yeah, right. My custom XP install turns off auto-run. Right. Ok. Open “My Computer”, yep, just as I thought, a disk image has been mounted. Right-click, “Autoplay”, bang. Installer screen.
Next, next, accept, next, etc. Followed by the fairly standard windows installer screen showing the progress of the install. Aside from the windows install, this has been the longest step since I built the VM. Oh well. It should pay dividends if I get the wondrous, shiny “Seamless Mode” working, right? After the wait, I was presented with everyone’s least favorite install screen. The notorious prompt to reboot. Sigh. What else to do? I accepted my fate and rebooted. Seamless mode here we come..
I admit, aside from the much-vaunted Seamless Mode, I had no further aspirations as to what good, if any, the “Guest Additions” install might be to me. As the VM booted back into windows, however, I began to get some inkling of what else would be in store.
The gist of the message seemed to be that my mouse would no longer be held captive by the guest OS. Most handy. I was getting tired of using that handy “Lock” key to get my mouse back. Once I cleared the message, I had my normal windows desktop. Time to try out the “killer” feature. I started a browser, and clicked on the now un-greyed “Seamless mode” menu item. The result:
Well.. The immediate result is that I was taken to yet another handy dialog letting me know that I could escape seamless mode with a key combination (specifically left-command-l). Once I cleared that dialog, however..
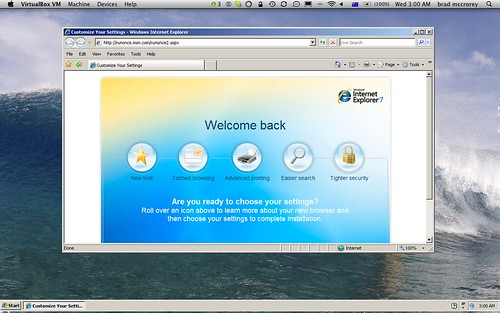
Ok. Even I can admit that’s kind of cool.
Given the new appearance of the cute little VirtualBox in my windows system tray, I presume there must be myriad other new bits of functionality available to me now, but for the sake of brevity, I’ll leave them for the reader to explore. The mouse, by the way, really is no longer held captive by the VM. I like that. “Guest Additions” turn out to be pretty handy. I might do a new snapshot to make sure they’re kept safe.
Final thoughts
There is probably plenty more I could say about this wonderful product. I said I’d say a little more about the licensing, so I will. There is a very, very long page with the details of the “Virtualbox PUEL” T’s and C’s, which, of course makes no mention of price. It does give the full text of the license which, like the copy in the installer, makes mention of a very, very vague “evaluation period”. A cursory look through Sun’s corporate site yielded no pricing information either. Thus, for the moment, I’m sticking with “Free”, even though I will be using the software in a business environment (I will do a little more looking, though, as I don’t want to expose my clients unnecessarily).
As for features, Sun provide rather a lot of information very little of which, I’ll admit, I bothered to read. It has everything I want, and a few things I didn’t even know I wanted until I tried them. This is more than good enough for me.
The bottom line.
I’m very, very impressed with this software. Sun seem to have, as has become their recent habit, snapped up a winner in VirtualBox (it was originally an open source project). They’ve kept its roots intact, by offering an open source version to download and compile (which I won’t be trying, sorry). Apparently the open source version lacks a few features, which will be rolled in at a later time (more info on the wikipedia page).
What surprised me most about VirtualBox, aside from the price, is the fact that it seems to be feature complete in every way. I was sure there would be some huge gaping feature hole between it and its competitors. However, from my experience, there seems to be no such problem, as far as desktop virtualization goes (I have yet to explore Sun’s server-side product range, so I don’t know yet how it will compare with VMWare ESX, for example). For a desktop user, there really doesn’t seem to be anything missing (please correct me if I’m wrong. I tend to “under-use” software at times in favor of getting my work done).
@vmwarefusion on twitter approached me after my initial tweet for help, with the humble suggestion that I use Fusion (a little creepy, but OK). Once I had decided on VirtualBox, I informed “it” to this effect, and “it” asked, quite reasonably “Why?”. I stand by my reply, that the price is right, and the performance is so much better that I wouldn’t think of trying another product. For my somewhat humble purposes, I’d stack this software up against its competitors any day, and I’m most grateful to the nice people at Sun for a fine product and a very vague license.


