
Apple’s recent “Unleashed” event revolved around the introduction of Apple silicon MacBooks Pro, but it also announced that the next major version of Apple’s operating system, called macOS 12 Monterey, would become available on October 25th.
The macOS Monterey release date is now in the past, and that means I’m ready to share with you my thoughts and impressions. I’ve been testing Monterey since the first public macOS Monterey preview version was released at the beginning of July 2021, so this review is based on the last few months of use—not just the last few days.
Monterey is the successor to the seventeenth major release of macOS, named Big Sur after the mountainous section of the Central Coast of California. Interestingly, Big Sur is located less than 40 miles away from Monterey Bay. It’s possible that Apple deliberately named the current major release of its operating system after a place that’s just a short drive away from Big Sur because the average user might easily fail to spot any obvious changes.
Indeed, Monterey has far more in common with updates like El Capitan, Sierra, or High Sierra than it does with updates like Yosemite, Catalina, or Big Sur. But just because cosmetic changes and major new features are few and far between doesn’t mean there isn’t a lot to talk about, so let’s dive right in.
Table of Contents
How I switched from Big Sur to Monterey
Whenever the next macOS release becomes available, you have two options on how to install it: you can update from the current version via Software Update, or you can start with a clean slate. I decided to go with the former method, and I’m happy to report that it went smoothly.
The clean install method is a good option if you want to install Monterey on an external drive. That way, you gain the ability to play with its features and test its stability while retaining the option to easily switch to Big Sur or any other version of macOS that’s installed on your main system drive.
Even though it’s generally perfectly safe to upgrade to Monterey via Software Update, you should make a backup so that you can recover your data, applications, and settings should anything go wrong. If your system drive isn’t encrypted, you can create a byte-to-byte backup using Disk Drill:
- Download, install, and launch Disk Drill.
- Select “Byte-to-byte Backup” from the “Extra Tools” menu in the left pane.
- Select your main system disk and click the “Create backup” button.
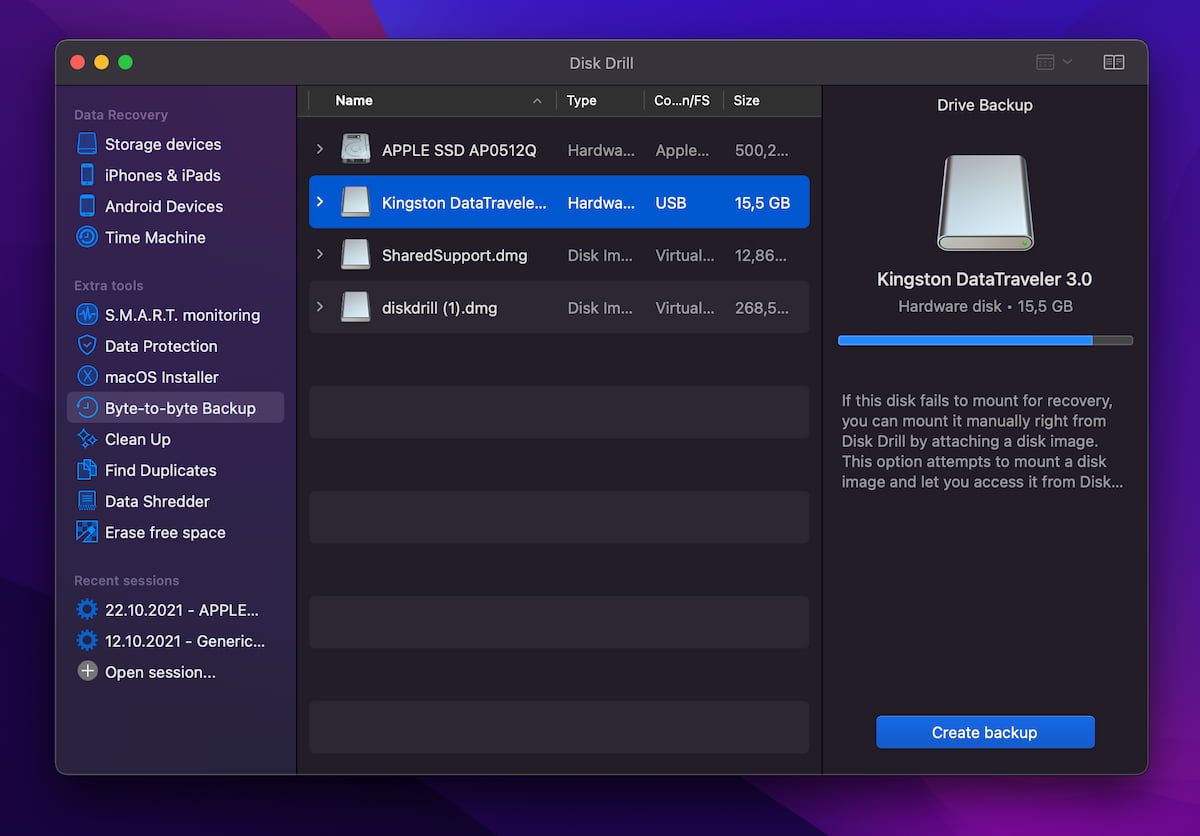
- Name your backup image and select a suitable location for it.
- Wait until your backup image is created.
If your system drive is encrypted with the Apple M1 or T2 security chip, then Time Machine is the way to go:
- Plug in an external backup drive.
- Open the Settings app.
- Click Time Machine.
- Click Select Backup Disk.
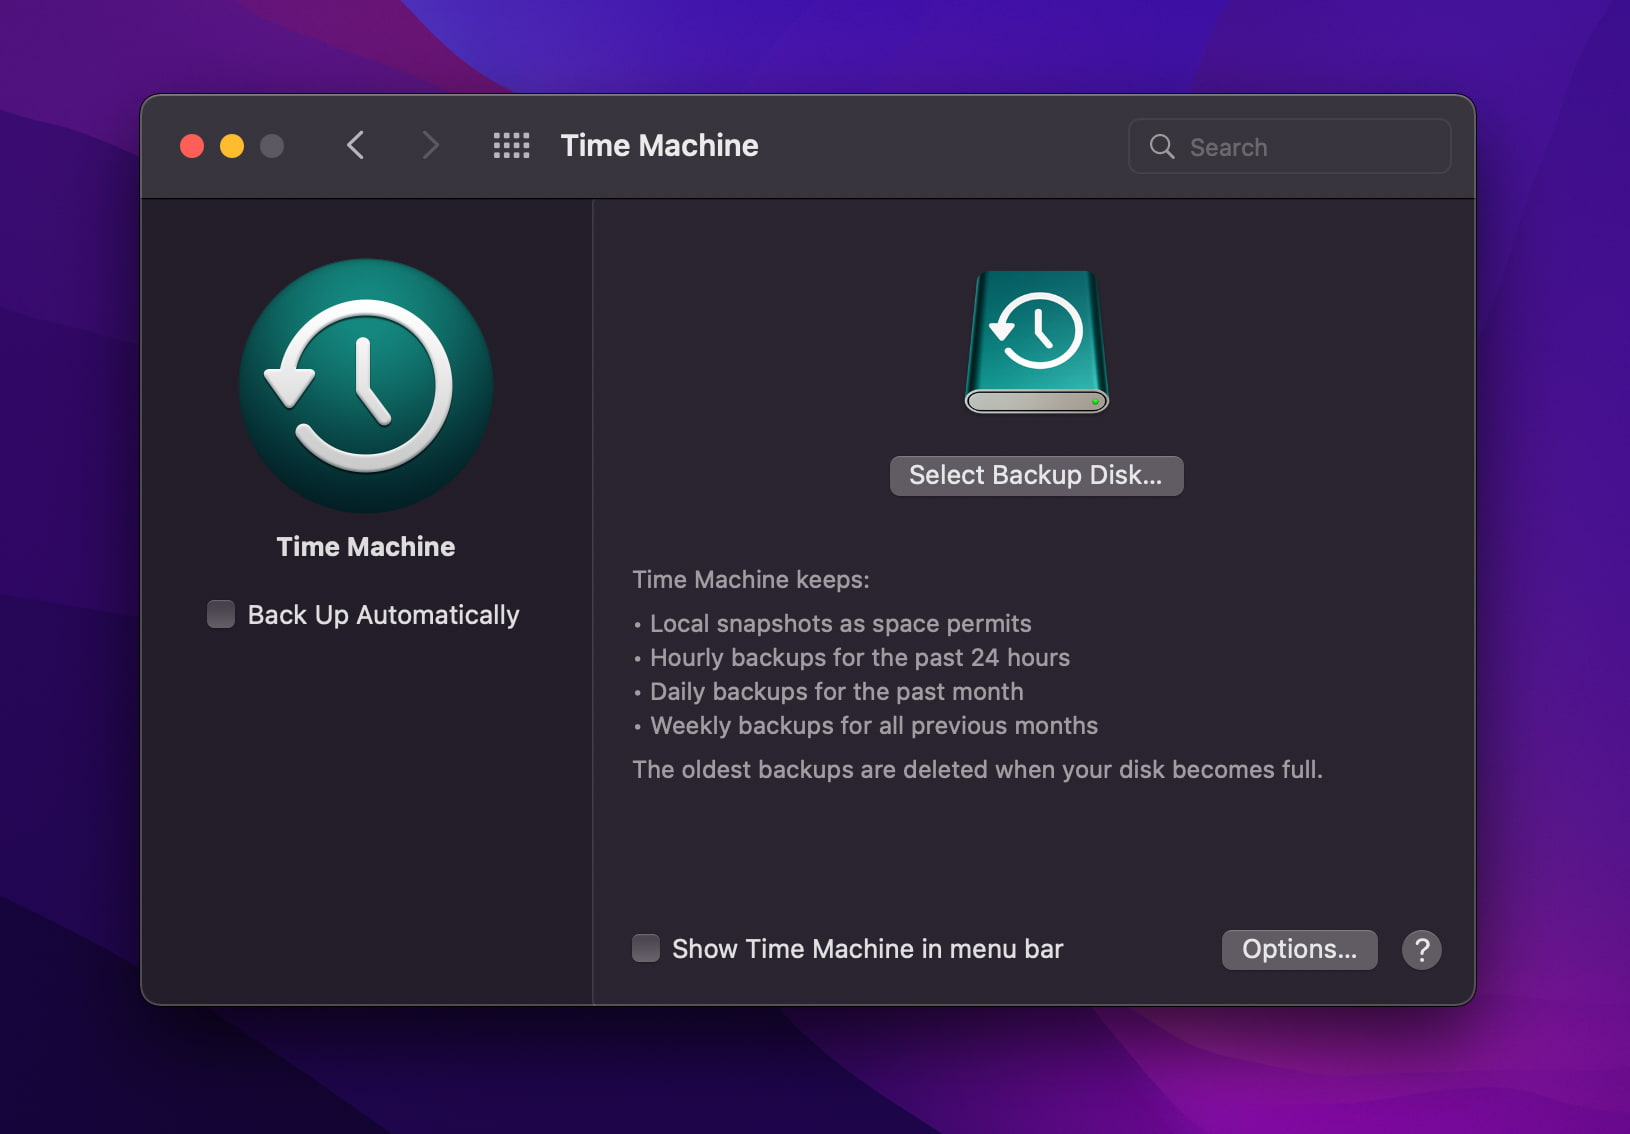
- Select the disk you’d like to use for backups.
Once your files are safely backed up, you can proceed with the update, which should take around one hour if you update via Software Update and up to several hours if you choose to perform a clean install, which involves the creation of a bootable USB using the macOS Monterey Installer.
To update to macOS Monterey via Software Update (Big Sur, Catalina, or Mojave):
If you’re running Big Sur, Catalina, or Mojave, you can update via Software Update:
- Click the Apple menu in the top-left corner.
- Select System Preferences.
- Click Software Update.
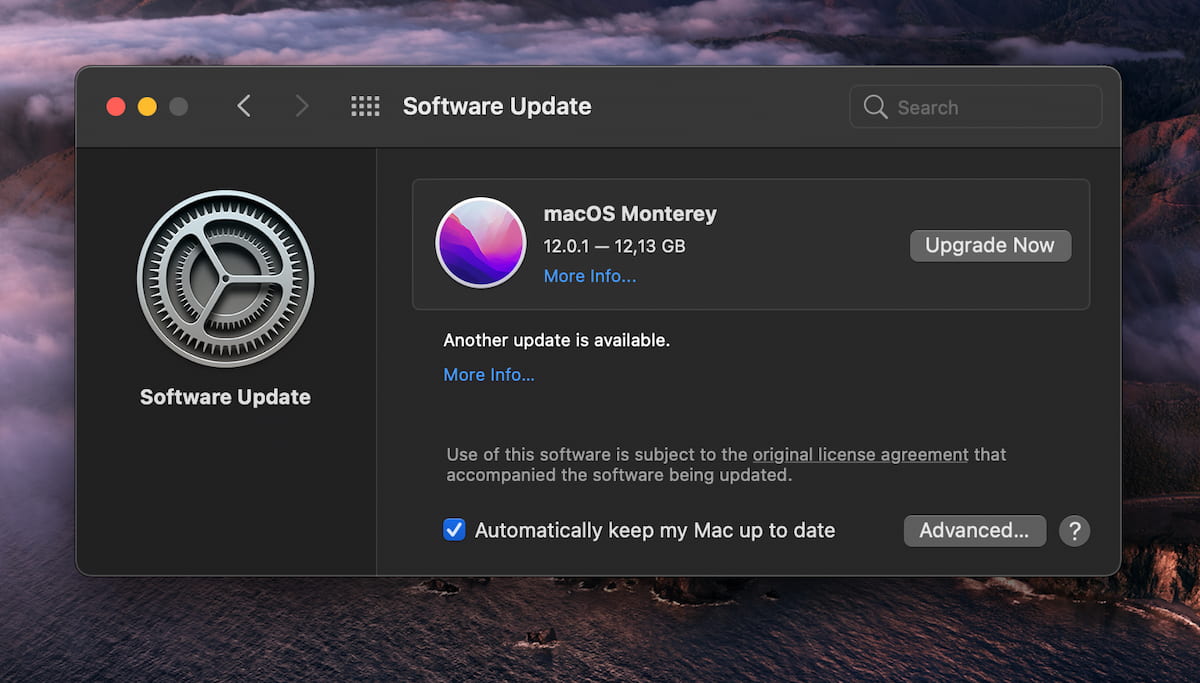
- Wait for the update to download. The macOS Monterey installer will open automatically.
- Click Continue and follow the onscreen instructions.
To update to macOS Monterey via the App Store (High Sierra or earlier):
If you’re still running High Sierra or earlier, then you can find the Monterey update under the App Store updates tab:
- Launch the App Store.
- Click the Updates tab.
- Click the Update button next to the Monterey update.
- Wait for the update to download and the installer to launch.
- Confirm that you’re ready to install the update.
What’s new in macOS Monterey?
Big Sur introduced a refreshed design language, Catalina got rid of iTunes, and Mojave brought us system-wide dark mode. What does Monterey bring to the table? A number of improvements and new features that together make up for what can only be described as a refined version of the same experience Big Sur users are used to.
Focus helps reduce distractions
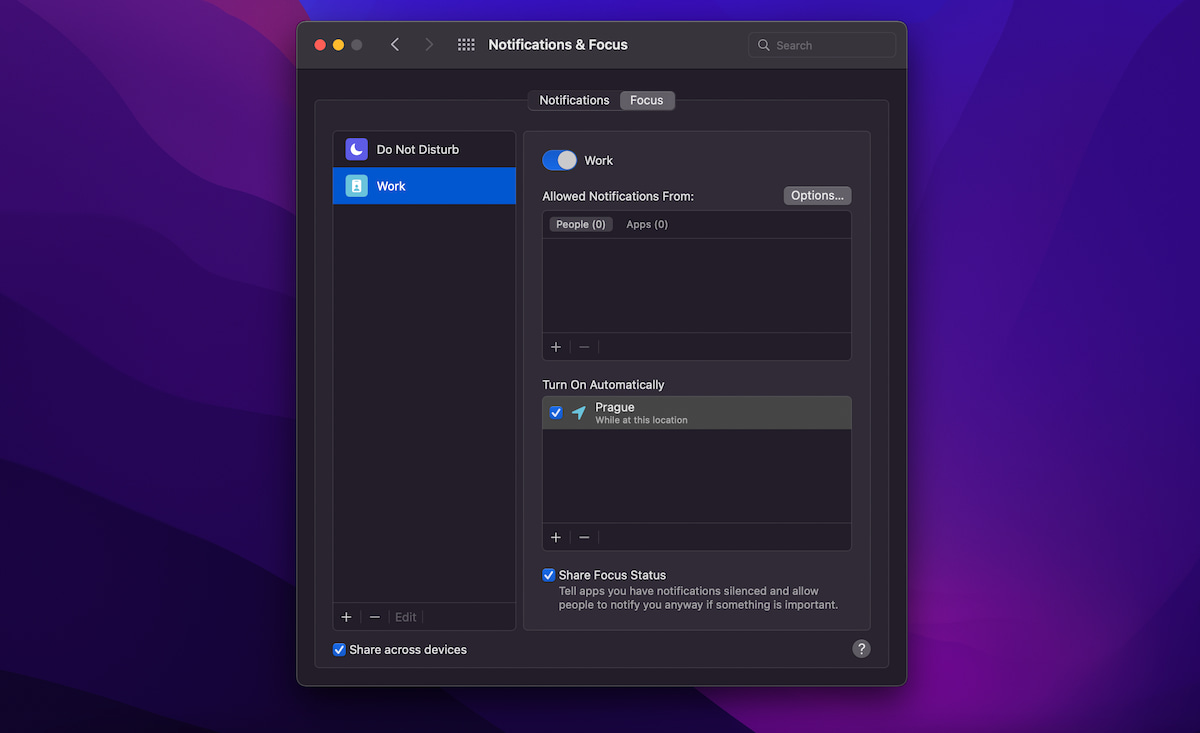
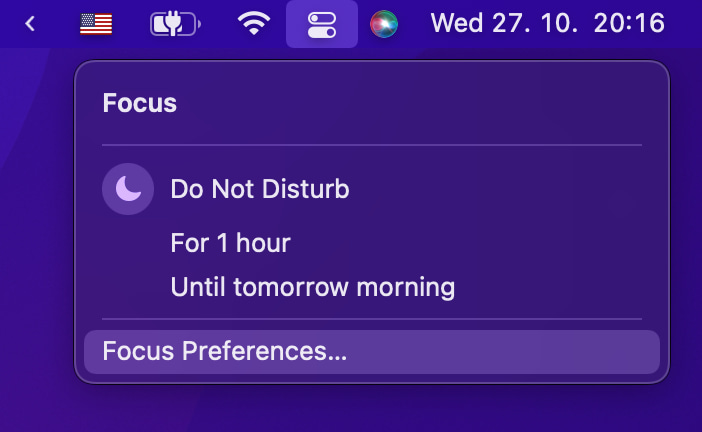
The one feature every Mac user who updates to Monterey will be able to appreciate and benefit from is called Focus. As its name suggests, the purpose of this feature is to reduce distractions, such as instant messages, app status notifications, and other alerts so that you can better focus on what really matters.
The biggest difference between Focus and Do Not Disturb is the level of control you get. Until now, you could either disable all notifications by activating Do Not Disturb or enable all notifications by deactivating it. That’s fine in certain situations, but not in others.
For example, a software developer may want to disable Messages notifications and other instant messaging applications that she doesn’t use for work, while keeping Slack notifications enabled to remain in touch with the rest of the team.
With Focus, you can do just that and more, with a few simple clicks:
- Click the Control Center icon in the Menu bar.
- Select Focus Preferences.
- Click the + icon and create a new Focus profile.
- Configure the Focus profile to allow notifications from your work colleagues and work apps.
- Configure when you want the Focus profile to automatically turn on (you can also enable and disable it manually at any time).
Monterey lets you share your Focus status with others in Messages and supported communication apps to let others know when it’s a good time to contact you.
Shortcuts app makes task automation simpler
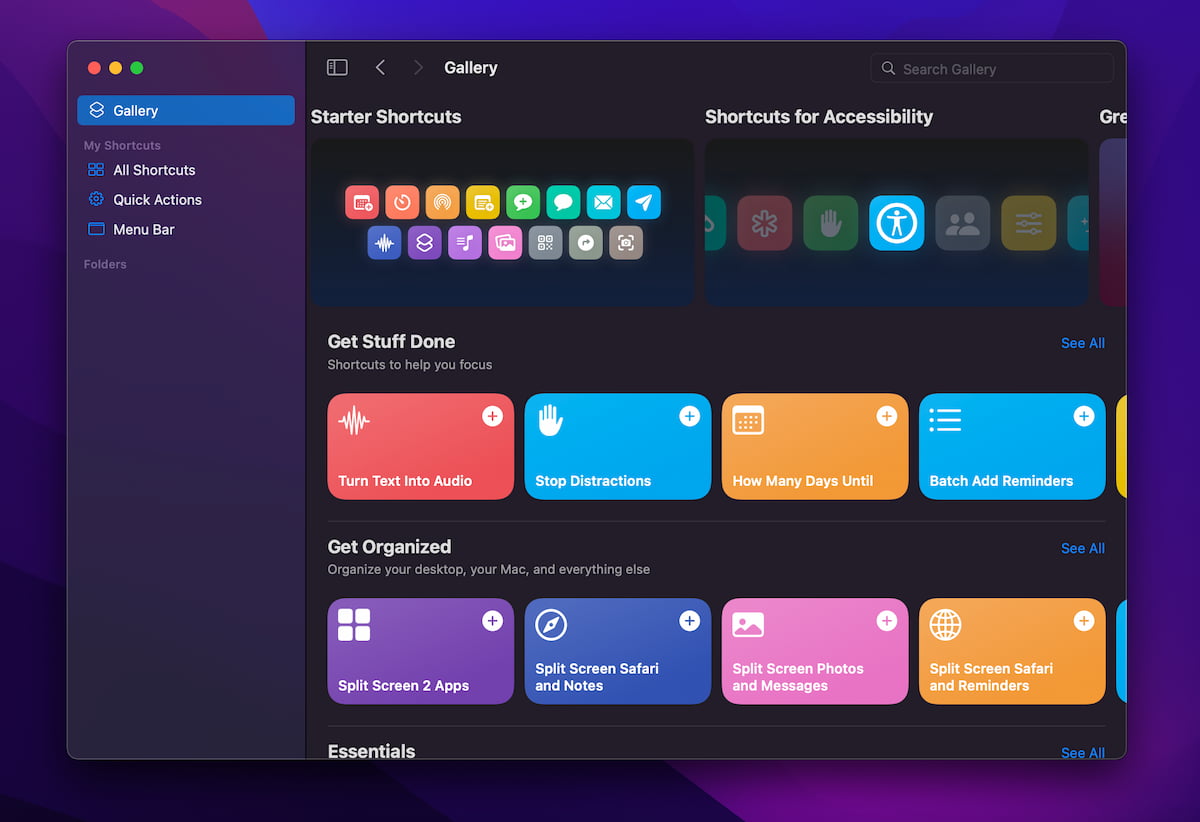
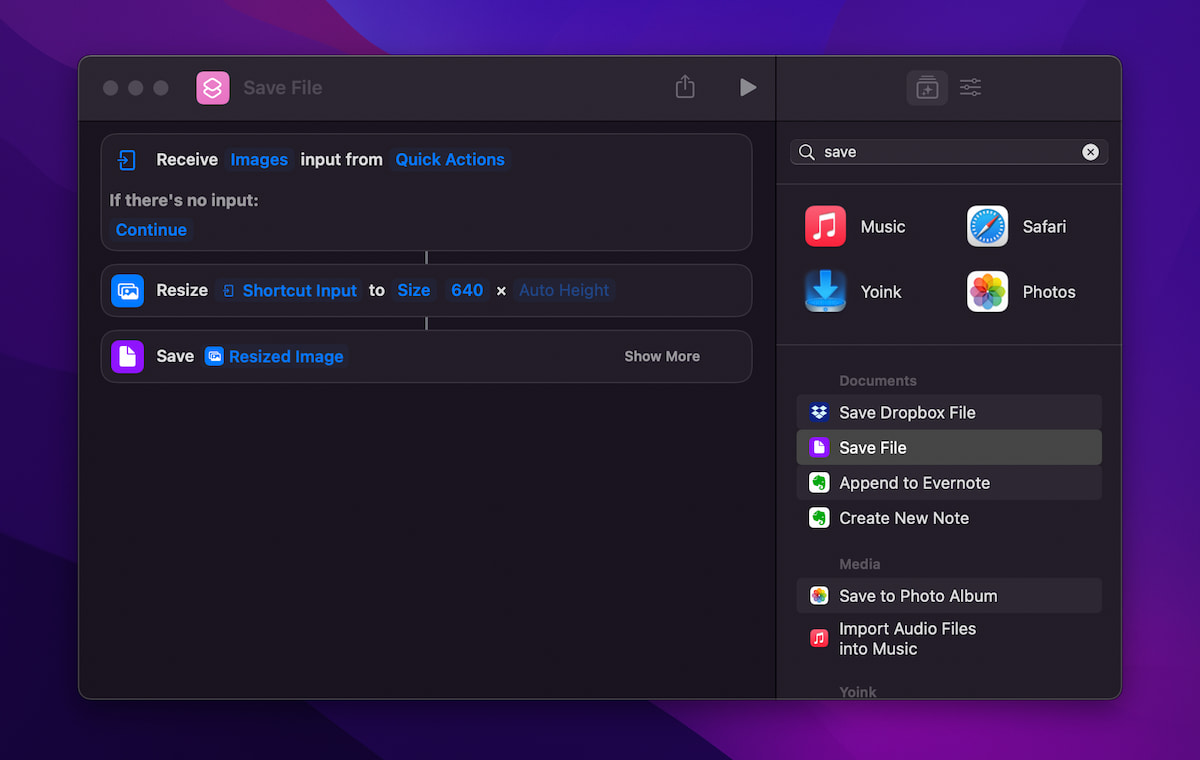
Mac power users are no strangers to task automation. From shell scripts and Apple scripts to Automator, the macOS provides many different ways to automate repetitive tasks, and Monterey introduces one more: the Shortcuts app.
Intended as an Automator replacement (you can import Automator workflows into Shortcuts), the new app provides a polished user interface for building simple and complex automations with intuitive drag-and-drop actions while giving users with coding skills the option to go a step further.
Shortcuts, as Apple calls automations created using the Shortcuts app, can be triggered from the Menu Bar, from Quick Actions, from Spotlight, or using Siri, and they can be shared across supported Apple devices. Best of all, the Shortcuts app comes with a gallery that showcases what’s possible, such as translating text into any language, making a GIF, or copying clipboard content to Evernote.
To create your first shortcut:
- Launch the Shortcuts app.
- Go to All Shortcuts.
- Click the + icon.
- Add actions from the right pane to build your shortcut.
- Apply the shortcut to save time.
Right now, now many third-party apps integrate with the Shortcuts app, so the number of available actions isn’t as large as it will undoubtedly be in a few months, but there’s already a lot you can play with.
Safari offers more control
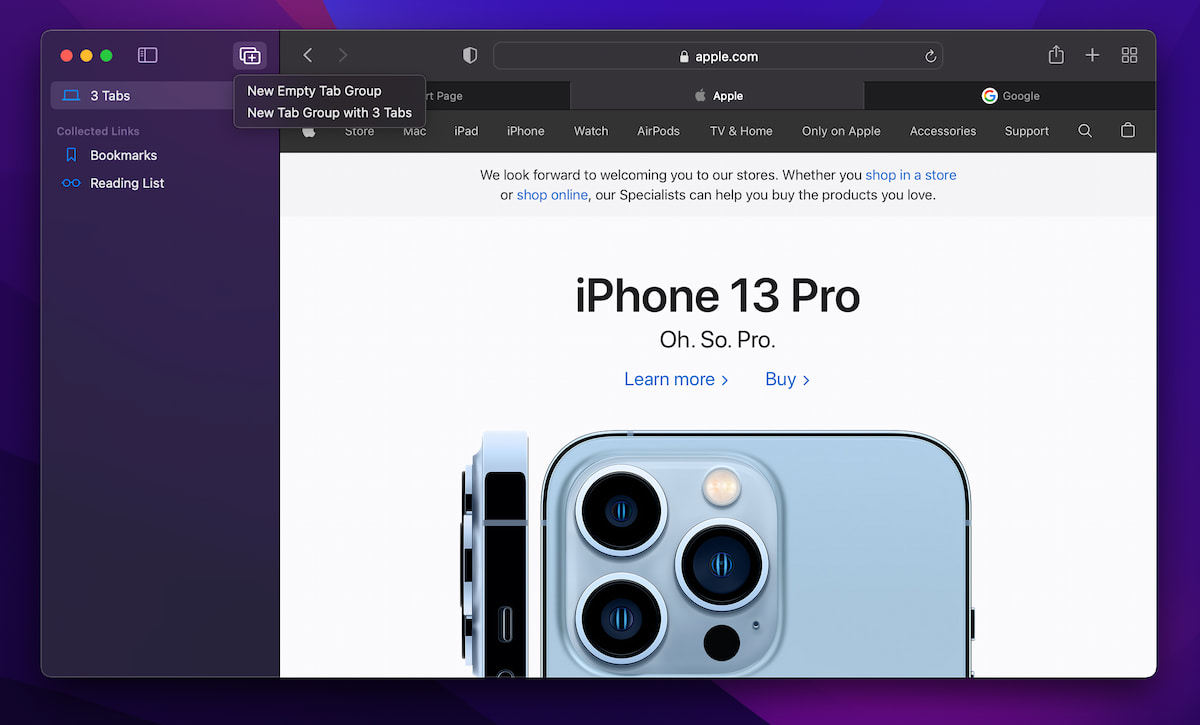
Throughout the Monterey beta, the changes Apple had been making to Safari were one of the biggest sources of disagreement among Apple fans. The Safari development team has clearly sided with the critics of Safari 15.0 because the version of Safari that comes with Monterey (15.1), and that’s now also available on an older version of macOS, looks pretty much just like Safari 14. This means that tabs are once again organized in a dedicated tab bar (or panel), instead of being displayed in line with the address bar.
Mac users who treat tabs as if they were collectible items can rejoice because the new Safari includes a Tab Groups feature that makes it possible to save and organize tabs into groups. You can have one group for work, another group for casual web browsing, and perhaps yet another group for an upcoming trip.
To protect users’ privacy better, Monterey Safari comes with Intelligent Tracking Prevention that prevents trackers from profiling users with their IP addresses. This feature is enabled by default, and you can disable it by following these instructions:
- Launch Safari.
- Click the Safari menu and choose Preferences.
- Go to the Privacy tab.
- Click the checkbox next to “Hide IP address from trackers.”
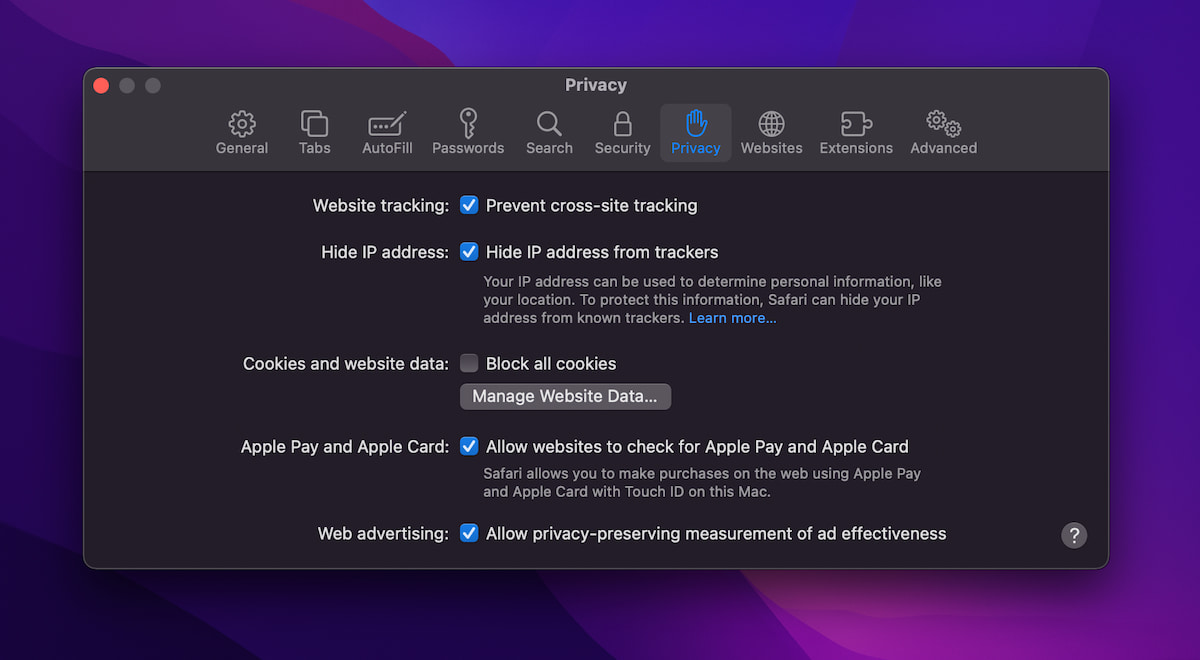
We recommend you keep the feature enabled since it shouldn’t interfere with your browsing experience at all.
Universal Control and AirPlay to Mac enable seamless control and content sharing
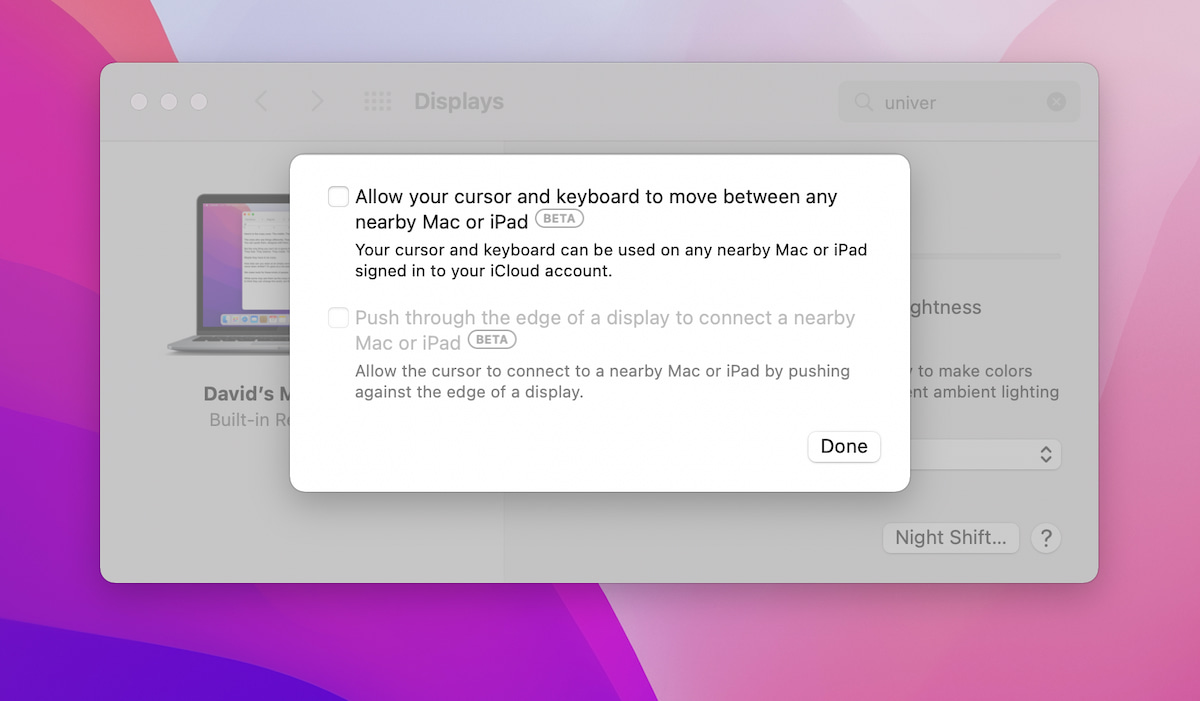
It’s a fairly common practice to use a docked iPad as a second screen to run an instant messenger or to display reference material, but it can be annoying to switch between keyboard and mouse and touch input. Monterey solves this problem with the Universal Control feature. With it, you can use your Mac keyboard to type on any device and your Mac mouse to seamlessly move your cursor from one device to the next. You can even draw something on an iPad using Apple Pencil and then drop the drawing into an app running on your Mac.
It seems that Apple has temporarily hidden the Universal Control option from the Settings app and disabled the command that was used to enable it during the Monterey beta program. When you search “universal control” in the Settings app, the pop-up suggestion box displays the appropriate suggestion, but nothing happens for a long time when you select it. It’s only when you wait a while and minimize and then open the Settings app again when the right settings window appears. Unfortunately, clicking the checkbox next to the “Allow your cursor and keyboard to move between any nearby Mac or iPad” option does nothing.
Until Apple enables Universal Control, you can play with AirPlay for Mac, which lets you share content from iPhone or iPad right to your Mac. This feature is great for presentations and in-person collaboration, but you can also use it to play iOS games on a large display.
Live Text and Visual Lookup make research easier
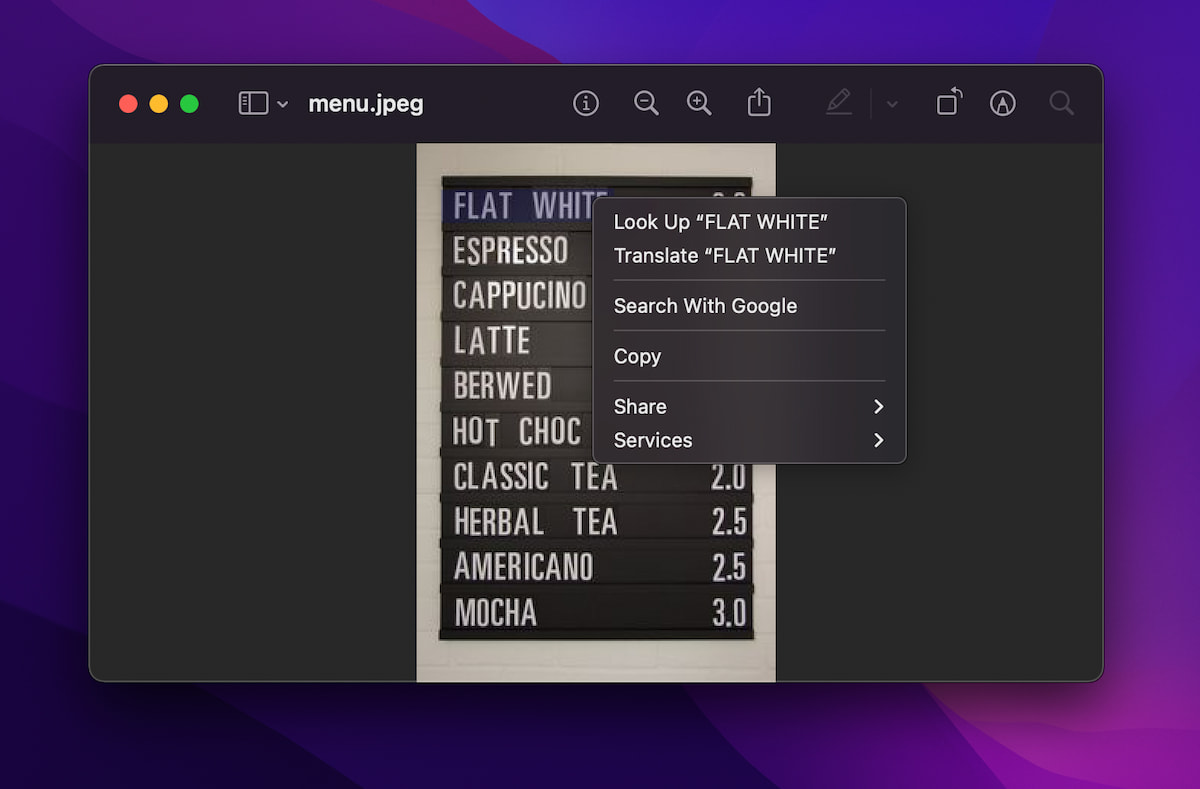
As someone who spends a lot of time doing research every day, I’m particularly excited about the Live Text and Visual Lookup features, and I’ve already used both multiple times with great success.
The Live Text feature makes it possible to copy text in photos and images and paste it anywhere you want. To use it, you simply need to open an image in Preview, Quick Look, or the Photos app, hover the cursor over any piece of text until the cursor switches to the text selection tool, and, finally, make your selection. From there, you can press CMD + C to copy the text to the clipboard and CMD + V to paste the copied text.
You can also right-click the selected text and choose any option from the context menu, including the “Look Up” option, which shows personalized suggestions from the web, iTunes, the App Store, movie showtimes, locations nearby, and other sources. The Loop Up option is not to be mistaken for the Visual Lookup feature, whose purpose it to find useful information from Wikipedia and other places about animals, art, landmarks, plants, and more in photos.
Notes app improvements keep you organized

When you move the cursor to the bottom-right corner when using Monterey, a small Quick Note box appears. By clicking on it, you can instantly create a new note in the Notes app to keep important information at hand. Besides writing text, you can quickly add links from running apps or a location from Maps.
Shared notes now display a handy Activity view that lets you see who edited what and when. Mentioning someone in a shared note is as easy as writing the “@” character followed by the person’s name. You can also add tags to your notes by simply writing the “#” character followed by the desired tag.
All tags appear in the new Tag Browser located in the sidebar, and you can right-click on them and create Smart Folders based on them. Together, these relatively small improvements result in a considerably better user experience, especially for people who use the Notes app a lot and struggle to stay organized while relying solely on folders.
FaceTime enhances online collaboration

Our collective reliance on remote collaboration applications has increased exponentially over the last two years, and Apple doesn’t want to see its customers flock to third-party tools like Zoom and Microsoft Teams. That’s why it developed a browser-based version of FaceTime that works on Windows and Android, enabling true cross-platform collaboration.
The native FaceTime app in Monterey boasts several notable improvements as well. The app now supports spatial audio to make voices sound like they’re coming from different places depending on where the person speaking is positioned on the screen.
FaceTime users can now reduce unwanted background noise using the Voice Isolation feature, while the Wide Spectrum mode ensures that all sounds come in, which can be useful when video chatting with a friend or relative while on vacation and wanting to share with them the local soundscape.
All owners of M1 Macs can turn on Portrait mode in FaceTime and certain third-party apps, including Webex and Zoom, to intelligently blur the background using the Neural Engine in the M1 chip.
Low Power Mode preserves battery power for when you need it
Since the release of the first MacBooks with the M1 chip, owners of Intel-based Macs have wished their machines were able to last as long on a single charge as the newest MacBook Air or the recently introduced MacBook Pro can.
With Low Power Mode in Monterey, you should be able to use your MacBook quite a bit longer before having to connect it to a charger, and you can activate this mode on any Apple silicon or Intel MacBook like so:
- Click Apple menu and go to System Preferences > Battery.
- Click Battery or Power Adapter.
- Select “Low power mode.”
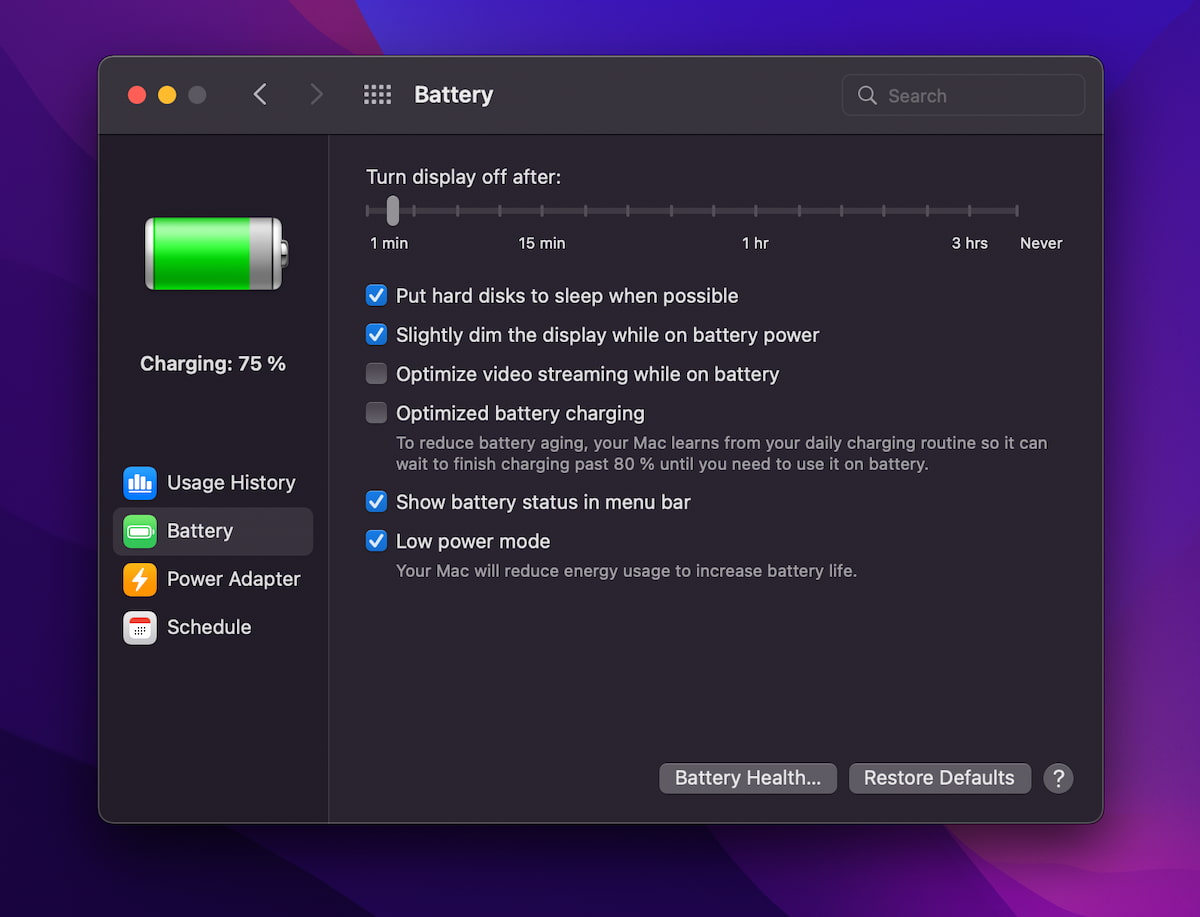
Just know that Low Power Mode will make your MacBook a bit slower because it disables the M1 performance cores and reduces the CPU clock speeds of Intel processors.
Should I update to Monterey?
Monterey is a solid macOS update that will be appreciated the most by people who have been relying on digital technology to stay connected and productive since the outbreak of the pandemic, but it does have a little something for everyone, including power users (Shortcuts), people who are heavily invested in Apple’s ecosystem (Universal Control and AirPlay to Mac), and those who are happy to learn new tricks to save a few minutes (Live Text and Visual Lookup).
But is Monterey worth installing? That depends on several factors. To start with, you need to find out if your Mac can actually run Monterey. Even though not much has seemingly changed under the hood compared with Big Sur, not all Macs that can run Big Sur can also run Monterey, namely:
- iMac (mid- and late-2014 and early 2015)
- MacBook Air (mid-2013 and early 2014)
- MacBook Pro (late 2013 and mid-2014)
- MacBook (early 2015)
These are the only macOS Monterey supported Macs:
- MacBook (early 2016 and later)
- MacBook Air (early 2015 and later)
- MacBook Pro (early 2015 and later)
- Mac Pro (late 2013 and later)
- Mac Mini (late 2014 and later)
- iMac (late 2015 and later)
- iMac Pro (2017 and later)
It’s possible that Apple is trying to accelerate the switch to Apple silicone by forcing its customers to buy new machines sooner than they would otherwise, but I’m just speculating.
If your Mac is on the list of supported devices, then you need to decide if potential stability and software compatibility issues are worth gaining access to the new features and improvements. I recommend you ask yourself the following questions:
- Do all apps I rely on support Monterey? Even though Monterey had been available to software developers and regular users for months before its official release, not all popular apps have been updated just yet. In most cases, that’s not a problem at all because this version of macOS doesn’t introduce any major architectural changes, but it’s always better to be safe than sorry, so you should check if all apps you rely on every day support Monterey without any issues.
- Do I have time to roll back to Big Sur if I experience issues? Whenever Apple releases a new version of macOS, forums all across the web are flooded with posts from desperate users who ended up with Macs that don’t boot properly or don’t run as intended. In most cases, the problems they experience are caused by strange software and hardware conflicts, but that doesn’t change anything about the fact that they can take a lot of time to solve. If time is something you don’t have, you better wait with the installation of Apple’s Monterey update until your schedule clears up a bit.
- Is there any specific Monterey feature that I really need? Let’s say you’re an office worker who spends a substantial amount of time every day processing documents and converting them from one file format to another one. The new Shortcuts feature in Monterey could be a real time-saver for you, making the installation of the new macOS release well-worth the small risk.
Have you answered “yes” three times? If so, don’t hesitate and update to Monterey right away. If you haven’t answered “yes” three times, then I recommend you wait at least a month to give Apple and software developers some time to improve compatibility and fix the most serious bugs that haven’t been fixed during the macOS Monterey public beta.
Big Sur vs Monterey: The final verdict
Monterey is a natural evolution of Big Sur, instead of a major overhaul like Catalina was after Mojave and Big Sur was after Catalina. As a result, there aren’t really that many surprises and consequences of updating—both positive and negative. If your Mac runs great on Big Sur, then you can expect it to run at least as well on Monterey. The new features are nice to have, but they’re certainly not something one couldn’t live without. All in all, the most sensible approach is to wait for at least a couple of weeks before updating, but you certainly have no reason to feel like you’re walking straight into a lion’s den by updating right away.


