
Do you have important data on a corrupted SD card? It’s a common problem; fortunately, it’s still recoverable – but don’t touch your memory card until you read this article, as you risk permanent data loss.
We prepared the ultimate guide on how to recover a corrupted SD card on a Mac, how to fix a corrupted SD card, and what to do if your SD card won’t even show up on your computer. Read on!
Table of Contents
What to Do if SD Card is Unreadable by Mac
If your SD card is unreadable by Mac, there is either something interfering with the connection or preventing your Mac from mounting its disk. If your SD card is not showing up on your Mac, we can’t repair the corruption. Here are some things you can try to fix an unreadable SD card on your Mac:
Try another Mac or PC (or Different Ports). Dust, debris, and/or wear and tear of your Mac ports may be blocking the connection with your SD card. If you’ve exhausted all ports (and tried a different card reader), try connecting your SD card to another Mac or PC.
Reset MacBook. If you have a lot of applications running in the background, your Mac may not have enough resources to mount the SD card. Reset your computer to refresh its resources.
Check SD card for physical damage. Physical damage from water, extreme temperatures, breakage can cause severe corruption and data loss, as well as other unpredictable behavior. In this scenario, your best option is to send your SD card to a professional data recovery service.
Force mount SD card from Disk Utility or Terminal. Mac needs to mount external drives so the devices can properly communicate. If your SD card won’t mount automatically (e.g. due to third-party apps), try mounting it manually using Disk Utility or the Terminal app.
Update firmware. Outdated drivers may be keeping your Mac from recognizing the SD card. Try updating your Mac (System Settings > Software Update).
Reset NVRAM or SMC. If other fixes prove ineffective, you can try resetting your Mac’s NVRAM (Nonvolatile Random-Access Memory) or SMC (System Management Controller).
To reset your Mac’s NVRAM:
Step 1. Shut down your Mac.
Step 2. Disconnect all USB accessories and devices.
Step 3. Power on your Mac and immediately press and hold the following keys: Option + Command + P + R.
Step 4. Once you hear the second startup chime (older Macs) OR the Apple logo appears and disappears twice (T2 Macs), release the keys.
To reset your Mac or MacBook’s SMC:
Step 1. Shut down your Mac.
Step 2. Press and hold the power button for 10 seconds, and release.
How to Recover Data from Corrupted SD Card on Mac
There are 2 ways to recover data from a corrupted SD card on Mac: (1) using data recovery software (DIY method) and (2) utilizing professional data recovery services.
In most cases of logical damage – such as deletion, formatting, corruption, malware infection, etc. – you can use data recovery software to restore your files.
However, if your SD card is physically damaged or it’s unreadable by Mac, we strongly recommend utilizing data recovery services instead to avoid permanent data loss.
Method 1: Use Data Recovery Software
As we previously mentioned, data recovery software is a great solution except in cases of physical damage. Using complex algorithms, they can reconstruct your files by extracting their data throughout the corrupted drive’s file system.
For this article, we’ll use an app called Disk Drill. It has a disk imaging tool that can copy your entire SD card onto your Mac and it works even if your memory card won’t show up in Finder. Once the SD card is backed up, you can safely repair or reformat it using Disk Utility.
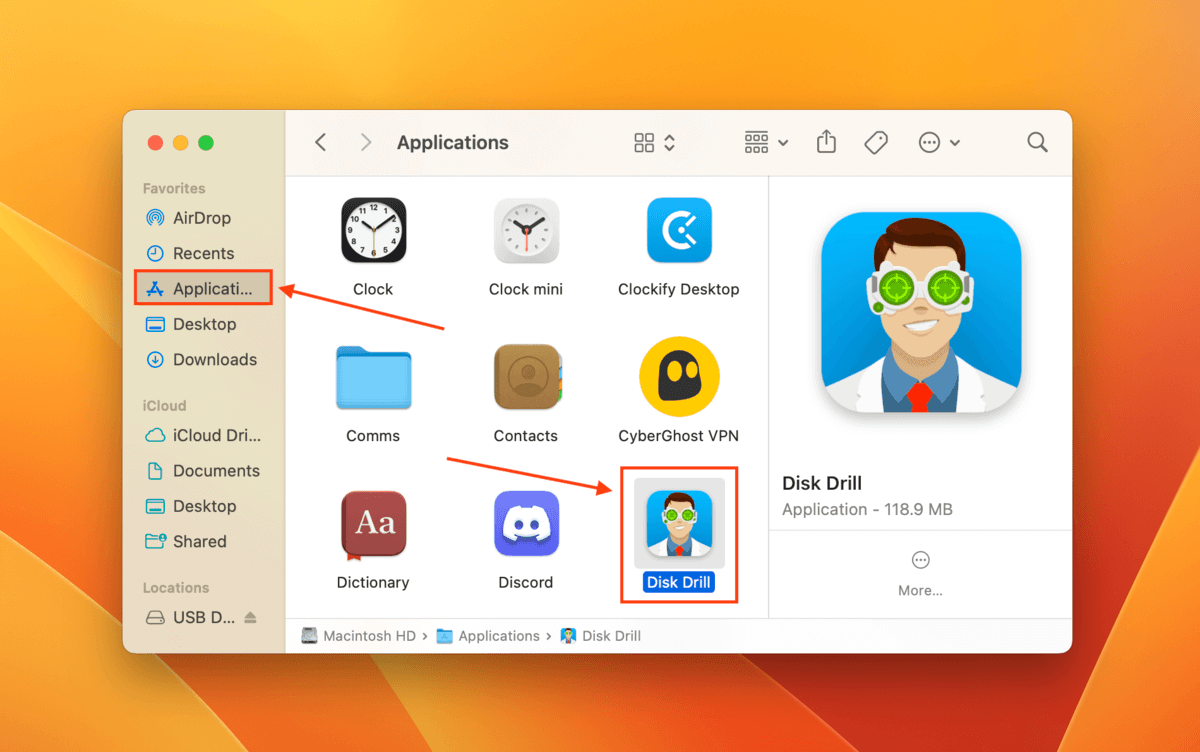
Step 1. Download and install Disk Drill.
Step 2. Connect your SD card to your Mac using a card reader, then launch the Disk Drill app (Finder > Applications).
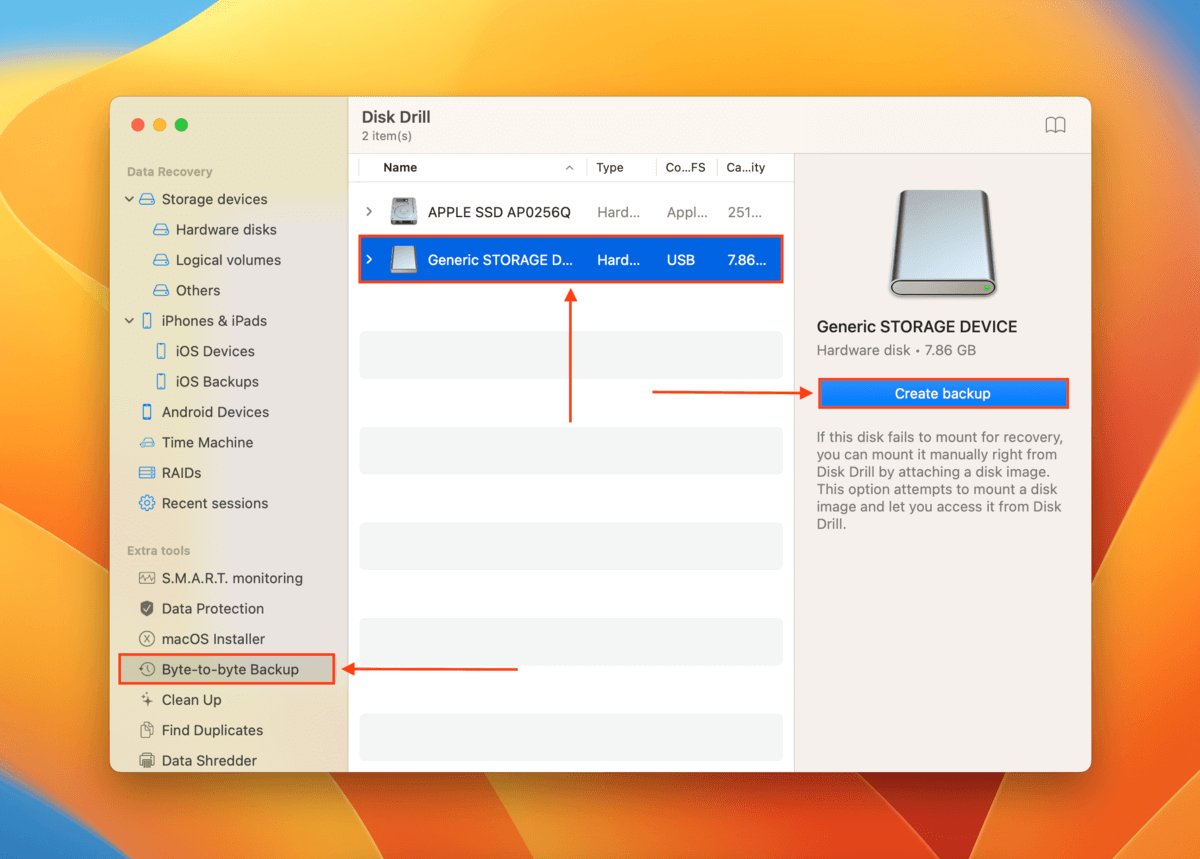
Step 3. On the left sidebar, click Byte-to-byte Backup. Then, select your SD card from the drive list (it may appear as “Generic Storage Device” or similar”) and click Create backup.
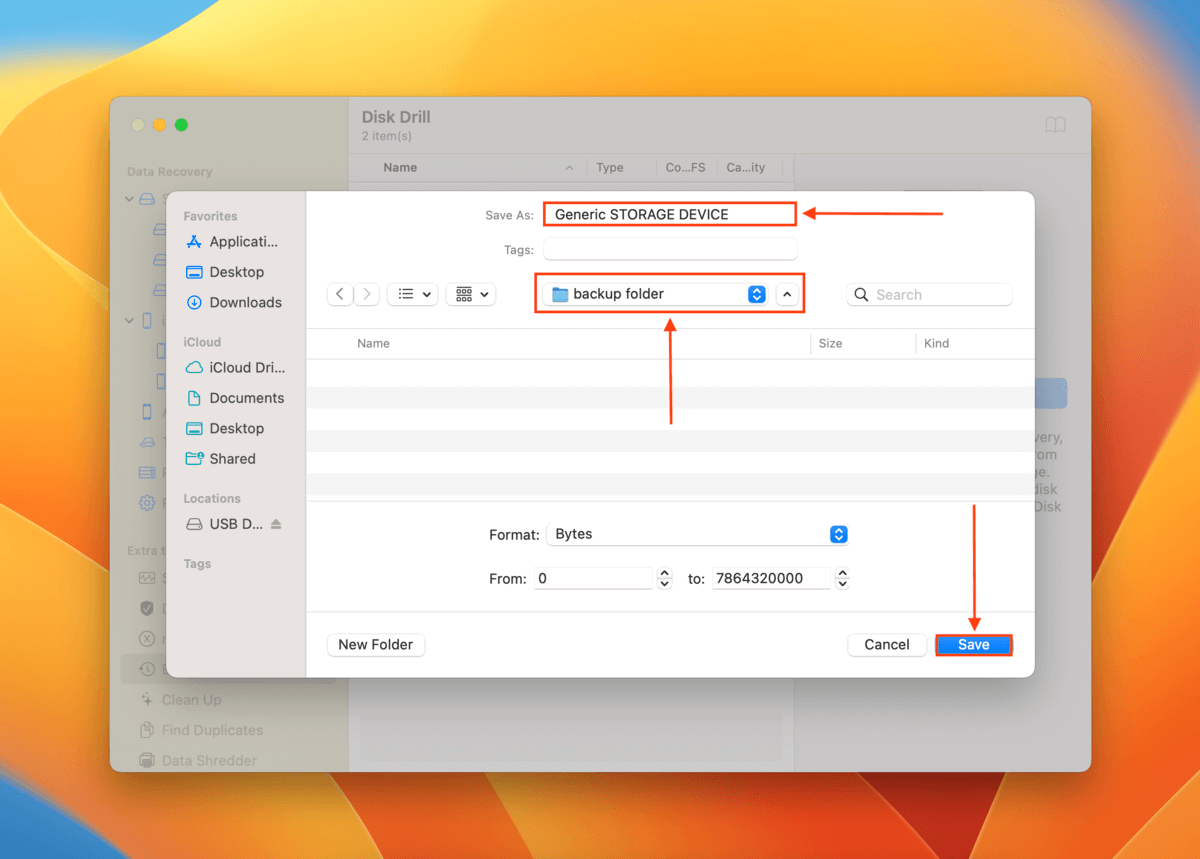
Step 4. Name your backup image and select an easy-to-find location on your Mac as the destination for the image backup file. Then, click Save.
Step 5. Once the backup has been created, return to Disk Drill’s main window.

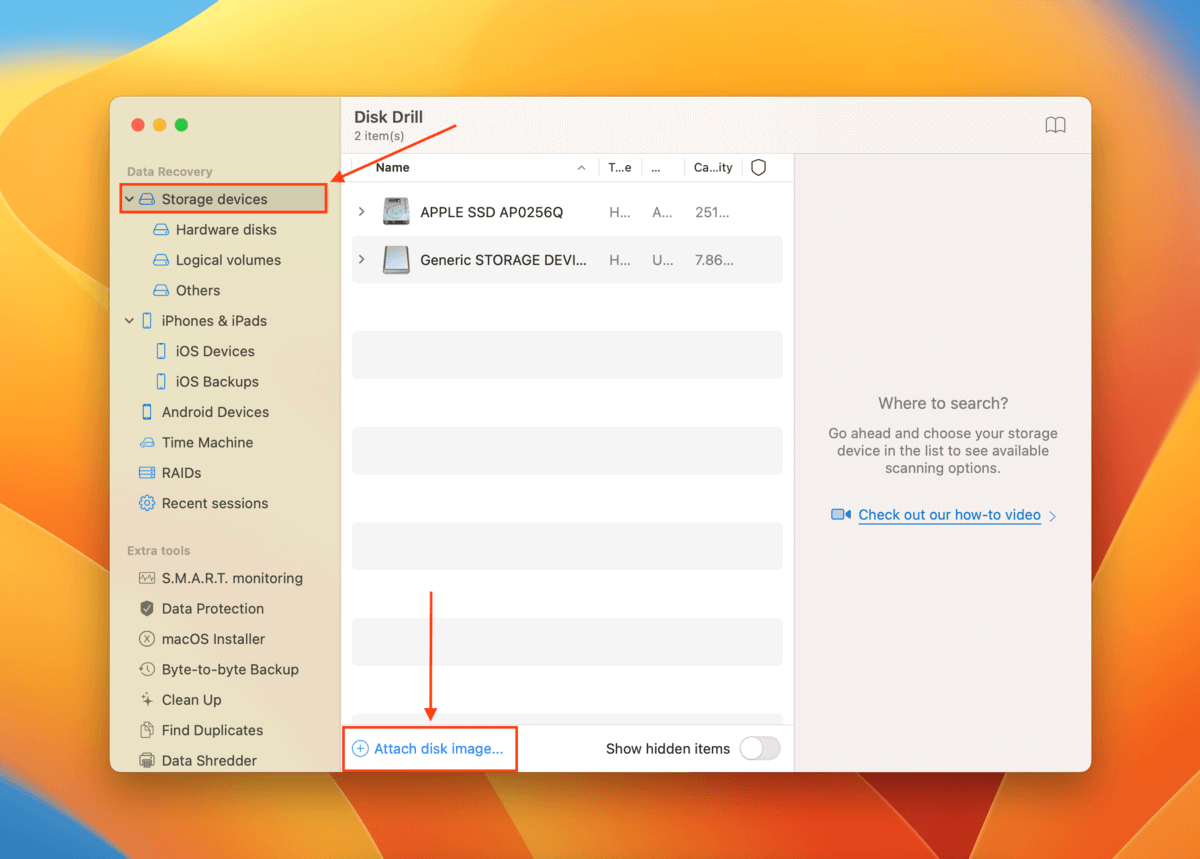
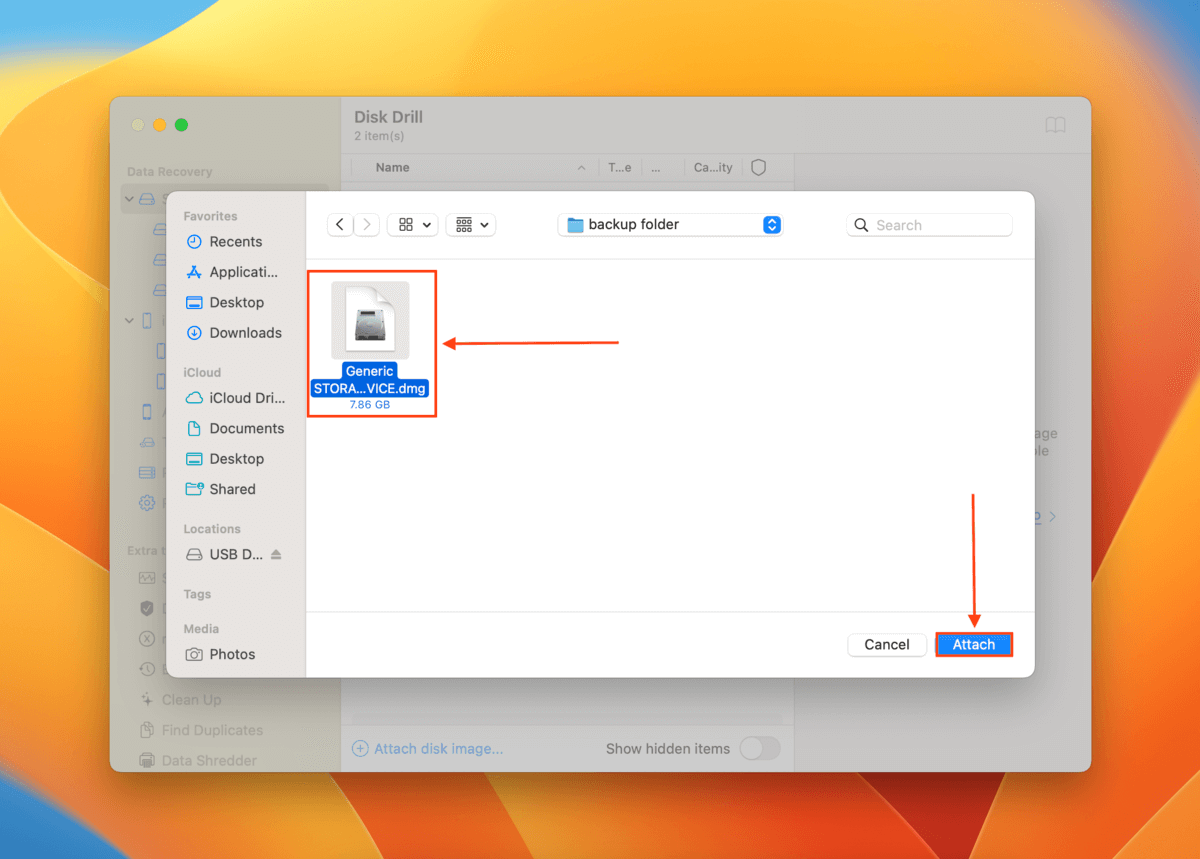
Step 6. On the left sidebar, select Storage devices and click Attach disk image… at the bottom of the window.
Step 7. Select the backup image we created in Step 4 and click Attach.
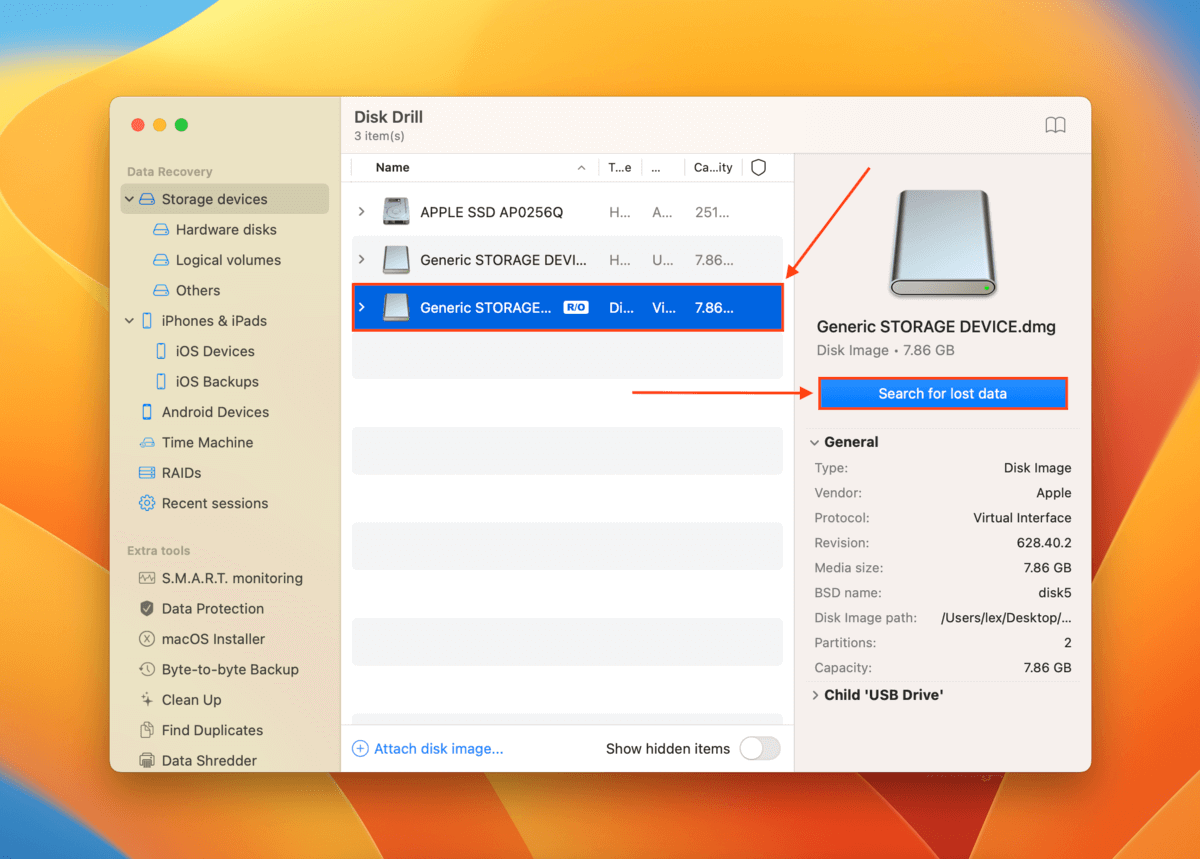
Step 8. Select the SD card backup image that has now appeared in the drives list (it should have R/O beside its name and is a DMG file type). Then, click Search for lost data.
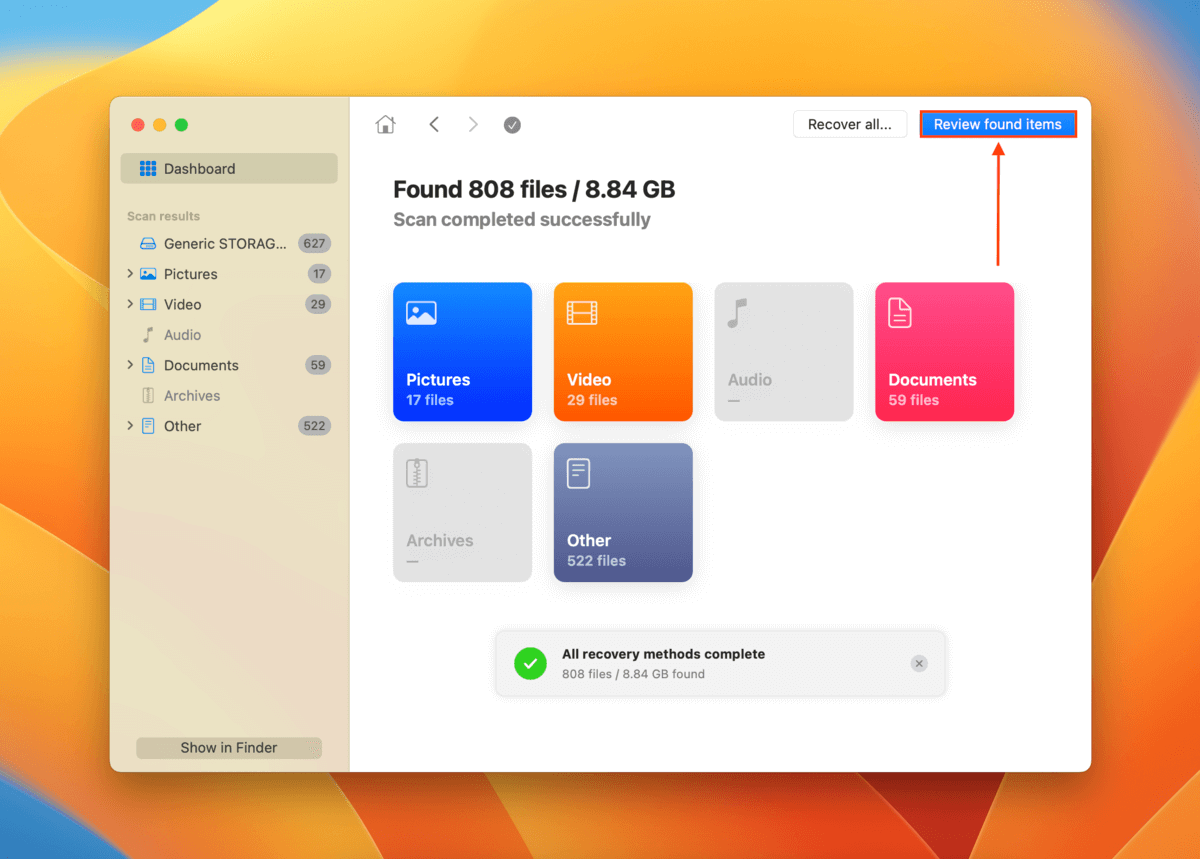
Step 9. Once the scan is complete, click Review found items.
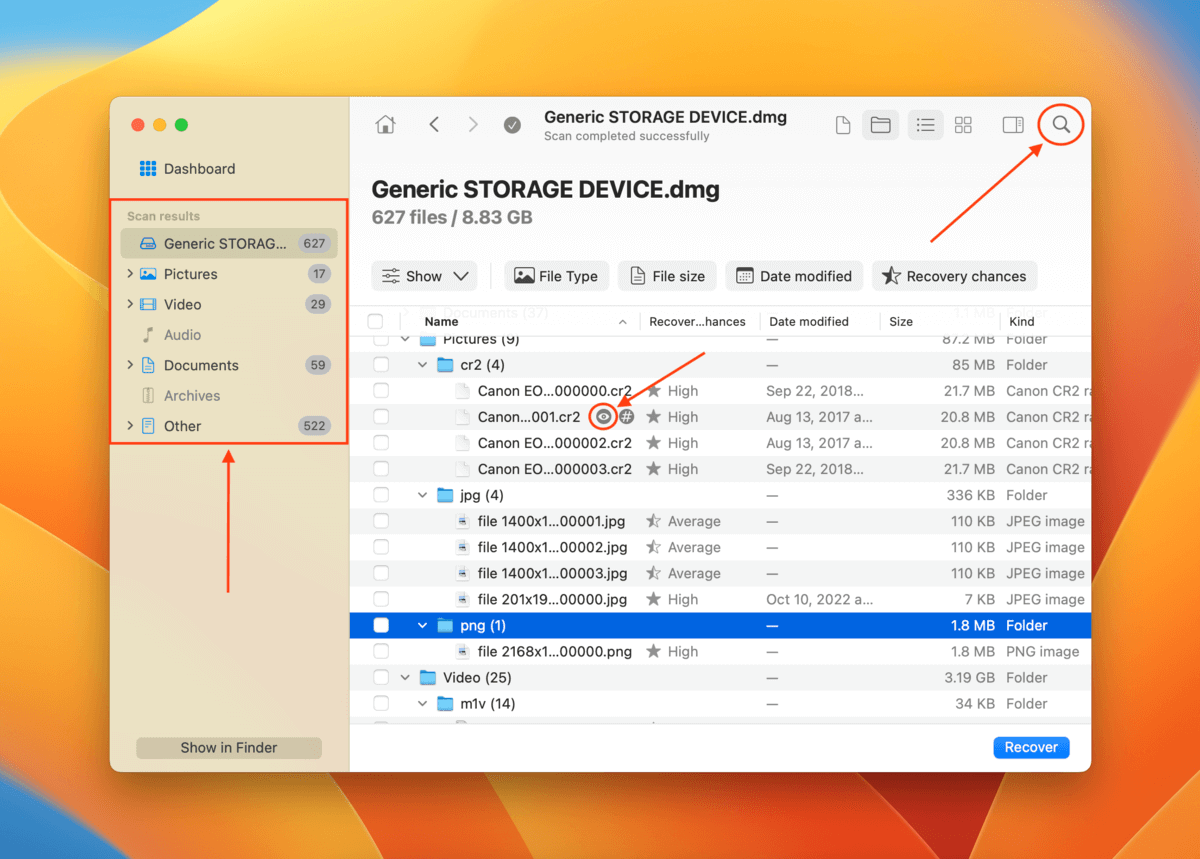
Step 10. Use the magnifying glass or the filters in the left sidebar if you want to locate specific files. You can preview your data by hovering your mouse pointer beside the file name and clicking the eye button that appears.
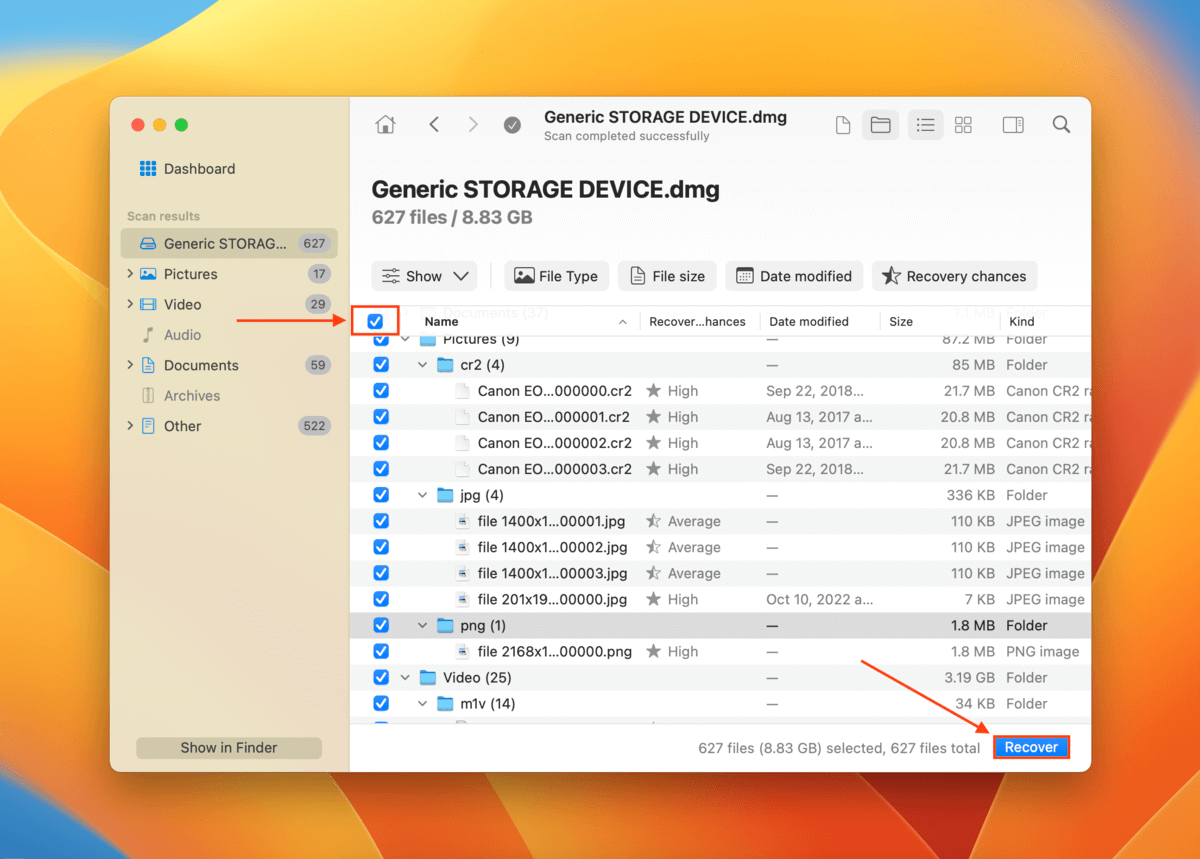
Step 11. Select the files you want to restore by ticking the boxes in the leftmost column. Alternatively, tick the box in the column header to select all files. Then, click Recover.
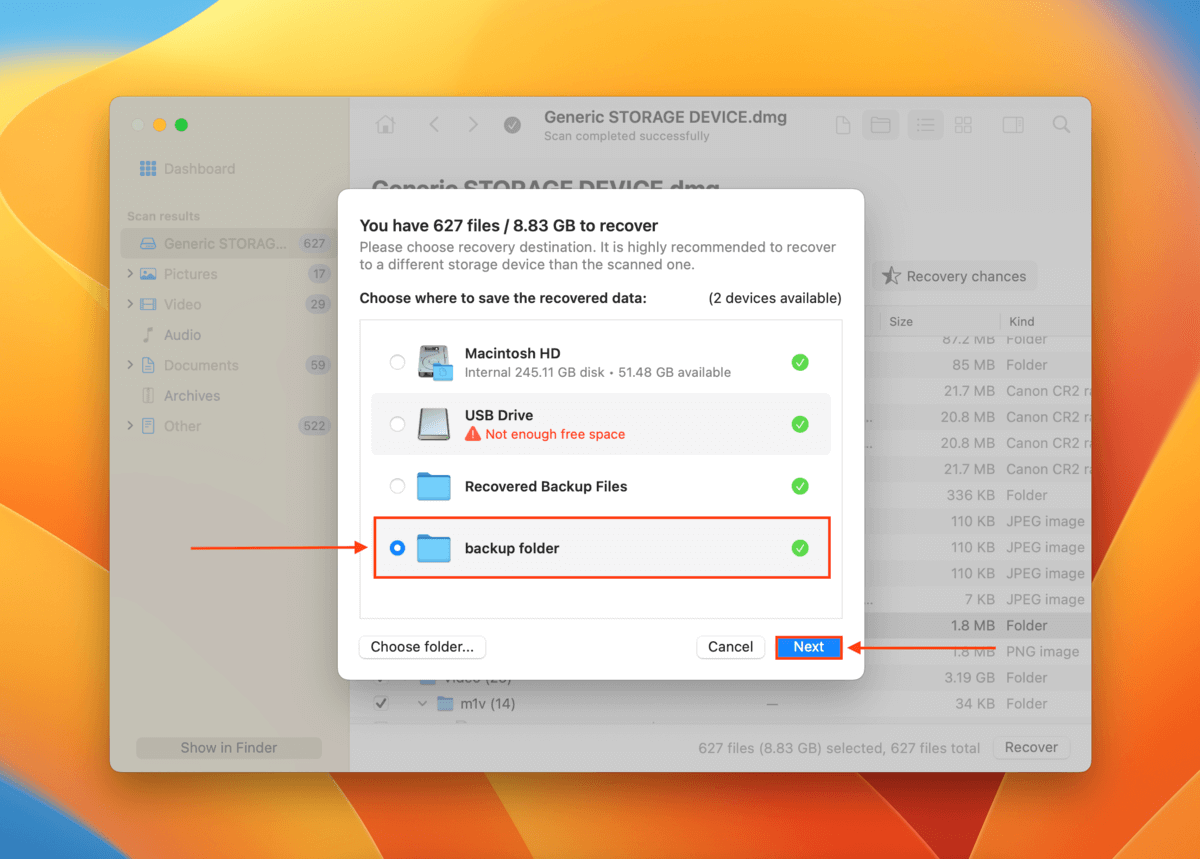
Step 12. Select a destination folder on your Mac where Disk Drill will save the recovered files. Then, click Next.
Method 2: Utilize Data Recovery Services
Data Recovery Services are teams of specialists that are trained to recover data from drives that are in various states of severe disrepair. They are better equipped to handle complex data recovery problems, including those caused by physical damage.
Here are some considerations when choosing a company to hire:
- No data – no charge guarantee – Try to find a company that offers this guarantee: if they don’t recover the data you’re looking for, you don’t have to pay anything.
- Free estimate – Some companies will give you a free estimate over the phone after you explain your situation.
- Class 100 Clean Room – Ensure that the company has a Class 100 Clean Room, which is a super sterile laboratory that ensures that storage devices aren’t damaged by small particles when the specialists take them apart for recovery purposes.
How to Fix Corrupted SD Card on Mac
A corrupted SD card is a common problem. Fortunately, macOS has all the tools users need to fix them. However, note that attempting to fix your sd card when it’s corrupted may result in permanent data loss.
We highly suggest you follow the steps in the recovery section first (above). You may still be able to restore your data after fixing your SD card, but prevention is the best cure!
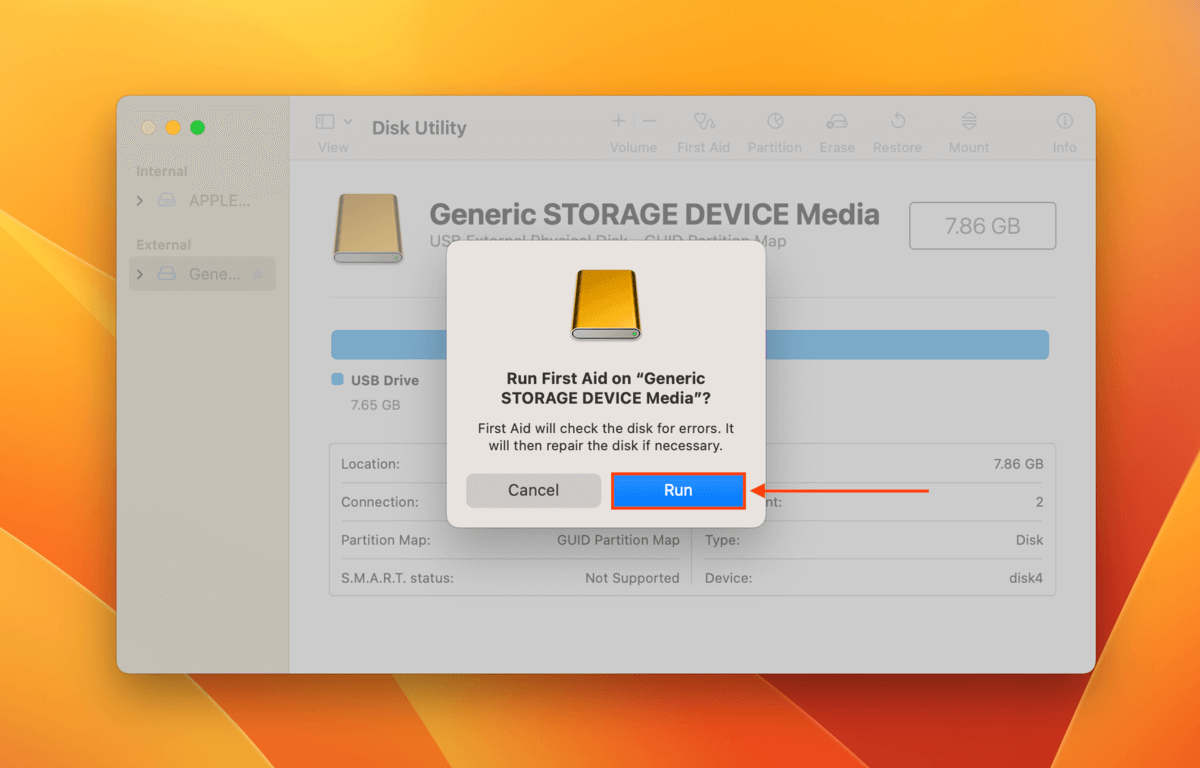
Method 1: First Aid
First Aid is a native macOS tool that can automatically detect and fix disk errors on your SD card, which may uncorrupt an SD card. It doesn’t wipe your SD card’s data, but note the repair work may still inadvertently cause data loss.
Step 1. Connect your card securely to your Mac using a card reader.
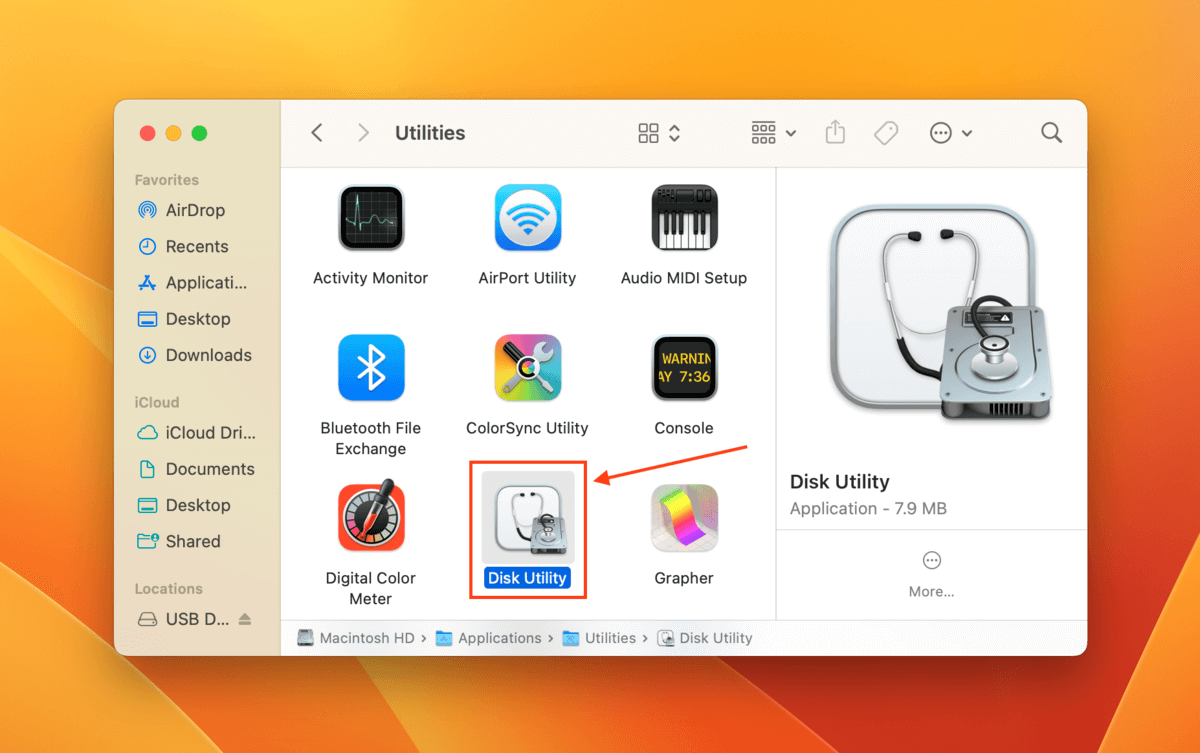
Step 2. Launch Disk Utility (Finder > Applications > Utilities).
Step 3. Select your SD card from the left sidebar and click the First Aid button at the top of the window.
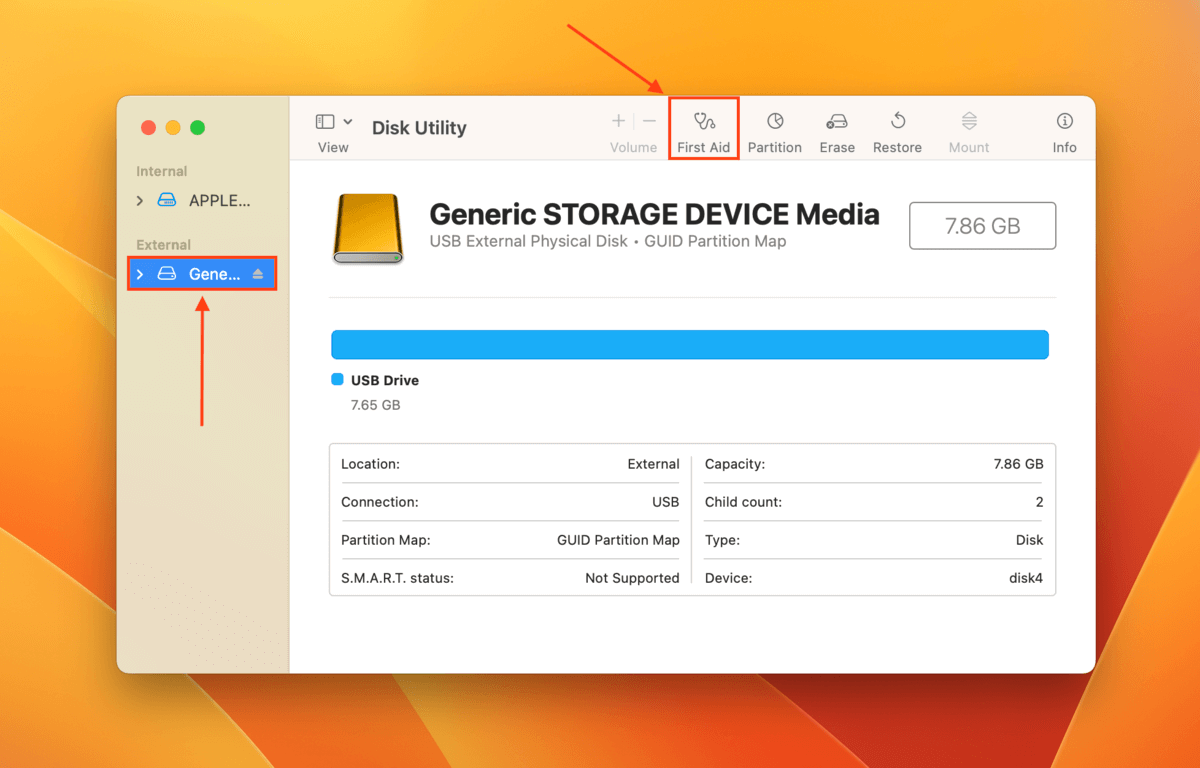
Step 4. When asked to confirm, click Run.
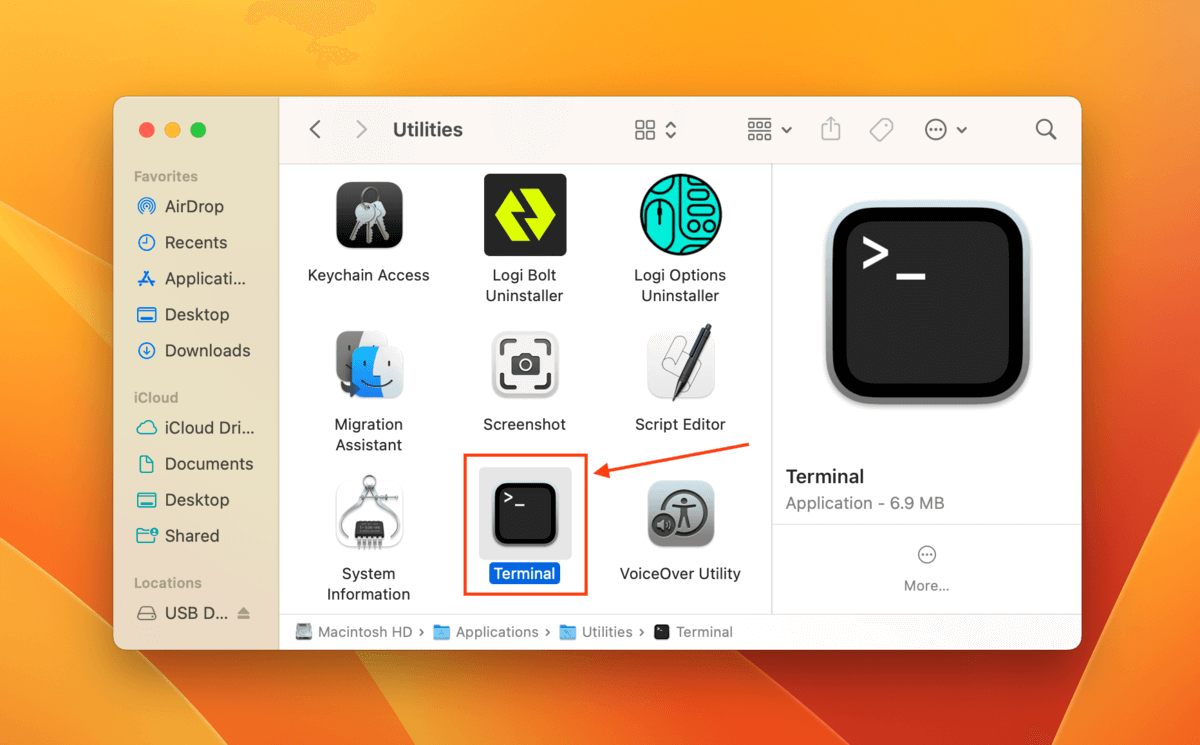
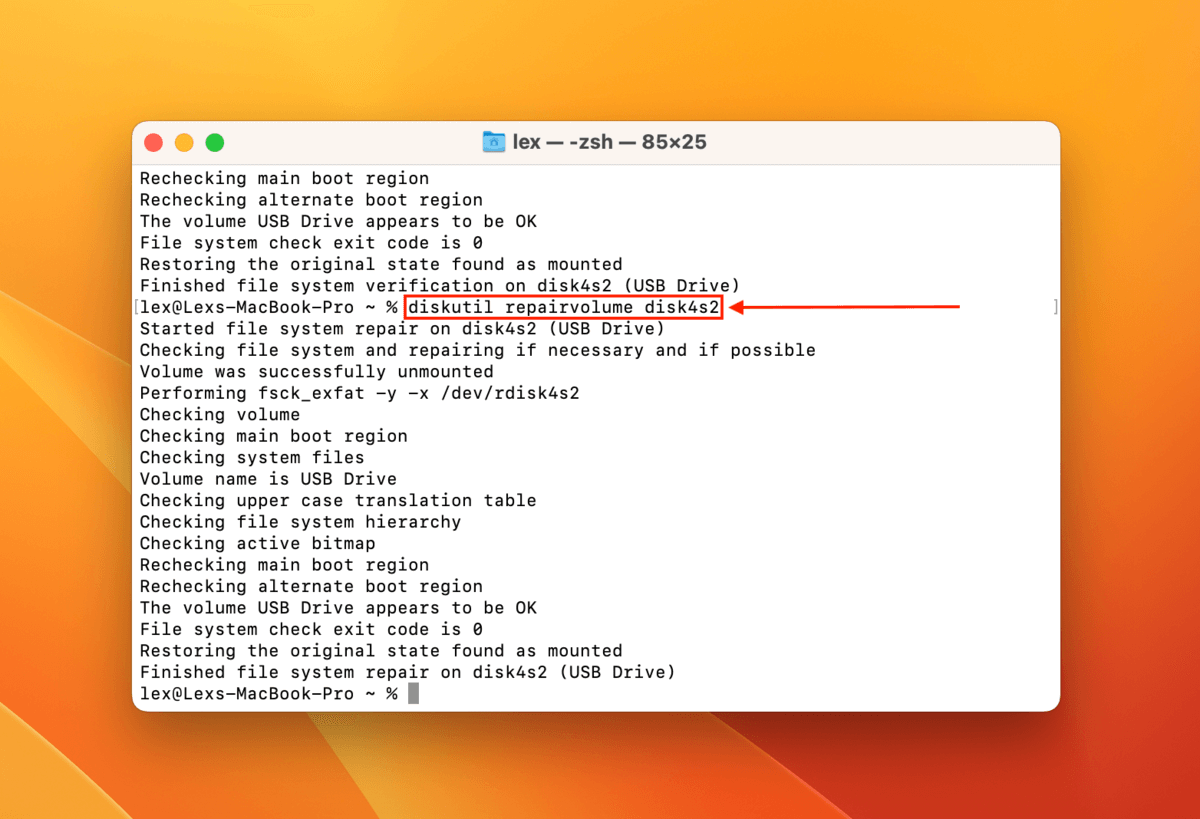
Method 2: Use Terminal for Error Check & Repair
The Terminal app is a command line interface that also comes shipped with macOS. Using the diskutil command, you can diagnose and even repair your SD card.
Step 1. Ensure your SD card is connected securely to your Mac.
Step 2. Launch the Terminal app (Finder > Applications > Utilities).
Step 3. Type the following command and hit return:
diskutil list disk
Take note of the volume name of your SD card, as we’ll be using it in step 4.
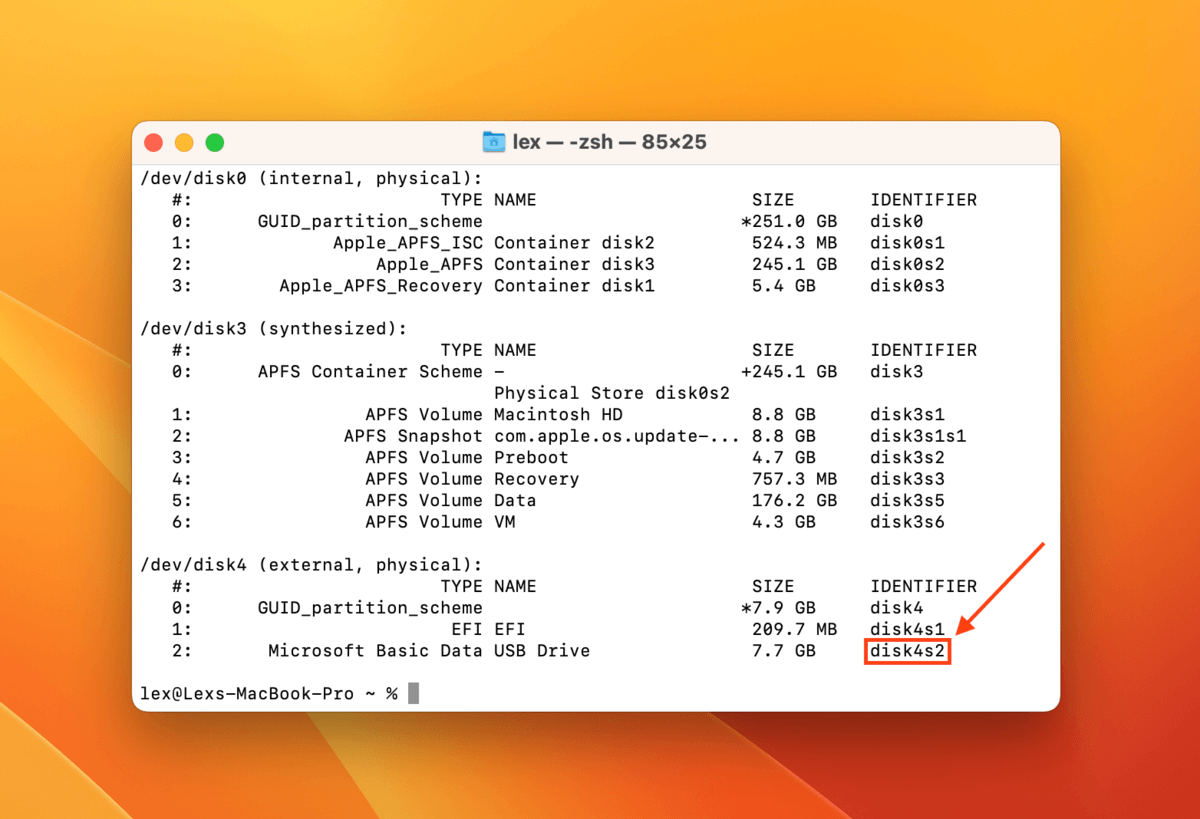
Step 4. Type the following command hit return:
diskutil verifyVolume [identifier]
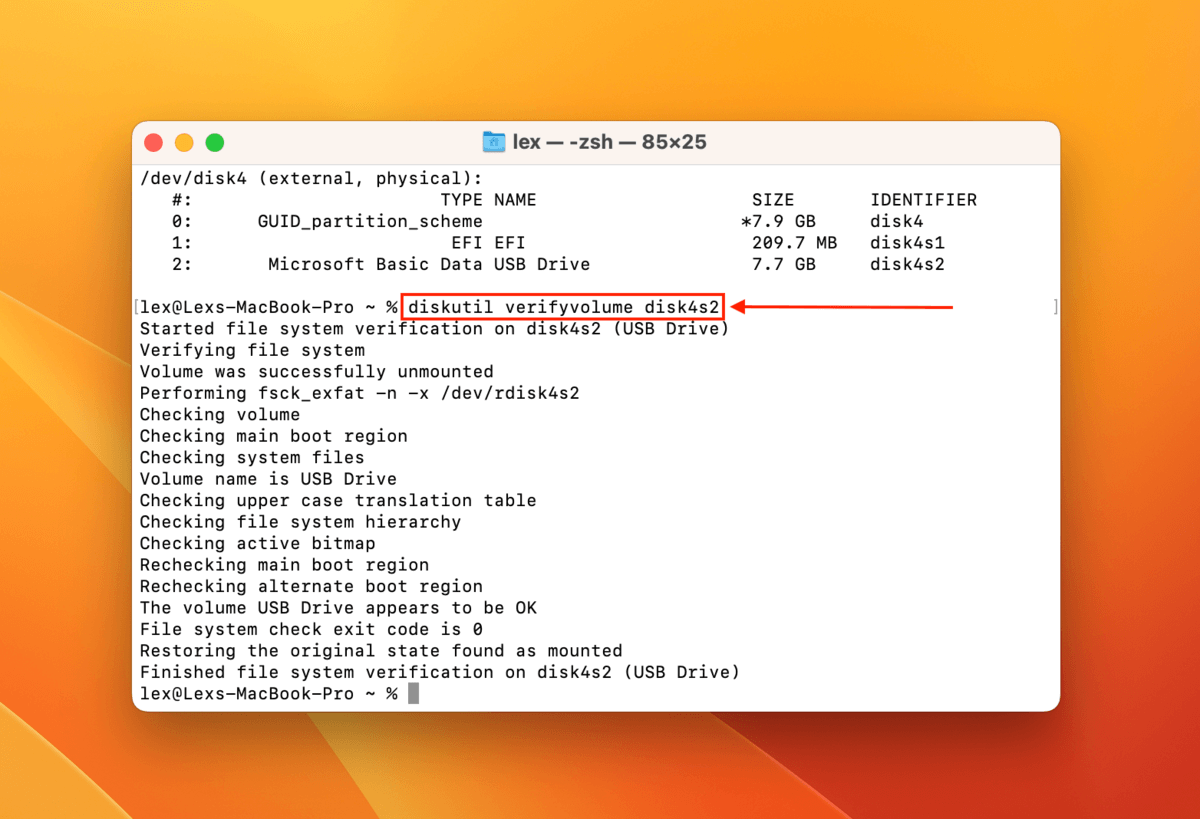
Step 5. If Terminal reports any errors, type the following command and hit return:
diskutil repairvolume [identifier]
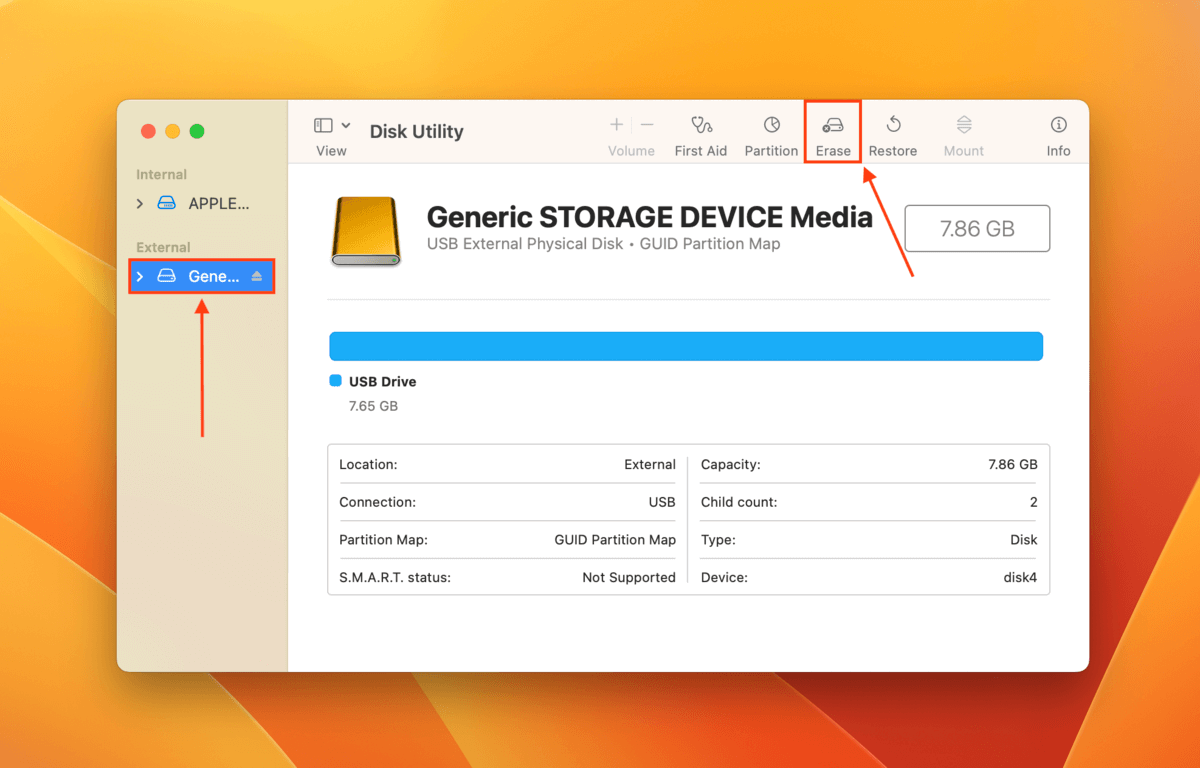
Method 3: Formatting
If the above 2 methods don’t work, your last resort is to format your SD card. By erasing everything on your memory card, you’ll get rid of the errors too. Fortunately, Disk Utility has a formatting tool that provides a wizard that makes the process easy.
Step 1. Connect your SD card to your Mac.
Step 2. Launch Disk Utility (Finder > Applications > Utilities).
Step 3. Select your SD card from the left sidebar and click Erase at the top of the window.
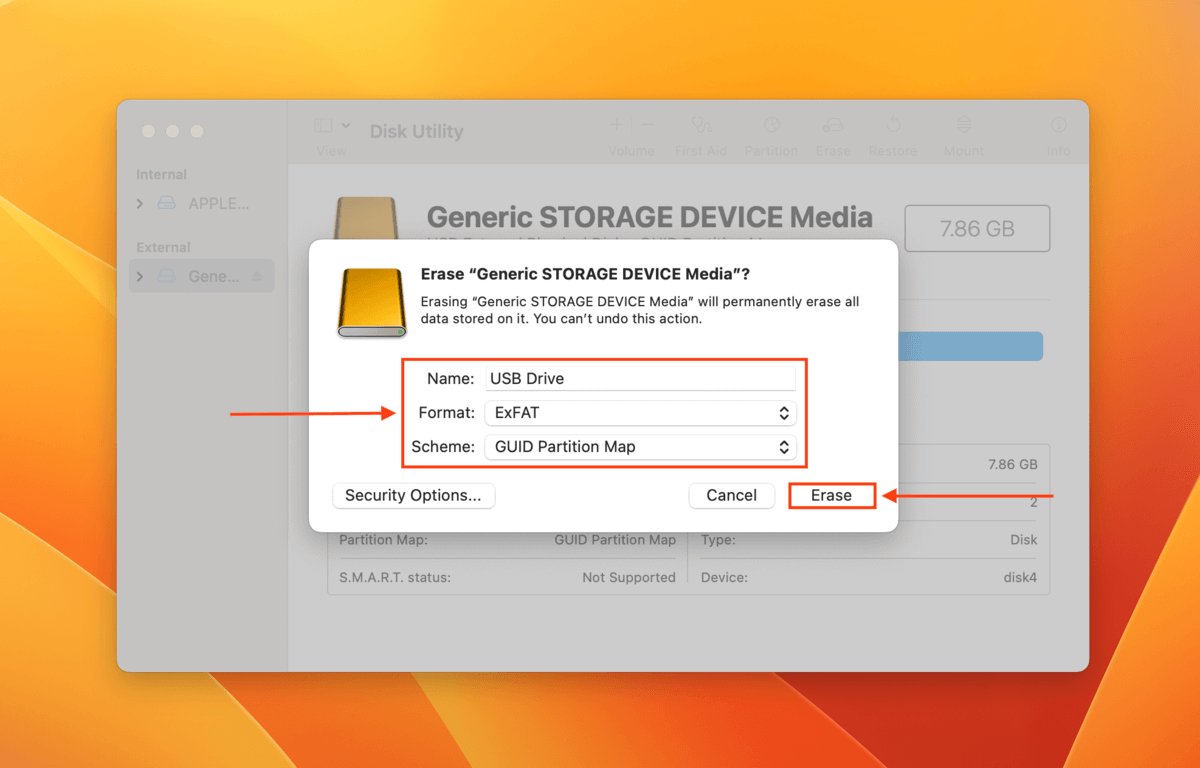
Step 4. Choose a name, format, and scheme for your SD card. We suggest the ExFAT format and the GUID Partition Map scheme for compatibility with Windows, Mac, and Linux computers. Then, click Erase.
Main Reasons for SD Card Corruption
Unfortunately, drive corruption is a common occurrence. This is doubly true for SD cards that by nature are meant to be used and handled more often than, say, external hard drives. While corruption may be caused by human error, as you’ll see below, many factors are outside of the user’s control.
| Reason | Description |
| 💥 Power outages & improper ejection | If your Mac suddenly loses power or you disconnect your SD card without properly ejecting it, you may have interrupted its read and write process (a common cause for corruption). |
| 🦠 Virus infections | Virus infections may delete or corrupt your data or may even hold it hostage from you. Virus infections are common for SD cards, especially when users connect it to multiple computers and devices (that may be infected themselves). |
| 🔨 Physical damage | Dust and debris, water, extreme temperatures, scratches, and other forms of physical damage may cause corruption. Don’t DIY physically damaged drives! Send your SD card to a professional data recovery service to avoid permanent data loss. |
| 🪤 Fake SD card | Fake SD cards are always at risk of malfunctioning one way or another. There’s no fix for this, so ensure you purchase your SD cards from an approved vendor. |
| 💿 Data degradation | Both data and storage devices have a finite lifespan and the passage of time slowly degrades their integrity. |
The only way to totally secure your data against loss is to back up your SD card whenever you have the chance.
Conclusion
SD card recovery is certainly possible with the right tools – but your chances of success depend on how badly it was corrupted and what caused it to malfunction. In the most severe cases, recovery can be impossible. To prevent potential data loss in the future, we strongly encourage you to routinely back up your SD card. You can use Time Machine, iCloud (for cloud storage), or even third-party apps. Or you can simply copy your files to a different storage device – just make sure it’s working properly!
FAQ:
PhotoRec is a free tool that you can use for SD Card recovery.
- Download and install PhotoRec onto your Mac.
- Launch the application.
- Use the command-line navigation to select the SD card storage device.
- Select the partition that will be recovered.
- Supply parameters to control the application’s settings.
- Select the type of files to be recovered.
- Choose the filesystem type.
- Select a location for the storage of recovered files.
- Perform the recovery.
This can be done using the First Aid feature found in Disk Utility.
- Launch Disk Utility.
- Select your SD card and then choose First Aid in Disk Utility.
- Wait for the process to complete and then check your SD card again and see if it’s readable.


